Mastering Transparency: A Comprehensive Guide to Making Images Transparent in Photoshop

In the vibrant world of digital imagery, where visual appeal reigns supreme, the ability to manipulate and refine photographs is an invaluable skill. From creating stunning wallpapers and aesthetic backgrounds to developing professional logos and intricate digital art, transparency plays a pivotal role in achieving a polished and versatile look. A transparent image, characterized by its invisible background, seamlessly integrates into any design, allowing the underlying elements of a webpage or a composite image to show through. This functionality is crucial for everything from high-resolution photography presentations and engaging visual design projects to optimizing images for web use. At Tophinhanhdep.com, we understand the power of impactful visuals, and this guide will delve deep into the art of making images transparent using Adobe Photoshop, empowering you to elevate your creative projects.
Whether you’re a seasoned photographer looking to protect your work with unobtrusive watermarks, a graphic designer crafting layered compositions, or simply someone who wants to place an object onto a different background, mastering transparency in Photoshop is a fundamental step. Recent updates to Adobe Photoshop have made this process more intuitive than ever, offering both automated shortcuts for quick results and sophisticated manual tools for pixel-perfect precision. This article will walk you through various techniques, ensuring you can tackle any transparency challenge, from simple object cut-outs to complex logo creations, all while keeping your visual assets optimized for quality and performance, a core tenet of Tophinhanhdep.com’s mission to provide comprehensive image tools and inspiration.
The Indispensable Role of Transparent Images in Visual Design
The digital landscape is inherently visual, and the ability to create and manipulate images with transparent backgrounds unlocks a world of creative possibilities. Transparent images are not just a technical feature; they are a cornerstone of modern visual design, offering unparalleled flexibility and aesthetic harmony across various platforms, including websites, social media, and print materials.
Why Transparency Matters: Branding, Aesthetics, and Beyond
![]()
The primary allure of a transparent background lies in its versatility. Imagine a finely designed logo, a signature element of your brand’s visual identity. If this logo has a solid white or colored background, it will appear as a block when placed over a textured website background, a busy photograph, or a different colored section of a design. This can be jarring and unprofessional, detracting from the overall aesthetic. However, with a transparent background, your logo – whether it’s a sophisticated text-only design or an intricate graphic – floats seamlessly, allowing the underlying elements to remain visible. This integration is vital for maintaining a consistent and professional brand image, especially in photography where watermarks are essential for copyright protection.
Branding and Watermarking: For photographers and businesses showcased on Tophinhanhdep.com, watermarking is a critical step in copyright protection and brand reinforcement. A transparent watermark, subtly overlaying your high-resolution photographs, discourages unauthorized use while ensuring your work is attributed. It’s a delicate balance: the watermark should be visible enough to serve its purpose but transparent enough not to distract from the beauty or message of the photograph itself. This is where Photoshop’s transparency features shine, allowing you to create custom, elegant watermarks that reflect your unique style.
Web Design and Aesthetic Backgrounds: In web design, transparent images are indispensable. They enable designers to layer elements, create complex visual hierarchies, and ensure images blend flawlessly with diverse website layouts and aesthetic backgrounds. A transparent PNG of a product or a person can be placed on any background – be it a vibrant nature scene, an abstract pattern, or a minimalist color block – without creating unsightly borders. This capability is fundamental for creating engaging user experiences and visually appealing websites, directly tying into the “Images (Wallpapers, Backgrounds, Aesthetic)” and “Visual Design (Graphic Design, Digital Art)” topics prominent on Tophinhanhdep.com.
Digital Art and Photo Manipulation: For digital artists and those engaged in photo manipulation, transparent images are the building blocks of composite visuals. Combining multiple images, each with its background removed, allows for the creation of imaginative scenes, surreal landscapes, or dynamic collages. Transparency facilitates the precise placement and blending of elements, making the impossible seem real. This aspect is crucial for unlocking creative ideas and producing impactful digital art, a key area of interest for Tophinhanhdep.com users.
Setting the Stage: Understanding Photoshop and Your Workflow
This tutorial primarily leverages Adobe Photoshop CC, particularly versions 21.0.0 (Photoshop 2020) and later, which include advanced AI-powered features for background removal. While many core functionalities remain consistent across different Photoshop versions, some newer, automated tools might not be available in older iterations. If you’re using an older version, you may need to rely more heavily on the manual selection tools discussed later in this guide. Regardless of your version, the fundamental principles of layer management, selection, and saving in appropriate formats (like PNG) are universal.
Before diving into the technical steps, it’s beneficial to consider your ultimate goal. Are you creating a simple text watermark? A complex logo with intricate graphics? Or are you merely trying to isolate a subject from its busy background? Understanding your objective will guide your choice of tools and workflow, ensuring an efficient and effective process. Remember, creativity and experimentation are key, and Photoshop offers a robust environment to bring your visual ideas to life, contributing to the rich “Image Inspiration & Collections” found on Tophinhanhdep.com.
Core Techniques for Achieving Image Transparency in Photoshop
Adobe Photoshop offers a spectrum of tools and techniques to make images transparent, ranging from highly automated, AI-driven shortcuts to precise manual selection methods. The best approach often depends on the complexity of your image and the level of precision required.
Quick and Automated Background Removal (Photoshop 2020+)
For users of Photoshop 2020 (version 21.0.0) or newer, Adobe has introduced powerful AI-driven features that can dramatically expedite the background removal process. These tools are excellent for images with clearly defined subjects and offer a great starting point even for more complex scenarios, saving valuable time for photographers and designers.
1. Copy the Background Layer: Before using automated tools, it’s good practice to duplicate your background layer. This ensures you’re not making destructive edits to your original image and provides a safety net if you need to revert.
- Open your image in Photoshop.
- Press
Ctrl + A(Windows) orCommand + A(macOS) to select the entire image. - Press
Ctrl + C(Windows) orCommand + C(macOS) to copy the selection. - Press
Ctrl + V(Windows) orCommand + V(macOS) to paste it as a new layer. This new layer will be what you work on. - In the Layers panel (Window > Layers), click the eye icon next to your original “Background” layer to hide it. This allows you to see the transparency as you work.
2. Utilize the “Remove Background” Quick Action: This is Photoshop’s most straightforward method for transparency.
- With your newly pasted layer selected in the Layers panel, open the Properties panel (Window > Properties).
- Scroll down to the Quick Actions section.
- Click the “Remove Background” button.
- Photoshop’s AI, powered by the “Select Subject” tool, will analyze your image, identify the main subject, and automatically create a layer mask to hide the background, leaving your subject on a transparent canvas. The transparent area will appear as a grey and white checkerboard pattern.
Refining the Automated Selection: While often impressive, the AI isn’t always perfect, especially with intricate details like hair, fur, or complex edges.
- If the result is nearly perfect, but needs minor tweaks, select the Layer Mask thumbnail in your Layers panel (the black-and-white icon next to your image thumbnail).
- Choose the Brush Tool (B). Set your foreground color to white to reveal parts of the subject that were mistakenly hidden, or to black to hide background areas that were missed. Adjust brush size and hardness as needed. Zoom in for precision.
This quick method is fantastic for rapidly preparing images for use as aesthetic backgrounds, product displays on e-commerce sites, or for quick photo manipulation tasks, making it a favorite among Tophinhanhdep.com users looking for efficient image tools.
Manual Selection Mastery: Precision with Tools
When automated tools fall short, or for those who prefer granular control, Photoshop’s suite of manual selection tools offers unparalleled precision. These methods are indispensable for complex images, ensuring every pixel is perfectly accounted for.
1. The Magic Wand Tool: Ideal for images with solid-colored backgrounds or areas of high contrast.
- Open your image and duplicate the layer, hiding the original background layer as described above.
- Select the Magic Wand Tool (W) from the toolbar.
- In the Options bar at the top, adjust the Tolerance. A higher tolerance selects a broader range of similar colors, while a lower tolerance selects fewer. A common starting point is 32.
- Click on the background area you want to make transparent. The Magic Wand will select all contiguous pixels within the tolerance range.
- If your background has multiple disconnected sections,
Shift-clickto add more areas to your selection. - Once all desired background areas are selected, press the
Deletekey. The selected areas will turn transparent. - You may need to repeat this process for any remaining background segments.
2. The Lasso Tools (Lasso, Polygonal Lasso, Magnetic Lasso): These tools are perfect for selecting irregularly shaped objects or backgrounds.
- Lasso Tool: Best for freehand selections. Click and drag to draw a selection outline.
- Polygonal Lasso Tool: Ideal for straight-edged selections. Click to set anchor points, forming straight lines between them. Double-click or click back to the starting point to close the selection.
- Magnetic Lasso Tool: Particularly useful for objects with distinct edges against their background. It “snaps” to the edges as you drag your mouse along the boundary. Click occasionally to set anchor points and guide the tool.
- After making your selection around the subject (or the background you want to remove), you can either
Deletethe background directly (if you selected the background) orInvertthe selection (Ctrl/Command + Shift + I) to select the subject, then copy/paste it to a new layer with a transparent background.
3. The Select and Mask Workspace: This is Photoshop’s most powerful environment for refining selections, especially challenging ones like hair or fur.
- Start by making an initial selection of your subject using any tool (e.g., Quick Selection Tool, Object Selection Tool, or even the automated “Select Subject”).
- With your selection active (you’ll see “marching ants”), go to Select > Select and Mask…
- In the Select and Mask workspace, you’ll find various tools:
- Refine Edge Brush Tool: Crucial for refining soft edges like hair. Brush along the problematic edges, and Photoshop intelligently distinguishes between foreground and background.
- Brush Tool: Use with (+) to add to the selection or (-) to subtract from it.
- View Modes: Experiment with different view modes (e.g., Overlay, On Layers, On Black/White) to best see your selection.
- Global Refinements: Adjust smoothness, feather, contrast, and shift edge sliders to fine-tune the selection globally.
- Once satisfied, choose Output To: New Layer with Layer Mask or New Layer from the Output Settings and click OK. This creates a new layer with your subject perfectly cut out, ready for use as a high-resolution stock photo or a component in digital photography.
By mastering these manual selection techniques, you gain complete control over your transparency process, ensuring professional results for even the most challenging images, a skill highly valued within the “Photography (Editing Styles)” and “Visual Design (Photo Manipulation)” communities at Tophinhanhdep.com.
Creating Professional Transparent Logos and Watermarks
Beyond simply removing backgrounds, Photoshop is an exceptional tool for creating original transparent assets, such as brand logos or custom watermarks. These elements are vital for establishing a strong visual identity and protecting your creative work.
Crafting a Text-Only Transparent Watermark
A simple, text-based watermark can be highly effective, offering a clean and professional way to brand your photographs without being overly distracting.
1. Create a New Project with a Transparent Background:
- In Photoshop, go to File > New.
- In the New Document dialog box, set your desired dimensions (e.g., 600 pixels wide x 400 pixels high for a typical watermark).
- Crucially, in the Background Contents dropdown, select “Transparent.” This is the single most important step for ensuring your watermark begins with a transparent canvas. If you miss this, you’ll end up with a solid background you’ll need to remove later.
- Click Create.
2. Add Your Text:
- Select the Type Tool (T) from the toolbar.
- Click on your new transparent canvas and type your desired text (e.g., your name, your photography business name, or “© Tophinhanhdep.com”).
- Use the Options bar (at the top) or the Character/Paragraph panels (Window > Character/Paragraph) to customize your font, size, and color.
- Font: Choose a font that is legible and reflects your brand.
- Color: Opt for neutral colors like white, light grey, or a subtle shade that contrasts sufficiently with typical image tones but doesn’t overpower. Avoid very dark or black fonts unless specifically designed for very light images.
- Use the Move Tool (V) to position your text watermark within the canvas. Consider common placements like the bottom right or left corner to minimize distraction from the main subject of a photo.
3. Adjust Opacity (Optional):
- In the Layers panel, select your text layer.
- Adjust the Opacity slider (located at the top of the Layers panel). Lowering the opacity makes your watermark semi-transparent, allowing more of the underlying image to show through. This is often preferred for watermarks to make them less intrusive.
4. Save as a PNG File:
- Once you are satisfied with your text watermark, go to File > Save As… or File > Export > Export As…
- For the file format, select PNG (*.PNG). This format supports transparency, preserving your invisible background. Do NOT save as JPEG, as JPEG files do not support transparency and will automatically fill your transparent areas with white or black.
- Click Save. You’ve now created a reusable text-only transparent watermark, perfect for protecting your photography and branding your images for platforms like Tophinhanhdep.com.
Designing a Graphic Logo with a Transparent Background
For those who desire a more elaborate logo incorporating graphics, shapes, or icons alongside text, the process is similar but involves more creative design steps.
1. Initiate with a Transparent Canvas:
- As with the text-only watermark, begin by creating a new document in Photoshop (File > New).
- Set your preferred dimensions and, crucially, select “Transparent” for the Background Contents. This foundational step guarantees your logo will have a transparent background from the outset.
2. Incorporate Graphic Elements:
- Shapes Tool: Photoshop’s Shape Tools (U) – Rectangle, Ellipse, Polygon, Custom Shape – allow you to create vector-based shapes directly on your canvas. These are easily scalable without loss of quality.
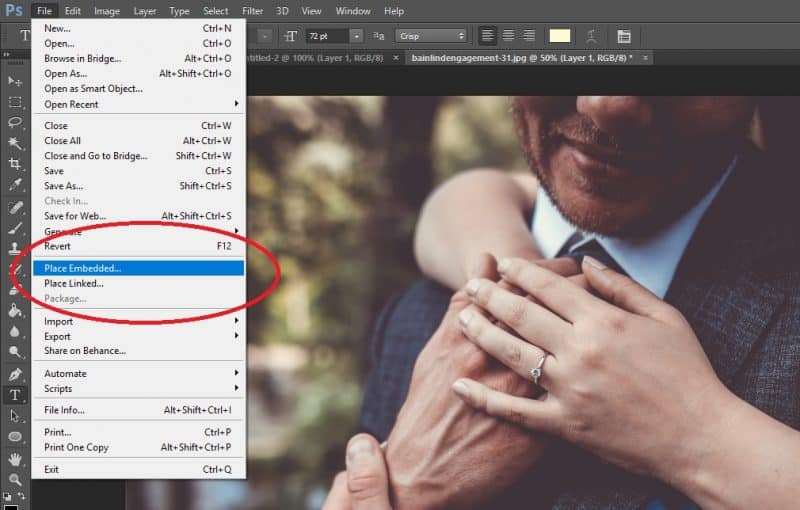
- Vector Art/Icons: You can import royalty-free vector art or photography-related icons from external resources. Go to File > Place Embedded… or File > Place Linked… to bring them into your Photoshop document. Ensure these imported graphics also have transparent backgrounds or remove their backgrounds using the techniques discussed earlier.
- Text Integration: Use the Type Tool (T) to add your business name or slogan, integrating it stylistically with your graphic elements. Experiment with font pairings and colors that complement your chosen graphics and brand identity.
3. Arrange and Refine Your Logo Design:
- Use the Move Tool (V) to position and align all elements of your logo.
- Utilize Layer Styles (Layer > Layer Style or fx icon at the bottom of the Layers panel) to add effects like drop shadows, strokes, or color overlays to your shapes and text, enhancing their visual appeal.
- Ensure all elements are harmonized in terms of color, proportion, and visual balance. Remember that powerful imagery should fit your photography pursuit and overall brand.
4. Save for Web (PNG-24):
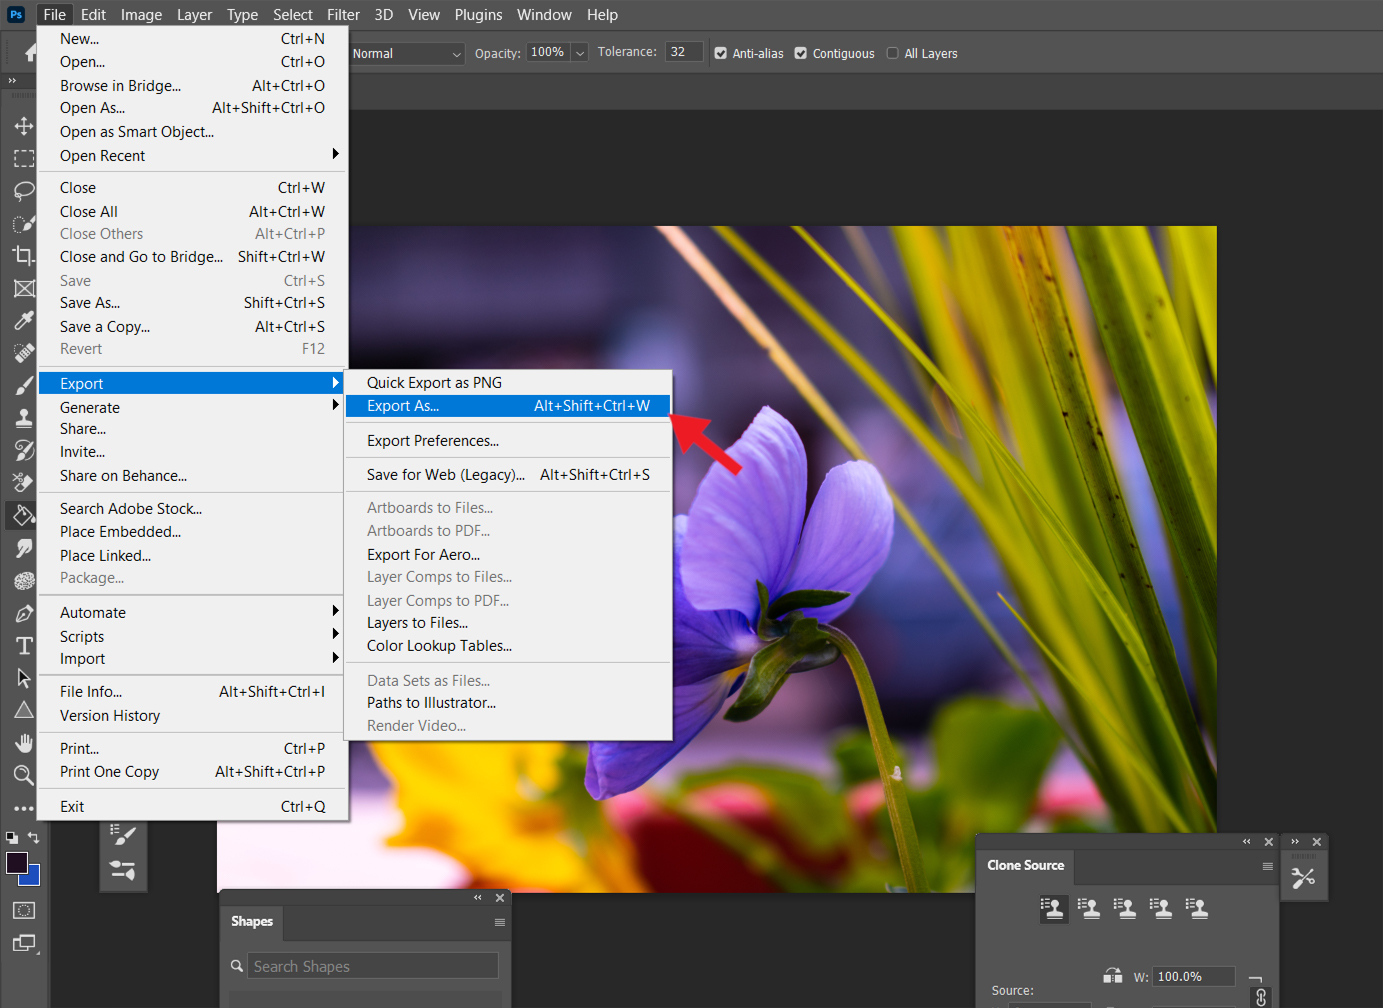
- Once your graphic logo is complete and looks exactly as you envision it, go to File > Export > Save for Web (Legacy)… (or File > Export > Export As… in newer versions).
- In the Save for Web dialog box, select “PNG-24” as the file format. PNG-24 supports full transparency and a wide range of colors, making it ideal for detailed logos. PNG-8 also supports transparency but with a more limited color palette, suitable for simpler logos.
- Ensure the “Transparency” option is checked.
- Click Save. This process ensures your logo retains its crisp edges and transparent background, ready to be seamlessly integrated into any project, enhancing your visual design for websites, marketing materials, or stock photo collections on Tophinhanhdep.com.
Integrating Transparent Elements into Your Photography and Designs
Creating transparent images is only half the battle; the true power comes from effectively integrating them into your existing photography and visual designs. This section focuses on applying your newly created transparent assets and ensuring they are optimized for practical use.
Seamlessly Applying Your Transparent Logo or Watermark
Once you have your transparent logo or watermark file (saved as a PNG), applying it to your photographs is a straightforward process in Photoshop, allowing for quick branding and protection of your “Beautiful Photography” and “High Resolution” images.
1. Open Your Target Image:
- Open the photograph or design you wish to watermark or brand in Photoshop (File > Open).
2. Place Your Transparent Watermark/Logo:
- Go to File > Place Embedded… (or File > Place Linked… if you want the logo to update automatically if the source file changes).
- Navigate to the location where you saved your transparent PNG logo/watermark file. Select it and click Place.
- Your logo will appear on top of your photograph. It will likely be a Smart Object, which means you can resize it non-destructively.
3. Position and Resize Your Watermark:
- Use the bounding box (transform controls) around your logo to resize it by dragging the corners (hold
Shiftto maintain proportions). - Drag the logo to your desired position on the image. Common placements include the bottom corners, top corners, or subtly across the center with reduced opacity.
- Consider Placement: The goal is for the watermark to be noticeable for protection and branding, but not so prominent that it detracts from the photograph itself. Think about the composition of your photo and choose a spot where the watermark complements rather than competes.
- Press
Enter(Windows) orReturn(macOS) to commit the placement.
4. Adjust Opacity (If Needed):
- With the logo layer selected in the Layers panel, you can further adjust its Opacity to make it more or less subtle. A lower opacity often creates a more professional and less intrusive watermark.
5. Save the Watermarked Image:
- Once you are happy with the placement and appearance of your watermark, save your final image.
- Go to File > Save As… or File > Export > Export As…
- Choose JPEG (.jpg) for web use, as it offers good compression for photographs. If you need to preserve the ability to edit the watermark separately later, save a master copy as a PSD (.psd) file as well.
- Click Save, and your image is now branded and protected, ready to be shared as part of your “Thematic Collections” or “Trending Styles” on Tophinhanhdep.com.
Best Practices for Saving and Optimizing Transparent Images
The way you save your transparent images is just as crucial as the way you create them. Proper saving ensures that transparency is preserved, file sizes are optimized, and image quality is maintained, aligning with Tophinhanhdep.com’s focus on efficient “Image Tools.”
1. Choose the Correct File Format: PNG is King for Transparency:
- PNG (Portable Network Graphics): This is the definitive format for images requiring transparency. PNG supports an alpha channel, which stores information about transparency levels for each pixel. It’s lossless, meaning no quality is lost during compression, making it ideal for logos, icons, and any graphic where sharp edges and true colors are paramount.
- PNG-24: Supports millions of colors and full alpha-channel transparency, offering the highest quality.
- PNG-8: Supports up to 256 colors and single-color transparency (either fully opaque or fully transparent), suitable for simpler graphics with fewer colors.
- JPEG (Joint Photographic Experts Group): This format does NOT support transparency. If you save an image with transparent areas as a JPEG, Photoshop will automatically fill those areas with white, black, or your canvas background color. JPEG is best for photographs where slight data loss during compression is acceptable for smaller file sizes.
- GIF (Graphics Interchange Format): Supports animation and transparency, but only single-color transparency (like PNG-8). It’s generally not recommended for high-quality static images with complex transparency due to its limited color palette.
- PSD (Photoshop Document): This is Photoshop’s native file format. It preserves all layers, masks, smart objects, and transparency information. Always save a PSD version of your transparent assets. This allows you to go back and make non-destructive edits later, a critical aspect of “Digital Photography” and “Editing Styles.”
2. Optimize for Web (File Size and Quality):
- While PNG preserves quality, it can sometimes result in larger file sizes, which can impact website loading times. Tophinhanhdep.com emphasizes “Image Tools” for optimization, and this applies directly here.
- When saving your transparent PNG for web use, utilize File > Export > Export As… or File > Export > Save for Web (Legacy)…
- These dialogs offer options to preview your image at different quality settings and resolutions. While PNG is lossless for quality, you can reduce dimensions if the full resolution isn’t needed for web display, significantly decreasing file size.
- Ensure the “Transparency” box is checked in the export dialogs.
- Consider using an “AI Upscaler” from Tophinhanhdep.com if you need to enlarge a small transparent logo without losing quality, or a “Compressor” to reduce PNG file size after creation without sacrificing visual integrity.
By diligently following these saving and optimization practices, you ensure your transparent images are not only visually perfect but also perform optimally across all digital platforms, embodying the best in “High Resolution” and “Digital Photography” standards promoted by Tophinhanhdep.com.
In conclusion, making images transparent in Photoshop is a versatile skill that underpins much of modern digital design and photography. Whether you’re safeguarding your creative work with a subtle watermark, crafting a compelling brand logo, or intricately manipulating photos for a new aesthetic background, Photoshop provides the tools to achieve stunning, professional results. From the swift, AI-powered “Remove Background” feature to the meticulous control offered by the “Select and Mask” workspace, mastering transparency empowers you to seamlessly integrate elements, enhance visual harmony, and express your creative vision without limitations. Remember to always save your transparent masterpieces in the PNG format to preserve their essential transparency, and keep a PSD file for future edits. Embrace the experimentation, unleash your creativity, and let your transparent images elevate your photography and design projects, finding inspiration and utility through platforms like Tophinhanhdep.com’s diverse “Image Inspiration & Collections” and advanced “Image Tools.”