How to Make Text Wrap Around an Image for Enhanced Visual Design

In the realm of digital content creation, the seamless integration of text and imagery is paramount to capturing an audience’s attention and effectively conveying a message. Whether you’re crafting a professional document, designing a compelling marketing graphic, or building an engaging presentation, knowing how to make text wrap around an image is a fundamental skill. This technique transforms static layouts into dynamic, visually appealing compositions, guiding the reader’s eye and enhancing overall readability. At Tophinhanhdep.com, we understand the power of stunning visuals and meticulous design. This comprehensive guide will delve into various methods for text wrapping across popular platforms like Microsoft Word, Adobe Photoshop, and Microsoft PowerPoint, illustrating how these techniques can elevate your projects, from “Beautiful Photography” displays to intricate “Visual Design” masterpieces.
Text wrapping is more than just a formatting trick; it’s a strategic design choice that impacts user experience and information hierarchy. By allowing text to flow organically around an image, you eliminate awkward white spaces, create a more cohesive look, and ensure that your “High Resolution” images and carefully selected “Stock Photos” are presented in the most impactful way. For those invested in “Digital Photography” and keen on refining their “Editing Styles,” mastering text wrap is an essential step towards creating truly professional and aesthetic content.
Mastering Text Wrapping in Microsoft Word
Microsoft Word remains a cornerstone for document creation, from reports to newsletters. Its robust text wrapping features allow for flexible and professional integration of images. Even for beginners, achieving a polished look with neatly aligned images and text is straightforward.

Getting Started with Document Preparation
Before diving into text wrapping, it’s beneficial to work with a practice document. This allows you to experiment without affecting crucial work. You can quickly generate dummy text using the =rand() function in Word, for example, =rand(2,5) creates two paragraphs of five sentences each.

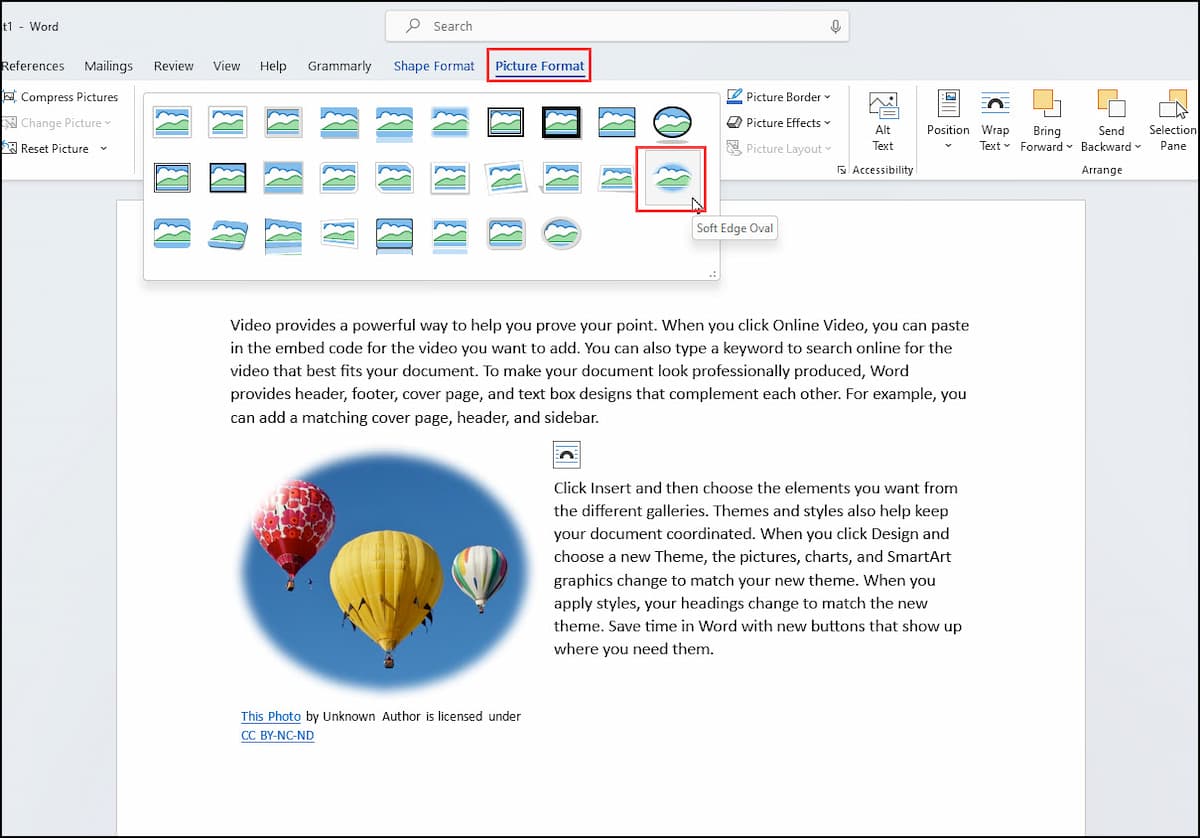
Once your text is ready, the next step is to insert your chosen image. Navigate to the “Insert” tab on the Word ribbon, then select “Pictures.” You can choose an image from your device or use Word’s “Online Pictures” feature, which often provides Creative Commons images along with their captions. When inserting, place your cursor where you’d like the image to roughly appear. Initially, the image might appear large or disrupt the text flow, but this is easily rectified.
Adjusting Image Size and Layout Options
Upon insertion, your image will likely need resizing. Instead of manually dragging the sizing handles, which can sometimes distort the image, it’s often better to use the “Size” options for precise control while maintaining the aspect ratio.
- Select the Image (and Caption): Click on the image. If it has a caption, ensure both the image and caption objects are selected to resize them proportionally. You should see one unified border around both.
- Access Size Settings: With the image selected, a “Picture Format” tab will appear on the ribbon. In the “Size” group, click the small arrow in the lower right corner to open the “Layout” dialog box.
- Refine Dimensions: In the “Layout” dialog box, go to the “Size” tab. Check “Lock aspect ratio” to prevent distortion. You can then change the “Absolute” height (e.g., to 2.5 inches) and press Tab; the width will adjust automatically. Click “OK.”
- Choose Text Wrap Style: With your resized image, you’ll notice a “Layout Options” control (a small icon) near its top-right corner. Clicking this reveals various text wrapping styles:
- Square: Text wraps around the square boundary of the image. This is a common and clean option, ideal for displaying “Wallpapers” or “Backgrounds” in a document.
- Tight: Text wraps closely around the actual contours of the image, even if it’s irregularly shaped. This can create a more organic flow, perfect for showcasing an “Aesthetic” piece of “Nature” photography.
- Through: Similar to Tight, but text can also fill in open areas within the image’s boundaries.
- Top and Bottom: Text is placed above and below the image, leaving clear space on the sides.
- Behind Text / In Front of Text: These options treat the image as a background or overlay, respectively, allowing text to flow completely over or under it. These are less about wrapping and more about layering, useful for subtle “Mood Boards” or “Thematic Collections.”
- Adjusting Text Boundaries: Once a wrapping style is chosen, you can further fine-tune the spacing between the text and the image. Go back to the “Layout” dialog box, select the “Text Wrapping” tab, and adjust the “Distance from text” settings (top, bottom, left, right) to create the desired visual buffer. This level of detail helps maintain a professional look, especially when integrating images sourced from “Trending Styles” or “Photo Ideas.”
These Word functionalities ensure your documents are not just informative but also visually engaging, presenting your “Beautiful Photography” and other “Images” with clarity and style.
Creative Text Wrapping Techniques in Adobe Photoshop
While Word focuses on document layout, Adobe Photoshop is the playground for “Graphic Design,” “Digital Art,” and “Photo Manipulation.” Text wrapping here is about artistic expression, shaping text to conform to objects and creating dynamic visual compositions for advertisements, posters, or “Creative Ideas.”
Wrapping Text Around Simple Shapes
For creating labels or text that appears to curve around a simple object, Photoshop offers a quick “Warp Text” feature. This is fantastic for adding text to product mockups or “Abstract” designs.
- Open Image and Create Text Box: Open your image in Photoshop (e.g., a bottle for a label). Select the “Horizontal Type Tool” and click-and-drag to create a text container where you want your text. Type your desired content.
- Customize Text: Adjust font, size, color, and transparency in the Text tool options bar to match your “Visual Design” needs.
- Activate Warp Text: With the text layer selected, go to the Text tool options bar and click the “Warp Text” icon (a ‘T’ with a curved line beneath it).
- Choose a Style: In the “Warp Text” dialog window, select a style like “Bulge.” Use the “Bend” slider to control the degree of the curve. “Horizontal Distortion” and “Vertical Distortion” sliders allow for further adjustments if the object is angled, ensuring the text perfectly mimics the object’s form.
This method is quick and effective for straightforward shapes, adding visual intrigue to your “Image Inspiration.”
Advanced Text Manipulation with Transform Wrap
For more intricate control and altering the text’s perspective, Photoshop’s “Transform Wrap” tool is invaluable. This technique is often used in “Digital Art” and “Photo Manipulation” for hyper-realistic effects.
- Prepare Text Layer: Insert your text as described above. The “Transform Wrap” tool, however, doesn’t directly work on live text layers. You need to “trick” Photoshop by rasterizing the text. First, create a new empty layer.
- Merge Layers: Select both your text layer and the new empty layer in the Layers Panel (hold Shift and click). Then, press Ctrl+E (Windows) or Command+E (Mac) to merge them. Important: Once merged, the text is no longer editable as text. Ensure all spelling and formatting are finalized beforehand.
- Activate Transform Wrap: Go to the top menu bar and select “Edit” > “Transform” > “Wrap.”
- Manipulate with Mesh: A mesh bounding box will appear around your text. You can drag the control points on this mesh to manipulate, distort, and reposition the text with incredible freedom. This allows you to wrap text around complex curves or give the impression that it’s receding into an object, perfect for advanced “Graphic Design” and adding depth to your “Creative Ideas.”
Conforming Text to Complex Outlines and Paths
When you need text to precisely follow the contour of an irregular object, either as an outline or filling its shape, using paths is the most powerful method in Photoshop. This is where “Photo Manipulation” shines.
- Create a Path: Use the “Pen tool” to draw a work path around the outline of your chosen shape (e.g., a face, an apple). Click to add anchor points, and click-and-drag to create curves. Close the path by clicking the final anchor point on top of the first. You can also generate a path from an active selection:
- Select Subject: Use “Select” > “Subject” for an automatic selection.
- Convert to Work Path: Go to the “Paths Panel” and click the “Make Work Path from Selection” icon (a circle with four dots at the bottom).
- Apply Text to Path: Select the “Text tool.” Hover your cursor over the created path. The text icon will change (e.g., a ‘T’ with a wavy line for wrapping inside or a ‘T’ with a circle for wrapping along the path).
- Type or Paste Text: Click on the path and start typing. For text that wraps along the edge, type directly onto the path line. For text that fills within the shape’s outline, click inside the path. Adjust font size and alignment to ensure the text conforms well.
- Inside Wrap: If typing inside a closed path, the text will fill the shape. You can use text alignment options (e.g., Justify) to make it conform more closely to the contours.
- Edge Wrap: When typing along an open path, the text will follow the path’s curve. Once typed, you can hide the original shape layer, leaving only the text forming its outline—a stunning “Visual Design” effect.
- Fine-Tuning: After the text is on the path, you can still adjust its properties (font, color, size). For example, increasing the size might make the text fill the shape more densely, useful for “Sad/Emotional” or “Abstract” text art. For precise control, prepare your text beforehand and copy-paste it into Photoshop.
These Photoshop techniques are crucial for “Image Editing Styles,” allowing for unparalleled creativity in “Visual Design” and producing high-impact “Digital Art.” Leveraging “AI Upscalers” on your base images before applying these techniques can ensure your final composite is always crisp and professional, fitting perfectly with Tophinhanhdep.com’s focus on quality visuals.
Achieving Text Wrap Effects in Microsoft PowerPoint
PowerPoint, primarily a presentation tool, doesn’t have the automatic text wrapping capabilities of Word or the advanced manipulation of Photoshop. However, you can still achieve impressive text wrap-like effects through strategic use of text boxes and layering, essential for “Image Inspiration & Collections” presented visually.
Manual Text Box Arrangement for Visual Flow
The key to text wrapping in PowerPoint is to work around its limitations by creating the effect manually using multiple text boxes. This is perfect for designing “Thematic Collections” slides or “Mood Boards” where precise control is needed.
- Insert Image and Initial Text: Begin by inserting your desired image onto the slide. Then, add a text box containing the main body of your text.
- Position the Image: Place your image in its intended position on the slide (center, corner, etc.).
- Divide the Text: This is the most crucial step. Instead of one large text box, divide your main text into smaller, manageable text boxes. Think of the space around your image: you might need one text box for text above, one for text to the left, one for text to the right, and one for text below.
- Arrange and Align Text Boxes: Drag and position these smaller text boxes around your image. Use your keyboard arrow keys for fine adjustments. It’s often helpful to enable “Ruler” and “Gridlines” (under the “View” tab) for precise alignment. The goal is to create the illusion that the text is flowing naturally around the image.
- Fine-Tune Readability: Once the text boxes are arranged, adjust their size, font, color, and line spacing to ensure readability and visual harmony. Remember, the ultimate aim is to make information “easily digestible for the audience.”
For irregular shapes, you might need to use the space bar and Shift-ENTER (for line breaks) within a single text box to push text away from the image’s contours. While more manual, this gives you complete control over the text flow around any shape, making it suitable for unique “Creative Ideas.”
Utilizing Grouping and Layering for Complex Slides
For presentations with multiple images, “Wallpapers,” or intricate layouts, advanced techniques like grouping and layering become indispensable. These methods help maintain design integrity and simplify adjustments.
- Grouping Objects: If you have an image and several surrounding text boxes that form a cohesive unit, group them. Select all relevant items by holding down the “Ctrl” key and clicking each one. Then, right-click on any selected item and choose “Group” > “Group.” Now, you can move, resize, or format this entire unit as a single object, ensuring that the text wrap effect remains intact. This is particularly useful when creating slides with recurring “Photo Ideas” or consistent “Trending Styles.”
- Layering Control: Sometimes, text or images might overlap unintentionally. PowerPoint’s layering features allow you to control the front-to-back order of objects. Right-click on an item and select “Bring to Front” (or “Bring Forward”) or “Send to Back” (or “Send Backward”). This ensures that your text is always readable and your images are never obscured, enhancing the “Visual Design” of your “Backgrounds.” Placing an image “Send to Back” behind text boxes can create a subtle, integrated effect, while “Bring to Front” makes it stand out.
These PowerPoint strategies, though requiring a hands-on approach, empower you to create highly customized and engaging presentation slides that effectively combine text and Tophinhanhdep.com’s “Beautiful Photography” or “Aesthetic” visuals.
Enhancing Your Visual Content with Tophinhanhdep.com Principles
The art of text wrapping is intrinsically linked to effective “Visual Design.” At Tophinhanhdep.com, we emphasize not just the technical “how-to” but also the artistic “why.” Thoughtful text wrapping ensures that your chosen images—be they “Nature” scenes, “Abstract” art, or evocative “Sad/Emotional” photos—are presented with maximum impact and clarity.
When integrating “High Resolution” images or carefully curated “Stock Photos” into your designs, consider how the text wrap enhances the narrative. Does the text flow smoothly around a silhouette, or does it neatly frame a key element within an image? These design choices contribute to the overall “Aesthetic” appeal and reader engagement.
Furthermore, Tophinhanhdep.com’s range of “Image Tools” can play a significant role in preparing your assets for optimal text wrapping. Using “Compressors” and “Optimizers” ensures that your images load quickly and seamlessly, especially in web-based applications or large documents. “AI Upscalers” can transform lower-resolution images into “High Resolution” assets, preventing pixelation when resized for text wrap, while “Image-to-Text” tools can assist in generating captions or descriptions that perfectly complement your visuals.
Whether you’re creating “Graphic Design” projects, experimenting with “Digital Art,” or curating “Image Inspiration & Collections,” the principles of well-executed text wrapping will elevate your work. It’s about creating harmony between different elements, making your content not only informative but also a pleasure to behold. By applying these techniques, your projects will resonate with a professional touch, reflecting the quality and attention to detail that Tophinhanhdep.com champions in the world of visual content.
In conclusion, mastering text wrapping is a crucial skill for anyone working with digital content. From the structured environments of Microsoft Word and PowerPoint to the creative freedom of Adobe Photoshop, each platform offers unique tools and approaches to integrate text and images seamlessly. By understanding these techniques and applying them thoughtfully, you can transform your documents, presentations, and designs into visually captivating experiences. Leverage the vast resources and high-quality “Images” available through platforms like Tophinhanhdep.com, combine them with your newfound text-wrapping prowess, and watch your “Visual Design” projects truly come to life. Experiment, explore, and never underestimate the power of a perfectly wrapped text.