Unlock Creative Freedom: How to Make Images Transparent in Photoshop for Photography & Design

In the vast and vibrant world of digital imagery, the ability to manipulate and refine visuals is paramount. Among the most fundamental and creatively empowering techniques is mastering image transparency in Adobe Photoshop. Whether you’re a professional photographer aiming to protect your intellectual property, a graphic designer crafting intricate web layouts, or a digital artist blending elements into a surreal masterpiece, understanding how to make an image transparent is a foundational skill.
This comprehensive guide will delve into the various methods Photoshop offers, from automated AI-powered shortcuts to meticulous manual selections, ensuring your images achieve that crisp, clean, and seamlessly integrated look. We’ll explore why transparency is crucial for everything from personal branding to complex visual compositions, connecting these techniques to the diverse array of image and design possibilities available on Tophinhanhdep.com.
The Imperative of Transparency: Why it Matters for Your Visuals
At its core, image transparency refers to the characteristic of an image or a portion of an image being see-through, allowing underlying content to be visible. In Photoshop, this is often represented by a gray and white checkerboard pattern, signifying areas devoid of pixels, ready to reveal whatever lies beneath. The practical applications of this simple concept are incredibly far-reaching, influencing everything from effective branding to breathtaking photo manipulation.
![]()
For photographers, especially those showcasing their beautiful photography online, transparency often serves as a powerful tool for copyright protection. Watermarking your images with a transparent logo or text deters unauthorized use, ensuring your hard work isn’t claimed by others. In the context of “Sad/Emotional” or “Nature” photography, a subtle, transparent signature can add a professional touch without distracting from the emotional impact or natural beauty of the scene.
From a design perspective, transparent images are the backbone of seamless visual integration. Imagine wanting to place a product image on a textured “Background” or “Wallpaper” for your website, or layering elements in a “Digital Art” piece without harsh, distracting edges. Transparency allows objects to float effortlessly, blending with any backdrop, creating a polished and “Aesthetic” visual experience. This capability is vital for web design, creating compelling “Visual Design” elements, and performing sophisticated “Photo Manipulation.”
Understanding PNG: The Gateway to Transparency
![]()
When dealing with transparent images, the choice of file format is critical. While numerous formats exist, the Portable Network Graphics (PNG) format is the undisputed champion for preserving transparency.
Unlike Joint Photographic Experts Group (JPEG) files, which are designed for photographs and compress images by discarding data, often resulting in loss of quality and inherently lacking support for a true alpha channel (transparency layer), PNG is a lossless format that fully supports varying levels of transparency. This means when you save an image with a transparent background as a PNG, those transparent areas remain perfectly clear.
Therefore, whether you’re creating a “High Resolution” logo for your brand or extracting an object from a “Stock Photo” for a new design, always remember to save your final output as a PNG file to ensure the transparency is maintained. Tophinhanhdep.com, as a hub for “Image Tools” like converters and optimizers, understands the importance of the correct file format, emphasizing that a transparent image saved as a JPEG will invariably lose its transparency, filling the transparent areas with a solid color, usually white or black.
Instant Transparency: Leveraging Photoshop’s AI for Quick Background Removal
Modern versions of Adobe Photoshop have dramatically simplified the process of removing backgrounds, thanks to powerful artificial intelligence algorithms. For many images, especially those with clearly defined subjects and contrasting backgrounds, achieving transparency can now be as quick as a few clicks. This is particularly useful for quickly processing “Digital Photography” or “Stock Photos” for immediate use.
The “Select Subject” tool, powered by Adobe Sensei AI, is at the forefront of this automation, capable of intelligently identifying the main subject in your photograph and creating a selection around it. This feature is a game-changer for photographers and designers looking to streamline their “Editing Styles” and quickly isolate elements for further “Photo Manipulation” or integration into “Visual Design” projects.
Step-by-Step with Quick Actions
To take advantage of Photoshop’s automated background removal, you’ll need Adobe Photoshop CC 2020 (version 21.0.0) or later. The process is remarkably straightforward:
- Open Your Image and Duplicate the Layer: Start by opening the image you wish to edit in Photoshop. It’s always a good practice to work on a duplicate layer to preserve your original image. You can do this by selecting the entire photo (Command + A on macOS or Control + A on Windows), copying it (Command + C / Control + C), and then pasting it back into the document (Command + V / Control + V). Alternatively, you can right-click the background layer in the Layers panel and choose “Duplicate Layer.”
- Hide the Original Background: In the Layers panel, click the eye icon next to your original background layer. This will make the original layer invisible, allowing you to clearly see the transparent background once it’s created on your new layer.
- Utilize Quick Actions: Locate the “Properties” panel on the right side of your workspace. If you don’t see it, go to Window > Properties. Within the Properties panel, find the “Quick Actions” section. Here, you’ll see an option labeled “Remove Background.” Click it.
- Observe the Magic: Photoshop’s AI will now analyze your image, identify the subject, and automatically remove the background. You should see your subject perfectly cut out against the universal gray and white checkered pattern, signifying transparency.
- Refine if Necessary: While remarkably accurate, the AI isn’t always perfect, especially with complex edges like hair, fur, or intricate details. If the result isn’t flawless, Photoshop automatically creates a layer mask (the black-and-white thumbnail next to your image layer). Select this mask, and then use a soft-edged paintbrush tool. Painting with white will reveal more of the subject (adding to the selection), while painting with black will hide parts of the subject (removing from the selection). This allows for precise “Photo Manipulation” and ensures a clean cut-out.
Once satisfied, you can delete the original background layer or simply leave it hidden. Remember to save your file as a PNG to preserve the transparency. For potential future edits, saving a PSD file is also highly recommended.
When Automatic Isn’t Perfect: Recognizing Limitations
While AI-powered background removal is a powerful “Image Tool,” it’s important to recognize its limitations. Images with low contrast between the subject and the background, busy or chaotic backgrounds, or subjects with very fine, intricate details (like wispy hair against a similar-colored backdrop) can sometimes confuse the AI, leading to less-than-perfect initial results. In these scenarios, or when absolute precision is non-negotiable for a “High Resolution” project or detailed “Digital Art,” manual selection methods become indispensable.
Precision Control: Manual Methods for Flawless Transparency
For those challenging images where Photoshop’s AI might fall short, or for designers who demand complete control over every pixel, manual selection techniques are your most potent allies. These methods require a bit more time and patience but offer unparalleled accuracy, allowing you to achieve a perfectly transparent background, no matter how complex the subject. This level of detail is often critical for professional “Graphic Design” and complex “Photo Manipulation.”
Choosing Your Weapon: A Toolkit of Selection Instruments
Photoshop offers a diverse arsenal of selection tools, each suited for different types of image challenges:
- Magic Wand Tool: Ideal for images with solid, uniform color backgrounds. Simply click on the background area, and it will select all similarly colored pixels within a specified tolerance. Great for quickly isolating logos or simple objects from a plain canvas.
- Select Object Tool: A semi-automated tool where you draw a rough box or lasso around the desired object, and Photoshop’s AI then refines that selection. It’s a hybrid approach, offering more control than “Remove Background” but still leveraging AI.
- Marquee Tools (Rectangular and Elliptical): Best for selecting objects that are perfect rectangles or circles. Think of product shots that fit neatly into geometric shapes.
- Lasso Tools (Lasso, Polygonal Lasso, Magnetic Lasso): These are your freehand selection tools.
- Lasso Tool: For completely freehand, organic selections.
- Polygonal Lasso Tool: Perfect for straight-edged objects, allowing you to click points to create a series of straight lines.
- Magnetic Lasso Tool: This intelligent tool snaps to edges of high contrast as you move your mouse, making it excellent for objects with well-defined, contrasting boundaries.
- Pen Tool: The ultimate precision tool for creating vector paths, which can then be converted into selections. While it has a steeper learning curve, the Pen Tool offers the most accurate and editable selections, essential for professional “Visual Design” and “Digital Art.”
The Art of Selection: A Detailed Manual Workflow
For images with complex details or busy backgrounds, a combination of these tools, often centered around the “Select and Mask” workspace, yields the best results. Here’s a detailed workflow for achieving flawless transparency:
- Initial Selection (Starting Point): Begin with “Select > Select Subject” even if you know it won’t be perfect. This gives you a good starting point that you can then refine. Alternatively, for specific objects, use the “Select Object Tool” by drawing a rough outline around your target. If these automatic tools don’t serve well, or if you’re using an older Photoshop version, you can start with a lasso tool.
- Refine with “Select and Mask”: This is where the magic happens for complex subjects.
- With your initial selection active (you’ll see the “marching ants”), go to “Select > Select and Mask” (or click the “Select and Mask” button in the options bar if you have a selection tool active).
- In the “Select and Mask” workspace, choose a viewing mode that highlights your selection clearly (e.g., “On Layers” or “On Black”).
- Refine Edge Brush Tool: This specialized brush (often the second icon on the left toolbar within “Select and Mask”) is invaluable for soft, complex edges like hair or fur. Brush along these difficult boundaries, and Photoshop will intelligently find and select the fine details, leaving the background behind. Adjust the “Radius” slider in the Properties panel for more or less sensitivity.
- Brush Tool (Add/Subtract): Use the standard brush tool (first icon) to manually add areas that were missed (with the plus icon selected) or subtract areas that were incorrectly included (with the minus icon selected). Adjust brush size as needed.
- Global Refinements: Experiment with the “Smooth,” “Feather,” “Contrast,” and “Shift Edge” sliders in the Properties panel to fine-tune the selection globally.
- Once satisfied, set the “Output To” option at the bottom right to “New Layer with Layer Mask” and click “OK.” This creates a new layer with your subject cut out and a non-destructive layer mask.
- Non-Destructive Editing with Layer Masks: The output from “Select and Mask” will be a new layer with a layer mask. This is crucial for “Digital Photography” and “Editing Styles” as it allows you to refine your selection non-destructively. To further adjust the transparency:
- Select the layer mask thumbnail (the black-and-white image next to your layer thumbnail) in the Layers panel.
- Use a paintbrush tool (shortcut ‘B’) with black paint to hide parts of your subject (effectively adding to the transparent area) or white paint to reveal parts of your subject (removing from the transparent area). You can use varying brush opacities and hardness for natural transitions.
- Final Cleanup with Eraser or Lasso Tools: Zoom in closely (100% or more) to inspect all edges. For any remaining stray pixels or small background elements, you can use the Eraser Tool directly on the image layer (if the mask is disabled, or by applying the mask) or make tiny selections with the Lasso Tools and delete them.
- Delete or Hide the Background Layer: Once your subject is perfectly isolated on its own layer with a transparent background (indicated by the checkerboard), you can either hide the original background layer (by clicking its eye icon in the Layers panel) or delete it entirely. For “Image Inspiration & Collections” or “Mood Boards,” having a clean, transparent subject is key.
- Save as PNG: The final crucial step is to save your masterpiece. Go to File > Save As, and in the format dropdown, select “PNG (*.PNG).” If you anticipate needing further edits, always save a duplicate copy as a Photoshop Document (.PSD) file. This preserves all your layers and masks, making future adjustments straightforward. This careful saving ensures your “High Resolution” images maintain their quality and transparency.
Creative Applications: Beyond Simple Backgrounds
The power of image transparency extends far beyond merely removing unwanted backgrounds. It’s a fundamental element in various “Visual Design,” “Graphic Design,” and “Digital Art” techniques, enabling sophisticated compositions and professional presentations. Whether you’re working on “Aesthetic” projects or creating thematic “Image Inspiration & Collections,” transparency offers immense creative flexibility.
Crafting Professional Watermarks and Logos
One of the most common and vital applications of transparency, especially for professional “Digital Photography,” is creating and applying watermarks. A well-designed, transparent watermark serves as your brand’s signature, offering a layer of “Copyright Protection” without obscuring the beauty of your work. Tophinhanhdep.com, with its focus on “Beautiful Photography,” understands the necessity of protecting your visual assets.
Creating a Text-Only Watermark:
The simplest form of a watermark is text-only, representing your name or business.
- New Project with Transparent Background: In Photoshop, go to File > New. When setting up your new document, ensure the “Background Contents” dropdown is set to “Transparent.” This is a critical step, as missing it will result in a solid background that defeats the purpose. A recommended size for a watermark might be around 600 pixels wide by 400 pixels high, but this can vary.
- Add Your Text: Select the “Text Tool” (T) and type your desired name or business name. Choose a font and color that align with your brand. Neutral colors often work best, providing visibility without being overly distracting on diverse images.
- Save as PNG: Once you’re happy with the text and its placement within your transparent canvas, save the file as a PNG. Go to File > Save As, select “PNG (*.PNG)” as the format, and click OK. This preserves the transparency, ensuring only your text appears when applied to another image.
Creating a Logo Watermark (with Graphics):
For a more distinct brand identity, you might incorporate graphical elements into your logo watermark. Tophinhanhdep.com features resources that can inspire “Creative Ideas” for such logos, including “Stock Photos” and “Vector Art.”
- Start with a Transparent Canvas: Again, create a new document with a transparent background, ensuring “Background Contents” is set to “Transparent.”
- Design Your Logo: Utilize Photoshop’s “Shapes Tool,” custom shapes, or import royalty-free imagery or vector art. You can find “Image Inspiration & Collections” or “Photo Ideas” on Tophinhanhdep.com to help you design a unique logo that complements your “Photography” style. Combine these graphics with your brand text, ensuring the overall design is cohesive and professional.
- Save for Web (PNG-24): Once your logo is complete on the transparent background, go to File > Export > Save for Web (Legacy). In the dialog box, select “PNG-24” as the preset. PNG-24 is essential for preserving the full range of transparency and ensures your logo looks crisp when applied.
Applying Your Watermark to Photos:
With your transparent watermark file ready, applying it to your “High Resolution” images is effortless.
- Open Your Photo: Open the image you want to watermark in Photoshop.
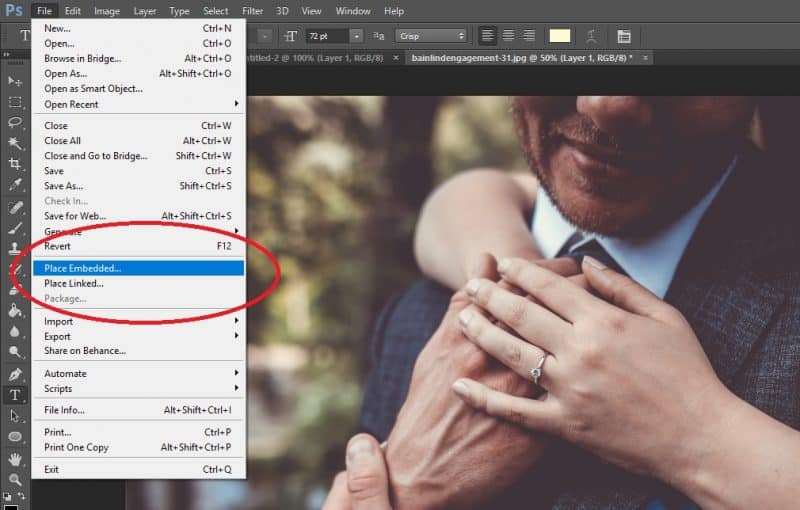
- Place Embedded: Go to File > Place Embedded. Navigate to where you saved your transparent PNG watermark file, select it, and click “Place.”
- Position and Resize: Your watermark will appear as a new layer. Use the Free Transform controls (Ctrl/Cmd + T) to resize and reposition your watermark. Typically, watermarks are placed in a corner (bottom-left or bottom-right) where they are visible but not overly distracting from the main subject. The goal is to claim your work without detracting from its quality or aesthetic.
- Save the Watermarked Image: Once the watermark is perfectly placed, save your image. You can save it as a JPEG for general web use or a PNG if it needs to retain any other transparency or for maximum quality.
Dynamic Visuals: Implementing Transparent Gradients
Transparency isn’t just about removing backgrounds; it’s also about creating subtle transitions and ethereal overlays. Transparent gradients are a powerful tool for adding depth, mood, or a soft fade to your images, perfect for “Aesthetic” compositions, “Digital Art,” or enhancing “Nature” backgrounds.
- Activate the Gradient Tool: Select the “Gradient Tool” (G) from your toolbar.
- Choose a Transparent Gradient: In the options bar at the top, click on the gradient thumbnail to open the Gradient Editor. In the “Basics” set, you’ll find a “Foreground to Transparent” gradient (often the second one). This is your starting point. You can customize the foreground color in your toolbar to change the color of the gradient.
- Edit the Gradient (Optional): To create more complex transparent gradients, click the gradient thumbnail again to open the full Gradient Editor.
- Opacity Stops: Above the gradient bar, you’ll see “Opacity Stops.” Click on one to select it, then adjust its “Opacity” slider to control the transparency at that specific point in the gradient. You can add more opacity stops by clicking above the bar to create multi-stage transparency.
- Color Stops: Below the gradient bar, “Color Stops” dictate the colors. Double-click a color stop to change its color.
- Apply the Gradient: Create a new, blank layer above your image (Shift + Ctrl/Cmd + N). With this new layer selected and the Gradient Tool active, click and drag across your image to apply the transparent gradient. The direction and length of your drag will determine the gradient’s spread.
- Blending Modes for Integration: To make the gradient blend seamlessly, experiment with the “Blending Modes” in the Layers panel (e.g., Overlay, Soft Light, Multiply). Adjusting the layer’s “Opacity” can also fine-tune its impact.
Alternatively, you can apply a transparent gradient as a Layer Style:
- Access Layer Styles: Double-click on the image layer (or any layer) to open the Layer Style panel.
- Select Gradient Overlay: Check the “Gradient Overlay” box in the left menu.
- Customize: Click on the gradient preview within the “Gradient Overlay” section to open the Gradient Editor, where you can define your transparent gradient as described above. Here, too, you can adjust blending modes and opacity.
These techniques allow you to create stunning “Visual Design” effects, from subtle atmospheric changes in a “Nature” photo to dramatic transitions in “Abstract” art, contributing significantly to your “Creative Ideas” and “Thematic Collections.”
Conclusion: Empowering Your Visual Storytelling with Tophinhanhdep.com
Mastering image transparency in Photoshop is an invaluable skill for anyone involved in “Photography” or “Visual Design.” It unlocks a world of creative possibilities, from safeguarding your intellectual property with a transparent watermark to crafting intricate “Digital Art” and seamless web layouts. Whether you opt for Photoshop’s intelligent AI shortcuts or delve into the meticulous precision of manual selections, the ability to control image transparency elevates your visual storytelling to new heights.
We’ve covered the crucial role of the PNG format, the efficiency of Photoshop’s “Remove Background” quick action, the detailed control offered by selection tools and “Select and Mask,” and the creative applications in watermarking and transparent gradients. These techniques are not just technical steps; they are gateways to enhancing your “Image Inspiration & Collections,” perfecting your “Editing Styles,” and realizing your most ambitious “Photo Ideas.”
As you continue your journey in visual creation, remember that the tools and inspiration for stunning visuals are readily available. Explore Tophinhanhdep.com for an extensive collection of “Wallpapers,” “Backgrounds,” “Aesthetic” images, and “Nature” photography, alongside “Image Tools” like converters, compressors, optimizers, and AI upscalers that can further refine your transparent creations. Dive in, experiment, and let the power of transparency transform your images into captivating works of art.