Mastering Transparency: How to Create Stunning Transparent Images in Photoshop with Tophinhanhdep.com

In the dynamic world of digital imagery, the ability to create transparent images is not just a technical skill—it’s a cornerstone of professional visual design, photo manipulation, and digital art. Whether you’re a seasoned photographer aiming to protect your high-resolution stock photos, a graphic designer crafting intricate layouts, or someone simply looking to enhance their aesthetic backgrounds, understanding Photoshop’s transparency tools is indispensable. On Tophinhanhdep.com, we understand the profound impact of high-quality images, and this comprehensive guide will equip you with the knowledge to achieve pristine transparent backgrounds, elevating your creative projects to new heights.
The concept of a transparent background allows for unparalleled flexibility. Imagine a logo that seamlessly blends into any website background, an abstract element hovering over a nature scene, or a product image that can be effortlessly placed onto diverse marketing materials. These possibilities are precisely why transparency is so coveted, and Photoshop remains the gold standard for achieving it. While various online resources exist, learning to master this skill yourself not only saves costs but also grants you ultimate creative control, aligning perfectly with Tophinhanhdep.com’s commitment to empowering your visual journey.
The Essential Role of Transparent Images in Digital Design and Photography
Transparent images are more than just a visual trick; they are a fundamental component of effective digital communication and artistic expression. Their versatility makes them crucial across various applications, from safeguarding your intellectual property to crafting sophisticated visual narratives.
Why Transparency Matters for Your Visual Content
One of the most compelling reasons to utilize transparent images, especially in the context of photography, is copyright protection. In an era of rampant digital distribution, where images can be effortlessly copied and shared, watermarking your photos with a transparent logo or text is a powerful deterrent against unauthorized use or, worse, outright theft. While no method offers absolute immunity, a clearly branded watermark discourages misuse and asserts your ownership, a vital consideration for contributors to Tophinhanhdep.com’s collections of beautiful photography and stock photos.
![]()
Beyond protection, transparency is a cornerstone of aesthetic appeal and seamless web integration. A logo with a transparent background can be placed on any webpage, document, or visual element without an unsightly white or colored box disrupting the overall design. This capability is paramount for creating professional-looking visuals for Tophinhanhdep.com’s users who frequently explore categories like “Aesthetic” and “Backgrounds.” It allows for layered compositions, complex photo manipulation, and a fluid visual experience, whether you’re designing wallpapers, crafting digital art, or assembling mood boards.
Furthermore, transparent images are vital for product photography and e-commerce. When showcasing items, isolating the product from its original background allows it to be placed against various backdrops, adhering to brand guidelines, or simply presenting it cleanly without distractions. This enhances the perceived quality and professionalism of the imagery, a significant advantage for those utilizing Tophinhanhdep.com’s high-resolution images for commercial purposes.
![]()
Tophinhanhdep.com’s Vision: Enhancing Your Images and Visuals
At Tophinhanhdep.com, our mission revolves around providing a rich ecosystem for all things visual. From extensive collections of “Wallpapers” and “Nature” photography to cutting-edge “Image Tools” and “Visual Design” resources, transparency plays a pivotal role in maximizing the potential of our offerings.
- For Photographers: Protecting your “High Resolution” and “Stock Photos” with a custom transparent watermark ensures your work, whether it’s “Beautiful Photography” or “Sad/Emotional” art, retains its integrity when shared or licensed. The techniques shared in this article are directly applicable to safeguarding your contributions.
- For Designers and Artists: “Graphic Design,” “Digital Art,” and “Photo Manipulation” thrive on the flexibility that transparent elements provide. Whether you’re creating a new “Abstract” background or compositing multiple images, the ability to remove or create transparent backgrounds is fundamental to realizing your “Creative Ideas.”
- For Content Creators: Seamlessly integrating “Aesthetic” images or elements into web designs, presentations, or social media content is simplified with transparent assets. This enhances the overall “Visual Design” and allows for greater thematic consistency across “Image Inspiration & Collections.”
By mastering transparent image creation in Photoshop, you’re not just learning a trick; you’re unlocking a new dimension of creative control that resonates with every aspect of Tophinhanhdep.com’s diverse content categories.
Unlocking Transparency: Step-by-Step Photoshop Techniques
Adobe Photoshop offers a spectrum of tools and techniques to achieve image transparency, catering to various levels of complexity and user preference. From automated shortcuts to precise manual selections, you can choose the method that best suits your image and desired outcome. This tutorial focuses on Adobe Photoshop CC, though many functions are transferable to other versions.
The Quick Route: Automatic Background Removal (Photoshop 2020+)
For many images, especially those with clearly defined subjects and contrasting backgrounds, Photoshop’s intelligent “Remove Background” feature can save significant time. This artificial intelligence (AI)-powered tool, available in Photoshop 2020 (version 21.0.0) and later, streamlines the process to just a few clicks.
Steps for Automatic Background Removal:
-
Open Your Image: Launch Adobe Photoshop and open the image file you wish to make transparent. Go to “File” > “Open” and select your image.
-
Duplicate the Background Layer: It’s good practice to work on a duplicate layer to preserve your original image. Select the entire photo (Cmd + A on Mac or Ctrl + A on Windows), then copy (Cmd + C / Ctrl + C) and paste (Cmd + V / Ctrl + V) it. This creates a new layer. In the Layers panel, click the eye icon next to the original “Background” layer to hide it. You’ll now be working solely with your new layer.
-
Access Quick Actions: In the Properties panel (usually on the right side of your workspace; if not visible, go to “Window” > “Properties”), locate the “Quick Actions” section.
-
Click “Remove Background”: Within “Quick Actions,” simply click the “Remove Background” button. Photoshop will analyze your image, automatically detect the subject, and eliminate the background.
-
Review and Refine (if necessary): Once the process completes, you should see your subject against a universal grey and white checkered pattern, indicating transparency. If your original background layer is still visible, the transparency won’t appear, so ensure it’s hidden.
While this AI-driven feature works wonders for many images, it might not be perfect for every scenario, especially those with complex edges, fine details like hair, or backgrounds that blend too closely with the subject. If the result is nearly perfect but needs minor tweaks, Photoshop automatically creates a layer mask (a black-and-white thumbnail next to your layer in the Layers panel). Select this mask, then use a white paintbrush to reveal any part of the subject that was mistakenly removed, or a black paintbrush to erase any remaining background elements. This non-destructive editing approach is a core principle in professional “Photo Manipulation.”
Precision and Control: Manual Selection Tools for Flawless Transparency
When automated tools fall short, or for those who prefer meticulous control, Photoshop offers an array of manual selection tools. The choice of tool often depends on the characteristics of your image—specifically, the contrast between the subject and the background, and the complexity of the subject’s edges.
Key Manual Selection Tools:
- Magic Wand Tool: Ideal for backgrounds with solid or very similar colors. It selects all pixels within a defined tolerance range.
- How to use: Select the “Magic Wand Tool” from the left toolbar. In the options bar at the top, adjust the “Tolerance” setting (a value of 32 is a good starting point; lower for more precision, higher for broader selection). Click on the area of the background you want to make transparent. Hold Shift and click on additional background areas to add them to the selection.
- Lasso Tools (Lasso, Polygonal Lasso, Magnetic Lasso): These are freehand selection tools.
- Lasso Tool: Draw a freeform selection by hand. Best for rough selections or areas where precision isn’t critical.
- Polygonal Lasso Tool: Creates selections using straight-line segments. Perfect for objects with sharp, angular edges.
- Magnetic Lasso Tool: Automatically snaps to the edges of an object as you drag your mouse, ideal for objects with well-defined, contrasting edges. It’s like having a guided selection.
- Select Object Tool: A more advanced AI-powered tool (Photoshop 21.0.0+) that allows you to draw a rough box or lasso around an object, and Photoshop intelligently selects it.
- Select Subject: Found under “Select” > “Select Subject,” this tool uses AI to attempt to automatically select the most prominent subject in your image, providing a good starting point for more complex images.
- Select and Mask: This dedicated workspace (accessible via “Select” > “Select and Mask”) is a powerful environment for refining complex selections, especially for challenging areas like hair or fur. It offers specialized brushes and edge detection algorithms to achieve incredibly precise cutouts.
General Steps for Manual Background Removal:
- Open Your File and Prepare Layers: Open your image in Photoshop. If it’s a “Background” layer, right-click it in the Layers panel and choose “Layer From Background” to convert it into a regular layer. This allows for transparency.
- Make an Initial Selection: Choose the most appropriate selection tool based on your image. For example, if your background is a solid color, start with the “Magic Wand Tool.” If your subject has a complex outline, begin with “Select Subject” or the “Object Selection Tool.”
- Refine Your Selection (Using Select and Mask for complexity): If your selection isn’t perfect, which is often the case, this is where refinement comes in.
- Go to “Select” > “Select and Mask.” This opens a dedicated workspace.
- Use the “Refine Edge Brush Tool” (looks like a brush with a circle in the middle) to brush over challenging areas like hair or fuzzy edges.
- Use the standard “Brush Tool” (with plus and minus icons at the top) to manually add to or subtract from your selection. Zoom in for precision.
- Adjust parameters like “Radius,” “Smooth,” “Feather,” and “Contrast” to fine-tune the edges.
- Once satisfied, set “Output To” to “Layer Mask” and click “OK.”
- Delete the Background: Once you have a clean selection (either directly or via a layer mask), ensure you are on the correct layer. If using a direct selection, simply press the “Delete” key. The checkered pattern will appear, signifying transparency. If you used a layer mask, the background will be hidden, and you can see the transparency without deleting pixels, allowing for non-destructive adjustments later.
- Repeat as Needed: For intricate images with multiple background areas, you may need to repeat the selection and deletion/masking process.
- Review and Finalize: Zoom in and inspect all edges. Use a small eraser or refine the layer mask further to catch any stray pixels or missed background areas. This attention to detail is crucial for creating professional “Digital Art” and “Photo Manipulation.”
Saving Your Transparent Masterpiece: The PNG Format
After meticulously creating your transparent image, the final crucial step is saving it correctly to preserve the transparency. The most common and widely supported format for transparent images is PNG.
How to Save Your Transparent Image:
- Go to “File” > “Save As.”
- Choose PNG Format: In the “Save As” dialog box, select “PNG (*.PNG)” from the “Format” dropdown menu.
- Name Your File and Save: Give your file a descriptive name and choose a location. Click “Save.”
- PNG Options: A “PNG Options” dialog box will appear. For most purposes, the default settings (“Smallest File Size (Slowest)” and “Interlace: None”) are suitable. Click “OK.”
Important Considerations:
- Checkerboard Pattern: While working in Photoshop, transparent areas are represented by a grey and white checkered pattern. This pattern will NOT appear in your final PNG file; it will truly be transparent.
- JPEG vs. PNG: Remember that JPEG files do not support transparency. If you save your transparent image as a JPEG, any transparent areas will automatically be filled with white, defeating your efforts.
- PSD for Future Edits: Tophinhanhdep.com highly recommends always saving a duplicate copy of your project as a PSD (Photoshop Document) file. This preserves all your layers, masks, and settings, allowing you to return and make further “Editing Styles” or “Photo Manipulation” adjustments at any time without starting from scratch.
- Optimization: After saving your transparent PNG, consider using “Tophinhanhdep.com’s Image Tools” like our “Compressors” or “Optimizers” to reduce file size without significant loss of quality, especially if the image is for web use. This ensures fast loading times for your “Wallpapers” or “Backgrounds.”
Crafting and Applying Transparent Logos and Watermarks
One of the most practical applications of transparent images is the creation and application of logos and watermarks. This process allows photographers to brand their work and designers to create versatile assets.
Designing a Text-Only Watermark for Copyright Protection
A text-only watermark is the simplest yet effective way to protect your “Beautiful Photography” or “High Resolution” images. It focuses solely on asserting your ownership.
- Start a New Project with a Transparent Background: In Photoshop, go to “File” > “New.” Crucially, in the “New Document” dialog box, ensure the “Background Contents” dropdown is set to “Transparent.” A typical size for a standalone watermark might be 600 pixels wide by 400 pixels high, but this can be adjusted.
- Create a New Layer for Text: Once your transparent canvas is open, ensure you have a new blank layer selected in the Layers panel.
- Add Your Text: Select the “Text Tool” (T) from the toolbar. Choose your desired font, size, and a neutral text color that will stand out on most images (e.g., light grey or white with a subtle drop shadow). Click on the canvas and type your name or business name (e.g., “© YourName Photography”).
- Position and Style: Position the text where it will be visible but not overly distracting, typically in a corner (bottom right or left). Adjust the font, size, and color to your satisfaction. Consider adjusting the layer’s opacity to make it less intrusive on your photos, a technique useful for “Aesthetic” images.
- Save as PNG: Once you are completely happy with your text-only watermark, save it as a PNG file using the steps outlined in the previous section. This preserves its transparent background, making it ready for use on any image.
Integrating a Graphic Logo for Professional Branding
For a more distinct and professional brand identity, a graphic logo with a transparent background is ideal. This process is similar to creating a text-only watermark but often involves importing or designing a graphic element. “Tophinhanhdep.com’s Image Inspiration & Collections” can be a great starting point for logo ideas.
- Create a New Document with Transparent Background: As with text-only watermarks, start a new Photoshop document with “Background Contents” set to “Transparent.”
- Design or Import Your Graphic:
- Design: Use Photoshop’s shape tools, pen tool, or custom brushes to design your logo directly on this transparent canvas. Experiment with colors and effects.
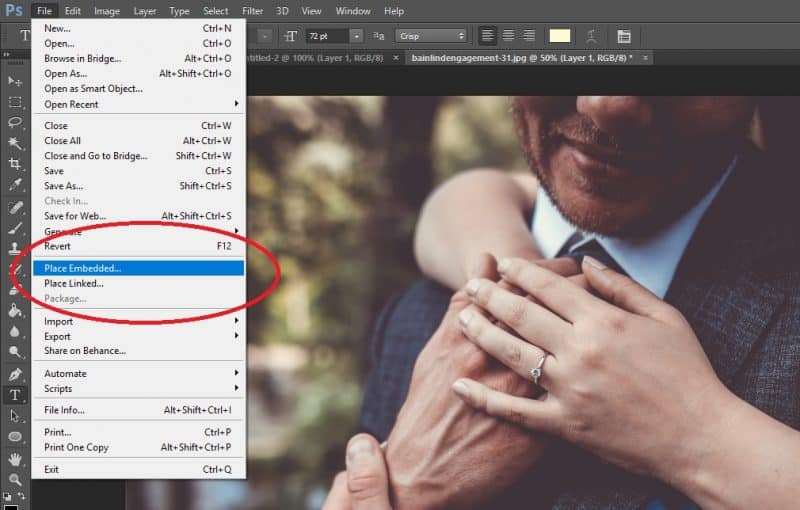
- Import: If you have an existing logo file (e.g., a vector file or a high-resolution raster image), go to “File” > “Place Embedded” and select your logo. Photoshop will place it as a Smart Object.
- Ensure Transparency: If your imported logo already has transparency, great! If not, or if you designed it with a solid background, use the “Magic Wand Tool” or “Select and Mask” techniques discussed earlier to remove any unwanted background, ensuring the logo itself is on a transparent layer.
- Refine and Position: Adjust the size, position, and any visual effects of your logo. Ensure it looks crisp and professional.
- Save as PNG-24 for Web (Crucial for Logos): For logos, it’s often best to use “File” > “Export” > “Save for Web (Legacy)…” and select “PNG-24.” This format is excellent for preserving sharp edges and transparency, making your logo perfectly adaptable for web design or integrating into other “Visual Design” projects on Tophinhanhdep.com.
Seamlessly Embedding Watermarks into Your Photography
Once you have your transparent watermark (text or graphic), applying it to your photos is a straightforward process. This is essential for all “Digital Photography” to maintain ownership.
- Open Your Photo: Open the image you wish to watermark in Photoshop.
- Place Your Transparent Watermark: Go to “File” > “Place Embedded…” and navigate to your saved PNG watermark file. Select it and click “Place.”
- Position and Scale: Photoshop will place the watermark on your image. Use the bounding box handles to resize it and drag it to your desired position. Remember to keep the focus on your “Beautiful Photography,” so the watermark should be noticeable but not distracting. Typical placements include corners or along an edge.
- Adjust Opacity (Optional): In the Layers panel, select your watermark layer. Reduce its “Opacity” (e.g., to 30-70%) to make it more subtle and blend seamlessly with your photo. This is a common practice for “Stock Photos” and general “Photography” to avoid detracting from the image’s primary subject.
- Final Save: Once you are happy with the placement and appearance, save your watermarked image. If you need to retain layers for future edits, save as a PSD. If the image is finalized for web or print, save it as a JPEG (if transparency is no longer needed for the overall image) or a PNG (if you plan to use this watermarked image as a transparent element itself in another composition).
Advanced Techniques: Layers, Masks, and Gradients for Enhanced Visuals
Beyond basic background removal, Photoshop’s robust layer system offers sophisticated tools to manipulate transparency, blend elements, and create stunning visual effects, aligning perfectly with “Visual Design” and “Image Tools” principles on Tophinhanhdep.com.
Beyond Basic Transparency: Opacity, Blending Modes, and Gradients
Layer Opacity: This is the most direct way to control the overall transparency of an entire layer. Adjusting a layer’s opacity in the Layers panel makes it more or less translucent, allowing underlying layers to show through. For example, you might reduce the opacity of an overlay texture or a “Sad/Emotional” filter to blend it subtly with a “Nature” background.
Blending Modes: Located next to the Opacity setting in the Layers panel, blending modes dictate how the pixels of one layer interact and combine with the pixels of the layers below it. This can create powerful transparent effects without altering a layer’s inherent opacity. For instance:
- Multiply darkens the underlying layers, making white areas transparent.
- Screen lightens, making black areas transparent.
- Overlay or Soft Light can create subtle transparent overlays, enhancing contrast and color without completely obscuring the background, perfect for “Aesthetic” visuals. Experimentation is key, as each mode yields a unique transparent interaction, influencing “Editing Styles” dramatically.
Transparent Gradients: Gradients that fade from color to transparency are incredibly useful for blending elements, creating soft edges, or adding subtle visual depth.
- Select the Gradient Tool (G): In the options bar, click the gradient thumbnail to open the Gradient Editor.
- Choose a “Foreground to Transparent” Preset: In the “Basics” set, select the second preset, which typically fades from your foreground color to transparency.
- Edit the Gradient (Optional): In the Gradient Editor, you can customize the colors and, crucially, the “Opacity Stops” (small sliders above the gradient bar). Drag an Opacity Stop to adjust its transparency. Add more Color Stops or Opacity Stops by clicking below or above the bar, respectively, to create complex transparent fades, ideal for sophisticated “Digital Art.”
- Apply the Gradient: On a new layer, click and drag with the Gradient Tool to apply your transparent gradient. You can then adjust the layer’s blending mode or opacity to integrate it further into your composition, enhancing “Photo Manipulation” effects or creating unique “Backgrounds.”
Non-Destructive Editing with Layer Masks and Clipping Masks
Professional “Visual Design” and “Photo Manipulation” heavily rely on non-destructive editing, which allows for changes without permanently altering original pixel data. Layer masks and clipping masks are central to this philosophy.
Layer Masks: Instead of erasing pixels to create transparency, a layer mask hides parts of a layer. It’s represented by a black-and-white thumbnail next to your layer icon.
- White reveals, black conceals: Painting with white on the mask makes the corresponding area of the layer visible; painting with black hides it, creating a transparent effect where the underlying layers show through. Shades of grey create semi-transparency.
- How to Create: Select your layer, then click the “Add Layer Mask” button (a rectangle with a circle inside) at the bottom of the Layers panel.
- Benefits: You can always refine your mask, bringing back hidden parts or adjusting transparency, making it invaluable for fine-tuning “Abstract” compositions or difficult subject cutouts. It’s far superior to the “Eraser Tool” for achieving complex transparencies.
Clipping Masks: A clipping mask allows the content of one layer (the clipping layer) to define the visibility of another layer (the clipped layer). Essentially, the clipped layer is only visible where the clipping layer has pixels.
- How to Apply: Hold down the Alt (Windows) or Option (Mac) key and click between two layers in the Layers panel. A small downward arrow will appear, indicating the top layer is clipped to the one below it.
- Benefits: Excellent for applying textures, patterns, or adjustment layers only to a specific shape or object, giving that object a transparent-like overlay without affecting the entire image. For instance, applying a transparent “Aesthetic” pattern to a specific text element.
Organizing and Optimizing Your Projects: Layer Groups and Merging
As your “Photo Manipulation” or “Graphic Design” projects grow, managing numerous layers can become cumbersome. Photoshop’s organizational tools help maintain a clean and efficient workflow, indirectly aiding in the management of transparent elements.
Layer Groups: Grouping related layers (e.g., all elements of a transparent logo, or all text layers) helps keep your Layers panel tidy.
- How to Create: Select multiple layers (Ctrl/Cmd + click), then right-click and choose “Group Layers,” or click the “Folder” icon at the bottom of the Layers panel to create an empty group and drag layers into it.
- Benefits: You can apply transformations (move, scale, rotate), opacity changes, or blending modes to an entire group at once, streamlining the process of adjusting complex transparent compositions. This also helps when preparing images for “Tophinhanhdep.com’s Image Tools” like “Compressors” by allowing you to work on logical segments.
Merging and Flattening Layers: When certain layers are finalized and you no longer need to edit them individually, merging them can reduce file size and complexity.
- Merging: Select the layers you want to combine, right-click, and choose “Merge Layers” (or Ctrl/Cmd + E). Be cautious, as this is a destructive action for the merged layers.
- Flattening: Right-click any layer and choose “Flatten Image.” This combines all visible layers into a single “Background” layer, drastically reducing file size. This is often the final step before exporting a finished JPEG, but remember it eliminates all transparency and individual layer editability.
- Note on Exporting: When saving as a PNG (for transparency) or JPEG (for no transparency) from a multi-layered PSD, Photoshop automatically flattens or merges layers as needed for that file format. You don’t always need to manually flatten beforehand. For “Tophinhanhdep.com’s Image Tools” like “AI Upscalers,” having a flattened, high-quality image can be beneficial for consistent processing.
Maximizing Your Creative Potential with Tophinhanhdep.com
Mastering the art of creating transparent images in Photoshop is a profound skill that directly enhances your ability to leverage and contribute to Tophinhanhdep.com’s vast resources. From the foundational elements of “Digital Photography” to the intricate details of “Graphic Design,” transparency is the invisible thread that binds together professional and aesthetically pleasing visual content.
From Inspiration to Impeccable Design: The Tophinhanhdep.com Advantage
Tophinhanhdep.com serves as both an inspiration hub and a practical toolkit for all your visual needs.
- Image Collections: Use transparent elements to customize “Wallpapers” to your desktop, blend abstract patterns into “Nature” photography, or create unique “Aesthetic” collages.
- Photography Resources: Protect your “High Resolution” and “Stock Photos” with custom transparent watermarks, asserting your brand for every click. Explore new “Editing Styles” knowing you can precisely cut out subjects for complex compositions.
- Image Tools Integration: Once you’ve perfected your transparent images in Photoshop, seamlessly transition to Tophinhanhdep.com’s “Image Tools” to “Compressors” them for web use, “Optimizers” them for performance, or even utilize “AI Upscalers” to enhance a transparent element’s resolution for larger projects.
- Visual Design Empowerment: Transparent images are fundamental to “Graphic Design,” “Digital Art,” and “Photo Manipulation,” enabling you to bring your most “Creative Ideas” to life without limitations. They are the building blocks for sophisticated “Mood Boards” and adapting to “Trending Styles.”
Continuing Your Journey in Digital Photography and Visual Art
The journey into digital image editing is continuous, filled with endless possibilities for learning and growth. The ability to make images transparent in Photoshop is a gateway to more advanced techniques and greater creative freedom. As you practice these methods, you’ll find yourself creating more polished logos, sophisticated photo manipulations, and versatile visual assets that stand out.
Tophinhanhdep.com is here to support every step of that journey, offering fresh “Photo Ideas,” diverse thematic collections, and a community of visual enthusiasts. Continue to experiment with Photoshop’s tools, explore new “Editing Styles,” and always remember that a clear vision, combined with technical skill, is the key to producing truly stunning images. Now that you can effortlessly create transparent images in Photoshop, the only limit is your imagination.