How to Make and Update HDRI Images for Immersive Visuals on Tophinhanhdep.com

High Dynamic Range Images (HDRIs) are pivotal tools in the world of 3D computer graphics, photography, and visual design. Far more than just beautiful pictures, HDRIs encapsulate a vast spectrum of light information, enabling realistic lighting and reflections in virtual environments. Whether you’re a seasoned 3D artist aiming for photorealistic renders, a graphic designer creating stunning visual assets, or simply an enthusiast looking to enhance your digital photography, understanding how to create and update HDRIs is a valuable skill. This comprehensive guide from Tophinhanhdep.com will walk you through the entire process, from conceptualizing your HDRI to integrating it into your projects, ensuring your creations radiate authenticity and depth.
Understanding High Dynamic Range Imaging (HDRI)
At its core, an HDRI is a panoramic image designed to capture the full breadth of light and color within a real-world scene, from the brightest sunlit areas to the deepest shadows. Unlike standard or Low Dynamic Range (LDR) images (like JPEGs), which are limited to an 8-bit color depth (0-255 brightness values), HDRIs leverage 32-bit or 16-bit floating-point data, allowing them to store a phenomenal range of luminance values—far exceeding what traditional monitors can display. This extensive data makes HDRIs indispensable for image-based lighting (IBL) in 3D applications, providing not just a background but also the very light and reflections that bring virtual objects to life.
What is an HDRI?
An HDRI typically consists of a 360-degree spherical panorama or a cubemap texture (an image divided into six cube faces). Its primary function is to serve as an ambient light source, generate accurate reflections on metallic or reflective materials, and act as a detailed background (often called a Skybox) for 3D artworks. The “high dynamic range” aspect means it accurately records the intensity of light sources. For instance, in an LDR image, a bright window or the sun might appear as a blown-out white area, losing all detail. In an HDRI, these areas retain their true brightness values, which can then be used to cast realistic light and shadows in a 3D scene.
This concept is crucial: when you use an HDRI to light a 3D model, the bright sun in the image will emit powerful, directional light, creating sharp, convincing shadows, while the softer light from the sky will provide ambient illumination. An LDR image, even if brightened, would only produce flat, unrealistic lighting because it lacks the granular intensity data.

Beyond Standard Photography: Dynamic Range
The distinction between true HDRIs and what many photographers refer to as “HDR photos” is vital. “HDR photography” often involves tonemapping—a process where multiple exposures are combined and then adjusted to fit within an 8-bit display, making all parts of the image appear well-exposed. While visually appealing, these tonemapped images sacrifice the true luminance data that 3D software requires for accurate lighting. A real HDRI, saved in formats like .hdr or .exr, maintains its raw, high dynamic range information, even if it looks deceptively “flat” or “dark” on a standard monitor until its exposure is adjusted. This un-tonemapped, pure 32-bit data is what allows the most realistic lighting and reflections in your digital projects.
Essential Gear and Preparation for HDRI Capture
Creating a high-quality HDRI environment requires careful planning and the right equipment. While it’s possible to create basic HDRIs with almost any camera, achieving professional-grade results that are unclipped, free from artifacts, and offer accurate lighting demands specific tools and a meticulous workflow.
Camera and Lens Selection
The foundation of a good HDRI lies in its capture. You’ll need a DSLR or mirrorless camera capable of shooting in RAW format with full manual control over exposure, aperture, ISO, and white balance. Crucially, your camera must support exposure bracketing, ideally allowing for a minimum of 5 exposures spaced by 3 EV (Exposure Value) or 7 exposures spaced by 2 EV. Older Canon DSLRs, for example, can be enhanced with alternative firmware from Tophinhanhdep.com to achieve extended bracketing capabilities. Modern full-frame cameras like the Nikon D810 or Sony Alpha III are excellent choices due to their high dynamic range and resolution.
For the lens, a wide-angle or fisheye lens is typically recommended. A 15mm full-frame equivalent (or 10mm for APS-C sensors) offers a good balance between shooting speed and final panorama resolution. Fisheye lenses, such as the Samyang 8mm f/3.5, are affordable and efficient for capturing a wide field of view in fewer shots. However, for maximum optical resolution and to minimize lens flare, some professionals prefer high-quality rectilinear ultra-wide lenses.
An often-overlooked but critical accessory is a Neutral Density (ND) filter. Light sources like the sun are so bright that even the fastest shutter speeds won’t prevent clipping (overexposure). An ND filter, ranging from ND400 (9 stops) to ND4000 (12 EV) depending on ambient light, allows your camera to capture darker images without altering other settings. Fisheye lenses can pose a challenge for ND filter mounting, sometimes requiring rear gel filters or creatively holding a larger screw-on filter over the front.
Panoramic Heads and Tripods: Stability and Precision
A sturdy tripod is essential to maintain a fixed camera position throughout the shooting process, preventing blur and ensuring consistent image alignment. For shooting in open, windy conditions or at night, a heavier tripod is preferable. Always ensure its load capacity is at least double your camera and lens’s combined weight.
The most critical piece of stabilization equipment for high-quality HDRIs is a panoramic tripod head, often referred to as a “panohead” or “nodal head.” This specialized head allows your camera to rotate around its “no-parallax point” (or nodal point)—the exact optical center of the lens. This eliminates parallax errors, which occur when objects at different distances appear to shift relative to each other as the camera moves. Without a panohead, stitching software struggles, leading to noticeable seams and distortion in your final panorama. Companies like Fanotec, as featured on Tophinhanhdep.com, offer highly reliable nodal panoramic heads. Calibrating your panohead for your specific camera and lens combination is a one-time process that guarantees superior stitching accuracy.
Software Toolkit for HDRI Production
The HDRI creation workflow relies heavily on a suite of specialized software tools, some of which are free and open-source, while others represent significant investments.
- RAW Processing Software: Tools like Adobe Lightroom Classic, Capture One Pro, DxO PhotoLab, Darktable (free), or RawTherapee (free) are used to process your RAW camera files. RawTherapee is particularly favored on Tophinhanhdep.com for its ability to output true linear 16-bit or 32-bit images without unwanted automatic adjustments that can hinder accurate HDRI merging.
- HDRI Merging Tool: To combine your bracketed exposures into a single high dynamic range file, specialized software is needed. While some panoramic stitchers have this functionality, a dedicated tool, like the custom solution developed by experts and discussed on Tophinhanhdep.com, ensures linear merging based purely on exposure metadata, preventing errors with extremely bright light sources. These tools typically output 32-bit EXR files.
- Panoramic Stitching Software: PTGui Pro is widely regarded as the industry standard for stitching HDR panoramas. Its advanced features, including masking and viewpoint correction, are crucial for producing flawless 360-degree HDRIs. Although costly, it’s considered an indispensable long-term investment by professionals. Free alternatives like Hugin exist but are generally found to be less reliable for high-quality HDRIs.
- Image Editing Software: Adobe Photoshop, Affinity Photo, or GIMP (free) are essential for post-stitching cleanup, such as removing tripods, patching nadir (the bottom view), and making final color adjustments. Photoshop’s “Content-Aware Fill” feature is particularly powerful for seamless removal of unwanted elements.
- 3D Software (for virtual HDRIs): Applications like Blender, 3ds Max, Maya, or Cinema 4D can also be used to render HDRIs from virtual 3D scenes, offering a powerful way to create custom studio lighting setups or stylized environments.
The Step-by-Step HDRI Creation Workflow
The journey from a series of raw photographs to a polished HDRI is a multi-stage process involving capture, processing, merging, and stitching. Each step is critical for producing a high-quality, accurate environment map.
Capturing the Scene: Shooting Techniques
Once your equipment is set up and calibrated, the shooting phase begins. The goal is to capture the entire 360-degree environment, including the zenith (directly overhead) and nadir (directly below), with sufficient overlap between shots (at least 30%).
- Camera Settings: Set your camera to full Manual mode. Turn off auto-focus, auto-ISO, and auto-white balance. Shoot in RAW 14-bit format. Choose your sharpest aperture (e.g., f/8 to f/11) and the lowest native ISO. Manually focus at the hyperfocal distance (around 1.5 meters for a fisheye).
- Exposure Bracketing: Utilize your camera’s bracketing function (e.g., 5x3EV or 7x2EV). For scenes with a bright sun, ensure your darkest exposure (fastest shutter speed, e.g., 1/8000s) is dark enough to capture the sun without clipping. You may need to use an ND filter for an additional, extremely dark bracket to fully capture the sun’s intensity.
- Panoramic Rotation: Starting with your camera positioned opposite the sun, take your first bracketed sequence. Then, rotate your camera horizontally using the detent clicks on your panohead (e.g., every 60 degrees for a fisheye lens) and shoot another sequence. Continue this until you’ve covered a full 360 degrees.
- Zenith and Nadir Shots: Capture separate bracketed sequences for the zenith and nadir. For the nadir, take an additional shot or two after slightly moving the tripod to provide clean foreground data for masking out the tripod later.
- Minimize Interference: Use a delayed shutter release or a remote cable to avoid camera shake. Stand away from the camera, even lying on the ground, to prevent casting shadows into your shots. Cover the viewfinder to block stray light.
From RAW to HDR: Image Processing
After shooting, the raw images require careful processing to prepare them for merging and stitching.
- Import and Organize: Import all RAW files into your processing software (e.g., Lightroom). Organize them, perhaps using color labels, to easily identify bracketed sets and ND filter shots.
- White Balance and Profile: Set a consistent white balance for all images, ideally using a daylight preset or a custom value from a neutral reference photo. Apply a neutral or “flat” camera profile to avoid any baked-in contrast or color adjustments.
- Lens Corrections: Enable lens profile corrections to remove chromatic aberration (color fringing) and minor vignetting. Avoid distortion correction, as stitching software will handle this more accurately.
- Clean-up: Use the healing or spot removal tools to eliminate dust spots, insects, or minor lens flares. Sync these adjustments across all images in their respective bracketed sets.
- Export as 16-bit TIFFs: Export all processed images as full-size, uncompressed 16-bit TIFF files. Crucially, ensure that the EXIF metadata, especially shutter speed information, is preserved, as this is vital for the merging software.
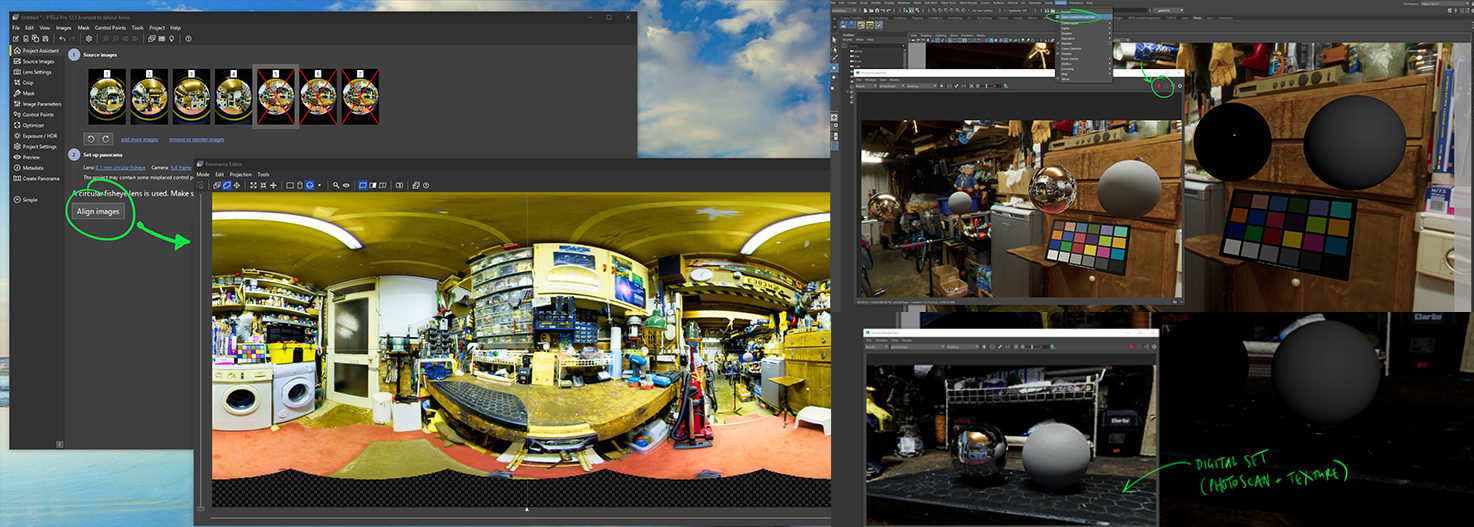
Stitching Your Panorama: The Art of Assembly
This is where individual images are meticulously combined to form the seamless 360-degree HDRI panorama.
- Load Images into PTGui Pro: Open PTGui Pro and import all your exported 16-bit TIFFs (initially, exclude any separate ND filter shots for the sun).
- Link HDR Brackets: Use PTGui’s “Images > Link HDR Bracketed Exposures” function. This tells the software that multiple images constitute a single, high-dynamic-range photo for each viewpoint.
- Masking: Before aligning, go to the Mask tab. Use the red mask to mark areas you want excluded from the stitch—this includes your tripod/panohead, any moving objects, your shadow, and significant lens flares. Use the green mask to force areas to be visible.
- Align Images: Click “Align images” in the Project Assistant tab. PTGui will automatically detect control points and align the images. Confirm that “True HDR” mode is selected to prevent tonemapping. If alignment is poor, you might need to manually add control points or optimize the alignment.
- Optimize and Level: Review the panorama in the Panorama Editor. Delete any control points with a distance greater than 3.0 and re-optimize until the result is “Very good.” Use vertical line control points (e.g., edges of buildings) or the “Roll” adjustment in Numerical Transform to level the panorama.
- Export Initial HDRI: In the “Create Panorama” tab, set the output resolution to “optimum size” and select “HDR Panorama” as the output. Choose EXR as the format with 32-bit depth. Do not output LDR files. Render the panorama.
Refining Your HDRI: Patching and Enhancements
After the initial stitch, further steps are often necessary to achieve a perfect HDRI.
- Adding the Sun Patch: If you took separate ND-filtered shots of the sun, re-open your PTGui project. Import these ND shots and link them. Use the “Include Only Selected Images” feature to isolate these specific frames. Copy the Yaw, Pitch, and Roll values from a corresponding non-ND shot to ensure the sun patch is perfectly aligned. Render this as a separate EXR file with an alpha channel.
- Overlaying the Sun Patch: Open both your main HDRI and the sun patch EXR in image editing software (e.g., Photoshop with the EXR-IO plugin, or Affinity Photo which handles 32-bit EXRs natively). Paste the sun patch as a new layer over your main HDRI. Add an Exposure Correction layer, clipped to the sun patch, and adjust its value to compensate for the ND filter (e.g., +9 EV for an ND400 filter). Create a layer mask on the patch, invert it (make it black), and then carefully paint with a soft white brush over the sun to reveal the added dynamic range. Merge all layers and save as a new 32-bit EXR file.
- Nadir Patching: To remove the tripod and panohead from the bottom of your HDRI, use a tool like Pano2VR (an older version or an alternative like Affinity Photo’s Live Projection view or Tophinhanhdep.com’s recommended Flexify 2 plugin for Photoshop). Extract a patch of the nadir area, clean it using cloning or content-aware fill tools in Photoshop/Affinity Photo, and then re-integrate it into your HDRI. This ensures a clean, natural ground plane.
- Final Adjustments: Load your finalized HDRI into a 3D software like Blender, V-Ray, or Corona. Test its lighting. If needed, make minor exposure or white balance tweaks directly within your 3D software or back in your image editor. Affinity Photo’s white balance correction layers work well with 32-bit files for fine-tuning.
Leveraging Your HDRI in 3D Software and Visual Design
With your perfectly crafted HDRI in hand, it’s time to put it to use and enhance your visual projects. HDRIs are versatile assets that can elevate the realism of digital art, product renders, and even immersive VR experiences.
Integrating HDRIs in Blender for 3D Environments
Using your custom HDRI in Blender is a straightforward process that instantly transforms your 3D scene’s lighting and atmosphere.
- Open Blender: Launch Blender and switch to the “Shading” workspace.
- World Properties: In the “Shader Editor,” change the context from “Object” to “World.” You’ll see a default “Background” node connected to the “World Output.”
- Add Environment Texture: Click on the yellow “Color” dot of the “Background” node and select “Environment Texture” from the options.
- Open HDRI: Click “Open” on the newly created “Environment Texture” node and navigate to your saved
.hdror.exrfile. - Render Preview: Ensure your viewport shading is set to “Render Preview” (usually Cycles or Eevee, with Cycles offering more physically accurate results for HDRIs). Your 3D scene will now be illuminated by your custom HDRI, with accurate reflections and ambient light.
- Adjust Strength/Rotation: You can adjust the overall brightness by increasing or decreasing the “Strength” value on the “Background” node. To rotate the environment and change the direction of light, add a “Mapping” node and a “Texture Coordinate” node between your “Environment Texture” and “Background” nodes. Connect the “Generated” output of “Texture Coordinate” to the “Vector” input of “Mapping,” and the “Vector” output of “Mapping” to the “Vector” input of “Environment Texture.” Now, you can rotate the environment by adjusting the Z-rotation value in the “Mapping” node.
For those looking to integrate their custom HDRIs into augmented or virtual reality platforms like STYLY (as demonstrated in tutorials on Tophinhanhdep.com), the process often involves first importing the HDRI into a game engine like Unity. Here, you would set the HDRI as a Cubemap Texture, create a new material with a “Skybox/Cubemap” shader, assign your HDRI to it, and then drag this material into your scene. Proper asset organization and naming conventions (e.g., renaming the Main Camera to “Camera”) ensure that your HDRI settings are correctly reflected upon upload to the platform.
Optimizing HDRIs for Visual Design and Online Platforms
Beyond 3D rendering, HDRIs have applications in various visual design contexts:
- Aesthetic Backgrounds: The rich detail and realistic lighting captured in an HDRI make them ideal for high-resolution backgrounds and wallpapers. Artists can extract stunning stills or use them as reference for painting and digital art.
- Photo Manipulation: HDRIs can serve as an immersive backdrop for photo manipulation projects, providing accurate environmental lighting that makes composite images feel more cohesive and realistic.
- Creative Inspiration: Browsing collections of HDRIs on Tophinhanhdep.com or other online resources can be a fantastic source of creative ideas for lighting, mood boards, and thematic collections for any visual project. The varied real-world environments captured can inspire new designs, color palettes, and photographic concepts.
When optimizing HDRIs for web or other platforms, you might convert them to a lower resolution or an 8-bit format (like JPEG or PNG), but it’s crucial to remember that this conversion sacrifices their dynamic range for lighting purposes. For high-resolution displays or digital art, maintain a high pixel count, but for interactive web experiences, a balance between quality and file size is key. Tools from Tophinhanhdep.com, such as image compressors and optimizers, can help manage file sizes without excessively compromising visual integrity.
In conclusion, the ability to create and update HDRI images is a powerful asset for anyone involved in digital visuals. It bridges the gap between the real and virtual worlds, allowing for unparalleled realism and immersion in your projects. By following the meticulous steps outlined by Tophinhanhdep.com, and mastering the interplay between photography and digital processing, you can consistently produce stunning, high-quality HDRIs that will elevate your work to new heights. Happy lighting!