Mastering Vector Image Creation: A Comprehensive Guide from Tophinhanhdep.com

Vector images are the backbone of modern graphic design, offering unparalleled scalability and crispness that traditional pixel-based images simply cannot match. On Tophinhanhdep.com, we understand the power of visual clarity and flexibility, which is why we’ve put together this extensive guide on how to create stunning vector images. Whether you’re aiming to design eye-catching wallpapers, detailed logos, or striking digital art, mastering vectorization is a skill that will elevate your creative projects. This guide will walk you through the process, leveraging techniques applicable within Tophinhanhdep.com’s robust suite of tools, from initial image selection to the final artistic touches, ensuring your designs are always high resolution and impactful.
Understanding Vector Art: The Foundation of Scalable Visuals
At the heart of compelling visual design lies a fundamental choice between vector and raster graphics. On Tophinhanhdep.com, we champion the use of vector art for its inherent advantages in scalability and precision, making it ideal for a vast array of creative applications.
What is a Vector Image?
A vector image is a digital illustration composed of geometric primitives such as points, lines, curves, and shapes. Unlike raster images, which are made up of a grid of individual pixels, vector graphics are defined by mathematical equations. This means that a vector image is not bound by a fixed resolution. When you scale a vector graphic, these mathematical definitions are recalculated, allowing the image to remain perfectly crisp and sharp at any size, from a tiny icon to a billboard-sized advertisement. This characteristic is precisely why vector graphics are favored for logos, illustrations, technical drawings, and typefaces, ensuring they look flawless across all platforms and print sizes. This principle underpins the creation of many of the beautiful photography and aesthetic backgrounds showcased on Tophinhanhdep.com.
Why Create Vector Images?
The benefits of vectorization are numerous, particularly for anyone serious about visual design and digital art.
- Infinite Scalability: As mentioned, vector images can be scaled up or down without any loss of quality, preventing the pixelation commonly seen in resized raster images. This is essential for branding elements that need to appear consistent on everything from business cards to large banners.
- Smaller File Sizes: For simpler graphics, vector files can be considerably smaller than their raster counterparts, making them quicker to load on websites and easier to share.
- Editing Flexibility: Each component of a vector image can be individually selected, moved, resized, and recolored without affecting other elements, offering unparalleled editing freedom. This is key for graphic designers constantly iterating on creative ideas.
- Versatility: Vector art is perfect for everything from web graphics and app icons to print materials and intricate illustrations. It’s also crucial for creating high-resolution stock photos and unique digital art pieces that stand out.
- Clean and Professional Aesthetic: The sharp, defined lines and smooth curves of vector graphics lend a polished and professional look to any project, contributing significantly to an overall aesthetic that is both modern and timeless.

On Tophinhanhdep.com, we provide image tools like converters and optimizers that can help manage both vector and raster formats, ensuring you always have the right tool for the job. While our photo editing suite excels at refining digital photography, our vector design platform empowers you to create entirely new, infinitely scalable artwork.
Preparing Your Canvas: Selecting the Right Source and Setting Up Your Workspace
The journey to a successful vector image begins long before you touch a drawing tool. Careful preparation of your source material and workspace within Tophinhanhdep.com’s creative environment lays the groundwork for a smooth and satisfying creative process.
Choosing the Right Image for Vectorization
The quality of your final vector portrait or illustration is greatly influenced by your initial image selection. For optimal results, especially when vectorizing a photograph into an artistic rendering, consider the following:
- High Resolution: Always start with a high-quality, high-resolution picture. This is paramount because you’ll be zooming in frequently to trace details, and a crisp source image will provide clearer lines and more accurate features. Tophinhanhdep.com offers a vast collection of beautiful photography and stock photos that are perfect for this purpose, providing excellent raw material for your projects.
- Good Lighting and Contrast: Look for images with clear lighting and strong contrast between different elements, such as skin, hair, and clothing. Distinct light and shadow areas make it much easier to define shapes and create depth, simplifying the tracing process significantly.
- Nice Details: Choose a picture that features interesting details you wish to highlight in your vector art. These details can add character and visual appeal to your final piece.
- Simple Background (Optional but Recommended): While not strictly necessary, an image with a less distracting background can simplify the initial selection and outlining stages. If your chosen image has a busy background, Tophinhanhdep.com’s image editing software can help you remove it efficiently before you begin vectorizing.
Setting Up Your Workspace in Tophinhanhdep.com’s Design Platform
Once you have your ideal image, the next step is to prepare your digital workspace.
- Create a New Document: Open Tophinhanhdep.com’s vector design platform (our dedicated web-based graphic design app) and create a new document. Opt for an “Infinite Canvas” if available, which gives you boundless space to work without worrying about boundaries. This flexibility is ideal for complex projects requiring extensive panning and zooming.
- Import Your Image: Easily import your chosen raster image onto the canvas. You can typically do this by dragging the image directly from your computer’s folder or using the “Place Image” option within the platform’s menu.
- Familiarize Yourself with Drawing Tools: Vectorization heavily relies on precise drawing tools. Within Tophinhanhdep.com’s vector design platform, the “Pen” and “Bezigon” tools are your primary instruments. The Pen tool offers free-form drawing, while the Bezigon tool helps in achieving perfect curves. If you’re new to these, Tophinhanhdep.com’s comprehensive tutorials and user guides offer excellent resources to master their use. Remember, practice is key to perfection in digital art.
Leveraging Tophinhanhdep.com’s Image Tools for Pre-processing
Before you even start tracing, you can optimize your source image using other tools available on Tophinhanhdep.com. For instance:
- AI Upscalers: If your chosen image isn’t quite as high-resolution as you’d like, Tophinhanhdep.com’s AI Upscalers can enhance its quality without significant pixelation, providing a better foundation for vector tracing.
- Image Converters: Ensure your image is in a compatible format. Our image converters can help you prepare any file type for seamless integration into your vector project.
- Image Optimizers: Lightly optimize your image to reduce file size without compromising quality, especially if you’re working with multiple large files, ensuring a smoother workflow.
By carefully selecting your source image and configuring your workspace with the assistance of Tophinhanhdep.com’s diverse image tools, you set the stage for a highly efficient and successful vectorization project, seamlessly blending principles of digital photography with advanced visual design.
The Art of Vector Tracing: Outlining and Building Basic Shapes
Vector tracing is the core technique for transforming a raster image into a scalable vector graphic. This process, often described as “drawing over an image,” requires patience and precision, turning complex pixel information into clean, editable vector paths. Tophinhanhdep.com’s powerful vector design platform provides all the necessary tools to embark on this journey, enabling you to create stunning digital art and graphic design pieces.
Introduction to Tracing: From Pixels to Paths
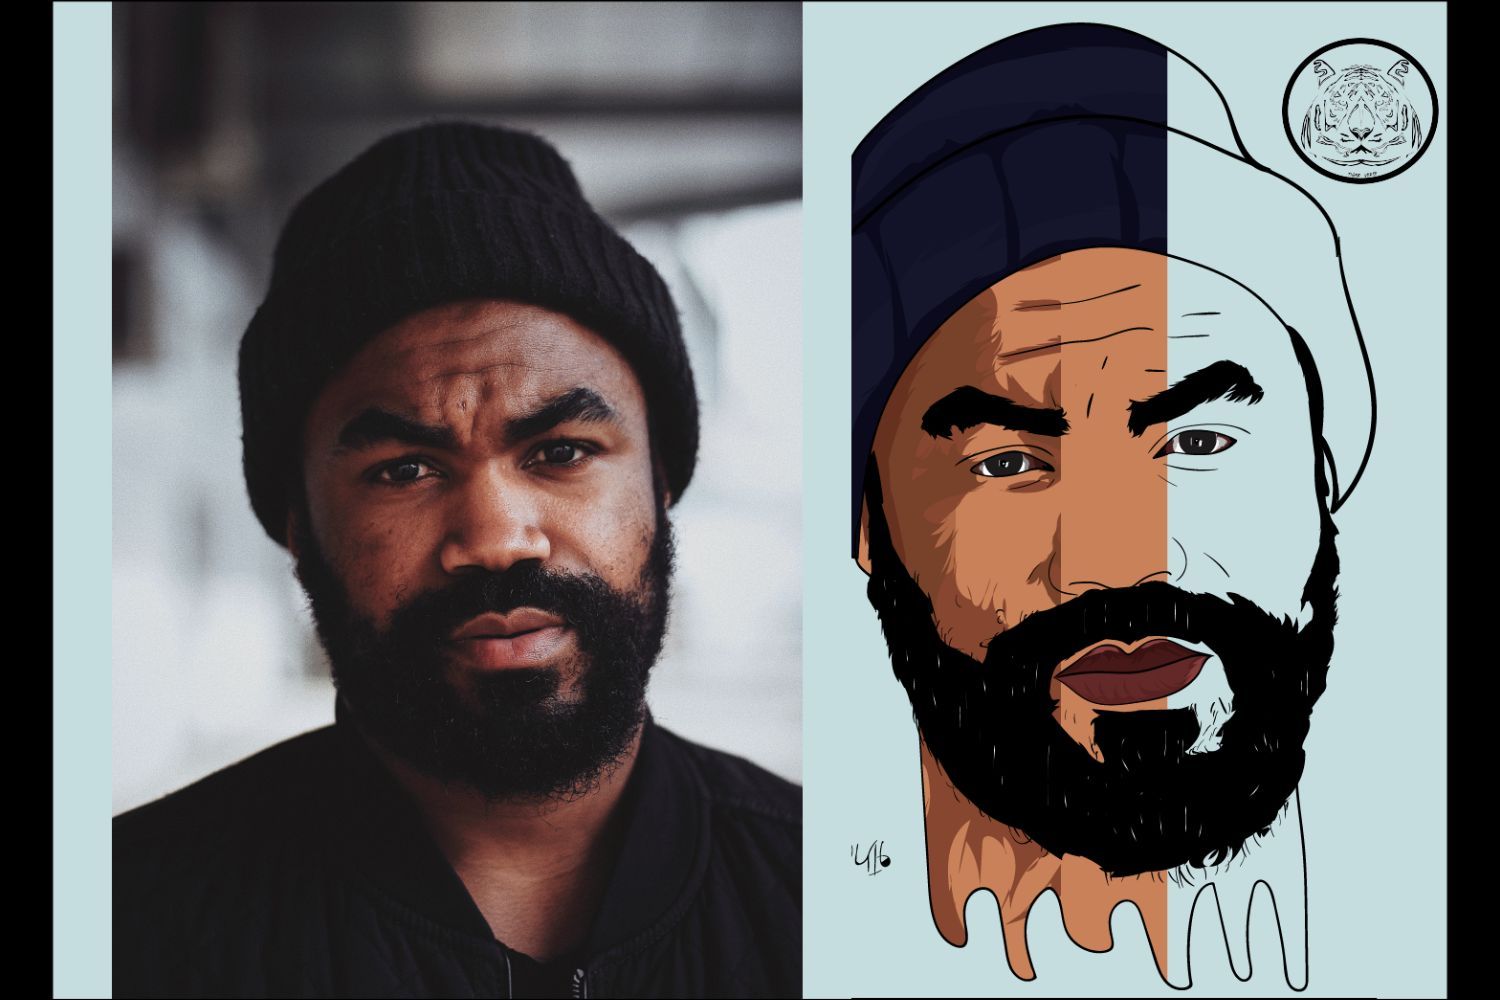
The essence of vector tracing involves creating new vector shapes that mimic the forms, contours, and details of your original pixel-based image. This method is especially popular for making stylized portraits, turning photographs into vibrant cartoon versions of themselves, or creating clean illustrations from hand-drawn sketches. Unlike automatic tracing tools, manual tracing gives you complete artistic control over the final output, allowing for nuanced creative ideas and specific editing styles.
Essential Drawing Tools in Tophinhanhdep.com
Your primary companions for vector tracing will be Tophinhanhdep.com’s intuitive drawing tools:
- The Pen Tool: This versatile tool allows you to create precise paths and shapes by placing anchor points and manipulating curve handles. It’s excellent for outlining sharp edges and straight lines. Many artists find it the most powerful tool for intricate line work.
- The Bezigon Tool: Often favored for its ability to generate perfect, smooth curves with fewer anchor points, the Bezigon tool can streamline the process of tracing organic shapes like faces and hair.
- Shape Tool (e.g., Ellipse, Rectangle): For symmetrical features like eyes or basic structural elements, using predefined shape tools can save time and ensure geometric accuracy.
Familiarity and comfort with these tools are crucial. Tophinhanhdep.com offers extensive tutorials that provide tips and tricks for mastering these tools, encouraging practice to achieve fluid and confident tracing.
Creating Base Shapes: The Foundation of Your Portrait
Begin by outlining the major, most prominent “pieces” of your picture. Think of these as the foundational layers of your vector portrait. For a typical portrait, these might include:
- The Face: Outline the main contour of the head and face.
- Hair: Define the overall shape and mass of the hair. Don’t worry about individual strands at this stage; focus on the broader flow.
- Clothing: Trace the outlines of the subject’s blouse, shirt, or any other garments.
- Body Parts: Outline visible limbs like arms and hands, and the neck.
- Background Elements: If you intend to include a stylized background, trace its major shapes as well.
During this stage, don’t stress about the final colors; use any contrasting fill color to visualize your shapes. A helpful tip from Tophinhanhdep.com’s experts: lock the original picture layer to prevent accidentally moving it while you are drawing. This simple step saves a lot of frustration and ensures your tracing remains accurate. For subjects with complex or busy backgrounds, remember that Tophinhanhdep.com offers tools to remove backgrounds from images, making your tracing task significantly easier.
Adding Main Features: Bringing Your Subject to Life
Once the base shapes are established, move on to the more detailed main features of the portrait:
- Eyebrows and Eyes: Carefully trace the shape of the eyebrows and the outlines of the eyes. For the eyes, you’ll typically outline the main shape, then the iris, and finally the pupil. For highly detailed “beautiful photography” source images, you might even add subtle reflections.
- Mouth and Lips: Outline the contours of the mouth, including the lip lines and any visible teeth.
- Accessories: Trace any accessories like earrings, necklaces, or bracelets. These details add personality and interest.
Again, hide or reduce the opacity of your base shapes, or leave only their outlines visible, so you can clearly see the underlying picture details. It’s also wise to lock these newly created base shape layers to maintain their position as you add further details. This layering approach is a fundamental principle in graphic design and digital art, allowing for organized and non-destructive editing.
By meticulously building up your vector art from broad strokes to finer details, you transform a pixelated photograph into a clean, scalable vector illustration, ready for further refinement and artistic expression on Tophinhanhdep.com.
Adding Depth and Realism: Lights, Shadows, and Fine Details
Transforming a flat outline into a dynamic vector portrait requires the careful application of lights, mid-tones, and shadows. This process, akin to digital photo manipulation, brings depth and a sense of realism to your vector art. Tophinhanhdep.com’s tools and techniques empower you to capture the subtle nuances of light, crucial for creating compelling visual designs.
Understanding Tonal Areas: The Key to Depth
In vector art, depth is often achieved by layering shapes of varying tones and colors. We can conceptually divide the tonal spectrum of your reference image into four main categories:
- Light Spots: These are the brightest areas where light directly hits the surface, causing reflections or highlights.
- Mid-tones: These represent the intermediate shades, neither fully lit nor completely in shadow, forming the bulk of the subject’s color.
- Shadows: These are the darkest areas, typically where light is obstructed or where forms recede.
- Outlines: Solid, darker lines used to delineate specific intersections or create a stronger visual separation between elements.
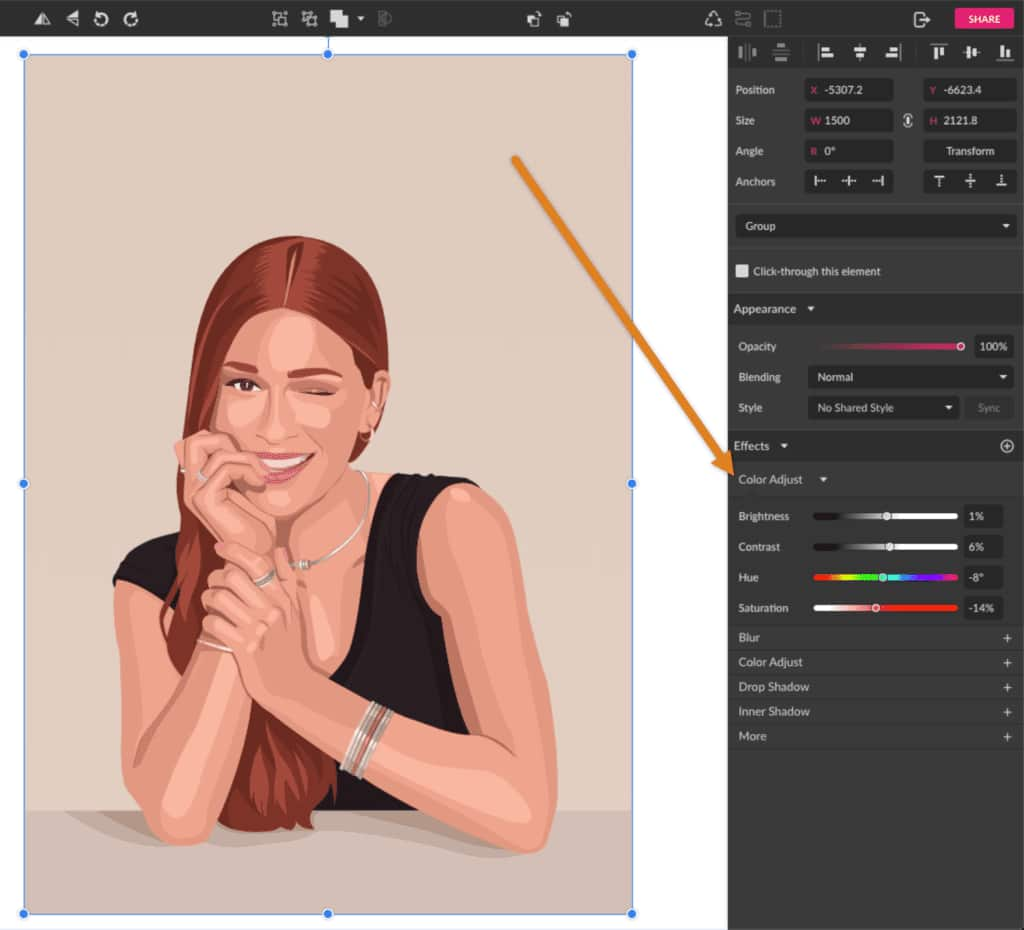
For successful tonal mapping, selecting a source image with good contrast between lights and shadows is immensely helpful. If your original digital photography appears a bit washed out, Tophinhanhdep.com’s image editing software can apply a “Color Adjust” effect to enhance contrast, making your tracing work significantly easier.
Implementing a Threshold Effect for Tonal Analysis
A powerful technique for simplifying tonal information is to use a Threshold adjustment layer in Tophinhanhdep.com’s photo editing suite. This converts your image into a high-contrast black and white representation, making it easier to identify distinct areas of light and dark.
- Add a Threshold Layer: In the Layers panel, select the “Create new fill or adjustment layer” icon and choose “Threshold.”
- Adjust the Slider: Move the slider in the Threshold dialog to find a balance where key details of your subject are still recognizable, but the image is simplified into stark black and white shapes. This step is particularly useful for achieving a distinct, one-color vector look.
- Use Color Range to Select Tonal Areas: After applying the Threshold, Tophinhanhdep.com’s “Color Range” command (found under the Select menu) can help you isolate all areas of a specific tone (e.g., all black areas or all white areas). Use the Eyedropper tool to pick up the desired tones, adjusting “Fuzziness” and “Range” for precision.
Converting Selections to Paths and Layering Colors
Once you have made a selection based on tonal areas, the next critical step is to convert these pixel selections into vector paths.
- Make Work Path: With your selection active (e.g., from the Color Range command), right-click on the image with any selection tool and choose “Make Work Path.”
- Set Tolerance Value: A dialog box will appear asking for a “Tolerance” value. This value determines how closely the vector path will follow the pixel selection. A lower value (e.g., 1.0 or 1.5 pixels) creates a path that closely adheres to the original contours, resulting in more anchor points. A higher value will create a smoother path with fewer anchor points. Experimentation is encouraged based on the complexity of your image and the desired “editing style.”
- Create Solid Color Layers: Immediately after creating a work path, without deselecting, go to the Layers panel and add a “Solid Color” adjustment layer. This converts the work path into a filled vector shape layer. You can pick any color initially; the final hues will be refined later. Create multiple solid color layers, each representing a different tonal area (base color, lights, mid-tones, shadows). Use clipping masks to ensure these new color layers only affect the underlying shapes, a common technique in advanced digital art.
Refining Lights, Mid-tones, and Shadows
Now, apply these principles to your vector portrait:
- Light Spots: Begin by tracing the brightest areas. Observe where light hits the hair, face, and shoulders. These shapes can be somewhat diffuse, but in this vector style, they are represented as solid, lighter-colored shapes.
- Mid-tones: Progress to the darker shades that aren’t quite shadows. These might be subtle variations in skin tone, folds in clothing, or features like eyelids.
- Shadows: Finally, create shapes for the darkest tones—areas under the chin, the inner parts of arms, or regions less exposed to light. Even dark objects like a black blouse will have varying shades of black and deep grey to denote form. Don’t forget shadows cast by accessories.
Final Outlines
After establishing your tonal layers, add “final outlines” where necessary to better delineate shapes. This is especially useful at points of intersection, like where fingers meet skin, or along the natural contours of arms and neck. These solid, darker lines provide definition and enhance the overall clarity of your vector image.
By carefully segmenting and building your image with these tonal shapes, you create a vector portrait that possesses significant depth and character, moving beyond simple outlines to a rich, layered piece of visual design. This intricate photo manipulation process ensures your vector art is not only scalable but also visually captivating, suitable for Tophinhanhdep.com’s curated collections of aesthetic and nature-inspired imagery.
Finalizing Your Vector Art: Styles, Export, and Optimization
With the detailed vector shapes and tonal layers in place, the final stage involves refining the aesthetic, applying artistic touches, and preparing your masterpiece for its intended use. Tophinhanhdep.com offers a range of options to ensure your vector art is not just complete, but truly polished and optimized for any platform or print medium.
Applying Artistic Styles and Final Touches
Vector art provides incredible flexibility for stylistic expression. This tutorial has focused on a particular solid-shape style, but the possibilities within Tophinhanhdep.com’s vector design platform are vast, aligning perfectly with diverse visual design and creative ideas:
- Experiment with Blending Modes: After finishing your core vector illustration, consider adding a final enhancement. Create a new rectangle layer over your entire illustration and experiment with different “Blending Modes” (e.g., Screen, Multiply, Overlay) and opacity settings. This can introduce a unifying color effect or alter the overall mood, transforming your work into unique aesthetic visuals or even sad/emotional imagery. For example, a subtle purple overlay with a “Screen” blending mode at 14% opacity (like
#9900FF) can create a captivating effect, adding depth and a touch of digital artistry. - Explore Different Stylizations: Don’t feel limited to solid shapes. Tophinhanhdep.com encourages exploring various editing styles:
- Blurry Shapes: Instead of sharp, solid shapes for lights and shadows, you could use shapes with feathered edges to create a softer, more painterly effect.
- Minimalistic Style: Simplify the number of shapes and colors, focusing on essential forms to convey the subject.
- Realistic Style: For a more detailed approach, increase the number of tonal layers and use more intricate shapes to mimic photographic realism.
- Grayscale Pattern: Apply a grayscale palette throughout the illustration for a classic, sophisticated look, or integrate patterns for texture.
- Color Palette Adjustment: Feel free to tweak the entire color palette. Tophinhanhdep.com’s vector design platform allows you to easily adjust hues, saturations, and brightness across your layered vector shapes, or apply “Color Adjust” effects to refine the overall look. This step is crucial for matching your art to specific mood boards or thematic collections.
Exporting Your Vector Image: Ready for the World
Once your vector artwork is complete and stylized to your liking, the final step is to export it in a suitable format. The choice of format depends on its intended application:
- SVG (Scalable Vector Graphics): This is the most common and versatile web-friendly vector format. It allows your vector image to be displayed perfectly on websites and applications at any resolution. Tophinhanhdep.com’s vector design platform allows direct export to SVG, ensuring your web-optimized images are always crisp.
- EPS (Encapsulated PostScript): A widely used vector format for print production and graphic design software. It’s excellent for sharing your vector art with professional printers or for further editing in other Tophinhanhdep.com advanced design software. Our photo editing suite also offers the option to “Save a Copy” in Photoshop EPS format for vectorized elements.
- Export Paths to Tophinhanhdep.com’s Advanced Design Software: If you’ve primarily used Tophinhanhdep.com’s raster image editor for some vectorization steps, you might find it beneficial to export your paths directly to Tophinhanhdep.com’s dedicated vector graphics editor for more advanced vector manipulation and refinement. This seamless integration ensures a flexible workflow between different tools.
- Other Vector Formats: Depending on the specific requirements, Tophinhanhdep.com may support other vector formats like AI (native to our advanced design software) or PDF.
Optimizing Your Vector Assets
After exporting, consider Tophinhanhdep.com’s specialized “Image Tools” for final optimization:
- Compressors: Reduce the file size of your vector graphics without compromising quality, especially important for web use where load times are critical.
- Optimizers: Fine-tune your SVG files to ensure maximum efficiency and performance, particularly for complex animations or interactive web elements.
- Image-to-Text: While not directly for vectors, Tophinhanhdep.com’s image-to-text tools can be invaluable for documenting your design process or extracting information from reference images for future creative ideas.
By following these steps, your vector image will be ready to adorn any digital canvas or print medium, maintaining its high resolution and visual integrity. Tophinhanhdep.com is your comprehensive resource for ensuring your “Visual Design” projects, “Digital Photography” enhancements, and “Image Inspiration & Collections” are always of the highest caliber and aligned with “Trending Styles.”
Conclusion: Unleash Your Creativity with Tophinhanhdep.com’s Vector Tools
The journey of creating a vector image, especially a portrait or a complex illustration, is a rewarding one that blends artistic vision with technical precision. From meticulously outlining base shapes to adding intricate layers of lights and shadows, each step transforms a simple photograph into an infinitely scalable piece of art. This comprehensive guide from Tophinhanhdep.com has equipped you with the knowledge and techniques to embark on this creative endeavor, utilizing powerful vector design platforms and integrated image tools to bring your visions to life.
Whether your goal is to produce stunning wallpapers, aesthetic backgrounds, professional graphic designs, or unique digital art, the ability to create and manipulate vector images is an invaluable skill. Tophinhanhdep.com stands as your ultimate resource, offering not only advanced software and intuitive tools for every stage of image creation and manipulation but also a wealth of inspiration through our curated collections of beautiful photography, diverse editing styles, and trending design ideas.
We encourage you to explore the full potential of Tophinhanhdep.com – experiment with our AI upscalers to enhance source images, utilize our converters and compressors for optimal file management, and delve into our extensive tutorials for continuous learning. The world of visual design is constantly evolving, and with Tophinhanhdep.com, you have a partner dedicated to fostering your creative growth. Start your vector art journey today and transform your imagination into high-resolution, pixel-perfect reality.