Mastering Photoshop Layer Masks: Precisely Masking Images Around Layers for Stunning Visuals

In the vast landscape of digital photography, visual design, and photo manipulation, Adobe Photoshop stands as an indispensable tool. Whether you’re crafting high-resolution backgrounds, designing abstract art, or finessing beautiful photography, the ability to precisely control the visibility of different parts of an image is paramount. Among Photoshop’s myriad features, Layer Masks emerge as one of the most fundamental yet powerful, offering unparalleled flexibility and non-destructive editing capabilities. At Tophinhanhdep.com, we emphasize tools that empower your creative ideas, and layer masks are central to achieving sophisticated visual effects, from seamless blends in aesthetic backgrounds to intricate cutouts for thematic collections. This comprehensive guide will delve into the essence of layer masks, from basic understanding to advanced tips and tricks, ensuring you can expertly mask out images around a layer in Photoshop.

Understanding the Core Concept of Layer Masks
Before diving into the practical application, it’s crucial to grasp what a layer mask is and why it’s superior to other transparency controls in Photoshop. Think of a layer mask as an adjustable stencil applied to a layer. Instead of permanently deleting pixels, it merely hides or reveals parts of the layer, offering complete reversibility—a cornerstone of professional, non-destructive editing. This approach is invaluable for photographers and digital artists who frequently experiment with editing styles and seek creative freedom without the fear of irreversible mistakes.
What Exactly is a Layer Mask?
At its simplest, a layer mask is an attached grayscale image that controls the transparency of its corresponding layer. Unlike the Opacity slider, which applies a uniform transparency to an entire layer, a layer mask allows for localized and varied transparency. This means you can have areas of a layer that are completely visible, completely hidden, or partially transparent, all within the same layer. This granular control is essential for complex photo manipulation and compositing, enabling smooth transitions between elements and layers, which is often seen in stunning wallpapers and backgrounds on Tophinhanhdep.com.
Consider a common scenario: blending two images. If you simply lower the Opacity of the top layer, the entire image becomes uniformly faded, often resulting in a muddy, indistinct effect. This might be suitable for a subtle overlay, but it fails when you need to selectively reveal or conceal specific portions to create a coherent scene. Similarly, while the Eraser Tool can selectively remove parts of an image, it does so destructively. Once pixels are erased, they are gone forever, making future adjustments or corrections difficult, if not impossible. This is where layer masks shine, providing a safety net for all your creative ideas and digital art projects.
The Grayscale Language: Black, White, and Gray
The operational logic of a layer mask is elegantly simple, relying solely on shades of grayscale:
- White reveals: Any area on the layer mask that is pure white will make the corresponding part of the layer 100% visible in your document.
- Black conceals: Conversely, any area on the layer mask that is pure black will make the corresponding part of the layer 100% transparent, effectively hiding it.
- Grays partially reveal/conceal: Shades of gray between black and white create varying degrees of partial transparency. Lighter grays result in more visibility, while darker grays lead to greater transparency. For example, 50% gray makes the layer 50% transparent.
This black, white, and gray system allows for incredibly subtle and complex blending effects. When you’re aiming for a soft, gradual transition, such as fading a nature background into a portrait, you’ll use gradients of gray on your mask. This principle forms the bedrock of non-destructive visual design in Photoshop and is a crucial skill for any digital artist or photographer aiming for high-quality results.
Setting Up for Success: Basic Masking Operations
To truly understand layer masks, a hands-on approach is best. Let’s walk through the initial steps of preparing your document and adding your first layer mask, comparing it to less effective alternatives to underscore its advantages. This foundation is key for creating captivating image collections and photo ideas featured on Tophinhanhdep.com.
Preparing Your Images for Masking
For most masking tasks, you’ll be working with at least two images in the same document. Let’s assume you want to blend two distinct photos—say, a lively cat photo over a calm dog photo.
- Load Images into Photoshop: Begin by loading both images into a single Photoshop document, each on its own layer. A convenient way to do this is to go to
File > Scripts > Load Files into Stack. In the dialog box, ensureUseis set toFiles, then clickBrowseto select your images. ClickOKto load them. Photoshop will place each image on a new layer. - Rename Layers (Optional but Recommended): For better organization, especially in complex projects, rename your layers. Double-click a layer’s name in the Layers panel (e.g., “Cat” for the top layer, “Dog” for the bottom layer) and press Enter/Return.
- Reposition Images: Select the
Move Tool(V) from the Toolbar. Click on the top layer (“Cat” layer) to select it, then click and drag the image within your document to reposition it. Holding downShiftwhile dragging will constrain movement to a straight line (horizontal or vertical), which is often useful. Repeat this for the bottom layer, temporarily turning off the visibility of the top layer by clicking itseye iconin the Layers panel to see the bottom image clearly.
Once your images are positioned, you’re ready to explore the power of layer masks for blending and compositing.
Adding a Layer Mask: The Initial Step
With your layers set up, adding a layer mask is straightforward:
- Select the Target Layer: In the Layers panel, click on the layer you wish to mask (e.g., the “Cat” layer). This is the layer whose visibility you want to control.
- Click the Add Layer Mask Icon: At the bottom of the Layers panel, locate and click the
Add Layer Maskicon (a rectangle with a circle inside).
Upon clicking, you’ll notice a new white thumbnail appear next to your layer’s preview thumbnail in the Layers panel. This white mask signifies that, by default, the entire content of the layer is 100% visible. No changes will appear in your document yet because white reveals everything. If you wish to start with a mask that hides the entire layer (a black mask), simply hold down Alt (Win) / Option (Mac) while clicking the Add Layer Mask icon.
Comparing Masks to Destructive Methods
To truly appreciate layer masks, it’s beneficial to understand why they are preferred over seemingly simpler alternatives like the Opacity option or the Eraser Tool, especially for visual design and digital photography applications found on Tophinhanhdep.com.
The Limitations of Layer Opacity:
While the Opacity slider in the Layers panel (top right) can make an entire layer transparent, its effect is uniform. If you set a layer’s opacity to 70%, every pixel on that layer becomes 70% transparent. This means you cannot have one part of the image fully visible and another part completely hidden with a smooth transition in between using only opacity. For example, fading one image into another requires a gradual change in transparency across different areas, which the global opacity setting cannot achieve. For nuanced photo manipulation or creating artistic digital art, this uniform application is severely restrictive.
The Problem with the Eraser Tool: The Eraser Tool offers selective transparency, allowing you to paint away parts of a layer. However, its primary drawback is its destructive nature. When you erase pixels with the Eraser Tool, they are permanently deleted from the layer. Imagine you’re meticulously erasing a background for a product shot, and hours later, you realize you accidentally erased a crucial part of the product. Without a non-destructive alternative, your only recourse might be to undo multiple steps (if history states are available) or restart the entire editing process. This makes the Eraser Tool a poor choice for any work that might require future adjustments, which is almost every professional photography or design project.
The Layer Mask Advantage: Layer masks circumvent these limitations entirely. They provide a non-destructive way to achieve selective transparency. When you “erase” with a layer mask, you’re not deleting pixels; you’re simply painting black onto the mask to hide them. The original image data remains intact underneath. This means you can always go back and paint with white to restore previously hidden areas or adjust gray values for subtle changes in transparency. This flexibility is what makes layer masks a cornerstone of efficient and creative visual design, enabling complex compositions and intricate editing styles that are fully reversible and adjustable, perfect for exploring new photo ideas and trending styles.
Advanced Techniques for Precision and Control
Once you’ve mastered the basics, layer masks offer a wealth of advanced techniques to refine your visual designs. From precise painting to intricate selections, these methods provide the control needed for professional-grade photo manipulation and digital art.
Manipulating Masks with Brushes and Selections
The core of working with layer masks involves using the Brush Tool and selections to define visible and hidden areas.
Painting on the Mask with the Brush Tool:
With a layer mask selected (indicated by a highlight border around its thumbnail in the Layers panel), the Brush Tool (B) becomes your primary instrument.
- Set Foreground/Background Colors: Press
Dto reset your foreground and background colors to default (black and white). Then, pressXto swap them, making black your foreground color. - Adjust Brush Settings: Right-click (Win) / Control-click (Mac) in your document to open the Brush Preset Picker. Choose a soft-edge brush (Hardness 0%) and adjust its size as needed. For smooth blends, a large, soft brush is ideal.
- Paint to Conceal: With black as your foreground color, paint over the areas of your image you want to hide. As you paint, you won’t see black paint; instead, the underlying layer or transparency will show through.
- Paint to Reveal: To restore hidden areas, press
Xagain to swap your foreground color to white. Then, paint over the areas you want to make visible. - Paint for Partial Transparency: To create partial transparency, choose a shade of gray as your foreground color. You can do this by clicking the foreground color swatch in the Toolbar and selecting a gray, or by adjusting the
Opacityof your brush in the Options Bar while painting with black or white.
This dynamic interaction of painting with black, white, and gray allows for incredibly nuanced control over blending images, creating artistic vignettes, or refining complex selections for your abstract or aesthetic photography.
Turning Selections into Layer Masks: Any selection you make in Photoshop can be instantly converted into a layer mask, providing a quick way to define complex shapes or areas.
- Create a Selection: Use any selection tool (e.g., Marquee Tool, Lasso Tool, Quick Selection Tool, Pen Tool) to outline the area you want to define.
- Apply as Mask: With the selection active and your target layer selected, simply click the
Add Layer Maskicon. Photoshop will automatically fill the area inside your selection with white (revealing it) and the area outside with black (hiding it). - Invert Selection for Mask: If you want the opposite effect (hide inside, show outside), hold
Alt(Win) /Option(Mac) while clicking theAdd Layer Maskicon, or create the mask normally and then invert it (Ctrl/Cmd+I).
This technique is incredibly efficient for isolating subjects or applying effects to specific regions, supporting diverse editing styles from high-resolution portrait photography to detailed graphic design.
Advanced Management: Moving, Copying, and Inverting
Beyond basic painting, Photoshop offers several powerful features for managing your layer masks effectively, enhancing your visual design workflow.
Viewing the Layer Mask Itself: Sometimes, you need to see the layer mask in isolation to assess its content:
- Show Mask Only: Hold
Alt(Win) /Option(Mac) and click on the layer mask thumbnail in the Layers panel. Your document view will temporarily switch to show the black-and-white mask. - Quick Mask Overlay: Press the backslash key
\to view the mask as a red overlay over your image. This highlights the hidden areas, making it easier to see where adjustments are needed without completely obscuring the image.
Disabling and Inverting Layer Masks:
- Disable Mask: Hold
Shiftand click on the layer mask thumbnail. A red “X” will appear over the thumbnail, indicating the mask is temporarily turned off, revealing the entire layer content. Shift-click again to re-enable it. This is invaluable for quickly comparing masked and unmasked versions of your image. - Invert Mask: Select the layer mask thumbnail, then go to
Image > Adjustments > Invertor use the shortcutCtrl+I(Win) /Command+I(Mac). This swaps black for white and white for black, instantly reversing the mask’s effect.
Unlinking and Moving Layer Masks: By default, a layer and its mask are linked, moving together. To move them independently:
- Unlink: Click the chain icon between the layer’s preview thumbnail and the mask thumbnail in the Layers panel.
- Move Mask: Select the mask thumbnail, then use the
Move Tool(V) to drag the mask around your document. The image content will remain stationary while the masked area shifts. - Move Layer Content: Select the layer’s preview thumbnail, then use the
Move Tool(V) to move the image content within the fixed mask. - Relink: Click where the chain icon used to be to relink them, making them move together again.
Copying and Deleting Layer Masks:
- Copy Mask: To duplicate a mask to another layer, hold
Alt(Win) /Option(Mac) and drag the mask thumbnail from its original layer to the target layer. Both layers will then share an identical mask, perfect for consistent effects across multiple elements in complex compositions. - Move Mask: To move a mask (not copy) to another layer, simply click and drag the mask thumbnail to the new layer without holding Alt/Option.
- Delete Mask: Right-click (Win) / Control-click (Mac) on the layer mask thumbnail and choose
Delete Layer Mask. This removes the mask but keeps the layer content intact. If you want to apply the mask permanently before deleting, chooseApply Layer Maskinstead.
These advanced manipulation and management techniques are critical for efficiency and flexibility in graphic design, digital art, and photo editing projects on Tophinhanhdep.com.
Optimizing Your Workflow: Tips for Professional Masking
To truly elevate your skills in visual design and digital photography, incorporating professional tips for layer mask usage is key. These techniques allow for nuanced control and complex effects, making your image manipulation seamless and polished, aligning with the high-quality visuals found on Tophinhanhdep.com.
Fine-Tuning with Density and Feathering
Photoshop’s Properties panel (Window > Properties) offers two crucial sliders for refining your layer masks: Density and Feather. These are especially useful for creating aesthetic backgrounds, artistic vignettes, and smooth blends.
-
Density: The
Densityslider controls the overall opacity of the entire layer mask. Reducing the density (from its default 100%) makes the hidden areas of the layer partially visible again. This is similar to adjusting the layer’s overall opacity but applies specifically to the mask. For instance, if you’ve masked out a background, lowering the Density allows the original background to subtly show through, creating a ghosting or blending effect. This is fantastic for adding depth or integrating elements without making them fully opaque. -
Feather: The
Featherslider softens the edges of your layer mask. Dragging this slider to the right expands the transition zone between hidden and visible areas, creating a smooth, gradual fade. This is indispensable for:- Seamless Blending: When compositing images, feathering ensures that one image doesn’t abruptly cut off, but rather blends naturally into another.
- Vignettes: Easily create classic vignette effects where the edges of an image gently fade to transparency or into another background, drawing focus to the center. This is a popular technique for beautiful photography and moody aesthetic images.
- Natural Transitions: Mimicking natural light fall-off or atmospheric haze, contributing to a more realistic and visually appealing final image.
By adjusting Density and Feather, you can achieve sophisticated blending and masking effects with a few simple slider movements, saving time and enhancing the artistic quality of your digital art.
Harnessing Layer Styles and Group Masks
Layer masks don’t operate in isolation; they integrate powerfully with other Photoshop features, notably Layer Styles and Layer Groups, opening up even more creative possibilities for photo manipulation and graphic design.
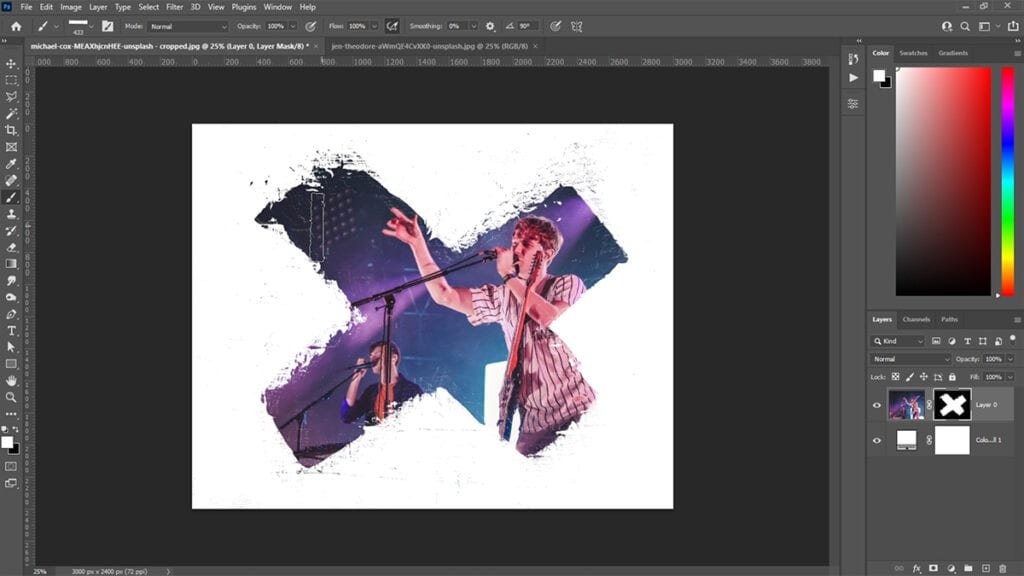
Layer Masks and Layer Styles: Layer Styles (like strokes, drop shadows, bevels) are effects applied to the entire content of a layer. An intelligent feature of Photoshop is how Layer Styles interact with Layer Masks. If you apply a Layer Style (e.g., a white stroke) to a layer that has an active layer mask, Photoshop automatically adjusts the Layer Style to conform to the visible parts of the layer as defined by the mask.
For example, if you have an image cropped into a circle using a layer mask and add a stroke, the stroke will follow the circular edge created by the mask, not the original rectangular bounds of the layer. Even if you move the mask (after unlinking it from the layer), the stroke will dynamically adjust to the new visible area. This smart integration allows for dynamic visual elements that always respect the masked shape, offering incredible precision for creative ideas. If you ever need the Layer Style to ignore the mask, you can uncheck “Layer Mask Hides Effects” in the Blending Options of the Layer Style dialog.
The Power of Group Masks:
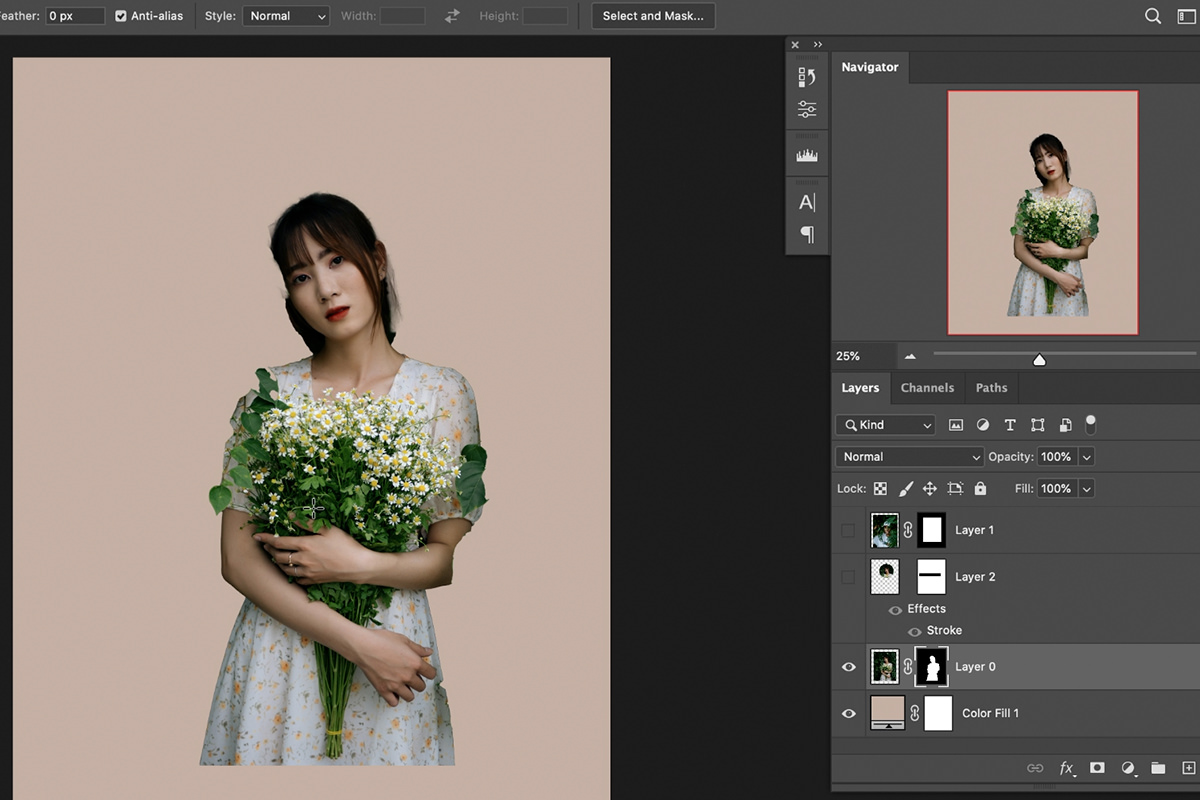
A common question arises: “Can I apply multiple layer masks to a single layer?” The direct answer is no, Photoshop only allows one layer mask per layer. However, there’s a powerful workaround using Groups. This technique is invaluable for complex compositions where you need multiple levels of masking.
- Create a Group: Select the layer you want to apply multiple masks to. Go to
Layer > Group Layersor use the shortcutCtrl+G(Win) /Command+G(Mac). This places your layer inside a new folder-like “Group” in the Layers panel. - Add Mask to Layer (First Mask): Your original layer can retain its own layer mask, for instance, a precise cutout of a subject from its background.
- Add Mask to Group (Second Mask): Now, with the Group selected in the Layers panel, click the
Add Layer Maskicon. This adds a layer mask to the entire group. This group mask acts as a “master mask” for everything inside the group.
The layers within the group will first be affected by their individual masks, and then the entire combined visible content of the group will be masked by the group’s layer mask. This hierarchical masking allows for intricate control. For example, you can precisely cut out a person using a mask on their layer, and then use a group mask to place that person within a circular frame, or to fade them into a different high-resolution background, without losing the original cutout. This advanced technique unlocks incredible potential for digital art, complex photo composites, and dynamic visual narratives.
Mastering layer masks in Photoshop is a journey that significantly enhances your capabilities as a digital artist or photographer. From basic blending to advanced compositing, the non-destructive nature and precise control offered by layer masks make them an indispensable tool. As you explore the vast resources and inspiration available on Tophinhanhdep.com for images, photography, and visual design, remember that the power to precisely mask out images around a layer is a skill that will consistently elevate your creative output, allowing you to bring your most intricate photo ideas and aesthetic visions to life.