How to Master Image Merging in Photoshop: A Comprehensive Guide by Tophinhanhdep.com

In the dynamic world of digital imagery, the ability to merge and blend photos seamlessly is a cornerstone skill for photographers, graphic designers, and digital artists alike. Whether you’re aiming to craft breathtaking composites, construct intricate visual narratives, or simply enhance the aesthetic appeal of your photographs, Adobe Photoshop provides an unparalleled suite of tools for combining multiple images into a singular, cohesive masterpiece. At Tophinhanhdep.com, we understand the power of visual storytelling and the creative freedom that advanced editing techniques unlock. This comprehensive guide will walk you through the essential methods for merging images in Photoshop, from fundamental layer management to sophisticated blending techniques, ensuring your creations align with the high-resolution, aesthetically pleasing content our community values.
Merging images isn’t just about technical proficiency; it’s about expanding your creative horizons. Imagine transforming a simple portrait into an ethereal scene by blending it with an unforgettable landscape, or constructing a dynamic collage from various thematic collections found on Tophinhanhdep.com. The possibilities are truly limitless. This guide will delve into practical, step-by-step instructions for several powerful merging techniques, helping you navigate Photoshop with confidence and transform your creative ideas into stunning digital art. By mastering these skills, you’ll not only streamline your photo manipulation workflow but also elevate your output to the standards of high-resolution photography and compelling visual design.
The Essentials of Image Merging in Photoshop
Before diving into the intricacies of specific merging techniques, it’s crucial to grasp the foundational principles and preparations that pave the way for successful image composites. Understanding why you’re merging images and how to set up your workspace correctly will significantly impact the final quality and realism of your artwork.
Why Merge Images? Unleashing Creative Vision

The act of merging images transcends mere technicality; it’s an art form that allows for unparalleled creative expression. For enthusiasts and professionals visiting Tophinhanhdep.com, the motivations behind combining images are diverse and inspiring:
- Creating Stunning Composites: This is perhaps the most common reason. Compositing allows you to combine elements from different photographs to create a scene that never existed in reality. Think of placing a subject photographed in a studio into a dramatic nature background or designing abstract art from disparate visual elements. This aligns perfectly with Tophinhanhdep.com’s focus on Wallpapers, Backgrounds, and Aesthetic images, offering a pathway to create unique content.
- Enhancing Photography: Sometimes, a single photograph might lack a crucial element or benefit from the addition of another. Merging can introduce more dramatic skies, integrate wildlife into a landscape, or even perform face swaps for fun or correction. This directly enhances the “Beautiful Photography” aspect by providing tools for advanced editing styles.
- Building Visual Narratives and Mood Boards: For graphic designers and digital artists, merging is instrumental in creating compelling visual stories or developing thematic collections. Combining images allows for the construction of mood boards that convey specific emotions – be it sad/emotional or uplifting – or to showcase trending styles in a cohesive manner.
- Expanding Photographic Possibilities: Certain photographic styles, like HDR (High Dynamic Range) and panorama stitching, inherently rely on merging multiple exposures or sequential shots. While Photoshop has dedicated tools for these, the underlying principles of layer merging are still fundamental.
The ultimate goal, as celebrated on Tophinhanhdep.com, is to generate high-resolution, impactful images that resonate with viewers and push the boundaries of visual design.
Preparing Your Images: Quality and Resolution Considerations
The success of any merged image hinges heavily on the quality and compatibility of your source files. Careful preparation can save countless hours in post-processing.
- Matching Dimensions and Resolution: Ideally, your source images should have similar dimensions and resolution. Attempting to merge a low-resolution image with a high-resolution one often results in a noticeable disparity in quality, making the composite look unrealistic. If you’re working with images of varying resolutions, consider using “Image Tools” like AI Upscalers (as found on Tophinhanhdep.com) to boost the quality of smaller images before merging.
- Consistent Lighting and Perspective: While Photoshop offers powerful tools for correction, starting with images that have similar lighting conditions, color temperatures, and perspectives will yield the most convincing results. For instance, blending a subject shot in direct sunlight with a background captured at dusk will require extensive and often challenging adjustments.
- Color Space: Ensure all images are in the same color space (e.g., sRGB or Adobe RGB) to avoid color shifts when they are combined. You can check and convert this in Photoshop via
Edit > Convert to Profile. - High-Resolution Sources: Always strive to start with the highest resolution versions of your images. This provides maximum flexibility for resizing, cropping, and making detailed selections without pixelation, a key factor in achieving the “High Resolution” quality emphasized by Tophinhanhdep.com.
Navigating Photoshop Layers: Your Merging Canvas
Photoshop’s layer system is the bedrock of non-destructive editing and the mechanism through which image merging is accomplished. Familiarity with the Layers Panel is non-negotiable.
- Opening Images: You can open multiple images into Photoshop in separate tabs (
File > Open) or load them directly into a single document as layers usingFile > Scripts > Load Files into Stack. The latter is often more efficient for initial setup. - The Layers Panel (F7): This panel (usually on the lower right) displays all layers in your document. Each image you merge will exist on its own layer, allowing independent manipulation.
- The Move Tool (V): Essential for positioning layers. Select a layer in the Layers Panel, then use the Move Tool to drag its content around the canvas. Holding
Shiftwhile dragging will constrain movement horizontally or vertically, or center the layer if dragging from one document to another. - Canvas Size: Sometimes, you’ll need to expand your document’s canvas to accommodate new merged elements, especially if you’re placing images side-by-side. Go to
Image > Canvas Sizeto adjust.
Understanding these basics sets the stage for more advanced techniques, ensuring that whether you’re working on a simple background change or a complex digital art piece, your workflow remains efficient and controlled.
Method 1: Precision Merging with Layer Masks and Selection Tools
One of the most powerful and flexible ways to merge images in Photoshop involves the use of Layer Masks in conjunction with various selection tools. This method offers unparalleled control over which parts of each image are visible, allowing for highly refined and realistic composites. This technique is fundamental for sophisticated photo manipulation and digital art projects, enabling artists to blend elements from Tophinhanhdep.com’s diverse image collections into seamless visuals.
Step-by-Step with Quick Selection and Layer Masks
This approach is ideal when you need to extract a specific subject from one photo and integrate it into another, offering precise control over the blending edges.
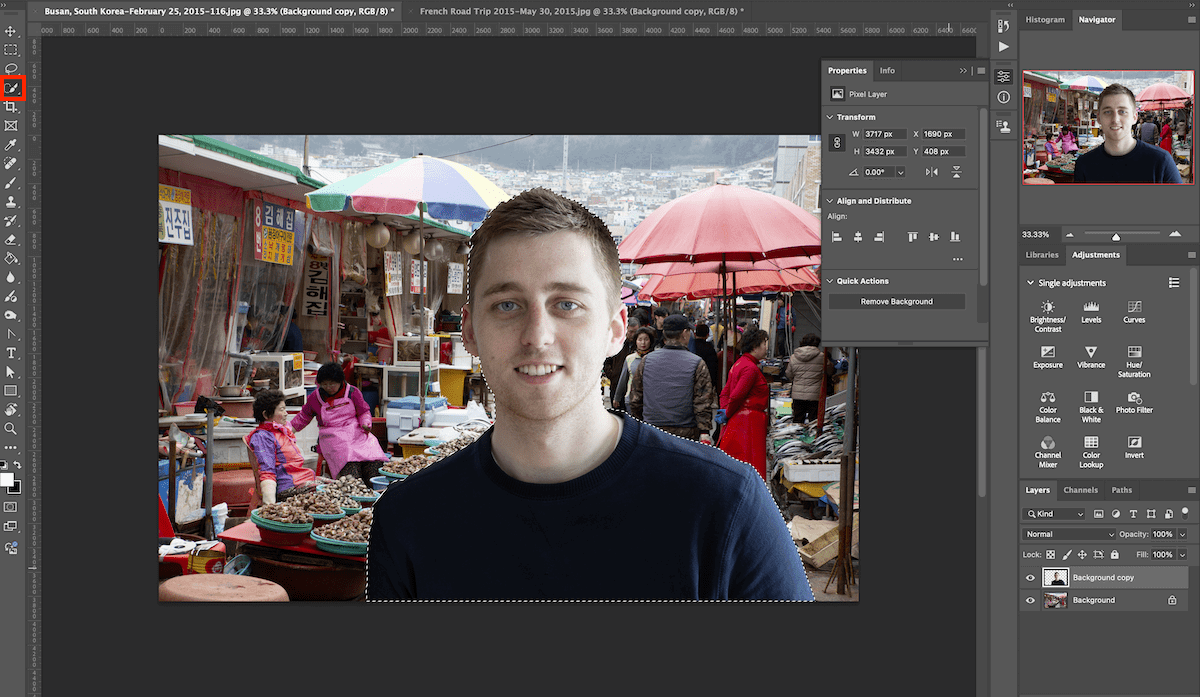
- Open the Necessary Images: Start by opening both the background image and the image containing your subject (the one you want to merge) in Photoshop. It’s often helpful to have them open in separate tabs initially.
- Isolate Your Subject with the Quick Selection Tool:
- Navigate to the subject image’s tab.
- Duplicate your background layer (
Ctrl/Cmd + J) to preserve the original. - Select the Quick Selection Tool (W). In the Options bar, ensure you have the “Add to selection” option active (the brush icon with a plus sign).
- Carefully brush over your subject. Photoshop will intelligently detect edges and create a selection (marching ants).
- If the selection overextends, switch to “Subtract from selection” (brush with a minus sign) in the Options bar and brush over the unwanted areas to refine.
- For extremely fine details, you might switch to the Refine Edge workspace (
Select and Maskin newer Photoshop versions) to smooth edges, feather, and shift edge for a more natural cut-out.
- Transfer the Subject to the Background Image:
- Once your subject is perfectly selected, copy it (
Ctrl/Cmd + C). - Switch to your background image’s tab and paste the subject (
Ctrl/Cmd + V). The subject will appear on a new layer above your background. - Use the Move Tool (V) to position the subject. If needed, resize or transform it using Free Transform (
Ctrl/Cmd + T). HoldShiftwhile dragging corner handles to maintain aspect ratio.
- Once your subject is perfectly selected, copy it (
- Create and Utilize a Layer Mask:
- With your subject layer selected in the Layers Panel, click the Add Layer Mask icon (a rectangle with a circle inside) at the bottom of the panel. A white thumbnail will appear next to your layer thumbnail, indicating a completely visible layer.
- Select the Brush Tool (B). Set your foreground color to black (press
Dto reset colors, thenXto swap if needed). - With the Layer Mask thumbnail active, paint with black to hide parts of the subject layer, revealing the background underneath. This is non-destructive, meaning you’re not deleting pixels, just concealing them.
- To reveal hidden parts, swap your foreground color to white (
X) and paint on the mask. - Adjust the hardness and opacity of your brush in the Options bar for softer or more gradual blending. A soft brush (low hardness) is crucial for natural transitions, especially around hair or fur.
- Achieving Smooth Transitions with the Gradient Tool:
- Instead of the brush, for broad, seamless blends (e.g., merging a sky), select the Gradient Tool (G).
- Ensure your foreground color is black and the Layer Mask thumbnail is active.
- Click and drag across the layer where you want the transition to occur. The gradient will smoothly fade one image into another. Experiment with different gradient types (linear, radial) from the Options bar.
This meticulous approach, though requiring patience, delivers exceptional results, allowing you to create high-resolution composites that feel organic and visually stunning, perfect for any “Visual Design” project or “Aesthetic” collection on Tophinhanhdep.com.
Achieving Seamless Blends: Tonal and Color Adjustments
Even with perfect masking, a successful composite often relies on matching the tonal and color characteristics of the merged elements. Discrepancies in lighting or color temperature can instantly betray the illusion.
- Color Temperature Adjustment:
- Select your subject layer.
- Add an Adjustment Layer:
Layer > New Adjustment Layer > Color BalanceorPhoto Filter. - Crucially, “clip” this adjustment layer to your subject layer by holding
Alt/Optionand clicking between the adjustment layer and the subject layer in the Layers Panel (a small down arrow appears). This ensures the adjustment only affects the layer directly below it. - Adjust the sliders (Cyan/Red, Magenta/Green, Yellow/Blue) to match the color temperature of the background.
- Alternatively, use
Hue/SaturationorSelective Coloradjustment layers for more specific color manipulation.
- Tonal Adjustments (Brightness, Contrast, Shadows, Highlights):
- Use
LevelsorCurvesadjustment layers (clipped to the subject layer) to match the brightness, contrast, and overall tonal range of the background. Pay close attention to shadow and highlight areas. - The Dodge Tool (O) lightens areas, and the Burn Tool (O) darkens areas. Use these with low exposure settings (5-10%) on a new, empty layer set to “Overlay” blend mode (filled with 50% gray) to subtly refine shadows and highlights on your subject, making it appear more integrated into the scene. This technique is often used in professional “Editing Styles.”
- Use
- Match Black and White Points: Ensure that the darkest black and brightest white points of your subject roughly align with those of the background. This is critical for visual consistency. Use the eyedroppers in the
LevelsorCurvesadjustment panels for precision. - Atmospheric Effects: Sometimes, adding a subtle atmospheric haze or blur to elements further away can enhance realism. A soft brush on a new layer with a low opacity, or a
Gaussian Blurfilter applied to a duplicated and masked background layer, can achieve this.
By meticulously attending to these tonal and color details, you can transform a jarring composite into a convincing and beautiful piece of “Digital Art” that fits seamlessly within Tophinhanhdep.com’s collections.
Method 2: Dynamic Blending with Blend Modes and Opacity
While Layer Masks offer granular control, Photoshop’s Blend Modes and Opacity settings provide a faster, often more creative, approach to merging images. These tools allow images to interact with each other in various ways, creating unique visual effects suitable for everything from aesthetic overlays to complex graphic design projects.
Leveraging Photoshop’s Blend Modes for Creative Effects
Blend Modes dictate how the pixels of one layer interact with the pixels of the layers beneath it. They are a powerful shortcut for achieving dynamic visual results without extensive masking.
- Loading Images into Photoshop:
- The most straightforward way for this method is to drag your desired overlay image directly from your computer’s folder onto the Photoshop document containing your background image. This automatically creates a new layer with the dragged image.
- Alternatively, open both images as separate documents. Then, using the Move Tool (V), click and drag the tab of the image you want to be the overlay onto the tab of the background image. Keep holding the mouse button down until the background image appears, then drag the image onto the canvas and release. Holding
Shiftduring this drag-and-drop will center the overlay image.
- Exploring Blend Modes:
- With your overlay layer selected in the Layers Panel, locate the “Blend Mode” dropdown menu (usually labeled “Normal” by default, near the top of the Layers Panel).
- Clicking this dropdown reveals a list of categories:
- Normal: No interaction, the top layer simply covers the layers below.
- Darken: Darken, Multiply, Color Burn, Linear Burn, Darker Color. These modes typically make lighter pixels transparent and blend in darker pixels. Ideal for text overlays or blending dark textures.
- Lighten: Lighten, Screen, Color Dodge, Linear Dodge (Add), Lighter Color. These modes make darker pixels transparent and blend in lighter pixels. Excellent for glowing effects, smoke, or light flares.
- Contrast: Overlay, Soft Light, Hard Light, Vivid Light, Linear Light, Pin Light, Hard Mix. These modes enhance contrast and brightness based on the underlying layers. “Overlay” and “Soft Light” are frequently used for subtle texture blending or enhancing overall mood.
- Inversion/Cancellation: Difference, Exclusion. These create unique, often abstract effects by subtracting pixel values.
- Component: Hue, Saturation, Color, Luminosity. These transfer specific color attributes from the overlay to the underlying layers, useful for color grading or shifting the mood of a scene without affecting luminosity.
- Experiment by clicking through different blend modes to see their immediate effects. You can also quickly cycle through blend modes by selecting the Move Tool (V) and then holding
Shiftwhile pressing the+or-keys on your keyboard.
- Combining Multiple Layers: This method excels when working with multiple layers. You can stack several images, each with its own blend mode and opacity, to create complex visual designs or rich aesthetic compositions. Tophinhanhdep.com encourages such creative layering for unique digital art.
Fine-Tuning Transparency with Opacity and Fill
Complementing Blend Modes, the Opacity and Fill sliders offer control over the overall transparency of a layer, providing another layer of refinement for your merged images.
- Adjusting Layer Opacity:
- Located directly to the right of the Blend Mode dropdown in the Layers Panel, the “Opacity” slider controls the transparency of the entire selected layer.
- A setting of 100% means the layer is fully opaque, while 0% makes it completely transparent.
- Adjusting opacity is crucial for subtle integration. For instance, if you’re overlaying a texture, reducing its opacity allows the underlying image to show through, creating a more harmonious blend. The visual outcome of an opacity change is highly dependent on the active blend mode.
- Understanding the “Fill” Slider:
- Positioned directly below the Opacity slider, “Fill” also controls transparency, but with a nuanced difference, particularly when layer styles (like drop shadows or strokes) are applied.
- While Opacity affects the transparency of both the layer’s pixels and its styles, Fill only affects the transparency of the layer’s pixels, leaving the layer styles at their full opacity.
- For basic image merging without layer styles, Opacity and Fill often produce identical results. However, in advanced “Graphic Design” and “Digital Art” projects, this distinction becomes vital.
- Dynamic Combinations: The real power of this method lies in combining Blend Modes with Opacity/Fill. You might set an overlay image to “Soft Light” mode with 60% opacity to subtly enhance contrast and color, or use “Screen” mode with 40% opacity for a dreamy, light-infused effect. Experimentation is key to discovering new “Creative Ideas” and unique “Editing Styles” that resonate with the visual inspiration found on Tophinhanhdep.com.
By fluidly adjusting these parameters, you gain immense flexibility in how your images interact, allowing for quick, impactful merges that can transform ordinary photographs into extraordinary visual compositions.
Beyond Basic Merging: Advanced Techniques and Workflow Optimization
Mastering the fundamental merging techniques in Photoshop is a significant step, but the platform offers even more sophisticated approaches and workflow enhancements for those looking to push the boundaries of “Photo Manipulation” and “Digital Art.” Tophinhanhdep.com encourages continuous learning to optimize your creative process and produce polished, professional-grade visual content.
Merging Multiple Layers and Flattening for Final Output
When your composite image begins to accumulate many layers, managing them efficiently becomes crucial. Photoshop provides several ways to combine layers, from temporary merges to final flattening.
- Merging Selected Layers (
Ctrl/Cmd + E):- To combine specific layers, select them in the Layers Panel (hold
Ctrl/Cmdto select multiple individual layers, orShiftto select a range). - Right-click on any selected layer and choose
Merge Layers. This is useful for grouping elements that belong together (e.g., a subject with its adjustment layers) while keeping other layers separate.
- To combine specific layers, select them in the Layers Panel (hold
- Merging Visible Layers (
Shift + Ctrl/Cmd + E):- This command merges all layers that currently have their “eye” icon visible in the Layers Panel into a single layer. Any hidden layers remain untouched and above the newly merged layer.
- This is a quick way to consolidate active elements without discarding hidden versions, offering a balance between simplification and non-destructiveness.
- Merging Layers onto a New Layer (Non-Destructive Merge):
- This is a highly recommended technique for maintaining a non-destructive workflow. It creates a new layer at the top of your stack that contains a merged copy of all visible layers, while leaving all original layers intact below it.
- Use the keyboard shortcut:
Shift + Ctrl + Alt + E(Windows) orShift + Command + Option + E(Mac). - This “stamping” technique is invaluable for applying global adjustments or filters to your entire composite without affecting individual source layers.
- Flattening an Image (
Layer > Flatten Image):- This command collapses all visible layers into a single background layer and discards any hidden layers.
- It significantly reduces file size and is typically performed as a final step before saving your image for web or print output, especially if you’re concerned about “Image Tools” like compressors and optimizers.
- Caution: Flattening is a destructive action for your layered file. Always save a layered
.PSDversion of your project before flattening, allowing you to return and make changes to individual elements later. Tophinhanhdep.com advises this best practice for all “Digital Photography” and “Graphic Design” workflows.
Troubleshooting and Refinement: Correcting Mistakes and Enhancing Composites
Even the most experienced artists encounter challenges. Knowing how to undo mistakes and refine your merges is critical for producing high-quality “Beautiful Photography” and “Digital Art.”
- Undoing Actions (
Ctrl/Cmd + Z): The simplest form of error correction. Photoshop remembers multiple steps (default 50, customizable), allowing you to revert through your history. - Fixing Selections and Masks: If a selection or layer mask isn’t perfect, it’s easy to correct:
- Mask Refinement: Re-select the Brush Tool, switch between black (hide) and white (reveal) foreground colors, and paint directly on the layer mask thumbnail to adjust visible areas.
- Selection Tools: Use
Select > Refine Edge(orSelect and Mask) for intricate cut-outs. Tools like theLasso Tool(L),Pen Tool(P), andQuick Mask Mode(Q) offer different levels of precision for initial selections.
- Removing Unwanted Objects (
Clone Stamp Tool/Patch Tool):- If merging introduces artifacts or requires removal of an object from the background or foreground, the
Clone Stamp Tool(S) is excellent for replicating texture from one area to another. - The
Patch Tool(J) is superb for removing larger, unwanted elements on simpler backgrounds. Select the unwanted area, then drag the selection to a clean donor area to seamlessly blend it out. These are powerful “Image Tools” for perfection.
- If merging introduces artifacts or requires removal of an object from the background or foreground, the
- Automatic Alignment (
Edit > Auto-Align Layers):- For images taken with slightly different camera positions (e.g., panoramas, focus stacking, or bracketed exposures),
Auto-Align Layerscan automatically align common areas in selected layers. - Select the layers you want to align in the Layers Panel, then go to
Edit > Auto-Align Layers. Choose “Auto” for Photoshop to analyze and align, or specific options like “Collage” or “Reposition” based on your needs.
- For images taken with slightly different camera positions (e.g., panoramas, focus stacking, or bracketed exposures),
- Snapping for Precision: Enable
View > SnapandView > Snap To > Document Boundsto make layers or selections snap precisely to the edges or center of your canvas, ensuring accurate positioning, especially when placing images side-by-side.
When to Use What: Choosing the Right Merging Technique
With several powerful methods at your disposal, knowing which technique to apply for a given task can streamline your workflow and optimize results.
- Layer Masks & Selection Tools (Method 1):
- Best for: Precision cut-outs, integrating specific subjects into new backgrounds, detailed composites, and scenarios where you need fine control over blending edges (e.g., hair, intricate objects). This is the gold standard for high-quality “Photo Manipulation” and creating realistic “Image Inspiration.”
- Pros: Non-destructive, offers maximum control, yields realistic results.
- Cons: Can be time-consuming for complex selections.
- Blend Modes & Opacity (Method 2):
- Best for: Creative overlays, adding textures, atmospheric effects (smoke, light leaks), subtle color grading, artistic compositions, and quick aesthetic changes. Excellent for developing “Creative Ideas” for “Backgrounds” or “Aesthetic” images.
- Pros: Fast, generates unique visual effects, highly experimental.
- Cons: Less control over specific edge details compared to masks; results can sometimes look artificial if not used subtly.
- Load Files into Stack & Auto-Align (Initial Step):
- Best for: Panorama stitching, HDR merging, focus stacking, or when combining multiple images taken from slightly different positions that need to be aligned automatically.
- Pros: Automates complex alignment tasks.
- Merging/Flattening Layers (Workflow Optimization):
- Best for: Consolidating workflow, preparing for final output, reducing file size, or applying universal adjustments. Remember to use the non-destructive “Merge onto New Layer” (
Shift + Ctrl + Alt + E) whenever possible to preserve your original layers for future edits.
- Best for: Consolidating workflow, preparing for final output, reducing file size, or applying universal adjustments. Remember to use the non-destructive “Merge onto New Layer” (
By understanding the strengths of each method and combining them judiciously, you can efficiently tackle any image merging challenge, transforming your “Photo Ideas” into high-impact visual assets suitable for Tophinhanhdep.com’s diverse categories, from “Wallpapers” to “Digital Art.”
Conclusion
The ability to merge images in Photoshop is more than just a technical skill; it’s a gateway to boundless creative expression. From seamlessly integrating a subject into an entirely new environment to crafting abstract digital art and enhancing “Beautiful Photography” with dynamic elements, the techniques outlined in this guide provide a robust foundation for your visual design journey. At Tophinhanhdep.com, we believe that every image holds untapped potential, and through the mastery of tools like Photoshop, you can unlock incredible “Creative Ideas” and generate stunning “High Resolution” visuals.
We encourage you to experiment with each method, combine them in innovative ways, and discover your unique “Editing Styles.” Remember to start with quality source images, utilize layers for a non-destructive workflow, and refine your blends for utmost realism. Whether you’re curating “Thematic Collections,” designing “Mood Boards,” or creating captivating “Wallpapers,” the power to combine images gives you the ultimate control over your visual narratives. Embrace the artistic freedom Photoshop offers, and let Tophinhanhdep.com be your continuous source of inspiration and high-quality image resources as you transform ordinary photos into extraordinary works of digital art.