Mastering Image Mirroring in Microsoft Word: Elevate Your Visual Documents with Tophinhanhdep.com

Microsoft Word, often perceived primarily as a text processing application, holds a surprisingly robust suite of features for visual manipulation, allowing users to transform ordinary documents into visually engaging creations. Among these capabilities, the ability to mirror images stands out as a particularly versatile tool, enhancing everything from graphic design projects to simple document aesthetics. Whether you’re aiming for perfect symmetry, preparing designs for specialized printing, or simply adding a unique artistic flourish, understanding how to mirror an image in Word can unlock a myriad of creative possibilities.
At Tophinhanhdep.com, we understand the profound impact of compelling visuals across all mediums. From stunning Wallpapers and captivating Backgrounds to the intricate details of Beautiful Photography and the evocative power of Sad/Emotional images, our platform is dedicated to providing and enhancing visual content. Mirroring images in Word can be a fundamental step in many Visual Design processes, including Graphic Design, Digital Art, and Photo Manipulation, aligning perfectly with our mission to inspire and equip users with the tools for visual excellence. This comprehensive guide will delve deep into the art of image mirroring within Microsoft Word, explore its practical applications, and show you how to integrate this skill into a broader visual strategy, often complemented by the vast resources and tools available on Tophinhanhdep.com.
The Core Mechanics: Flipping Images and Objects in Word
Mirroring, in the context of image editing, refers to the process of creating a reversed copy of an image, text, or shape, either horizontally or vertically. It’s distinct from simple rotation, which merely spins the object on its axis. A mirror image reflects the original, much like looking into a looking glass. This fundamental transformation is invaluable for achieving symmetrical designs, creating interesting visual effects, or preparing materials for specific printing methods like iron-on transfers where the final output needs to be reversed.
Microsoft Word simplifies this process with intuitive controls, though the method can vary slightly depending on whether you’re dealing with a standard image, a shape, or text within a text box. Understanding these nuances is key to mastering the feature.
Basic Image Mirroring: Horizontal and Vertical Flip
The most direct way to mirror a picture or shape in Microsoft Word is through its built-in “Flip Horizontal” and “Flip Vertical” options. These functions allow you to instantly reverse an image along its corresponding axis, creating a perfect mirror effect without the need for complex adjustments. This method is incredibly efficient for quick edits and is applicable across various versions of Word for both Windows and Mac.
Step-by-Step Guide for Mirroring an Image:
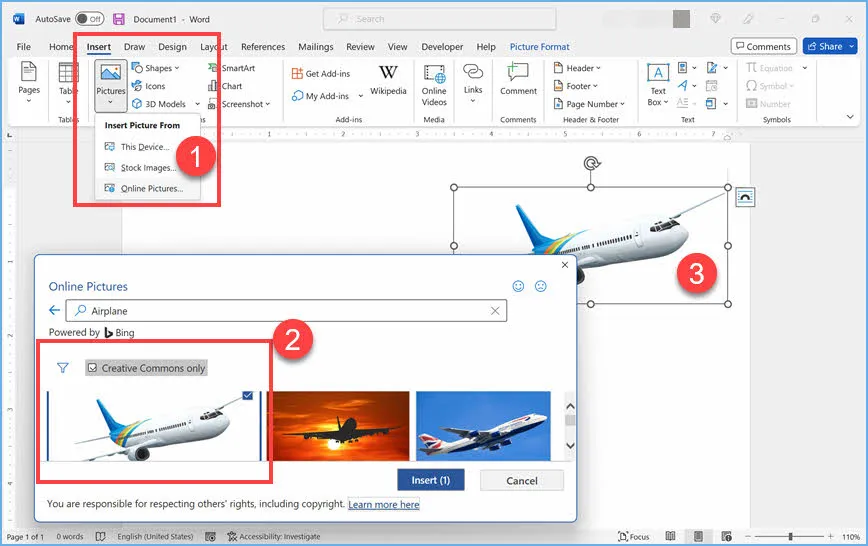
- Insert Your Image: Begin by opening your Microsoft Word document. Go to the “Insert” tab in the top menu, then click on “Pictures.” You can choose to insert an image from your device (“This Device”), from Stock Photos provided by Word, or from “Online Pictures.” For images curated from Tophinhanhdep.com, ensure they are downloaded and ready for insertion.
- Select the Image: Once the image is in your document, click on it to select it. This action will usually make the “Picture Format” tab (sometimes labeled “Format”) appear in the toolbar at the top of the Word window.
- Navigate to Rotate Options: In the “Picture Format” tab, locate the “Arrange” group. Within this group, you will find the “Rotate” button. Click on it to open a drop-down menu.
- Choose Your Flip Direction: The drop-down menu will present several options, including “Rotate Right 90°,” “Rotate Left 90°,” “Flip Vertical,” and “Flip Horizontal.”
- “Flip Horizontal”: Selecting this option will mirror your image along its vertical axis, effectively creating a left-to-right reversal. This is the most common form of mirroring used for design symmetry or transfer printing.
- “Flip Vertical”: Choosing this will mirror your image along its horizontal axis, resulting in an upside-down reflection. This can be used for dramatic effects or specific design layouts.
- Observe the Change: Immediately after making your selection, the image in your document will be mirrored according to your chosen direction. You can easily undo this action by clicking the “Undo” button (Ctrl+Z or Cmd+Z) or by selecting the image and choosing the same flip option again to revert it to its original orientation.
This method is remarkably simple and fast, making it the go-to technique for basic image mirroring. It’s particularly useful when working with Nature or Abstract images from Tophinhanhdep.com, allowing you to create stunning symmetrical patterns or subtly alter the composition for a new Aesthetic appeal within your documents.
Mirroring Text and Shapes for Creative Projects
While the “Flip Horizontal” and “Flip Vertical” options work directly for standalone images, Microsoft Word handles text differently. You cannot directly flip text using these options because text is treated as an editable string of characters rather than a fixed visual object in the same way an image is. To mirror text or more complex shapes, you need to place them within a container—specifically, a text box or use WordArt—and then apply a 3-D rotation effect to that container. This method offers a powerful way to integrate mirrored typography and intricate geometric designs into your documents.
Step-by-Step Guide for Mirroring Text (or Complex Shapes):
- Insert a Text Box or WordArt:
- For Text Box: Go to the “Insert” tab, click on “Text Box” in the “Text” group, and then select “Draw Text Box” (or “Draw Vertical Text Box” for vertical orientation). Draw your desired text box size on the document.
- For WordArt: Go to the “Insert” tab, click on “WordArt” in the “Text” group, and choose a WordArt style. This automatically creates a text box with pre-formatted text.
- Add Content: Type your desired text, insert a shape, or even embed a smaller image into this text box. For shapes, go to “Insert > Shapes” and draw your shape inside the text box.
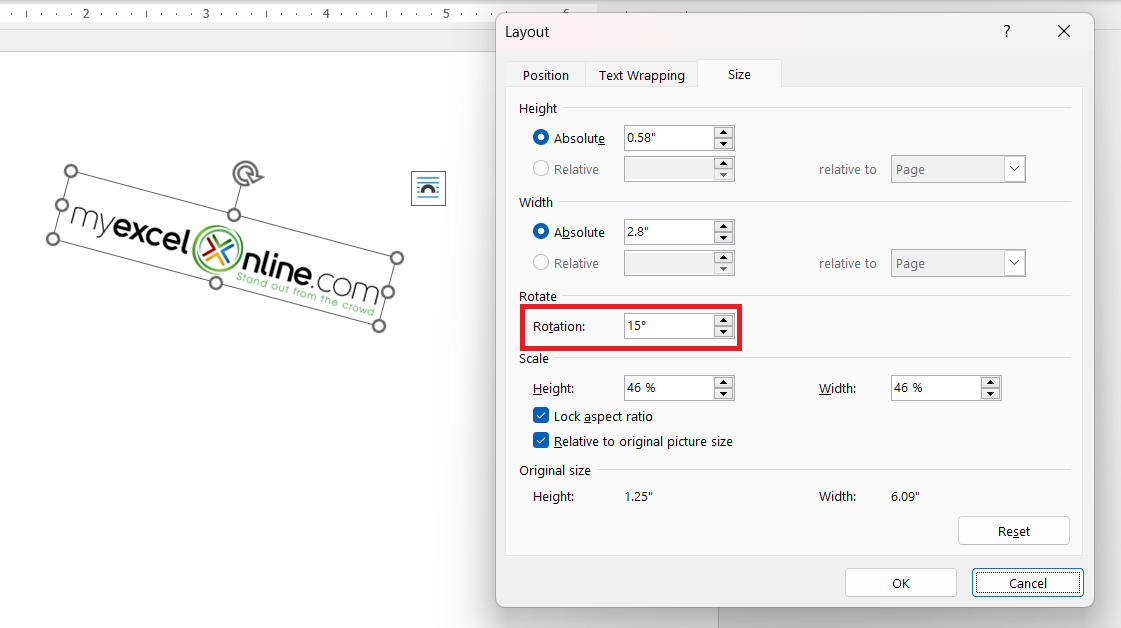
- Format the Container: Right-click on the border of the text box (or WordArt object) and select “Format Shape” from the context menu. This will open the “Format Shape” pane on the right side of your Word window.
- Access Effects Options: In the “Format Shape” pane, ensure “Shape Options” is selected. Then, click on the “Effects” icon (it often looks like a pentagon or a small “fx” symbol).
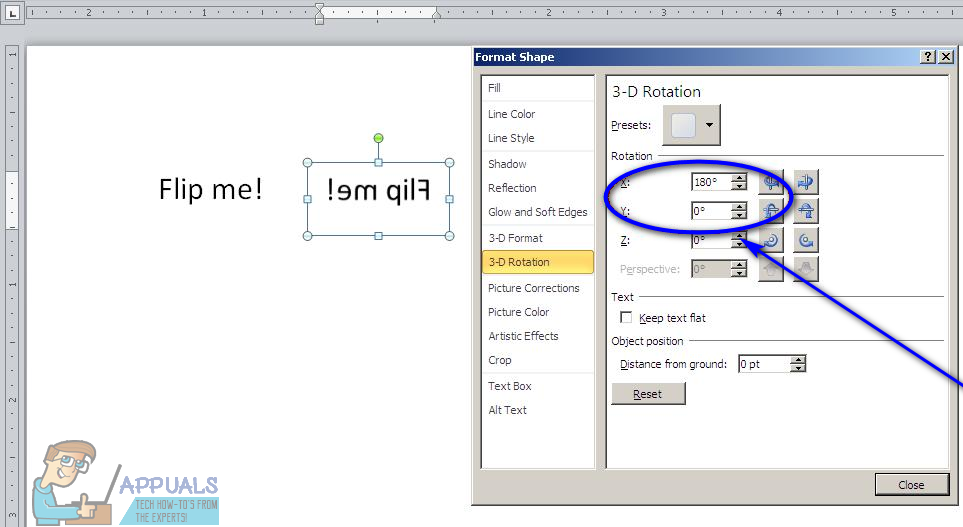
- Apply 3-D Rotation: Expand the “3-D Rotation” section. You’ll see options for “X Rotation,” “Y Rotation,” and “Z Rotation.”
- To mirror horizontally, change the “X Rotation” value to 180 degrees. As you type, you’ll see the contents of your text box flip horizontally, creating the mirror effect.
- To mirror vertically, you would typically set the “Y Rotation” to 180 degrees, though “Flip Vertical” on images is more common. For text, X-rotation is usually what’s needed for horizontal mirroring.
- Refine Appearance (Optional):
- Remove Text Box Outline: Often, the text box will have a default outline. To remove it, go back to the “Format Shape” pane, click on the “Fill & Line” icon (looks like a tipped-over paint can), expand “Line,” and select “No Line.”
- Remove Text Box Fill: Similarly, if the text box has a shaded background, expand “Fill” under “Fill & Line” and select “No Fill.” This ensures only your mirrored content is visible against the document background.
This method, while involving a few more steps, grants granular control over text and shape mirroring. It’s especially powerful for Graphic Design elements like custom headers, logos, or informational overlays where mirrored text can add a sophisticated touch. When sourcing fonts or visual elements for these text boxes, consider the diverse Image Inspiration & Collections on Tophinhanhdep.com to find unique styles that complement your mirrored designs.
Beyond Simple Flips: Advanced Visual Effects and Design Integration
Microsoft Word’s capabilities extend beyond basic horizontal and vertical mirroring. It offers advanced features that allow for more sophisticated visual effects, adding depth, realism, and artistic flair to your mirrored elements. These features, combined with the strategic use of visual assets from Tophinhanhdep.com, can transform your documents into truly compelling visual experiences.
Enhancing Depth with Reflection Effects
Distinct from a full mirror flip, reflection effects in Word simulate an object reflecting on a surface, like water or polished glass. This creates a more subtle, often artistic, mirrored appearance that can add significant depth and professionalism to your document’s visuals.
Applying Reflection Effects:
- Select Your Object: Click on the image, shape, or text box to which you want to apply a reflection.
- Access Picture/Shape Format: Go to the “Picture Format” or “Shape Format” tab in the ribbon.
- Choose Picture/Shape Effects: In the “Picture Styles” or “Shape Styles” group, click on the “Picture Effects” or “Shape Effects” button.
- Select Reflection: From the drop-down menu, hover over “Reflection.” A sub-menu will appear with various preset reflection styles. These range from full reflection with varying degrees of offset and transparency to partial reflections.
- Customize Reflection (Optional): After choosing a preset, you can further refine it. In the “Format Picture” or “Format Shape” pane (which you can open by right-clicking the object and selecting “Format Picture/Shape” or by choosing “Reflection Options” from the reflection menu), navigate to the “Effects” section. Here, you can adjust:
- Transparency: Control how see-through the reflection is.
- Size: Modify the height of the reflection.
- Distance: Adjust the gap between the original object and its reflection.
- Blur: Soften the edges of the reflection for a more diffused look.
Reflection effects are excellent for creating Aesthetic images or enhancing Beautiful Photography within your documents. Imagine a serene Nature image from Tophinhanhdep.com with a gentle, transparent reflection at its base, mimicking a calm lake. This adds a sophisticated touch that goes beyond a simple flip.
Fine-Tuning Your Mirrored Creations with Advanced Formatting
Once you’ve mirrored an image or applied a reflection, Word provides extensive formatting and styling options to ensure these elements perfectly integrate with your document’s overall visual theme. These advanced controls allow for intricate customization, aligning with principles of Graphic Design and Digital Art.
- Gradient Fill:
- Application: For shapes or text boxes, you can apply gradient fills to create smooth color transitions within the mirrored object itself or its reflection. This can transform a static mirrored element into a dynamic visual.
- Process: In the “Format Shape” pane, under “Fill & Line,” select “Gradient fill.” You can then choose preset gradients, adjust colors, type, direction, and angle to achieve a unique blend of hues. This is particularly effective for Abstract designs or custom Backgrounds.
- Outline Effects:
- Application: Adding an outline to your mirrored image or text box can help define its boundaries, make it stand out, or integrate it more subtly.
- Process: Under “Fill & Line” in the “Format Shape/Picture” pane, expand the “Line” options. You can choose solid lines, gradient lines, adjust color, transparency, width, and even composite line types. A delicate outline can frame a mirrored High Resolution image from Tophinhanhdep.com, drawing the viewer’s eye.
- Shadow Effects:
- Application: Shadows add depth and dimension, making a mirrored object appear to lift off the page or cast a realistic shadow.
- Process: In the “Effects” section of the “Format Shape/Picture” pane, expand “Shadow.” Choose from various preset shadows, or customize properties like color, transparency, size, blur, angle, and distance. A subtle shadow can enhance the realism of a mirrored object in a Photo Manipulation project.
- Transparency Settings:
- Application: Adjusting transparency (or opacity) allows you to create subtle overlay effects, blend mirrored elements seamlessly with their surroundings, or achieve dramatic visual contrasts.
- Process: For images, in the “Format Picture” pane, under “Picture” icon (looks like a mountain and sun), go to “Picture Transparency.” For shapes/text boxes, under “Fill & Line,” adjust the “Transparency” slider for the fill. This is crucial for creating layered Visual Design elements, where a mirrored image might act as a ghostly backdrop or a semi-transparent overlay.
By combining these advanced formatting options with mirroring techniques, you can achieve sophisticated visual effects that elevate your Microsoft Word documents from simple text files to rich, interactive visual statements. This level of customization allows you to implement creative ideas often associated with dedicated Digital Art software, right within Word.
Strategic Applications and Synergy with Tophinhanhdep.com
The ability to mirror images in Microsoft Word is more than just a trick; it’s a powerful tool with diverse applications across professional and personal projects. When integrated with the extensive resources and advanced functionalities offered by Tophinhanhdep.com, these mirroring techniques can significantly enhance your Visual Design workflow, from conceptualization to final output.
Mirroring for Professional and Personal Design
Mirroring plays a crucial role in various design scenarios, providing both functional and aesthetic benefits:
- Brochure and Flyer Design: Creating symmetrical layouts can add a sense of balance and professionalism to Promotional Material. Mirroring images or text blocks helps achieve visual harmony, making flyers and brochures more eye-catching. A mirrored logo, for instance, can create a striking emblem when incorporated into a multi-page design.
- Logo Design: While professional logo design often happens in dedicated software, prototyping mirror effects in Word can quickly visualize symmetrical logo concepts. Mirroring elements of a logo can yield a balanced and memorable design that stands out.
- T-Shirt and Iron-On Transfers: This is perhaps one of the most practical applications. When printing designs onto transfer paper for fabric, the image must be mirrored horizontally so that it appears correctly (un-mirrored) once pressed onto the garment. Whether it’s Aesthetic text, a stylized Abstract design, or a simple graphic, mirroring in Word ensures your custom apparel project turns out perfectly.
- Creating Symmetrical Art and Patterns: Mirroring allows for the rapid creation of perfectly symmetrical compositions. A single half of an image—say, a Nature photograph or an Abstract pattern from Tophinhanhdep.com—can be mirrored to generate a full, balanced design. This is particularly useful for crafting unique Wallpapers, Backgrounds, or repeatable patterns that could inspire new Photo Ideas or Thematic Collections.
- Enhancing Photography and Digital Art: Photographers and digital artists can use mirroring to create surreal effects, alter perspectives, or form composite images. For example, a Beautiful Photography piece of a landscape can be mirrored to create an illusion of reflection, adding depth and artistic intrigue. This technique directly ties into Photo Manipulation and Digital Photography practices, often leveraging High Resolution images.
- Mood Boards and Presentations: For Image Inspiration & Collections, mirrored elements can add a sophisticated touch to mood boards. In presentations, mirrored images can be used to compare two similar but contrasting ideas, or to visually represent concepts of duality and reflection, making your slides more dynamic and memorable.
The versatility of mirroring transforms Word from a simple word processor into a capable tool for basic graphic design, opening up avenues for creative expression in countless projects.
Leveraging Tophinhanhdep.com for Pre- and Post-Mirroring Excellence
The process of mirroring an image in Word is often just one step within a larger Visual Design workflow. Tophinhanhdep.com serves as an invaluable ecosystem, providing resources and Image Tools that perfectly complement and enhance your work with mirrored images.
1. Image Preparation with Tophinhanhdep.com’s Tools (Pre-Mirroring):
Before you even import an image into Word for mirroring, Tophinhanhdep.com offers crucial tools to ensure your starting material is of the highest quality:
- AI Upscalers: For older or lower-resolution images you wish to mirror, our AI Upscalers can dramatically increase their quality and size without pixelation. A mirrored, upscaled image will retain clarity and impact, especially if it’s intended for print or large displays.
- Image Converters: If your image is in an unsupported format or needs to be optimized for Word, our Converters can transform it into a universally compatible format (like JPEG or PNG) while maintaining optimal quality.
- Compressors and Optimizers: While mirroring doesn’t affect file size, a heavy image can slow down your Word document. Use Tophinhanhdep.com’s Compressors and Optimizers to reduce file size before insertion, ensuring your mirrored document remains efficient without sacrificing visual quality. This is particularly important for documents rich in High Resolution Stock Photos.
- Background Removal: Sometimes, you only want to mirror a specific subject from an image. Our background removal tools can isolate the subject, allowing you to mirror it independently in Word without distracting backgrounds, perfect for Photo Manipulation or logo integration.
2. Enhancing Mirrored Creations with Tophinhanhdep.com’s Collections (Post-Mirroring):
After mirroring images in Word, Tophinhanhdep.com can further enrich your project:
- Image Inspiration: Use our Photo Ideas, Mood Boards, and Thematic Collections to find complementary visuals or new ways to integrate your mirrored designs. Perhaps a mirrored abstract pattern created in Word can become a unique background for a Sad/Emotional quote, or a flipped Nature image can inspire an entire series of Digital Art.
- Trending Styles: Explore Trending Styles on Tophinhanhdep.com to see how mirrored aesthetics are being used in contemporary Visual Design. This can inform how you present or combine your mirrored elements for maximum impact.
- Photography and Digital Art Resources: If you’re using mirrored images as part of a larger Digital Photography or Digital Art project, Tophinhanhdep.com provides resources on Editing Styles and techniques that can be applied to further enhance the mirrored output.
By thoughtfully preparing your images with Tophinhanhdep.com’s Image Tools and drawing inspiration from its vast Image Inspiration & Collections, your mirrored images in Microsoft Word will not only be technically perfect but also creatively inspired and visually impactful, ultimately elevating the quality and aesthetic appeal of your entire document.
Troubleshooting and Frequently Asked Questions
Even with clear instructions, users may encounter specific challenges or have common questions when attempting to mirror images in Microsoft Word. Addressing these helps ensure a smooth and successful experience, allowing you to fully leverage Word’s visual capabilities.
Common Challenges and Solutions
- “Flip Horizontal” is Greyed Out/Disabled for Text:
- Challenge: Many users try to directly select text and find the “Flip Horizontal” option unavailable.
- Solution: As discussed, direct mirroring isn’t supported for raw text. Always place your text inside a Text Box or use WordArt. Once the text is in one of these containers, right-click the container, go to “Format Shape,” then “Effects,” and apply a “3-D Rotation” of 180 degrees on the X-axis. This mirrors the text effectively.
- Mirroring Multiple Images at Once:
- Challenge: Word doesn’t have a built-in feature to mirror several selected images simultaneously with a single click.
- Solution: You’ll need to mirror each image individually using the “Format” tab > “Rotate” > “Flip Horizontal/Vertical” method. However, a workaround for grouped objects is possible:
- Select all images you want to mirror.
- Right-click on one of them and choose “Group” > “Group.”
- Now, the group acts as a single object. You can often apply the “Flip Horizontal” or “Flip Vertical” to the entire group. This is particularly useful for complex Visual Design layouts or Mood Boards where maintaining relative positions of multiple elements is crucial.
- Mirrored Image Doesn’t Print Correctly:
- Challenge: You’ve mirrored an image for an iron-on transfer, but when printed, it still appears un-mirrored.
- Solution: While Word mirrors the image on screen, some printer drivers have their own mirroring options (often called “mirror image,” “reverse print,” or “T-shirt transfer” mode) that must be enabled within the printer’s settings dialog before printing. Always check your printer’s specific preferences. Word’s mirroring is for visual presentation within the document; the printer often handles the final reversal for transfers.
- Mirroring Affects the Original Image File:
- Challenge: Concern that performing a mirror action in Word will permanently alter the source image file on your computer.
- Solution: Rest assured, mirroring an image in Microsoft Word does not affect the original image file. The changes are applied only within the Word document itself. You can experiment freely without worrying about distorting or losing your original Beautiful Photography or High Resolution Stock Photos. If you want to save the mirrored version as a new image file, you would typically right-click the mirrored image, choose “Save as Picture,” and save it under a new name.
FAQs: Quick Answers to Your Mirroring Queries
Q1: How do I mirror an image horizontally in Microsoft Word? A1: Select the image, go to the “Picture Format” tab, click “Rotate” in the “Arrange” group, and choose “Flip Horizontal.”
Q2: Can I mirror an image vertically in Microsoft Word? A2: Yes. Select the image, go to the “Picture Format” tab, click “Rotate,” and choose “Flip Vertical.”
Q3: Is there a keyboard shortcut to mirror an image in Word? A3: No, there isn’t a direct keyboard shortcut for mirroring images in Word. You must navigate through the “Picture Format” tab and “Rotate” options.
Q4: Why can’t I directly mirror text in Word? A4: Text in Word is treated as editable characters, not a single graphic object. To mirror text, you must place it inside a Text Box or use WordArt, then apply a 180-degree “X Rotation” via the “Format Shape” pane’s “3-D Rotation” options.
Q5: Will mirroring an image in Word change its original file size or quality? A5: No, mirroring in Word is a visual adjustment within the document and does not alter the original image file’s size or quality. For optimal quality, ensure your images are prepared using Image Tools like Compressors or AI Upscalers from Tophinhanhdep.com before inserting them into Word.
Q6: Can I undo a mirroring effect? A6: Yes, you can click the “Undo” button (Ctrl+Z or Cmd+Z), or select the mirrored image and apply the same “Flip Horizontal” or “Flip Vertical” option again to revert it. For text boxes mirrored with 3-D rotation, reset the X Rotation to 0.
Q7: Can these mirroring techniques be used in other Microsoft Office programs like PowerPoint or Excel? A7: Yes, the core “Flip Horizontal” and “Flip Vertical” options for images, and the 3-D rotation method for text boxes/shapes, are generally consistent across Microsoft Office applications like PowerPoint and Publisher, as they share similar graphics engines. Some minor interface differences might exist depending on the Office version.
By familiarizing yourself with these common issues and their solutions, you can confidently integrate mirroring into your document creation process, making the most of Word’s capabilities for impactful Visual Design.
Conclusion
The ability to mirror an image, text, or shape in Microsoft Word is a powerful yet often underutilized feature that can dramatically enhance the Visual Design and aesthetic appeal of your documents. From creating perfect symmetry for Graphic Design projects and preparing visuals for specialized printing like iron-on transfers, to simply adding a unique Aesthetic touch to Beautiful Photography and Abstract compositions, mirroring opens up a world of creative possibilities.
Whether you opt for the straightforward “Flip Horizontal” or “Flip Vertical” options for images, or employ the slightly more involved “3-D Rotation” method for text within text boxes, Word provides accessible tools for these transformations. Furthermore, the integration of advanced features like reflection effects, gradient fills, outlines, and shadows allows for an even greater degree of customization, letting you fine-tune your mirrored creations to professional standards, akin to elements found in sophisticated Digital Art.
As you embark on your journey to master image mirroring in Word, remember that your creative potential is amplified by leveraging complementary resources. Tophinhanhdep.com stands as a premier destination for all your visual needs, offering an expansive library of Images—including Wallpapers, Backgrounds, and diverse Photography styles—alongside essential Image Tools like AI Upscalers, Converters, and Compressors. These tools empower you to optimize your images for quality and performance before you even bring them into Word, ensuring that your mirrored elements are derived from the best possible source material. Post-mirroring, Tophinhanhdep.com continues to be a source of Image Inspiration & Collections, helping you weave your custom mirrored graphics into broader Mood Boards or Thematic Collections.
In essence, mirroring in Microsoft Word is more than a simple edit; it’s a strategic design choice that, when combined with the robust ecosystem of Tophinhanhdep.com, can elevate your documents from mere informational carriers to compelling visual narratives. So, dive in, experiment with these techniques, and unleash your creativity to transform your Word documents into visually stunning creations that capture attention and leave a lasting impression.