Mastering the Mirror: A Comprehensive Guide to Flipping Images in Photoshop with Tophinhanhdep.com

Adobe Photoshop, from its foundational roots in Photoshop CS to the sophisticated capabilities of modern Photoshop CC, stands as the undisputed titan of digital image editing. It’s not merely a software; it’s an expansive digital canvas and an indispensable toolbox for everyone from aspiring beginners to seasoned professionals. Whether your goal is to meticulously edit a high-resolution portrait, craft stunning digital art, or design captivating visuals for social media, Photoshop remains the premier choice. Its continuous evolution ensures it consistently leads technological innovation in the visual arts.

At Tophinhanhdep.com, we understand the power of visual design and the impact of perfectly manipulated images. Our extensive resources cover everything from breathtaking wallpapers and aesthetic backgrounds to advanced photo manipulation techniques. This guide delves into one such powerful technique: how to mirror an image or a selection within Photoshop, enabling you to create intriguing visual effects, achieve perfect symmetry, or correct compositional elements with ease. This skill is invaluable for photographers aiming for unique editing styles, graphic designers seeking creative ideas, and anyone looking to enhance their image collections with trending styles and thematic concepts.
The Fundamentals of Mirroring in Photoshop: A Step-by-Step Approach
Mirroring an image, at its core, involves creating a reflection of your visual content. This simple action can lead to dramatic transformations, producing abstract art, symmetrical designs, or correcting an image’s orientation to better fit a layout. With Tophinhanhdep.com’s focus on digital photography and visual design, understanding this technique is crucial for unlocking new creative possibilities.
Setting the Stage: Opening Your Image and Layer Management
Every successful Photoshop endeavor begins with proper preparation. This includes opening your image and establishing a non-destructive workflow through effective layer management.
1. Launch and Open Your Image:
Begin by launching Adobe Photoshop. Once the application is open, navigate to File > Open in the top menu bar. Browse your computer to locate the image you wish to work on and open it. This initial step is fundamental for any photo editing task, whether you’re working on a nature photograph, a portrait, or an abstract image destined for Tophinhanhdep.com’s diverse collections.
2. Duplicate Your Background Layer for Safety:
A cardinal rule in Photoshop editing, especially when performing transformative actions like mirroring, is to work on a duplicate layer. This ensures that your original image remains untouched, providing a safety net if you need to revert or adjust your edits without loss of quality.
To duplicate your background layer, simply right-click on the “Background” layer in the Layers panel (usually located on the bottom-right of your screen) and select Duplicate Layer. Alternatively, you can drag the “Background” layer down to the Add New Layer icon at the bottom of the Layers panel. Name your new layer something descriptive, like “Mirrored Layer,” and ensure it is selected and active. This practice aligns with Tophinhanhdep.com’s emphasis on professional editing styles and high-resolution output, as it preserves image integrity.
Mirroring an Entire Image (Canvas Flip)
If your artistic vision or practical need involves flipping the entire canvas, Photoshop offers a direct and straightforward method. This is particularly useful when you want to achieve a complete symmetrical effect for a wallpaper or background image, or to simply reverse the orientation of a photo.
1. Access the Image Rotation Options:
With your image open and preferably on a duplicated layer, navigate to the top menu bar and select Image. From the dropdown menu, hover over Image Rotation.
2. Choose Your Flip Orientation:
Within the Image Rotation submenu, you’ll find two options relevant for mirroring the entire canvas:
- Flip Canvas Horizontal: This will create a mirror image along the vertical axis, essentially reflecting the left side to the right, and vice versa. This is commonly used for creating symmetrical landscapes or abstract designs where a horizontal reflection is desired.
- Flip Canvas Vertical: This option creates a mirror image along the horizontal axis, reflecting the top side to the bottom, and vice versa. This can be great for creating intriguing visual effects, such as reflections in water, adding to Tophinhanhdep.com’s array of aesthetic and nature-inspired images.
Upon selecting your desired flip option, your entire canvas will instantly transform. This quick, single-click method is perfect for generating full-image reflections, ideal for producing unique backgrounds or testing compositional balance. Remember to save your work frequently, especially after significant transformations, to ensure your beautiful photography remains intact.
Advanced Mirroring: Working with Selections and Layers
While flipping the entire canvas is simple, many creative scenarios demand more nuanced control. Often, you’ll want to mirror only a specific element or section of your image, seamlessly integrating it into the original composition. This technique is central to photo manipulation and creating complex visual designs found on Tophinhanhdep.com.
Isolating Your Subject: Making Precise Selections
The key to mirroring a selection lies in accurately isolating the part of the image you want to duplicate and flip. Photoshop provides a robust suite of selection tools for this purpose.
1. Choose Your Selection Tool: Photoshop offers various selection tools, each suited for different shapes and complexities.
- Rectangular Marquee Tool (M): Ideal for square or rectangular selections. You’ll find this tool, resembling a dotted rectangle icon, in the Tools panel (typically on the left side of your screen).
- Elliptical Marquee Tool (M): For circular or oval selections.
- Lasso Tools (L): For freehand selections, polygonal shapes, or magnetic selections that snap to edges.
- Quick Selection Tool (W) / Magic Wand Tool (W): Excellent for quickly selecting areas based on color and tone.
- Pen Tool (P): For the most precise and editable selections, particularly useful for intricate objects or smooth curves, aligning with the precision required for digital art and high-resolution photography.
2. Activate and Make Your Selection: Click on your chosen selection tool to activate it. Your mouse cursor will change to reflect the tool’s shape. Move your cursor to the starting point of the area you wish to select.
- For Marquee Tools: Press and hold the left mouse button, then drag to define your selection area. A moving dotted line (marching ants) will indicate the selected region. For perfect squares or circles, hold down the
Shiftkey while dragging. - For other tools: Follow their specific usage patterns (e.g., clicking and dragging for Quick Selection, tracing with the Pen Tool).
Mastering these selection techniques is paramount for achieving professional results in photo manipulation and for generating creative ideas that resonate with Tophinhanhdep.com’s audience.
Duplicating and Transforming Your Selection
Once your desired area is precisely selected, the next steps involve duplicating it and applying the mirror transformation.
1. Duplicate the Selection to a New Layer: With your selection still active, create a new layer containing only that selected portion. This is easily done using a keyboard shortcut:
- Windows: Press
Ctrl + J - Mac: Press
Command + JThis action immediately creates a new layer in your Layers panel named “Layer 1” (or similar), containing just your selected content. This isolated layer is now ready for transformation without affecting the original image. This non-destructive approach is a cornerstone of modern digital photography editing styles.
2. Access the Free Transform Command: Ensure your newly duplicated layer is actively highlighted in the Layers panel. Now, navigate to the top menu bar:
- Select
Edit > Free Transform. Alternatively, use the quick keyboard shortcut: - Windows:
Ctrl + T - Mac:
Command + TA bounding box with handles will appear around your selected content, indicating that it is in Free Transform mode.
3. Adjust the Reference Point (Crucial for Controlled Flipping): In the center of the Free Transform bounding box, you’ll see a small target icon – this is the reference point. This point determines the origin of any transformation (scaling, rotating, flipping). For a mirror effect, you need to move this reference point to the edge where you want the reflection to occur.
- If your reference point is not visible (common in newer Photoshop versions), check the
Toggle Reference Pointcheckbox in the Options Bar at the top. - Click and drag the reference point from its center position to one of the side handles of the bounding box – specifically, the side that will act as your mirror line. For instance, if you want to mirror horizontally from the right, drag the reference point to the right-side handle.
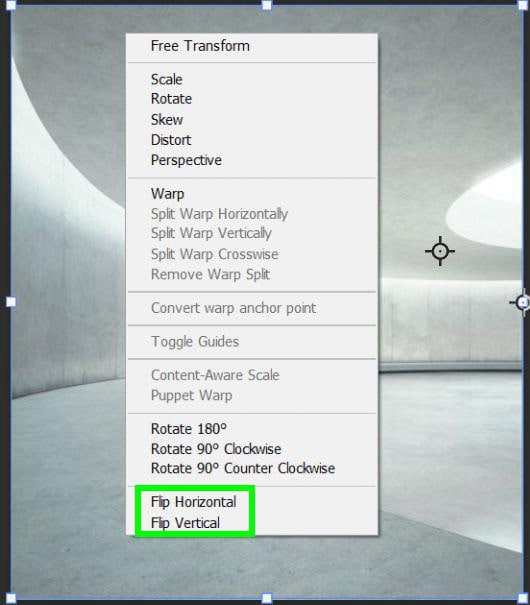
4. Execute the Flip Transformation: With the Free Transform bounding box active and the reference point positioned correctly, right-click (Windows) or Control-click (Mac) anywhere inside the bounding box. A context menu will appear.
- Choose
Flip Horizontalto mirror the selection from left to right. - Choose
Flip Verticalto mirror the selection from top to bottom.
You’ll see the bounding box move to the mirrored position, but the image content might appear outside the current canvas boundaries. Don’t worry, this is normal.
5. Commit the Transformation:
Once you’ve applied the flip, confirm the transformation by clicking the checkmark icon in the Options Bar at the top of the screen, or by pressing Enter (Windows) / Return (Mac). The Free Transform box will disappear, and your flipped selection will now exist on its own layer, ready for positioning.
Positioning and Refining the Mirrored Element
After flipping your selection, the next step is to accurately position it to create your desired mirrored effect. This often involves blending it seamlessly with the original image, a core aspect of photo manipulation and digital art.
1. Activate the Move Tool:
Select the Move Tool from the Tools panel (it looks like a black arrow or a cross with arrows on its tips, shortcut V).
2. Position Your Flipped Selection: With the Move Tool active and your flipped layer selected, click and drag the flipped image portion to its desired location on the canvas. For symmetrical designs or precise alignment, you’ll often drag it directly adjacent to the original selection, or to a new area of the canvas.
3. Utilize Guides for Precision: For pixel-perfect placement, especially when creating truly symmetrical compositions, guides are invaluable.
- Show Rulers: If your rulers are not visible, go to
View > Rulers(orCtrl/Cmd + R). - Drag Guides: Click and drag from the horizontal ruler (for vertical guides) or the vertical ruler (for horizontal guides) onto your canvas. Position a guide exactly where you want your mirror line to be.
- Snap to Guides: With guides in place, the Move Tool (and Free Transform) will “snap” your layers to the guides, ensuring perfect alignment. This attention to detail is essential for the high-quality visual content featured on Tophinhanhdep.com.
Once positioned, your mirrored selection can be further refined using Free Transform again (Ctrl/Cmd + T) to scale, rotate, or skew it if necessary, ensuring it perfectly integrates into your creative idea or visual design.
Enhancing Your Mirrored Masterpiece: Beyond the Basic Flip
Mirroring is not just a technical process; it’s a launchpad for incredible creativity. Tophinhanhdep.com encourages users to explore various editing styles and creative ideas, and advanced mirroring techniques can unlock new dimensions in your photography and digital art.
Creative Applications and Artistic Effects
The simple act of mirroring can lead to surprisingly complex and visually engaging outcomes.
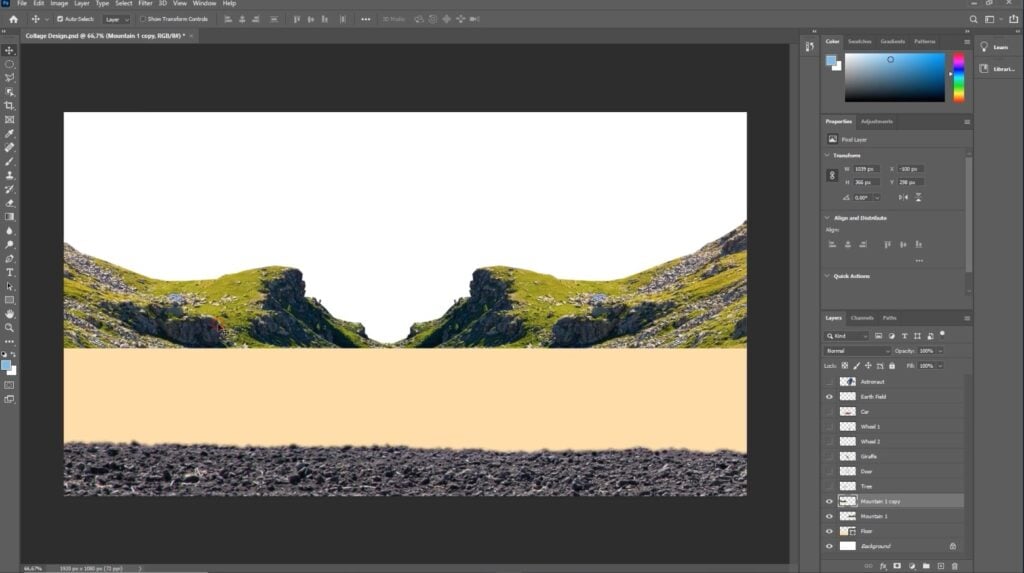
- Symmetrical Landscapes and Water Reflections: Mirroring the bottom half of a landscape image to reflect the top can simulate still water, creating stunning and serene nature scenes. This is a popular technique for enhancing aesthetic and beautiful photography, often seen in high-resolution wallpapers.
- Kaleidoscopic Patterns: By duplicating and flipping a section multiple times, rotating each instance, and strategically arranging them, you can generate intricate, mesmerizing kaleidoscopic patterns. This pushes the boundaries of digital art and abstract images, providing endless possibilities for unique backgrounds and graphic design elements.
- Double Exposure and Surrealism: Combine a mirrored element with a blend mode (see below) or a layer mask to create surreal double exposures, merging two realities into one compelling image. This taps into the “sad/emotional” or “abstract” categories by evoking deeper feelings or alternative perspectives.
- Character Design and Fantasy: For character artists, mirroring a face or a creature’s features is fundamental for ensuring symmetry, which can then be deliberately broken for unique, asymmetrical designs.
Troubleshooting Common Mirroring Issues
Even seasoned designers encounter occasional hiccups. Knowing how to troubleshoot common issues ensures a smooth workflow and prevents frustration.
- “Can’t Locate the Flip Option”: If you’re using an older or different version of Photoshop and the menu paths seem unfamiliar, use Photoshop’s built-in
Helpmenu. Search for “flip,” and Photoshop will often highlight or direct you to the correct command. - “Logo or Text Flipped Unintentionally”: A common mistake is using
Image > Image Rotation > Flip Canvaswhen you only want to flip a specific element that includes text or a logo. The canvas flip will mirror everything. The solution is to ensure your text/logo is on its own layer and then only flip that specific layer usingEdit > Transform > Flip Horizontal/Vertical. - “Image Flipped the Wrong Way”: Double-check whether you selected
Flip HorizontalorFlip Vertical. The visual outcome is distinct, and choosing the incorrect axis will produce an unexpected result. - “Confusing Rotate with Flip”: These are two different transformations. Flipping creates a mirror image (a reflection). Rotating changes the orientation around a central point (like turning a wheel). If your image is simply tilted or upside down, you need to rotate it (e.g.,
Image > Image Rotation > 90° CW/CCWor using Free Transform’s rotation handles), not flip it. - “People Look Unnatural After Flipping”: Humans are subtly asymmetrical, and a perfectly mirrored face can sometimes look uncanny or “off.” For portraits or images featuring people, consider if a full mirror effect is truly desired. Sometimes, subtle mirroring or blending is more effective, or you might need to make post-flip adjustments to soften the effect, aligning with the nuances of beautiful photography. Tophinhanhdep.com’s guides on portrait photography and editing styles offer further insights into this.
Workflow Tips and Best Practices for Tophinhanhdep.com Users
To truly master image manipulation in Photoshop and elevate your creative output for Tophinhanhdep.com’s high standards, incorporating these professional workflow tips is essential.
1. Expand Canvas Space for Mirrored Elements:
If you plan to mirror a selection and place it adjacent to the original, ensure you have enough canvas space. Go to Image > Canvas Size and adjust the width or height as needed. This prevents your mirrored portion from being cropped prematurely.
2. Leverage Layer Masks for Seamless Blending:
After mirroring, a Layer Mask is a powerful tool for blending. Instead of erasing parts of your flipped layer (which is destructive), add a layer mask (the rectangular icon with a circle in the Layers panel). Then, paint with black on the mask to hide parts of the flipped layer, or with white to reveal them. This allows for smooth transitions and non-destructive adjustments, crucial for refined photo manipulation and visual design.
3. Experiment with Blend Modes:
The Blend Modes in the Layers panel (dropdown menu above the layers) can dramatically alter how your mirrored layer interacts with the layers beneath it. Options like “Overlay,” “Soft Light,” “Multiply,” or “Screen” can create unique atmospheric effects, abstract blends, or subtle integrations, opening up a world of creative ideas for your image collections.
4. Convert to Smart Objects for Non-Destructive Transformations:
Before performing multiple transformations (like repeated flipping, scaling, and rotating), consider converting your layer to a Smart Object (right-click layer > Convert to Smart Object). This preserves the original image data, meaning you can scale, rotate, and flip repeatedly without cumulative loss of quality, which is vital for maintaining high-resolution images.
5. Master Keyboard Shortcuts: Efficiency is key in professional editing. Memorize frequently used shortcuts:
Ctrl/Cmd + J(Duplicate Layer)Ctrl/Cmd + T(Free Transform)V(Move Tool)M(Marquee Tools)Ctrl/Cmd + Z(Undo)- Holding
Spacebar(temporarily activates Hand Tool for panning). This shortcut mastery allows you to focus more on creative ideas and less on navigating menus.
6. Utilize Tophinhanhdep.com’s Image Tools: Once your mirrored masterpiece is complete, leverage Tophinhanhdep.com’s dedicated image tools. Use our compressors and optimizers to prepare your images for web sharing without sacrificing quality. For those looking to further enhance resolution, our AI upscalers can refine your beautiful photography, ensuring it meets the highest standards for backgrounds, wallpapers, and stock photos. Explore our platform for inspiration, thematic collections, and trending styles to continuously fuel your creative journey.
Conclusion
The ability to mirror an image or a selection in Photoshop is a fundamental skill that transcends basic editing, opening doors to sophisticated photo manipulation, digital art, and creative visual design. From producing perfectly symmetrical compositions for stunning wallpapers and backgrounds to crafting intricate abstract images and correcting compositional imbalances, the mirroring technique is versatile and powerful.
By following the steps outlined in this comprehensive guide, Tophinhanhdep.com users can confidently navigate Photoshop’s tools, transforming their images with precision and flair. Remember that practice is the cornerstone of mastery. The more you experiment with mirroring, selections, layers, and blend modes, the more intuitive the process will become, allowing you to seamlessly integrate this technique into your unique editing styles.
Tophinhanhdep.com is your ultimate resource for all things visual, offering not just tutorials but also a vast collection of images, photography insights, and tools to elevate your creative projects. Dive in, experiment, and let your imagination take the lead in crafting extraordinary visual experiences.