Master the Art of Mirroring: A Comprehensive Guide to Flipping Images and Text in Microsoft Word with Tophinhanhdep.com

Microsoft Word, often perceived as a simple word processor, is a remarkably versatile tool that extends far beyond basic document creation. Hidden within its extensive feature set are powerful image and text manipulation capabilities, including the ability to create mirror images. Whether you’re a graphic designer striving for visual balance, a DIY enthusiast preparing iron-on transfers, or simply exploring creative avenues in your digital documents, mastering the art of mirroring in Word can unlock a new dimension of possibilities.
At Tophinhanhdep.com, we understand the profound impact of compelling visuals. From stunning Wallpapers and Aesthetic Backgrounds to insightful Digital Photography and cutting-edge Image Tools, our platform is dedicated to empowering creators and enthusiasts with resources for all things visual. This guide will walk you through the precise steps to mirror images and text in Microsoft Word, seamlessly integrating this skill into your broader visual design toolkit.
The Transformative Power of Mirroring: Why and When to Flip Your Visuals
Mirroring, also known as flipping, an image or text isn’t just a technical trick; it’s a fundamental technique in visual design and has numerous practical applications. Understanding why and when to apply this effect can significantly enhance your projects.
Creative Applications in Visual Design
In the realm of Visual Design, mirroring is a potent tool for achieving aesthetic harmony and creating dynamic compositions. Graphic designers often employ mirroring to introduce symmetry, which can convey balance, stability, and elegance. For instance, creating symmetrical logos or patterns, where one half is a perfect reflection of the other, is a classic design principle that instantly appeals to the eye.
Mirroring can also be a springboard for Creative Ideas and unique Photo Manipulation. Imagine taking a beautiful landscape photograph from Tophinhanhdep.com’s Nature Photography collection and mirroring it to create a stunning, surreal reflection, transforming a serene scene into an Abstract masterpiece. This technique can be invaluable when crafting Mood Boards, allowing you to experiment with different layouts and visual rhythms. By duplicating and flipping elements, you can quickly generate new design variations and explore Trending Styles in digital art, pushing the boundaries of conventional imagery. Tophinhanhdep.com provides an expansive range of High-Resolution Images and diverse Editing Styles that can serve as the perfect foundation for these creative explorations.
Practical Uses for Everyday Projects
Beyond artistic expression, the ability to mirror images and text in Word has highly practical implications. One of the most common uses is preparing designs for iron-on transfers. When you print a design onto transfer paper, it needs to be mirrored so that when it’s applied to fabric, the image or text appears correctly (not backwards). This is essential for custom t-shirts, tote bags, personalized signs, and other fabric-based crafts.
Similarly, mirroring is crucial for creating decals, stencils, or reverse printing for specific signage where the design needs to be legible from the opposite side of a transparent surface. For example, if you’re making a window decal that will be viewed from outside, you would print the mirrored image on the adhesive side. For those creating specialized documents or even unique aesthetic backgrounds for presentations, a mirrored effect can make certain elements pop or align with a specific visual theme. Whether your goal is functional or purely decorative, Tophinhanhdep.com encourages you to explore how Word’s mirroring capabilities can simplify these tasks and elevate your output.
Your Step-by-Step Guide: Mirroring Text, Images, and Shapes in Microsoft Word
Microsoft Word offers a couple of ways to achieve a mirror effect, primarily depending on whether you are working with text or embedded images/shapes. The most robust method for text involves utilizing WordArt or Text Boxes, while direct flipping is ideal for standalone images and shapes. It’s worth noting that functionality might vary slightly across different Word versions (Windows vs. Mac, and older vs. newer releases), but the core principles remain consistent.
Method 1: Mirroring Text with WordArt and Text Boxes (The 3D Rotation Technique)
This method is the most reliable for text and WordArt, as it allows you to literally rotate the object in a 3D space, creating a perfect mirror image.
-
Insert a Text Box or WordArt:
- For Text Box: Go to the Insert tab in the Word ribbon. Select Text Box and then choose Draw Text Box. Click and drag to draw a text box on your document.
- For WordArt: Go to the Insert tab, click WordArt, and select a style. Type your desired text into the WordArt placeholder.
- Tophinhanhdep.com Tip: Consider your font and overall visual impact. Mirrored text can be a powerful aesthetic, especially with carefully chosen typography that complements your images from Tophinhanhdep.com’s collections.
-
Enter and Format Your Content:
- Type or paste the text you wish to mirror inside the newly created Text Box or WordArt object.
- Format the text as desired (font, size, color, bold, italic, etc.).
-
Access Formatting Options:
- Select the object: Click on the Text Box or WordArt to select it. You should see a border appear around it.
- Open Format Tab: Depending on your Word version and selection, you might see contextual tabs like Shape Format, Drawing Tools Format, or Picture Tools Format appear in the ribbon. Click on the relevant “Format” tab.
- For Mac users: You might need to right-click the box and select “Format Shape” to open the Format Shape pane directly.
-
Navigate to 3-D Rotation Settings:
- Windows & Newer Mac Versions: Look for the Text Effects button (often found in the “WordArt Styles” group or “Shape Styles” group on the ribbon). Click on it, then hover over 3-D Rotation, and select 3-D Rotation Options… This will open the “Format Shape” or “Format Object” pane on the right side of your screen.
- Alternatively (especially for Text Boxes/Shapes): Right-click the selected Text Box or WordArt, then select Format Shape… from the context menu. In the “Format Shape” pane that appears, select the Effects icon (often a pentagon or a circle with a shadow) to expand the effects options.
-
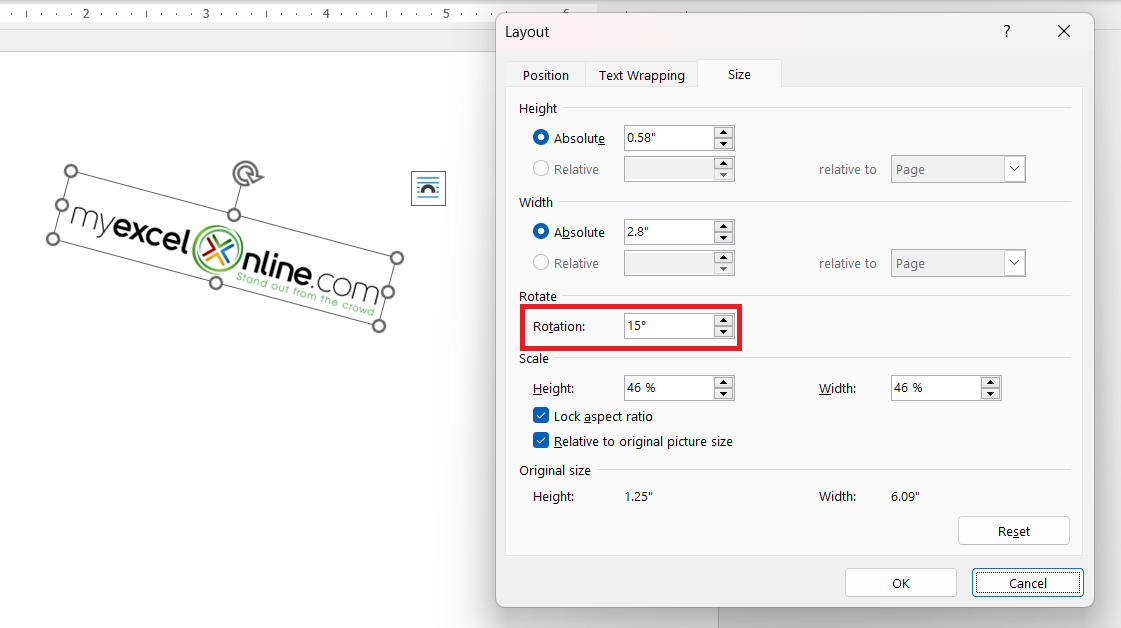
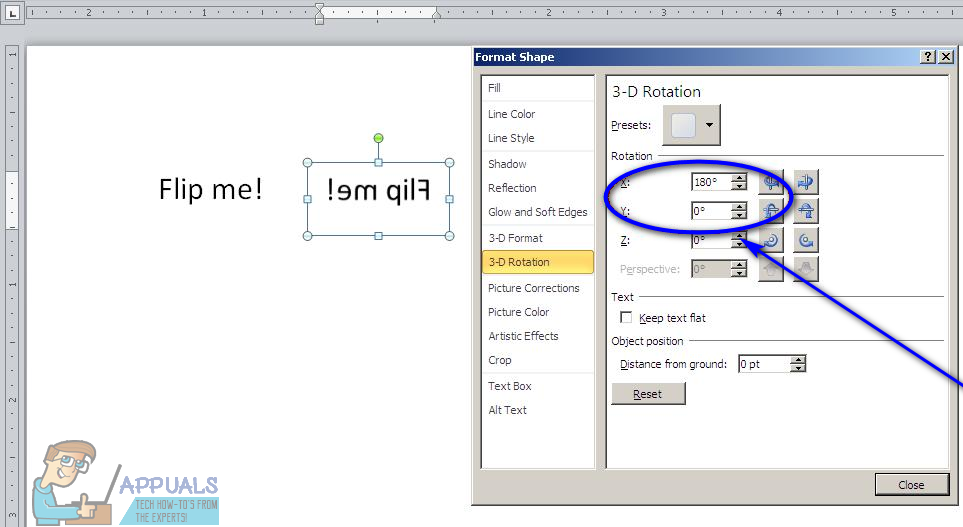
Apply 180° X Rotation:
- Within the “Format Shape” or “Format Object” pane, under the 3-D Rotation section, locate the X Rotation field.
- Enter 180 (degrees) into this box.
- As you type or use the arrows, you will see your text or WordArt immediately flip horizontally, creating the mirror effect.
-
Refine Appearance (Remove Border and Fill):
- Often, Text Boxes come with a default border and/or fill color, which you usually want to remove for a clean mirror effect.
- To remove fill color: In the “Format Shape” pane, select the Fill & Line icon (looks like a tipped-over paint can for fill and lines). Under Fill, select No fill.
- To remove outline/border: In the “Format Shape” pane, under Line, select No Line or No Outline. Alternatively, you can right-click the text box, select Outline from the mini toolbar, and choose No Outline.
- Tophinhanhdep.com Insight: Clean, borderless mirrored text is ideal for preparing designs that will be integrated into larger graphic design projects or serve as transparent overlays, complementing Tophinhanhdep.com’s wide array of aesthetic backgrounds.
Method 2: Flipping Images and Simple Shapes Horizontally or Vertically
This method is quicker and more direct for standalone images (like those from Tophinhanhdep.com’s extensive collections) or simple graphic shapes. It performs a direct flip rather than a 3D rotation, which is perfectly suitable when you don’t need the nuanced text rendering of the 3D rotation technique.
-
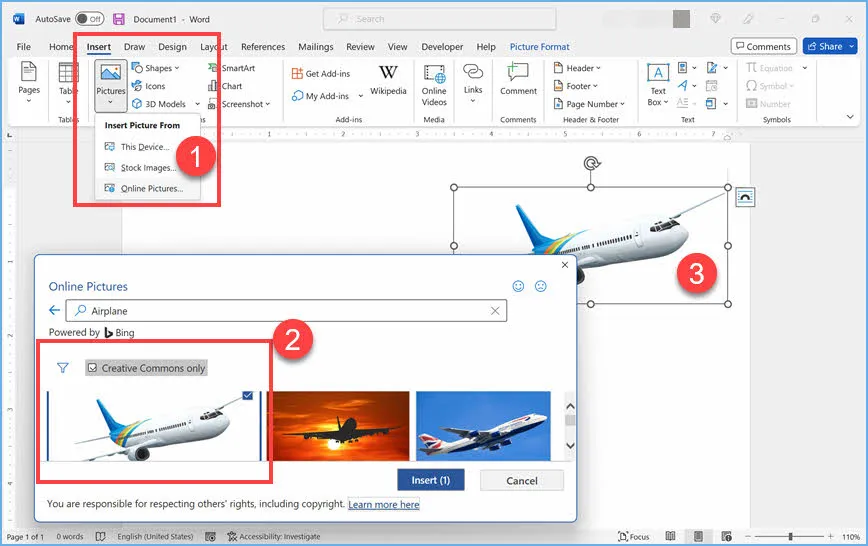
Insert Your Image or Shape:
- Go to the Insert tab.
- Select Pictures to insert an image (from your device, stock images, or online sources). Tophinhanhdep.com offers a vast selection of high-resolution stock photos and inspiring images perfect for this.
- Select Shapes and choose the desired shape.
-
Select the Object:
- Click on the image or shape to select it. Contextual tabs like Picture Format or Shape Format should appear in the ribbon.
-
Access Rotation/Flip Options:
- Click on the Picture Format or Shape Format tab.
- In the “Arrange” group, locate the Rotate button.
-
Perform the Flip:
- Click on the Rotate button.
- From the dropdown menu, select Flip Horizontal to create a mirror image (a left-to-right reversal).
- Alternatively, select Flip Vertical to invert the object (an upside-down flip).
- Note: Unlike text in a regular Word document, embedded images and shapes are much more forgiving with this direct flip option.
From Screen to Print: Outputting Your Mirrored Designs
Once you’ve perfectly mirrored your images and text within Word, the next crucial step is to successfully translate your digital creation into a physical print. This process often requires attention to specific printer settings to ensure the mirrored effect is preserved and optimized for its intended purpose.
Configuring Printer Settings for Mirror Printing
While you’ve mirrored the content within Word, many printers offer a “mirror image” or “reverse print” option directly in their settings. Utilizing this can sometimes be an alternative or a complementary step, especially if you used the direct “Flip Horizontal” method in Word and need to reinforce the effect during printing, or if Word’s internal mirroring isn’t rendering as expected.
-
Initiate the Print Process:
- In your Word document, click on the File tab (top-left corner).
- Select Print from the dropdown menu, or use the shortcut Ctrl+P (Windows) / Cmd+P (Mac).
-
Access Printer Properties:
- In the “Print” dialog box that appears, you’ll see your chosen printer. Look for a button labeled Printer Properties, Printer Preferences, or Properties (the exact wording varies by printer manufacturer and driver version). Click this button.
-
Locate Mirror/Reverse Print Option:
- A new dialog box will open, displaying your printer’s specific settings. Navigate through the tabs – common ones include Layout, Paper/Quality, Effects, or Advanced.
- Look for an option explicitly labeled “Mirror Image,” “Reverse Print,” “Flip Horizontally,” or similar. This feature is often found under the “Layout” or “Effects” tab.
- Check the box or toggle the switch to enable this feature.
- Tophinhanhdep.com Recommendation: Always consult your printer’s manual or manufacturer’s website for precise instructions, as these settings can be highly printer-specific. For printing designs based on high-resolution photography, ensuring your printer drivers are up-to-date (a type of “Image Tool” for print output) is crucial for optimal quality.
-
Confirm and Print:
- Click OK to apply the printer settings.
- Back in the Word “Print” dialog box, review all settings (page range, number of copies) and then click Print.
- Note: If you’ve already mirrored your object in Word using the 3D Rotation method, enabling “Mirror Image” in printer settings might result in a double-mirror (i.e., it reverts to the original orientation). Test with a single page first to ensure the desired outcome.
Optimizing Your Mirrored Output
Beyond the technical steps, several design and material considerations can significantly impact the quality and effectiveness of your printed mirror images.
- Choosing the Right Paper: The type of paper you use is critical. For iron-on transfers, specialized transfer paper is a must. For general decorative prints, consider paper weight, thickness, and finish (glossy or matte) based on the desired visual effect. Tophinhanhdep.com understands that the medium often defines the message, just as a nature wallpaper benefits from a high-quality display.
- Design Considerations for Mirrored Content:
- Text Orientation: If your document contains text that shouldn’t be mirrored (e.g., instructions on the same page as an iron-on design), ensure it’s placed outside the mirrored object or in a separate document. Remember, mirrored text will appear backward until transferred.
- Images and Graphics: Pay attention to how logos, icons, or specific graphics will look when mirrored. Some designs might lose their intended impact or become unrecognizable. Previewing is key. Our “Visual Design” section on Tophinhanhdep.com highlights the importance of consistent branding, which extends to mirrored elements.
- Background Color: The background within your text box or image frame will also be mirrored or affected by the printing process. Experiment with different color schemes, keeping the final output medium in mind.
- Leveraging Tophinhanhdep.com’s Image Tools: Before bringing images into Word, or for more complex preparations, consider using Tophinhanhdep.com’s advanced Image Tools. Our Compressors and Optimizers can ensure your images are file-size efficient without sacrificing quality, leading to faster processing and better print results. For images intended for large-format prints, our AI Upscalers can enhance resolution, guaranteeing crisp, high-definition mirrored prints even from smaller source images.
Troubleshooting and Expanding Your Visual Horizons with Tophinhanhdep.com
While mirroring in Word is generally straightforward, you might occasionally encounter challenges. Understanding common issues and knowing how to troubleshoot them will save you time and frustration. Furthermore, recognizing Word’s limitations can open doors to more powerful Image Tools available on Tophinhanhdep.com for truly advanced visual design projects.
Common Issues and Solutions
- “Mirror Image” Option Missing in Printer Settings:
- Solution: Not all printers, especially older models or basic office printers, support a direct “mirror image” option in their drivers. If this is the case, you must rely on mirroring the content directly within Word using the 3D Rotation method for text/WordArt or the “Flip Horizontal” for images/shapes. If the Word method still isn’t sufficient, consider using an external image editor to mirror the entire document content (e.g., paste into Paint, flip, then print the image) or explore professional printing services.
- Text Box Border/Fill Still Visible After Printing:
- Solution: Double-check that you’ve applied “No fill” and “No Line” (or “No Outline”) to your text box in Word’s “Format Shape” pane. Sometimes, default settings can persist.
- Mirroring Not Applying Correctly:
- Solution: Ensure you’ve selected the entire object (Text Box, WordArt, Image) before attempting to mirror. For text, confirm you’ve used the
X Rotation to 180°under3-D Rotationfor the Text Box or WordArt itself, not just standard text formatting. If you’re using the printer’s mirror option, ensure you haven’t also mirrored in Word (this would effectively un-mirror it).
- Solution: Ensure you’ve selected the entire object (Text Box, WordArt, Image) before attempting to mirror. For text, confirm you’ve used the
- Outdated Printer Drivers:
- Solution: Outdated or generic printer drivers can sometimes cause issues with advanced printing options, including mirroring. Visit your printer manufacturer’s official website to download and install the latest drivers specifically designed for your model and operating system. This is akin to ensuring your digital photography equipment has the latest firmware for optimal performance.
- Inability to Preview Mirrored Print Directly in Word:
- Solution: Microsoft Word generally doesn’t offer a live preview of how the “mirror image” printer setting will affect your printout. To work around this, you can:
- Mirror the content within Word (using the 3D Rotation method). The preview in Word will show the mirrored text/image.
- For content intended to be mirrored by the printer driver, print a single test page on plain paper first.
- Alternatively, copy your entire document content into an image editing software (like Paint or a more advanced tool from Tophinhanhdep.com’s Image Tools), flip it horizontally there, and then preview or print from that software.
- Solution: Microsoft Word generally doesn’t offer a live preview of how the “mirror image” printer setting will affect your printout. To work around this, you can:
Unleashing Advanced Capabilities with Tophinhanhdep.com’s Tools
While Microsoft Word provides essential mirroring functionality, for professionals in Graphic Design, Digital Art, and Photo Manipulation, or for anyone seeking truly advanced control and effects, dedicated image tools are indispensable. Tophinhanhdep.com offers a robust suite of such resources that complement and extend beyond Word’s capabilities.
- Beyond Basic Flips: For intricate symmetrical designs, complex abstract images, or precise photo manipulation, tools found or recommended on Tophinhanhdep.com offer layers, masks, advanced blending modes, and more sophisticated transformation options. You can take a Beautiful Photography piece, apply multiple mirror effects, blend them, and integrate them with other elements, creating truly unique compositions that Word simply cannot achieve.
- AI-Powered Enhancements: For transforming your mirrored creations into high-quality, professional-grade assets, Tophinhanhdep.com’s AI Upscalers can take your images to the next level. Imagine mirroring a small graphic for a new logo, then using an AI Upscaler to enlarge it without pixelation, ensuring it looks sharp and professional at any size.
- Efficient Workflow with Image Tools: Our platform provides access to tools for converting image formats, compressing files for web use, and optimizing them for various platforms. This ensures that your mirrored images, whether for a website background or a digital art gallery, are always presented in their best form, aligning with best practices in digital photography and image management.
- Inspiration and Education: Tophinhanhdep.com isn’t just about tools; it’s also a hub for Image Inspiration & Collections. Explore thematic collections, trending styles, and photo ideas that can spark new ways to incorporate mirrored elements into your projects, whether for aesthetic wallpapers or compelling marketing visuals.
In conclusion, the ability to mirror images and text in Microsoft Word is a valuable skill that bridges the gap between basic document creation and creative visual design. From preparing practical iron-on transfers to crafting aesthetically balanced graphic elements, Word offers accessible methods to achieve mirrored effects. By understanding both the direct flipping and the 3D rotation techniques, along with key printing considerations, you can confidently integrate this skill into your projects.
As you delve deeper into the world of visual content, remember that Tophinhanhdep.com stands as your premier resource. We offer an expansive universe of stunning images, cutting-edge photography insights, advanced image tools, and boundless visual design inspiration. While Word provides a solid foundation, exploring the broader ecosystem of tools and resources on Tophinhanhdep.com will undoubtedly empower you to unlock your full creative potential and take your visual projects to an unparalleled level of excellence.