Mastering Image Placement: How to Move Pictures Freely in Microsoft Word for Stunning Visual Design

In today’s visually-driven world, the ability to seamlessly integrate and manipulate images within documents is paramount. Whether you’re crafting a professional report, a captivating presentation, or a creative project showcasing beautiful photography and intricate digital art found on Tophinhanhdep.com, Microsoft Word offers powerful tools to achieve your desired visual aesthetic. Gone are the days of struggling with stubbornly placed pictures; Word empowers you to move, resize, and arrange images with remarkable precision.
This comprehensive guide will delve into the various techniques and advanced options available in Microsoft Word, enabling you to master image placement and elevate your document’s visual design. We’ll explore everything from the fundamental drag-and-drop method to intricate text wrapping styles, precision positioning, and the nuances of working across different Word platforms. By understanding these capabilities, you can transform your documents into engaging visual experiences, making them as impactful as the high-resolution images, abstract designs, or nature photography you might curate from Tophinhanhdep.com for your projects.
Understanding Image Placement Defaults in Word
When you first insert an image into a Microsoft Word document, it doesn’t automatically grant you the freedom to place it anywhere on the page. By default, Word treats newly inserted images in a specific way that can often feel restrictive to new users. Understanding this default behavior is the first step toward gaining full control over your document’s visual layout.
The “In Line with Text” Default
By default, every graphic you insert into a Word document is placed “In Line with Text.” This means Word treats the image as if it were just another character in your text. Imagine a very large letter in your paragraph – that’s how Word initially perceives your image.
What are the implications of this default setting?
- Movement tied to text: If you add or delete text before the image, the image will move along with that text. It doesn’t stay fixed on the page; its position is relative to the text around it.
- Limited free movement: You cannot simply click and drag an “In Line with Text” image to any arbitrary spot on the page. It will snap back to a position dictated by the text flow, much like a character would.
- No text wrapping: Text will not flow around an “In Line with Text” image. Instead, the image will sit within the line of text, pushing the entire line down if it’s too tall, or creating a large gap if it’s wide. This often results in awkward white space and disrupts the visual flow of your document.
This default setting is useful in specific scenarios, such as when inserting small icons or logos that truly need to behave like text characters within a line. However, for most visual design purposes, especially when working with larger photographs or graphic elements designed to enhance the document’s aesthetic, you’ll want to change this behavior to allow for more flexible positioning. The key to unlocking this flexibility lies in understanding and utilizing Word’s text wrapping options.
Mastering Text Wrapping for Free Image Movement
The magic key to moving pictures freely in Word documents, allowing them to float independently of the surrounding text, is text wrapping. Text wrapping defines how an object (like an image) interacts with and flows around the text on your page. By adjusting these settings, you can transform a rigid “in-line” image into a dynamic visual element that complements your content.
Accessing Layout Options and Text Wrapping Styles
Word provides a user-friendly interface to access text wrapping options, making it relatively straightforward to gain control over your images. The primary gateway to these options is the Layout Options button or the Wrap Text feature on the ribbon.
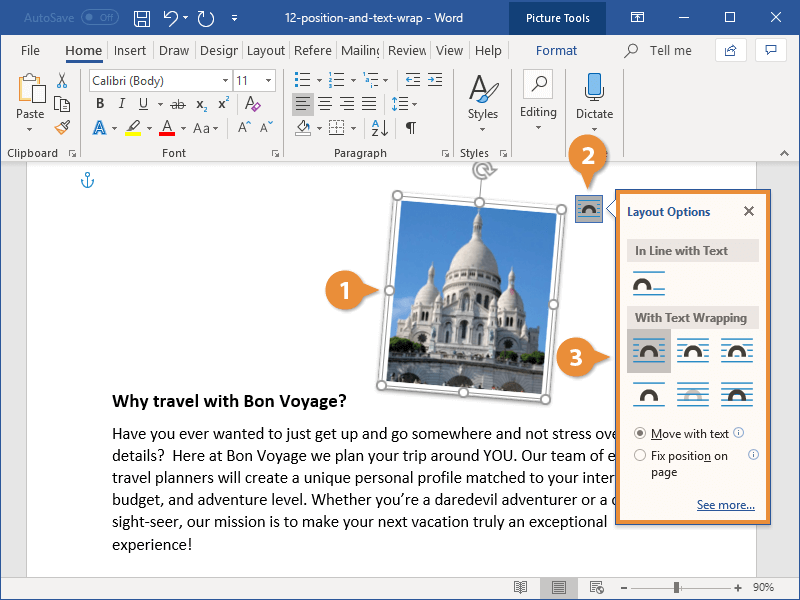
- Select the Object: The first step is always to select the picture you wish to move. Click on the image once. You’ll know it’s selected when selection handles (small circles or squares) appear around its border.
- Accessing Layout Options Button: Once selected, a small Layout Options icon (often a small box with lines next to it) will typically appear near the top-right corner of the image. Clicking this button reveals a dropdown menu with various text wrapping choices.
- Using the Ribbon: Alternatively, with the picture selected, a contextual “Picture Tools” or “Picture Format” tab will appear on the Word ribbon. Navigate to this tab, and within the “Arrange” group, you’ll find the Wrap Text button. Clicking this button opens a similar menu of text wrapping options.
Within these menus, you’ll find a range of text wrapping styles, each with its own icon illustrating how text will flow around the image. These include:
- In Line with Text: This is the default setting, as discussed earlier. The image behaves like a character.
- With Text Wrapping Options (often grouped):
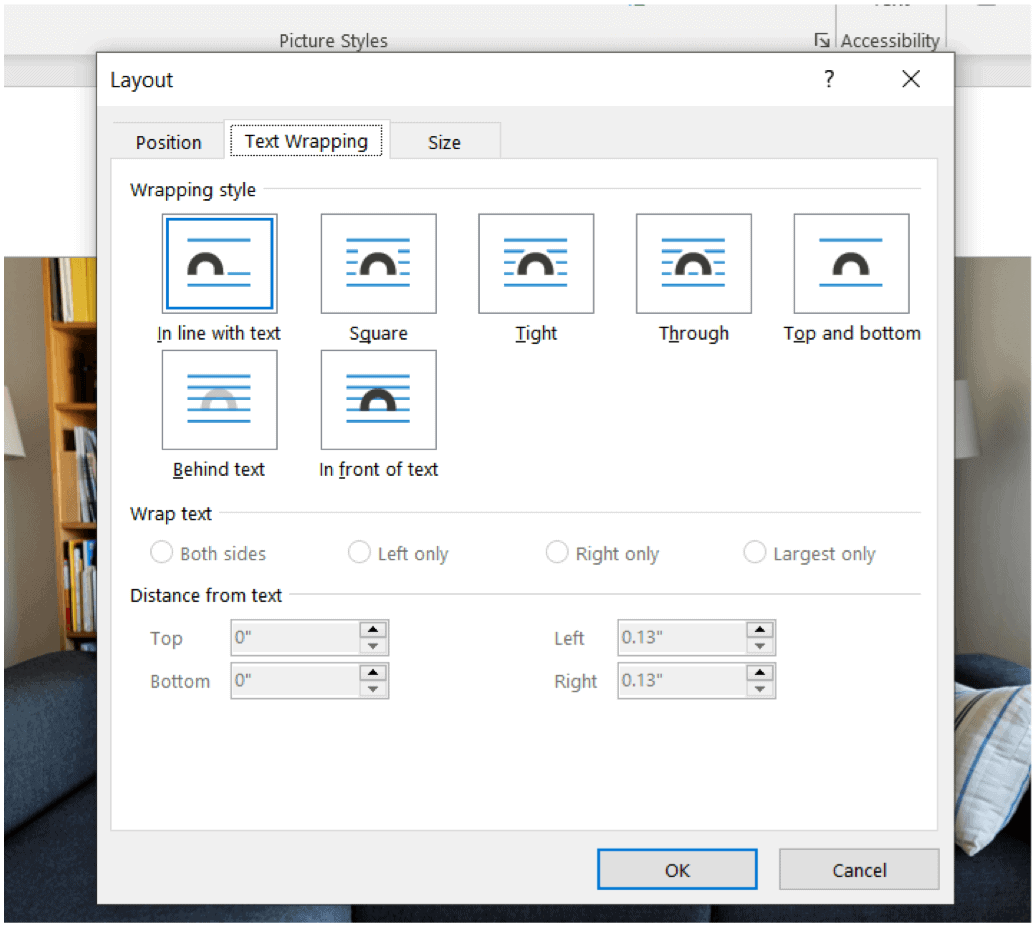
- Square: Text wraps around the rectangular bounding box of the image. This is a very common and versatile option, especially for images with clear rectangular outlines.
- Tight: Text wraps more closely around the actual contours of the image, rather than just its rectangular bounding box. This is effective for images with irregular shapes, though it requires a transparent background for the image to work optimally.
- Through: Similar to Tight, but the text can flow into any open white space within the image itself (e.g., if the image has a hole in the middle). This is less commonly used.
- Top and Bottom: Text stops above the image and resumes below it, leaving the sides of the image clear. This is great for images that should break up a paragraph or span the width of a column without text flowing beside them.
- Behind Text: The image is placed behind the text layer. This is perfect for watermarks, background textures, or artistic overlays that should not interfere with text readability. Images like subtle abstract backgrounds or artistic overlays from Tophinhanhdep.com would fit well with this setting.
- In Front of Text: The image is placed in front of the text layer, obscuring any text underneath it. This is ideal for images that need to stand out, like a prominent logo, a call-to-action button, or a striking piece of beautiful photography from Tophinhanhdep.com that acts as a focal point.
Once you select a text wrapping option (any option other than “In Line with Text”), you gain the ability to freely click and drag the image anywhere on the page. The surrounding text will automatically adjust to accommodate the image’s new position, creating a dynamic and professional layout.
Practical Application of Text Wrapping Options
Understanding the theoretical differences between text wrapping styles is one thing, but knowing when and how to apply them effectively is crucial for visual design.
Let’s consider practical applications:
- For block-style images: If you have a square or rectangular photograph, like a high-resolution stock photo or a nature landscape from Tophinhanhdep.com, selecting “Square” wrapping is usually the most straightforward and aesthetically pleasing option. The text will flow neatly around its edges, maintaining a clean visual line.
- For irregularly shaped graphics: Imagine a logo or an artistic vector shape with an irregular outline and a transparent background. Using “Tight” wrapping will allow the text to contour closely to the shape, maximizing space and creating a more organic, integrated look. This is especially useful for digital art elements.
- For full-width visuals: When you want an image, perhaps a striking abstract background or a panoramic view, to span the entire width of your document, “Top and Bottom” wrapping is often preferred. This ensures your text clearly separates into sections above and below the image, preventing text from squeezing awkwardly around the sides.
- For subtle branding or aesthetic layering: If you’re incorporating a watermark-like logo or a faded aesthetic background from Tophinhanhdep.com, setting the image “Behind Text” allows your content to remain fully readable while adding a subtle visual layer.
- For prominent overlays: Sometimes, an image needs to command attention, perhaps a call-to-action button or a diagram that must sit directly over other content without being affected by it. “In Front of Text” achieves this by placing the image on the topmost layer.
Key tip: After applying a text wrapping style, you can then simply click and drag the image with your mouse. Word will automatically reflow the text. To fine-tune the movement, especially for small adjustments, select the image and then hold down the Ctrl key while pressing the arrow keys. This allows for pixel-by-pixel precision, which is invaluable for achieving perfect alignment.
Overcoming Selection Challenges: The Selection Pane
Occasionally, you might find that you can’t select a picture, or it’s difficult to grab it with your mouse. This often happens when an image is placed “Behind Text” or is obscured by other objects, like large blocks of text or other images. In such cases, the Selection Pane is your best friend.
- Access the Selection Pane: Go to the Home tab on the Word ribbon. In the “Editing” group (usually on the far right), click Select, and then choose Selection Pane….
- Identify and Select: The Selection Pane will appear, listing all the objects (pictures, shapes, text boxes, etc.) on your current page or in your document. You can easily identify your picture by its name (e.g., “Picture 1,” “Image 2,” or a custom name if you’ve set one). Clicking on the image’s name in the pane will instantly select it in your document, even if it’s hidden or hard to click.
- Toggle Visibility: The Selection Pane also has eye icons next to each object. Clicking these icons allows you to temporarily hide or show objects. This is incredibly useful for isolating a specific image or troubleshooting layering issues.
Once selected via the Selection Pane, you can then proceed to adjust its Layout Options, change its text wrapping, or reposition it as needed. This tool is indispensable for complex visual designs involving multiple overlapping images, a common technique in digital art and photo manipulation.
Precision Positioning and Advanced Layout Controls
While drag-and-drop combined with text wrapping offers a great deal of freedom, there are times when you need absolute precision or specific alignment relative to page elements. Microsoft Word provides advanced positioning tools that go beyond simple mouse movements, ensuring your images, whether they are high-resolution stock photos or carefully crafted graphic designs, are exactly where they need to be.
Using the Position Menu and Dialog Box for Exact Placement
For automatic placement in predefined spots or for entering exact coordinates, Word’s Position menu and Layout dialog box are invaluable.
- Select the Object: As always, begin by selecting the image.
- Access the Format Tab: Depending on the object, a “Picture Tools Format,” “Shape Format,” or similar contextual tab will appear on the ribbon. Click on this Format tab.
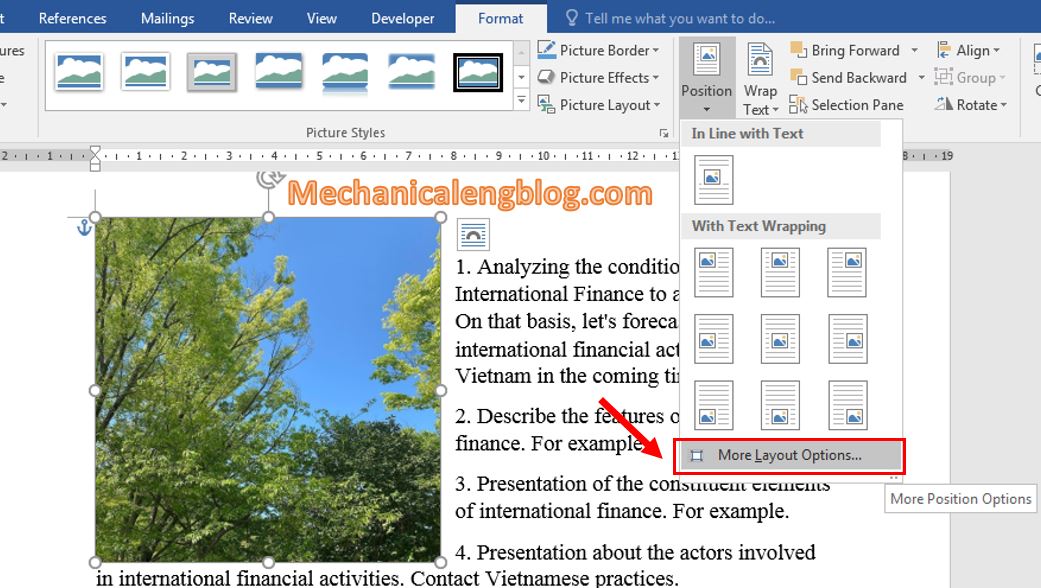
- The Position Button: In the “Arrange” group of the Format tab, click the Position button. This menu offers a grid of nine automatic positions, typically aligning the image to the top-left, top-center, top-right, middle-left, middle-center, middle-right, bottom-left, bottom-center, or bottom-right of the page.
- Automatic Wrapping: Selecting one of these preset positions will automatically apply a text wrapping style (usually “Square”) if the image was “In Line with Text,” forcing the text to wrap around it. This instantly frees the image for more flexible movement within that region.
- More Layout Options (The Layout Dialog Box): For granular control, click More Layout Options… from the Position menu (or from the Layout Options icon next to the image, by selecting “See more”). This opens the Layout dialog box, which is the command center for image positioning.
- Position Tab: Within this dialog box, the “Position” tab allows you to:
- Horizontal and Vertical Absolute Position: Enter precise measurements (in inches, centimeters, or points) relative to the page, margin, or column. This is crucial for maintaining consistent spacing across multiple images or pages.
- Relative Position by Percentage: Position an image as a percentage across the page or within a column.
- Options Group (Allow Overlap): At the bottom of the Position tab, you’ll find the “Options” group. Here, you can check the Allow overlap box. This is essential if you want to create layered effects with multiple images, enabling complex photo manipulation and creative designs. Remember to repeat this for each picture you wish to overlap.
- Text Wrapping Tab: If you find that the position options are grayed out, it’s likely because your image is still “In Line with Text.” Navigate to the “Text Wrapping” tab within the Layout dialog box and select any wrapping style other than “In Line with Text” to activate the positioning controls.
- Position Tab: Within this dialog box, the “Position” tab allows you to:
Using the Layout dialog box provides absolute control over image placement, allowing you to align images to specific distances from margins, columns, or other page elements. This level of detail is vital for professional-looking documents, especially when incorporating precise graphic design elements.
Aligning Objects with Guides and Other Elements
Beyond fixed positions, Word helps you align images dynamically with other objects or text using alignment guides and gridlines.
- Alignment Guides: These are green lines that appear temporarily as you drag an image, indicating when it’s aligned with margins, other images, or text baselines.
- Enable Alignment Guides: Select the image, go to the Format tab, click Align, and ensure Use Alignment Guides is checked. If it’s unchecked, select it.
- Drag and Align: Simply click and drag your image. As it approaches a potential alignment point (like a page margin, the center of the page, or the edge of another object), a green guide will appear, helping you visually snap the image into place.
- Gridlines: For even more structural alignment, you can turn on gridlines, which function like graph paper in the background.
- Enable Gridlines: Go to the View tab on the ribbon and check the Gridlines box in the “Show” group. Alternatively, from the Align menu (under the Format tab), you can select View Gridlines.
- Precise Placement: With gridlines visible, you can drag your images to align precisely with the grid, ensuring uniform spacing and layout, particularly useful for visual design elements that require mathematical precision.
- Aligning Multiple Objects: You can also align several images relative to each other.
- Select Multiple Images: Hold down the Ctrl key and click on each image you want to align.
- Align Options: Go to the Picture Format (or “Picture Tools Format”) tab, click Align, and choose an option like Align Left, Align Center, Align Right, Align Top, Align Middle, or Align Bottom. This is perfect for arranging a collection of images, such as a thematic collection or photo ideas from Tophinhanhdep.com, into a neat grid or row.
- Distribute Options: Also under the Align menu, “Distribute Horizontally” and “Distribute Vertically” help space multiple selected objects evenly between the leftmost and rightmost (or topmost and bottommost) objects.
Grouping and Overlapping Multiple Images
For complex visual compositions, especially in photo manipulation or digital art, you might need to treat several images as a single unit or layer them on top of each other.
- Grouping Images: Grouping allows you to move, resize, or rotate multiple images as if they were one object.
- Select Multiple Images: Hold down the Ctrl key and click on each image you wish to group. (Remember: if images are “In Line with Text,” you won’t be able to multi-select or group them. Change their text wrapping first via the Layout Options).
- Group Command: Right-click on one of the selected images, point to Group, and then select Group.
- Ungrouping: To separate them later, right-click the grouped object, point to Group, and select Ungroup.
- Benefits: Grouping is incredibly useful for designing collages, infographics, or sections where several images form a cohesive visual unit, ensuring they maintain their relative positions when moved.
- Allowing Overlap: As mentioned in the Layout dialog box section, ensuring “Allow overlap” is checked for each image is critical when you want pictures to visually layer on top of each other. This enables techniques like creating depth, combining elements from different high-resolution photos, or placing frames and borders around images, often seen in creative visual design. Without this setting, Word tries to prevent objects from occupying the exact same space.
The Role of Anchors and Advanced Management
Beyond the visible act of dragging and dropping, Word uses an underlying mechanism called an “anchor” to manage how non-inline images relate to your document’s text. Understanding anchors is key to predicting image behavior and ensuring stability in your document layout, especially for complex arrangements involving images, photography, and graphic design elements.
Deciphering Object Anchors
An object anchor (represented by a small anchor symbol, usually near the paragraph mark) indicates the paragraph to which a floating picture or object is tied. It doesn’t appear for “In Line with Text” pictures because those images are treated as characters within the text itself and don’t “float.”
- What it means: For images with any text wrapping option other than “In Line with Text,” the anchor associates the image with a specific paragraph. This means that if you move that associated paragraph, the image will move with it. If you delete the anchored paragraph, the image will also be deleted.
- Why it’s important: If your image is unexpectedly jumping around or disappearing, checking its anchor can provide clues. An image’s position is not just absolute on the page; it’s also relative to the paragraph it’s anchored to.
- Showing Anchors: By default, anchors might not be visible. To display them:
- Show Formatting Marks: On the Home tab, in the “Paragraph” group, click the Show/Hide ¶ button (the paragraph symbol). This will reveal all hidden formatting marks, including object anchors.
- Always Show Anchors: Go to File > Options > Display, and then check the Object anchors box. This setting ensures anchors are always visible regardless of other formatting marks.
Anchors themselves cannot be removed because they are fundamental to how Word handles floating objects. However, by changing the text wrapping options, you effectively change the rules by which the object relates to its anchor and the surrounding text, providing the flexibility needed for most visual layouts.
Locking Anchors and Their Limitations
Sometimes, you want an image to stay exactly where it is, regardless of text edits or additions to the anchored paragraph. This is where locking the anchor comes in handy.
- Locking an Anchor:
- Select the picture.
- Click the Layout Options icon.
- Select See more… to open the Layout dialog box.
- On the Position tab, in the “Options” group at the bottom, check the Lock anchor box.
- Result: With the anchor locked, the image’s position becomes fixed relative to its anchored paragraph. Even if you edit or add text within that paragraph, the image will not shift its position on the page.
- Important Note on “In Line with Text”: Anchor locking and all other positioning options are unavailable for images placed “In Line with Text.” This is because, as character-like objects, they don’t have an anchor in the same floating sense; their position is inherently tied to the text flow. To utilize anchor locking or any advanced positioning, the image must have a text wrapping style applied.
While locking an anchor provides stability, it’s essential to remember that if the anchored paragraph itself is deleted, the locked image will also be deleted. This reinforces the concept that even floating images are fundamentally linked to the document’s text structure. Effective use of anchors, alongside strategic text wrapping, contributes significantly to maintaining the integrity of your visual design, especially in long documents featuring high-resolution images or complex photo manipulation.
Navigating Image Movement in Word for the Web vs. Desktop
It’s important to acknowledge that the full suite of image manipulation tools available in the desktop version of Microsoft Word is not always present in its web-based counterpart, Word for the web. This distinction is crucial for users who rely on different platforms for their document creation and visual design tasks, especially when working with high-resolution images or detailed graphic elements from Tophinhanhdep.com.
Limitations of Word for the Web
Word for the web offers a convenient and accessible way to edit documents from any browser, but it comes with certain limitations regarding image placement.
- Restricted Text Wrapping: In Word for the web, you typically won’t find the full “drag to any position” flexibility offered by “Square,” “Tight,” or “Through” text wrapping styles. Instead, options might be limited to simpler choices like “Square Left” or “Square Right.” This means you cannot freely drag an image to an arbitrary spot on the page; it will still align itself to the left or right margin, or within the text flow.
- No Fixed Position on Page: Features like “Fix position on page” (which works in conjunction with “In Front of Text” or “Behind Text” wrapping in desktop Word) are generally unavailable. This means that if an image is positioned with specific text wrapping and a fixed position in the desktop version, it may not retain that exact floating behavior when opened in the web version.
- Reduced Control for Overlapping and Grouping: Advanced features such as allowing images to overlap or grouping multiple images are also typically not fully supported or are less intuitive to manage in Word for the web. This can be a significant hurdle for complex visual designs or photo manipulation projects.
- “In Line with Text” Predominance: Images inserted directly into Word for the web often behave predominantly “In Line with Text” or with very basic wrapping, making free movement difficult without the advanced options.
For users trying to insert two photos into a single cell on a table and move them freely, as a common question highlights, the web version’s lack of a full “Wrap Text” option like “Square” means that such precise, unconstrained movement isn’t directly achievable within the browser.
The Power of the Desktop Application
For complete and uncompromised control over image placement, text wrapping, and advanced layout options, the desktop version of Microsoft Word remains the definitive tool.
- Full Text Wrapping Suite: The desktop application provides access to all text wrapping styles (Square, Tight, Through, Top and Bottom, Behind Text, In Front of Text), offering ultimate flexibility for how text interacts with your images.
- Absolute and Relative Positioning: The Layout dialog box in desktop Word gives you the power to specify absolute positions (e.g., “1 inch from top, 2 inches from left”) or relative positions (e.g., “50% from page center”), ensuring pixel-perfect placement for high-resolution images and precise graphic designs.
- Anchors and Locking: The ability to view and lock anchors provides robust control over image stability, preventing unwanted shifts during document edits.
- Grouping and Overlapping: Desktop Word fully supports grouping multiple images, shapes, and other objects, allowing you to move and manipulate them as a single unit. It also offers the “Allow overlap” feature, essential for creating layered visual effects and intricate photo manipulation.
- Visual Design Flexibility: For any serious visual design project, whether it involves carefully arranged abstract art, a collection of aesthetic photography, or complex digital art from Tophinhanhdep.com, the desktop version is indispensable. It provides the tools necessary to create documents that are not just informative but also visually stunning.
Recommendation: If you find that you cannot make specific changes to a picture’s layout or movement in Word for the web, and you have access to the desktop version, the best practice is to open the document in the desktop app (usually via an “Open in Word” or “Edit in Desktop App” button). Perform all necessary image adjustments there, save the document (Ctrl+S), and then you can safely reopen it in Word for the web. The layout settings applied in the desktop version will typically be retained, even if they cannot be directly modified in the web interface. This ensures that the aesthetic and visual design integrity of your document, rich with images from Tophinhanhdep.com, remains intact across platforms.
Conclusion
Mastering the art of moving pictures freely in Microsoft Word is a fundamental skill for anyone looking to create visually engaging and professionally polished documents. From the moment an image is inserted, understanding Word’s default “In Line with Text” behavior and knowing how to swiftly transition to flexible text wrapping options like “Square,” “Tight,” or “In Front of Text” unlocks a world of creative possibilities.
Whether you’re leveraging the simplicity of drag-and-drop for quick adjustments, or delving into the precision of the Layout dialog box for absolute positioning, Word provides a comprehensive toolkit. Features such as alignment guides, gridlines, grouping, and the nuanced control offered by object anchors ensure that your high-resolution images, aesthetic photography, abstract designs, or nature-inspired visuals sourced from Tophinhanhdep.com are placed exactly where you envision them.
While Word for the web offers convenience, the desktop application remains the powerhouse for intricate visual design and photo manipulation, providing the full spectrum of tools needed to craft truly impactful documents. By applying the techniques outlined in this guide, you gain not just technical proficiency but also the artistic freedom to enhance your content, making it as compelling as the diverse image collections and visual inspirations found on Tophinhanhdep.com. Embrace these methods, and transform your documents into dynamic visual experiences that effectively convey your message with style and precision.