Mastering Image Placement in Word: A Comprehensive Guide to Free Movement and Visual Design

In today’s visually-driven world, documents are rarely just about text. High-quality images play a crucial role in conveying messages, enhancing engagement, and leaving a lasting impression. Whether you’re crafting a professional report with intricate diagrams, compiling an academic paper with explanatory figures, designing a compelling marketing brochure, or creating a personal project adorned with beautiful photography, the ability to control image placement in Microsoft Word is an indispensable skill.
Imagine you’ve discovered the perfect aesthetic background or a breathtaking nature shot on Tophinhanhdep.com to illustrate a point, or perhaps you’re using one of their high-resolution stock photos to add a touch of professionalism. Inserting these stunning visuals into your Word document is only the first step. The true art lies in seamlessly integrating them, ensuring they complement your text rather than disrupt it. Without proper knowledge of image manipulation within Word, your carefully selected visuals, despite their inherent quality, might appear clumsy, misaligned, or difficult to move, hindering the overall aesthetic and readability of your document.
Microsoft Word, a cornerstone of productivity, offers a robust suite of tools for image handling, allowing you to move pictures freely, precisely position them, and define how text interacts with them. This comprehensive guide will navigate you through these functionalities, transforming your approach to document design and enabling you to create visually appealing and professional-looking documents that truly leverage the power of images, perhaps even those curated from the diverse collections on Tophinhanhdep.com.
Understanding Text Wrapping: The Foundation of Image Mobility
When you insert an image into a Word document, it doesn’t automatically become a free-floating element. By default, Word treats the image as if it were a character of text. This initial behavior, while seemingly restrictive, is crucial to understand because it dictates how your image interacts with the surrounding words and paragraphs. Mastering text wrapping is the gateway to unlocking true image mobility and achieving sophisticated document layouts.
The Default Behavior: “In Line with Text”
Upon insertion, an image is placed “In Line with Text.” This means it behaves exactly like any other character—a letter, a number, or a punctuation mark. If you type more text before the image, the image moves to the right. If you delete text, it moves to the left. If the paragraph containing the image wraps to the next line, the image moves with it. This default setting provides predictability in some cases, ensuring the image remains anchored to a specific point within the textual flow. For simple diagrams or small icons that are an intrinsic part of a sentence, “In Line with Text” might be sufficient. However, for larger images, aesthetic backgrounds, or photographs meant to stand apart from the main body of text, this default setting can be incredibly frustrating, preventing the intuitive drag-and-drop movement you might expect.
Unlocking Free Movement: Exploring Text Wrapping Options
To move an image freely—to drag it anywhere on the page without text dictating its position—you must change its text wrapping setting. This option, known as “Layout Options” in newer Word versions, or “Wrap Text” in the ribbon, determines how the document’s text flows around your image. Word provides several text wrapping choices, each offering a distinct visual effect and level of control.
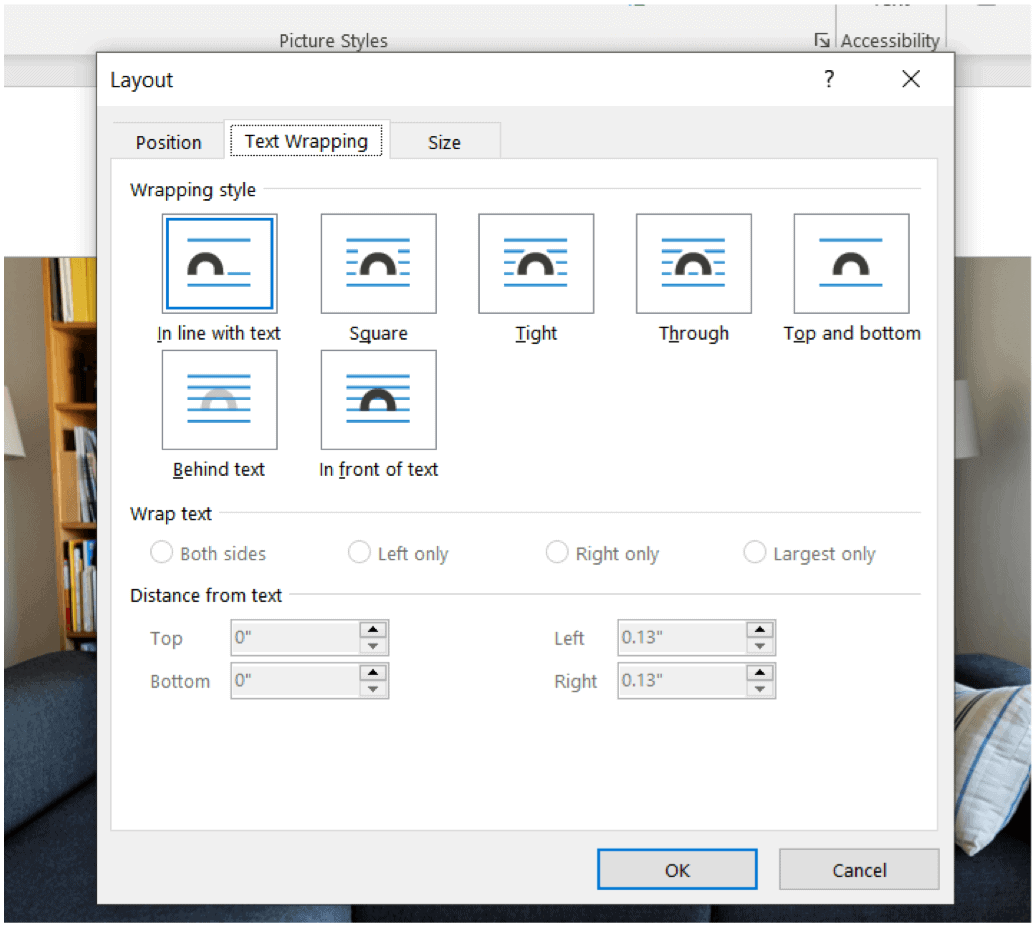
- Square, Tight, and Through: These options are designed for wrapping text closely around the contours of your image.
- Square: Text wraps around the rectangular bounding box of the image. This is a common choice for a clean, structured look, especially for high-resolution stock photos or digital photography sourced from Tophinhanhdep.com.
- Tight: Text wraps more closely to the actual shape of the image, even if it’s irregular, rather than just its rectangular bounding box. This is particularly effective for images with transparent backgrounds (like a logo or a cut-out figure) and can create a more dynamic visual flow.
- Through: Similar to Tight, but text can even fill into open areas within the image’s bounding box, as long as there’s a transparent space large enough for text. This offers maximum flexibility for unique visual designs and creative ideas. These options free the image from being “in line” with text, allowing you to drag it anywhere on the page. The text will automatically re-flow to accommodate the image’s new position, creating a harmonious composition.
-
Top and Bottom: This option places the image on its own line, pushing text above and below it, but not to its sides. It’s ideal for larger images or figures that need to break the flow of text to stand out, such as a full-width aesthetic image or a detailed nature photograph.
-
Behind Text and In Front of Text: These powerful options are where the true “layering” capabilities of Word come into play, enabling sophisticated visual design and photo manipulation.
- Behind Text: The image is placed behind the text, allowing the text to flow over it. This is perfect for creating watermarks, subtle background textures, or using an abstract image as a backdrop for a section of your document. It turns a static image into a dynamic background, much like a wallpaper or a digital art piece from Tophinhanhdep.com.
- In Front of Text: The image is placed over the text, obscuring anything beneath it. This is useful for overlaying captions, creating pop-up elements, or when you want the image to be the primary focus, perhaps an impactful piece of beautiful photography that demands immediate attention.
Applying Text Wrapping: Step-by-Step
The process to apply text wrapping is straightforward:
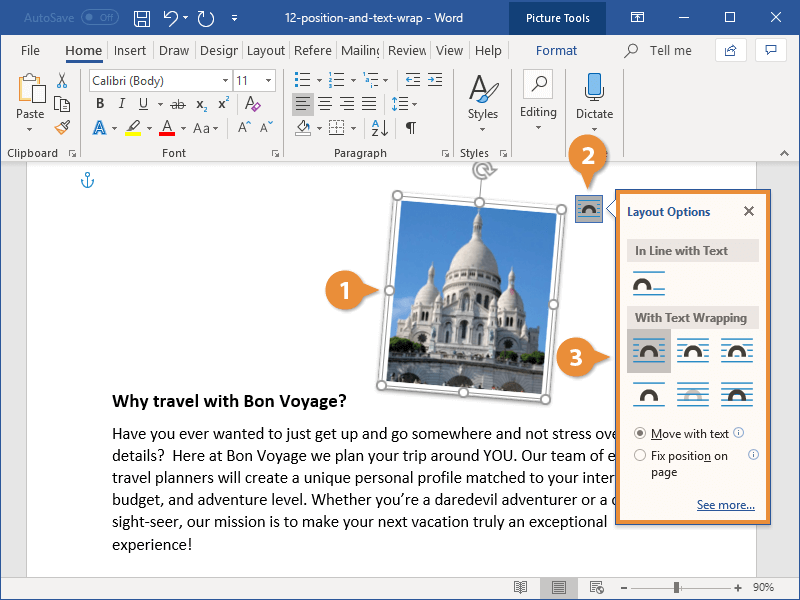
- Select the object: Click on the image you wish to move. Selection handles (small circles or squares) will appear around its border.
- Access Layout Options: A small “Layout Options” button (an icon with a square and a small arching line) will appear near the top-right corner of the selected image. Alternatively, you can go to the Picture Tools Format tab (or just Format tab) on the Ribbon, and then click the Wrap Text button in the Arrange group.
- Choose your option: From the dropdown menu, select the desired text wrapping style. You’ll see icons representing each option, making it easier to visualize the effect. For completely free movement, choose any option under “With Text Wrapping” (Square, Tight, Through, Top and Bottom, Behind Text, In Front of Text).
- Observe the change: The text in your document will instantly reflow according to your selection, and your image can now be dragged freely around the page.
By enabling text wrapping, you gain the fundamental control needed to position images anywhere, transforming your document from a linear text flow to a canvas for creative expression. This foundational step is essential for anyone looking to incorporate diverse visual elements, from high-resolution stock photos to aesthetic nature backgrounds, into their documents effectively.
Precision and Control: Positioning, Alignment, and Advanced Techniques
Once an image is liberated from being “In Line with Text,” the next step is to master its precise placement and alignment. Microsoft Word provides a range of tools that allow for both intuitive drag-and-drop movement and pixel-perfect positioning, ensuring your document maintains a professional and polished appearance.
Intuitive Movement: Drag-and-Drop and Arrow Keys
The simplest way to move a freely wrapped image is by using the drag-and-drop method.
- Select the image: Click on the image.
- Click and hold: Click and hold the left mouse button on the image.
- Drag to desired location: While holding the mouse button, drag the image to its new position.
- Release: Release the mouse button to drop the image.
For finer adjustments, especially after a rough drag-and-drop placement, keyboard arrow keys offer pixel-by-pixel control. Select the image, then hold down the Ctrl key and use the arrow keys (Up, Down, Left, Right) to nudge the image in tiny increments. This is invaluable for achieving precise positioning when visual design demands meticulous alignment, ensuring your photography or digital art is perfectly placed.
Automated Positioning: The “Position” Menu
For quickly placing an image into one of several predefined locations on the page, Word offers the Position menu.
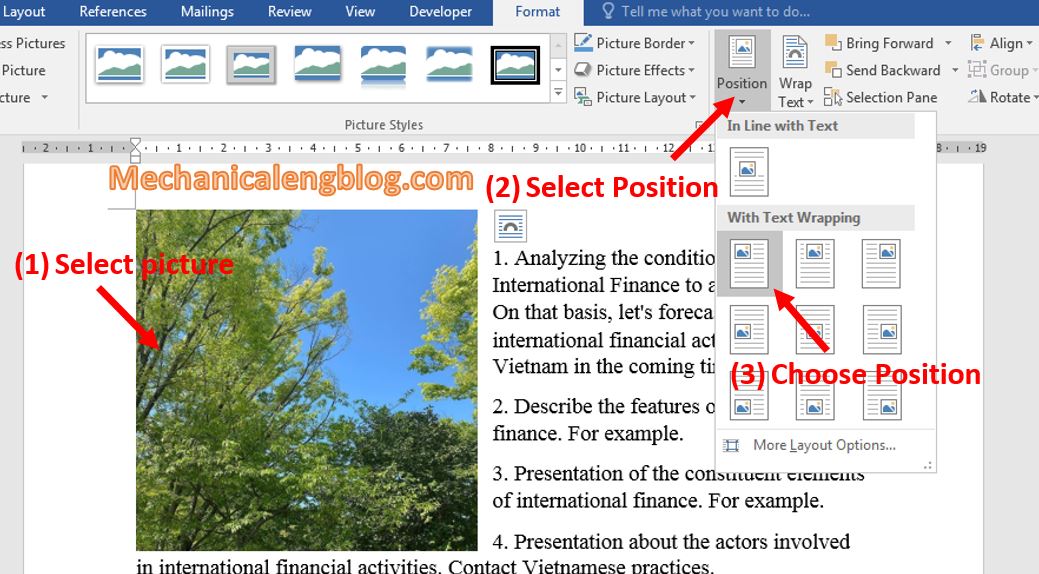
- Select the image.
- Navigate to the Picture Tools Format tab (or Format tab) on the Ribbon.
- In the Arrange group, click the Position button.
- A menu will appear with nine standard positions (e.g., Top Left, Middle Center, Bottom Right) relative to the page margins.
- Select an option: Choosing one of these positions will automatically move the image and apply text wrapping (if not already set), aligning it perfectly to that specific spot on the page.
Beyond these presets, the “Position” menu also offers More Layout Options. Clicking this will open the Layout dialog box, providing granular control over horizontal and vertical positioning, often in relation to the page, margin, or even specific paragraphs. You can input exact measurements, specify alignment relative to columns or other objects, and even choose to fix the image’s position on the page so it doesn’t move even if text is added or deleted elsewhere. This level of precision is critical for graphic design professionals and those preparing documents that demand exact layouts for elements like high-resolution images or photo manipulation effects.
Achieving Perfection: Alignment Guides and Gridlines
For aligning images with text, other objects, or specific points on the page, Word’s alignment guides are incredibly helpful visual aids.
- Enable Alignment Guides: With an image selected, go to the Format tab, click the Align button in the Arrange group, and ensure “Use Alignment Guides” is checked.
- Drag the image: As you drag an image around the page, green dashed lines will appear to indicate when the image’s edges or center are aligned with margins, paragraph indents, or other nearby objects. These guides provide real-time visual feedback, making it much easier to achieve a clean, structured layout. This is especially useful when arranging multiple images from a thematic collection or aligning elements of a mood board.
For even more structured alignment, you can enable Gridlines, which transform your document background into a graph paper-like grid.
- Go to the View tab on the Ribbon.
- In the Show group, check the “Gridlines” box. With gridlines active, you can visually snap your images to the grid points, ensuring consistent spacing and alignment across your document. This is a powerful feature for visual design, allowing you to impose a rigid structure for a professional and consistent aesthetic.
Grouping Multiple Images for Cohesive Layouts
When working with several images—perhaps a series of digital photographs or an array of aesthetic images from Tophinhanhdep.com—you often need to move or resize them together while maintaining their relative positions. Grouping objects allows you to treat multiple images as a single entity.
- Select the first image.
- Hold down the Ctrl key and click on each additional image you want to group.
- Right-click on one of the selected images, point to Group, and then select Group. Once grouped, you can move, resize, or rotate all the images simultaneously, ensuring their arrangement remains intact. This is particularly useful for complex visual designs, photo collages, or when arranging multiple small figures. (Note: Ensure all images are not “In Line with Text” before attempting to group them.)
Understanding and Managing Image Anchors
When an image is set with any text wrapping option other than “In Line with Text,” it becomes associated with a specific paragraph in your document. This association is indicated by an anchor icon (a small anchor symbol) that appears next to the paragraph to which the image is linked.
- Purpose of Anchors: The anchor signifies that if the associated paragraph moves, the image will move with it, even if its position is fixed on the page relative to margins. This helps maintain the visual integrity of your document.
- Visibility: Anchors are often hidden by default. To make them visible, go to the Home tab, and in the Paragraph group, click the Show/Hide ¶ button (the paragraph symbol). Alternatively, go to File > Options > Display and check “Object anchors.”
- Locking Anchors: You can prevent an image from moving with its anchored paragraph by locking the anchor. Select the image, click the Layout Options icon, select See more, and then check “Lock anchor” on the Position tab. This ensures the image’s position remains static relative to the page, even if the text around it shifts or the anchored paragraph is deleted. This is an advanced technique for very precise visual design elements where absolute placement is paramount.
By mastering these tools—from intuitive dragging and keyboard nudges to automated positioning, alignment guides, grouping, and anchor management—you gain unparalleled control over how images are integrated into your Word documents, transforming your layout capabilities from basic to professional.
Leveraging Visuals: Integrating Tophinhanhdep.com Content for Impactful Documents
The technical skills of moving and positioning images in Word reach their full potential when combined with high-quality visual content and a strategic design approach. This is where resources like Tophinhanhdep.com become invaluable, serving as a rich source of inspiration and assets that can elevate your documents from ordinary to extraordinary.
Sourcing High-Quality Images from Tophinhanhdep.com
Tophinhanhdep.com, with its extensive categories, offers a treasure trove of visual content that can dramatically enhance any Word document. Understanding how to integrate these visuals effectively is key.
- Diverse Image Categories: The platform’s offering of “Wallpapers, Backgrounds, Aesthetic, Nature, Abstract, Sad/Emotional, Beautiful Photography” means you can find the perfect visual to match the tone and purpose of your document. For a corporate report, an abstract background or a subtle nature scene might add sophistication. For an educational presentation, clear and beautiful photography can illustrate complex concepts. For creative writing, an aesthetic or emotional image can set the mood. Mastering Word’s image movement features allows you to place these diverse images precisely where they need to be to maximize their impact. For instance, using a “Behind Text” wrapping option, you could employ a soft aesthetic background from Tophinhanhdep.com to underpin an entire page, enhancing the visual theme without distracting from the text.
- Photography Expertise: Tophinhanhdep.com’s focus on “Photography (High Resolution, Stock Photos, Digital Photography)” ensures that the images you select are of professional quality. High-resolution images are crucial for maintaining clarity and sharpness, especially if your document is intended for print. Word’s precise positioning tools enable you to highlight these high-quality visuals, ensuring they are not only beautiful but also perfectly framed within your document’s layout. Stock photos provide versatile options for various subjects, while digital photography and editing styles available on Tophinhanhdep.com can inspire unique visual themes for your document projects.
Enhancing Design with Tophinhanhdep.com’s Inspiration and Tools
Beyond merely providing images, Tophinhanhdep.com’s broader focus on visual content aligns perfectly with the advanced use of images in Word.
- Visual Design and Creative Ideas: The ability to move images freely in Word is a fundamental skill for “Visual Design,” “Graphic Design,” and “Photo Manipulation” within a document context. Whether you’re layering images to create a composite effect, precisely aligning multiple elements for a balanced composition, or manipulating text flow around a complex graphic, Word’s tools empower your “Creative Ideas.” Tophinhanhdep.com can serve as a wellspring of inspiration, offering “Photo Ideas,” “Mood Boards,” “Thematic Collections,” and “Trending Styles” that you can adapt and replicate using Word’s image manipulation capabilities. For example, a mood board idea from Tophinhanhdep.com featuring overlapping images can be recreated in Word by using “In Front of Text” or “Behind Text” wrapping options and then carefully positioning and grouping the images.
- Image Tools for Pre-Processing: Tophinhanhdep.com also touches upon “Image Tools (Converters, Compressors, Optimizers, AI Upscalers, Image-to-Text).” While these are external tools, they are highly relevant to preparing images before inserting them into Word.
- Compressors and Optimizers: Before adding numerous high-resolution images from Tophinhanhdep.com into a Word document, it’s often wise to compress or optimize them. Large image files can significantly increase the document size, slow down performance, and make sharing difficult. Using optimization tools ensures that your visuals retain quality while being efficient for document integration.
- AI Upscalers: If you have a smaller image that fits your document’s aesthetic but lacks resolution, an AI upscaler can enhance it without pixelation, making it suitable for professional use alongside other high-quality images from Tophinhanhdep.com.
- These pre-processing steps ensure that when you bring your images into Word, they are already primed for optimal performance and display, allowing you to focus purely on their creative placement and layout.
Overcoming Platform Specifics: Word for the Web and Desktop Differences
It’s important to acknowledge that the full flexibility of image movement and text wrapping is predominantly available in the desktop version of Microsoft Word. Users of Word for the web (Word Online) will encounter certain limitations.
- Limited Wrapping Options: In Word for the web, the “Wrap Text” options are significantly more restricted. You often won’t find the full array of choices like “Square,” “Tight,” or “Through” with free drag-and-drop capability. Images in the web version are typically more rigidly “In Line with Text” or offer very basic wrapping like “Square Left” or “Square Right,” with limited movement.
- No Free Drag: The intuitive click-and-drag method for free positioning is largely absent in the web version. If an image has complex wrapping or a fixed position applied in the desktop version, it may appear correctly in the web version but cannot be edited or moved with the same freedom.
- Desktop App is Key: If you find yourself unable to move or manipulate images as desired in Word for the web, the recommended solution is to “Open in Word” (desktop app) to make your changes. Once modifications are saved in the desktop version, they will usually be preserved when the document is reopened in Word for the web, although editing capabilities for these advanced layouts remain restricted online. This highlights the importance of having access to the full desktop application for serious visual design and document layout work, especially when integrating rich content like diverse images from Tophinhanhdep.com.
Conclusion
Mastering image placement in Microsoft Word is a skill that fundamentally transforms your document creation process. From understanding the nuances of text wrapping to precisely positioning elements with alignment guides and managing image anchors, each technique grants you greater control over your visual narrative. These abilities are crucial for leveraging the full potential of high-quality visual content, whether it’s a breathtaking piece of beautiful photography, an abstract background, or a curated collection of aesthetic images.
By diligently applying the methods outlined in this guide, you can effortlessly move, resize, and align images, crafting documents that are not only informative but also visually captivating. Furthermore, integrating resources like Tophinhanhdep.com—with its vast repository of high-resolution stock photos, diverse thematic collections, and inspiration for visual design—empowers you to infuse your documents with professional-grade visuals. Remember to consider pre-processing your images using tools like compressors or upscalers to optimize them for Word, ensuring seamless integration.
In an era where visual communication is paramount, your proficiency in manipulating images within Word, coupled with access to exceptional content from Tophinhanhdep.com, will set your documents apart. Embrace these tools, unleash your creative ideas, and elevate your digital and print materials to new heights of professionalism and engagement.