Mastering Image Placement: How to Move Pictures Freely in Microsoft Word

Microsoft Word is far more than just a word processor; it’s a versatile platform for creating visually rich and professional documents. Whether you’re compiling a report with illustrative graphs, designing a marketing flyer with compelling visuals, or crafting a personal project adorned with beautiful photography, the ability to effectively incorporate and manipulate images is paramount. At Tophinhanhdep.com, we understand the power of visual communication – from stunning wallpapers and backgrounds to high-resolution stock photos and intricate digital art. We know that the visual impact of your content often hinges on the precise placement and seamless integration of your images.
Yet, a common challenge many users face is the perceived rigidity of image placement in Word. The frustration of an image “snapping back” to an undesired position or refusing to budge can transform a simple task into a time-consuming struggle. This guide, drawing upon the expertise cultivated at Tophinhanhdep.com in visual design and digital photography, will demystify the process. We’ll explore a comprehensive suite of techniques that empower you to move, resize, and position pictures with ultimate freedom and precision, ensuring your documents achieve the polished, professional look your visual content deserves.
Essential Techniques for Free Image Movement
The journey to mastering image placement in Microsoft Word begins with understanding the fundamental methods that grant you control. While Word defaults to inserting images “in line with text”—treating them like a character—the true flexibility comes from altering this behavior. Here, we delve into the core techniques that unlock fluid image manipulation.

The Intuitive Drag-and-Drop Method
The most direct and often preferred method for repositioning an image is the classic drag-and-drop. This technique offers immediate visual feedback and allows for quick adjustments, making it ideal for initial layouts or minor tweaks.
To utilize the drag-and-drop method:
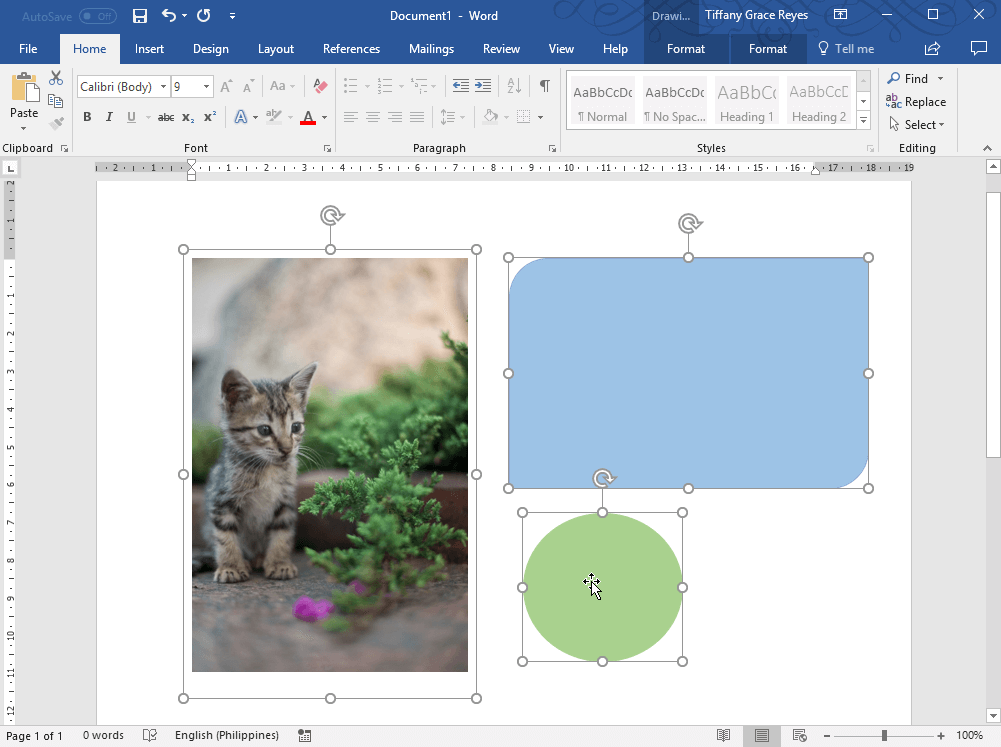
- Select the Picture: Simply click on the image once. You’ll notice selection handles (small squares or circles) appearing around its border, indicating it’s active.
- Initiate the Drag: Click and hold the left mouse button anywhere on the selected picture. Your cursor will typically change to a four-headed arrow, signifying that the object can be moved.
- Move to Desired Location: While holding the mouse button, drag the picture to its new position within the document. You’ll see a ghosted outline of the image moving, providing a preview of its new placement.
- Release and Drop: Once the picture is exactly where you want it, release the mouse button. The image will snap into its new location.
Pro Tip for Precision: For fine-tuning after an initial drag-and-drop, select the picture and then use the arrow keys on your keyboard. Each press will nudge the image a tiny increment, offering pixel-level control over its position. Holding down the Ctrl key while using arrow keys can provide even more minute adjustments.
Precision with Cut and Paste
For situations where an image needs to be moved a significant distance, between different sections, or even to a different document, the cut-and-paste method offers a reliable alternative to dragging across long distances. It’s particularly useful for maintaining consistent spacing or when the drag-and-drop becomes cumbersome due to complex document structures.
Here’s how to employ cut and paste:
- Select the Picture: Click on the image you wish to relocate.
- Cut the Image: Right-click on the selected image and choose “Cut” from the context menu, or use the keyboard shortcut
Ctrl+X(orCmd+Xon Mac). The image will disappear from its current location and be stored temporarily on your clipboard. - Navigate to New Location: Place your cursor at the exact point in your document where you want the picture to appear.
- Paste the Image: Right-click in the desired position and select “Paste” from the context menu, or use
Ctrl+V(orCmd+Von Mac). The image will be inserted at the cursor’s position.
Leveraging “Paste Special”: For even greater control over how the pasted image behaves, particularly concerning its format and interaction with text, consider using “Paste Special.” After cutting the image, instead of a simple paste, go to the “Home” tab, click the small arrow below “Paste,” and select “Paste Special.” This allows you to choose formats like “Picture (Enhanced Metafile)” or “Picture (PNG),” which can sometimes preserve quality or provide different wrapping behaviors.
Harnessing the Layout Options Button
The “Layout Options” button is arguably the most critical feature for unlocking truly free image movement in Word. When you insert an image, it’s typically set “In Line with Text,” meaning it’s treated like a character. This restricts its movement and causes text to flow around it awkwardly. The Layout Options icon, a small square with a curved arrow, appears near the top-right corner of a selected image. Clicking it reveals the gateway to flexible image placement.
To enable free movement via Layout Options:
- Select the Picture: Click on the image.
- Access Layout Options: Click the “Layout Options” icon that appears.
- Choose a Text Wrapping Option: In the menu that appears, you’ll see options under “With Text Wrapping.” Selecting any option other than “In Line with Text” will immediately grant you greater freedom. Popular choices include:
- Square: Text wraps around the rectangular bounding box of the image.
- Tight: Text wraps closely around the actual shape of the image (if it has transparency or irregular edges).
- Through: Similar to Tight, but can also fill internal spaces within the image.
- Top and Bottom: Text stops above the image and resumes below it.
- Behind Text: The image appears as a background element, underneath the text.
- In Front of Text: The image floats above the text, potentially obscuring it.
Once you’ve chosen a wrapping option (like “Square” or “In Front of Text”), the image becomes a “floating object,” no longer tethered “in line with text.” This allows you to drag it freely anywhere on the page, and the text will adjust according to your chosen wrapping style.
Fine-Tuning Placement with Advanced Layout Controls
Beyond the basic methods, Microsoft Word offers an array of advanced tools to achieve pixel-perfect placement, intricate text interaction, and organized visual compositions. These features are indispensable for professional-looking documents, especially when working with high-resolution images or complex visual designs curated from Tophinhanhdep.com.
Understanding Text Wrapping Styles
As introduced with the Layout Options button, text wrapping is the cornerstone of fluid image placement. Each style offers a distinct way for your text to interact with your images, directly influencing the visual flow and readability of your document.
- In Line with Text: (Default) The image is treated like a character. It moves with the text, cannot be freely dragged, and any resizing affects the line height. Best for small icons or images that must stay with specific text.
- Square: Text flows around the rectangular boundary of the image. This is a common and versatile option, creating a clean look.
- Tight / Through: Ideal for irregularly shaped images or those with transparency (e.g., PNGs). Text wraps closely to the visible contours, allowing for creative integration. “Through” can even push text into open areas within the image’s boundaries.
- Top and Bottom: Text fills the space above and below the image, leaving the sides clear. Useful for large images that divide sections of text.
- Behind Text: The image becomes a background element, allowing text to flow directly over it. Excellent for watermarks, subtle branding, or artistic layering, complementing the aesthetic backgrounds often featured on Tophinhanhdep.com.
- In Front of Text: The image overlays the text, obscuring anything beneath it. Perfect for floating logos, callout boxes, or when you explicitly want the image to be the dominant foreground element.
To access and modify these options in detail:
- Select the picture.
- Go to the “Picture Format” (or “Format”) tab on the Ribbon.
- Click “Wrap Text” in the “Arrange” group.
- Choose your desired option or select “More Layout Options” for granular control via the Layout dialog box.
Utilizing the Position Dialog Box for Absolute Control
For situations demanding absolute precision—placing an image exactly 1.5 inches from the left margin and 2 inches from the top of the page, for instance—the “Position” dialog box is your most powerful tool. This goes beyond drag-and-drop to offer numerical, rule-based placement.
To access the Position Dialog Box:
- Select the picture.
- Go to the “Picture Format” (or “Format”) tab.
- Click the “Position” button in the “Arrange” group.
- Select “More Layout Options” from the dropdown menu.
Within the “Layout” dialog box, navigate to the “Position” tab. Here, you can:
- Horizontal and Vertical Position: Enter specific numerical values (e.g., “1.5 inches from Left Margin”) or select relative positions (e.g., “Centered relative to Page”).
- Relative To: Specify if the position should be relative to the page, margin, column, or paragraph.
- Lock Anchor: This crucial option, available under “Options” at the bottom of the “Position” tab, allows you to “Fix position on page.” This prevents the image from shifting its absolute position even if text is added or deleted around it, which is incredibly useful for maintaining a consistent visual design.
- Allow Overlap: If you intend to stack or layer multiple images (a technique often used in digital art and creative layouts), ensure this checkbox is selected for each overlapping image.
Important Note: If the position options are grayed out, it means your image is still set “In Line with Text.” You must first change its text wrapping to any option under “With Text Wrapping” (e.g., Square) on the “Text Wrapping” tab within the same Layout dialog box.
The Role of Alignment Guides and Gridlines
For visually aligning objects without exact measurements, Word provides intelligent “Alignment Guides” that appear dynamically as you drag an image. These green lines indicate when your image’s edges or center align with other objects (text, other images, margins, or the page center).
To use Alignment Guides:
- Select the picture.
- Go to the “Picture Format” (or “Format”) tab.
- Click the “Align” button in the “Arrange” group.
- Ensure “Use Alignment Guides” is checked.
Now, as you drag your image, watch for the green lines to appear, helping you visually snap to common alignment points.
For a more structured visual aid, you can enable “Gridlines.” These are background lines resembling graph paper, which can be invaluable for precise, measured layouts, especially when dealing with multiple image elements.
- Go to the “View” tab.
- Check the “Gridlines” box in the “Show” group.
Grouping Multiple Images for Unified Movement
When designing complex visual arrangements, such as a collage of photos or an infographic featuring several image elements, moving each piece individually can be tedious and prone to misalignment. Word’s “Group” feature allows you to combine multiple objects into a single unit, which can then be moved, resized, or rotated as one cohesive item. This is particularly useful for presenting thematic collections or mood boards, echoing the “Image Inspiration & Collections” themes on Tophinhanhdep.com.
To group images:
- Select Multiple Images: Hold down the
Ctrlkey (orCmdon Mac) and click on each picture you want to group. - Access Grouping Options: With all desired images selected, go to the “Picture Format” (or “Format”) tab.
- Group Objects: Click the “Group” button in the “Arrange” group, then select “Group” from the dropdown.
Now, when you click and drag any part of the grouped object, all images move together, maintaining their relative positions. You can also resize the entire group proportionally. To make individual adjustments later, simply select the group and choose “Ungroup.”
Strategic Image Organization: Tables and Anchors
Beyond simple floating objects, Word provides structural elements and underlying mechanisms that can further enhance your control over image placement, offering both structured layouts and insights into how Word manages your visuals.
Leveraging Tables for Structured Layouts
When a formal, grid-based arrangement of images is required, such as in a catalog or a structured photo report, tables offer an excellent solution. They provide a robust framework for organizing multiple pictures, ensuring consistent spacing and alignment that can be challenging to achieve with free-form placement alone. This approach lends itself well to showcasing collections of high-resolution stock photos or digital photography in an orderly fashion.
To use tables for picture placement:
- Insert a Table: Go to the “Insert” tab, click “Table,” and draw or specify the desired number of rows and columns.
- Insert Pictures into Cells: Click inside a table cell. Go to the “Insert” tab, click “Pictures,” and then select your image. Repeat for other cells.
- Adjust Layout: You can then resize the images within their cells, adjust cell margins, or even modify table properties (e.g., removing borders for an invisible grid) to achieve your desired aesthetic.
Text Wrapping within Tables: If you want text to wrap around pictures inside table cells, you’ll still need to adjust the individual picture’s text wrapping settings. For the table itself, you can right-click the table, select “Table Properties,” and under the “Table” tab, ensure “Text Wrapping” is set to “Around” if you want document text to flow around the entire table. Within the “Options” for table properties, “Allow row to break across pages” and “Automatically resize to fit contents” can also be useful.
Deciphering Object Anchors: What They Mean for Your Images
A fundamental concept in understanding free image movement in Word is the “object anchor.” When an image is set to any text wrapping option other than “In Line with Text,” it becomes a floating object and gets tied to a specific paragraph in your document. This invisible marker, the anchor, indicates which paragraph “owns” the image. If that paragraph moves, the image will move with it.
- Visibility: Anchors are typically hidden by default. To see them, go to the “Home” tab, and in the “Paragraph” group, click the “Show/Hide ¶” button (the paragraph mark icon). Alternatively, you can enable them permanently via “File > Options > Display” and check “Object anchors.”
- Behavior: An anchor looks like a small ship’s anchor symbol. It resides in the left margin next to the paragraph it’s associated with. While you can drag an image freely, its anchor will remain attached to a paragraph. If you delete the anchored paragraph, the image will also be deleted.
- Significance: Understanding anchors helps diagnose unexpected image shifts. If an image moves when you edit text far away, check its anchor. It might be attached to a paragraph that was affected by your edits. You can drag the anchor to a different paragraph to re-associate the image.
Locking Anchors for Stability
For maximum stability, especially in complex layouts where precise images must remain in an absolute position, Word allows you to “lock” an image’s anchor. This prevents the image from moving with its associated paragraph, effectively fixing its position on the page regardless of text edits or additions.
To lock an anchor:
- Select the picture.
- Click the “Layout Options” icon.
- Select “See More.”
- On the “Position” tab of the Layout dialog box, check the “Lock anchor” box. (Note: This option is only available for floating objects, not “In Line with Text” images.)
Locking the anchor is a powerful technique for maintaining the integrity of your visual design, ensuring that your carefully placed nature photography or abstract art remains exactly where you intended it to be, even through extensive document revisions.
Overcoming Common Challenges and Web Version Limitations
While Microsoft Word provides robust tools for image manipulation, users occasionally encounter specific hurdles. Understanding how to troubleshoot these common issues and recognizing the limitations of different Word versions can save significant time and frustration.
Troubleshooting Unselectable Images
One of the most vexing issues is when an image appears in your document but you simply cannot click to select it. This often occurs when the image is positioned “Behind Text” or is obscured by another object.
To select an otherwise unselectable picture:
- Go to the “Home” tab.
- In the “Editing” group, click “Select” and then choose “Selection Pane.”
- The “Selection Pane” will appear on the right side of your screen, listing all objects (pictures, shapes, text boxes) in your document. Click on the name of your desired picture in this list to select it.
Once selected in the Selection Pane, you can then adjust its layout options to bring it “In Front of Text” or move it as needed.
Resizing and Rotating During or After Movement
Moving images often goes hand-in-hand with resizing and rotation to achieve the perfect visual balance within your document. Tophinhanhdep.com, with its focus on image optimization and high-quality photography, emphasizes the importance of these adjustments.
- Resizing: When an image is selected, you’ll see small circular or square handles on its corners and sides.
- To resize proportionally (maintaining aspect ratio), click and drag a corner handle.
- To resize non-proportionally (stretching or squishing), drag a side handle.
- For precise numerical resizing, use the “Height” and “Width” input boxes in the “Size” group on the “Picture Format” tab.
- You can resize while moving by dragging a corner handle and then dragging the image itself.
- Rotating: A circular arrow handle usually appears above a selected image.
- Click and drag this rotation handle to rotate the image freely.
- For precise rotations (e.g., 90-degree increments), use the “Rotate” options found in the “Arrange” group on the “Picture Format” tab.
Remember that resizing images, especially enlarging low-resolution ones, can degrade their quality. Always aim to start with the best possible source image, ideally high-resolution, which you can find and optimize on Tophinhanhdep.com.
Specific Considerations for Word for the Web
It’s crucial to acknowledge that the web-based version of Microsoft Word, while convenient, has limitations compared to its desktop counterpart, particularly regarding advanced image manipulation. Users attempting to implement intricate visual designs might find themselves frustrated.
- Limited Text Wrapping: Word for the web often restricts text wrapping options to “In Line with Text,” “Square Left,” and “Square Right,” lacking the full suite of “Tight,” “Through,” “Behind Text,” and “In Front of Text” options available in the desktop version.
- Restricted Free Movement: The ability to freely drag and drop images to any position on the page is significantly curtailed or entirely absent for images with complex wrapping or fixed positions in Word for the web. Images might behave as if they are permanently “In Line with Text” even if they were formatted otherwise in the desktop app.
- No Layout Options Icon: The convenient “Layout Options” icon often does not appear or offers fewer choices in the web version.
- The Desktop Solution: If you encounter these limitations and need full control over your image placement, the recommended solution is to “Open in Desktop App.” This option is usually found in the “Editing” dropdown at the top of the Word for the web interface. Make your advanced adjustments in the desktop version, save the document, and then you can reopen it in the web version (though some layouts might render differently or revert if modified further in the web app).
This distinction is particularly important for professionals involved in visual design or digital art who rely on precise layouts. Always confirm you are using the full desktop application when fine-tuning your image compositions.
Conclusion
The ability to move pictures freely in Microsoft Word is more than just a convenience; it’s a fundamental skill for anyone looking to create visually engaging and professional documents. From the intuitive drag-and-drop method to the powerful control offered by the Layout Options, Position dialog box, and text wrapping styles, Word provides a comprehensive toolkit for image manipulation. Leveraging features like alignment guides, grouping, and anchors allows for increasingly sophisticated and stable document designs, transforming your raw content into a polished presentation.
At Tophinhanhdep.com, we believe that every image—whether a breathtaking piece of nature photography, a sophisticated abstract graphic, or a crucial data visualization—deserves to be presented optimally. By mastering these techniques, you’re not just moving pixels; you’re enhancing your visual storytelling, reinforcing your message, and elevating the overall quality of your output. Remember to experiment with the various options, practice regularly, and never shy away from diving into the more advanced settings. The flexibility and precision available in Microsoft Word will empower you to craft documents that truly stand out, making your visual content, from the vast collections on Tophinhanhdep.com, shine in every context.