Mastering Image Placement in Word: A Comprehensive Guide to Moving and Manipulating Visuals

In the realm of digital document creation, Microsoft Word stands as an indispensable tool for countless users, ranging from students crafting academic papers to professionals developing intricate reports. While its prowess in text formatting is widely acknowledged, its capabilities in handling visual elements – particularly images – are equally critical for producing engaging and professional-looking content. The ability to seamlessly move and precisely position images within a Word document transforms a mere collection of words into a visually compelling narrative. This guide delves deep into the nuances of image placement in Word, offering practical advice and advanced techniques to help you master visual integration, drawing parallels to the extensive resources and inspiration available on Tophinhanhdep.com.
For anyone who has ever wrestled with an image stubbornly refusing to budge, or text flowing awkwardly around a picture, this guide is your key to unlocking Word’s full potential. We understand that effective visual communication hinges on more than just selecting the right image; it requires the skill to position it optimally, ensuring it complements the text and enhances the overall aesthetic. Just as Tophinhanhdep.com provides a vast library of high-resolution images, from stunning nature photography to abstract backgrounds and aesthetic wallpapers, knowing how to wield these visuals within your documents is paramount.
The Fundamentals of Image Placement in Word
At its core, moving or repositioning a picture in Word is often perceived as a simple drag-and-drop operation. However, as many users quickly discover, this seemingly straightforward action can sometimes lead to frustrating results. The secret to achieving the desired layout lies in understanding and utilizing Word’s “Layout Options,” particularly text wrapping.
Understanding Default Behavior: In Line with Text
When you initially insert an image into a Word document, it is, by default, placed “In Line with Text.” This means Word treats the image as if it were a single character of text. While this might seem restrictive, it serves a purpose: it ensures the image moves along with the surrounding text, maintaining its relative position within a paragraph. For simple documents where images are merely illustrative and don’t require complex interaction with text, this default can be sufficient. For example, if you’re writing a short blog post and insert a beautiful, high-resolution stock photo of a landscape from Tophinhanhdep.com, “In Line with Text” might be acceptable if the image is intended to break up paragraphs without overlapping text.
However, this default setting is precisely why images can feel “stuck.” If you try to drag an “In Line with Text” image, it will behave like a large text character, only allowing horizontal movement within its line and often pushing surrounding text awkwardly. This limitation can be particularly frustrating when aiming for a sophisticated visual design or trying to create a creative layout inspired by thematic collections found on Tophinhanhdep.com.
Unlocking Freedom with Layout Options and Text Wrapping
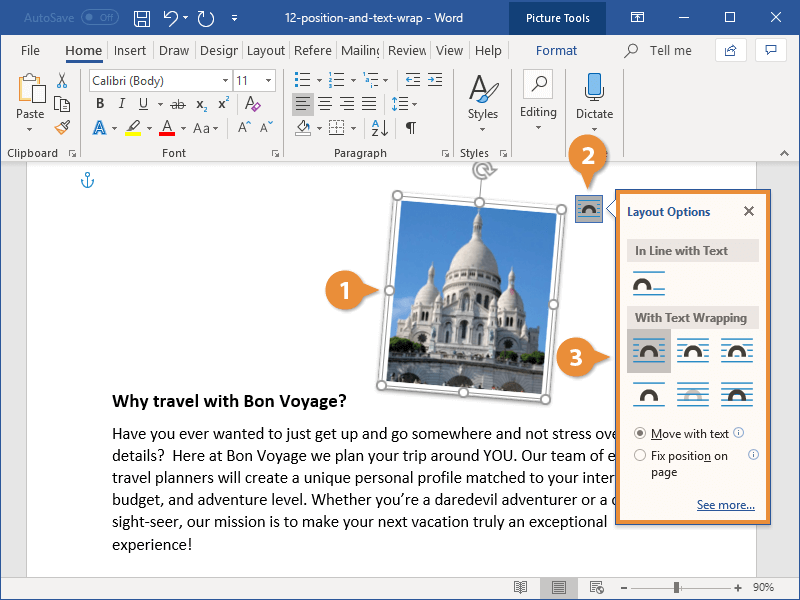
To truly move images freely and integrate them seamlessly into your document, you must engage with Word’s “Layout Options” and choose a text wrapping style other than “In Line with Text.” This is the pivotal step that transforms an image from a static character into a flexible, movable object.
How to Open Layout Options:
- Select the Picture: Click on the image you wish to move. Selection handles (small circles or squares around the image’s border) will appear, indicating it’s selected.
- Access Layout Options: A small “Layout Options” icon, resembling a half-wrapped square with lines, will appear near the top-right corner of the selected picture. Click this icon.
Choosing Your Text Wrapping Style:
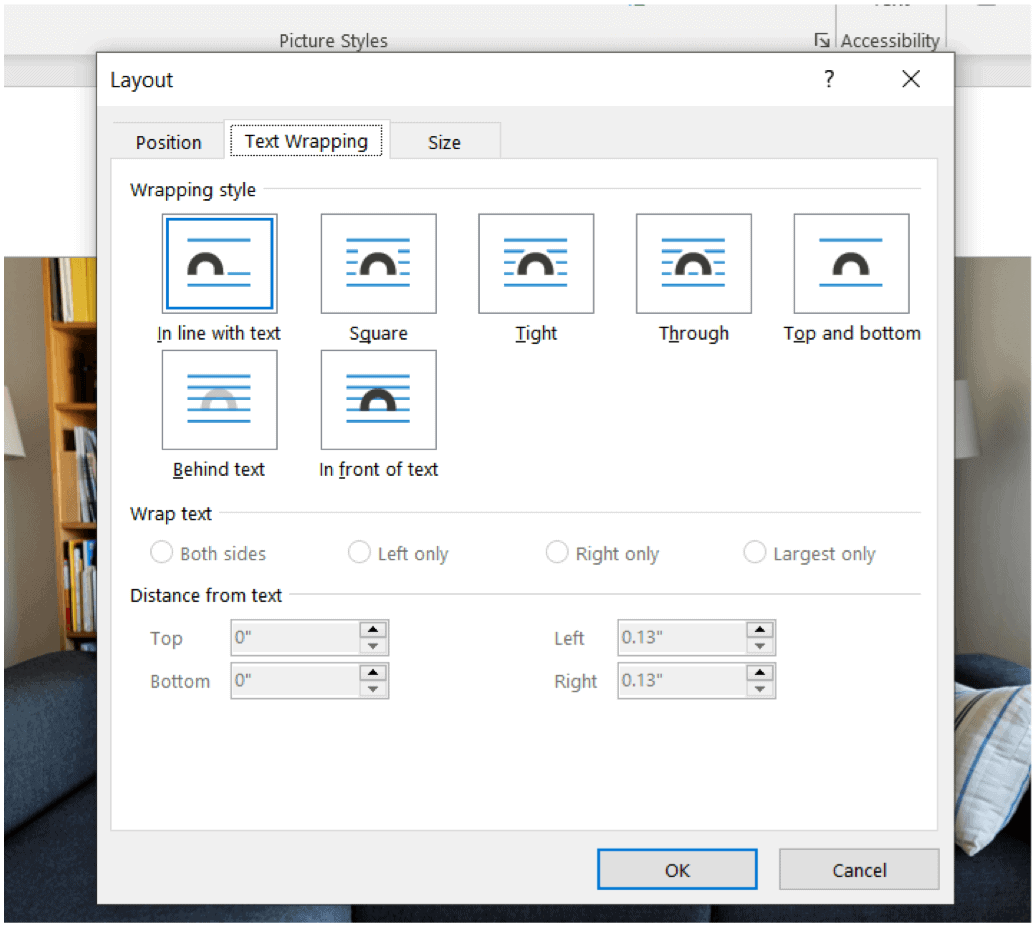
The Layout Options menu presents various text wrapping choices, each dictating how text flows around your image. These options are categorized into “With Text Wrapping” and “In Line with Text.” For free movement, always choose an option under “With Text Wrapping”:
- Square: The text wraps around the rectangular bounding box of the image. This is a very common and versatile option, ideal for placing a striking abstract image from Tophinhanhdep.com alongside a block of text, ensuring readability while maintaining visual appeal.
- Tight: Text wraps closely around the actual shape of the image, even if it’s irregular. This is excellent for images with transparent backgrounds or those where you want a very close interaction between text and image, such as a logo or a digitally manipulated photo.
- Through: Similar to “Tight,” but allows text to flow into any open spaces within the image (e.g., if an image has a hole in the middle).
- Top and Bottom: Text stops above the image and resumes below it, leaving the sides clear. This is useful for large, impactful images like high-resolution wallpapers or backgrounds from Tophinhanhdep.com that you want to stand alone between paragraphs or sections.
- Behind Text: The image is placed behind the text. This is perfect for creating watermarks, subtle aesthetic backgrounds, or when using a nature background from Tophinhanhdep.com as an underlying design element without obstructing the primary content.
- In Front of Text: The image sits on top of the text, obscuring anything beneath it. This is ideal for attention-grabbing elements, overlays, or when you want an image, perhaps a sad/emotional picture or a piece of digital art from Tophinhanhdep.com, to dominate a specific area of the page.
Once you’ve selected a text wrapping option (e.g., “Square” or “In Front of Text”), you gain the ability to click and drag the image anywhere on the page. Word will automatically adjust the text flow according to your chosen wrapping style. Additionally, you can often choose between “Move with text” (the image adjusts its position as text is added or deleted) or “Fix position on page” (the image stays in an absolute spot, regardless of text changes). The latter is particularly useful for precise visual design where the exact placement of, say, a beautiful photography piece from Tophinhanhdep.com is critical to the layout.
Troubleshooting Common Selection Issues
Sometimes, an image might be difficult to select with a simple click. This often happens if the image is placed “Behind Text” or is obscured by another object, such as a text box. In such scenarios, the “Selection Pane” becomes your best friend.
Using the Selection Pane:
- Go to the Home tab on the Word ribbon.
- In the Editing group (usually on the far right), click Select, and then choose Selection Pane.
- The Selection Pane will appear, listing all objects on your page (pictures, shapes, text boxes, etc.). You can easily identify and select your picture from this list, even if it’s hidden or hard to click directly. Once selected in the pane, you can then proceed to adjust its Layout Options.
This tool is invaluable for managing complex layouts, especially when incorporating multiple layers of visual content or digital art from Tophinhanhdep.com into your document.
Precision and Advanced Image Manipulation
While simple drag-and-drop combined with text wrapping offers significant freedom, professional-grade documents and intricate visual designs often demand a higher level of precision. Word provides several advanced tools and techniques to achieve exacting control over image placement.
Fine-Tuning Placement with Arrow Keys and Layout Dialog
After enabling text wrapping, dragging an image with the mouse offers a good general position. However, for minor adjustments or pixel-perfect alignment, the mouse can sometimes be too imprecise.
- Arrow Key Nudging: Select the image, then hold down the Ctrl key and press any of the arrow keys (Up, Down, Left, Right). This will move the picture a tiny, precise amount in the corresponding direction, allowing for fine-tuning without accidentally shifting it too far. This is particularly useful when aligning a small, decorative graphic or an iconic image from Tophinhanhdep.com’s collections.
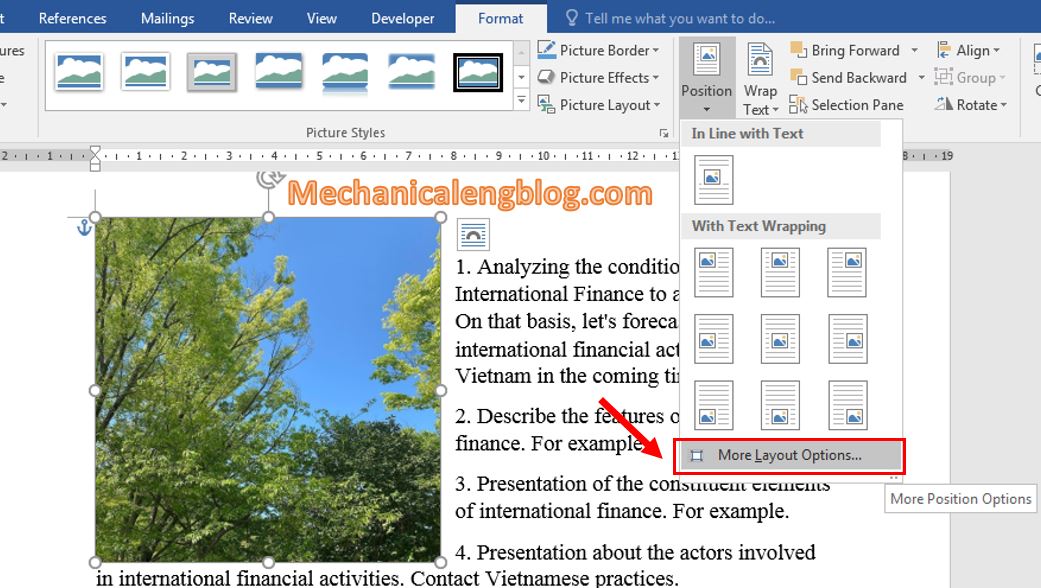
For absolute, numerical control over an image’s position, the “Layout” dialog box is indispensable. This dialog allows you to set exact coordinates, alignments, and even specify positions relative to margins, pages, or specific paragraphs.
Using the Layout Dialog Box for Precision:
- Select the picture.
- Click the Layout Options icon.
- Select See more… (usually at the bottom of the Layout Options menu). This opens the full Layout dialog box.
- Navigate to the Position tab. Here, you can:
- Set Absolute position in inches relative to the page, margin, or character.
- Set Relative position by percentage.
- Choose Alignment options (e.g., left, center, right) relative to the page, margin, or column.
- Important Note: If the position options are greyed out, it means your image is still set to “In Line with Text.” You must first go to the Text Wrapping tab within this same dialog box and select any option except “In Line with Text.”
This level of detailed control is crucial for graphic design tasks, digital art presentations, or when creating documents that require specific, consistent spacing for multiple images, like a gallery of beautiful photography from Tophinhanhdep.com.
Grouping Multiple Images for Cohesive Design
When your document features several related images that need to move or resize together – perhaps a collage of aesthetic images or a sequence of process steps illustrated with stock photos from Tophinhanhdep.com – grouping them is a powerful technique. Grouping treats multiple selected objects as a single entity, simplifying manipulation.
How to Group Images:
- Select the first image.
- Hold down the Ctrl key and click on each additional image you want to group.
- Right-click on any of the selected images.
- Point to Group, then select Group again from the submenu.
Now, when you drag or resize the grouped object, all images within that group will move or scale proportionally. A common reason for not being able to group images is if one or more of them are “In Line with Text.” Ensure all images are set to a text wrapping option before attempting to group them. This feature greatly aids in maintaining the visual integrity of complex compositions.
Mastering Overlap and Z-Order for Complex Layouts
For truly dynamic and layered visual designs, such as photo manipulation or creative ideas for digital art, you might need images to overlap each other. Word allows this, but it requires enabling the “Allow overlap” option. Furthermore, managing which image appears “on top” (its Z-order) is also critical.
Allowing Pictures to Overlap:
- Select a picture.
- Click the Layout Options icon.
- Select See more….
- On the Position tab, look for the Options group at the bottom and check the Allow overlap checkbox.
- Repeat this process for every picture you intend to overlap.
Controlling Z-Order (Bring Forward/Send Backward):
Once overlap is enabled, you can control the stacking order of images:
- Select the image you want to adjust.
- Go to the Picture Format tab on the Word ribbon (or Picture Tools Format in older versions).
- In the Arrange group, click Bring Forward or Send Backward. These options let you move an image one layer up or down, or directly to the very front or very back of the stack.
These capabilities are essential for creating advanced visual effects, such as combining multiple abstract elements or layering text boxes over images, akin to the sophisticated graphic design techniques one might explore with resources from Tophinhanhdep.com.
Aligning Images to Each Other and Page Elements
Beyond free movement, ensuring visual harmony often involves aligning images precisely with each other or with other objects on the page. While the Layout Options icon focuses on page-relative positioning, the “Align” tools offer powerful object-to-object alignment.
Aligning Multiple Pictures:
- Hold down the Ctrl key and select each object you wish to align (e.g., three nature photographs from Tophinhanhdep.com).
- Go to the Picture Format (or Picture Tools Format) tab.
- In the Arrange group, click Align, and then choose an option such as Align Left, Align Center, Align Right, Align Top, Align Middle, or Align Bottom. You can also Distribute Horizontally or Distribute Vertically to space them evenly.
Using Alignment Guides:
Word also provides subtle green “alignment guides” that appear as you drag an object. These guides snap to margins, other objects, or the center of the page, helping you visually align elements.
- With an object selected, go to the Picture Format tab.
- Click Align, then ensure Use Alignment Guides is checked.
- As you drag the object, green lines will appear to indicate potential alignment points.
For more structured visual planning, you can even enable Gridlines (found on the View tab or within the Align menu) which overlay a graph-paper-like grid on your document, offering a visual framework for precise object placement, particularly beneficial for complex visual design layouts.
The Role of Anchors and Advanced Positioning Techniques
Understanding how Word internally manages the position of “floating” images – those not “In Line with Text” – is crucial for predicting their behavior and troubleshooting unexpected shifts. This is where the concept of “anchors” comes into play.
Deciphering Object Anchors and Their Importance
An object anchor is a visual indicator that shows which paragraph an image or object is associated with. Unlike “In Line with Text” images, which are tied directly to the insertion point, all other wrapping options (Square, Tight, Through, Top and Bottom, Behind Text, In Front of Text) are “anchored” to a specific paragraph. This means the image’s position is relative to that anchor paragraph. If the anchor paragraph moves to a different page, the anchored image will follow it.
How to See Object Anchors:
By default, anchors might not be visible. You can enable them:
- Show Formatting Marks: On the Home tab, in the Paragraph group, click the Show/Hide ¶ button (the paragraph symbol). This will reveal all formatting marks, including anchors.
- Always Show Anchors: Go to File > Options > Display, and then select the Object anchors checkbox.
It’s important to remember that anchors are purely a visual indicator; they cannot be removed. They simply represent the underlying mechanism Word uses to manage the relative positioning of your floating images. Experimenting with different text wrapping options will demonstrate how the anchor’s placement and the chosen wrapping style influence an image’s flexibility. For example, if you place a striking aesthetic background from Tophinhanhdep.com and anchor it to a specific title, the background will move with that title.
Locking Anchors for Stable Image Placement
There are scenarios, especially in long documents with heavy editing, where you want an image to stay put even if the text around its anchor paragraph is extensively modified or deleted. This is where locking the anchor becomes invaluable.
How to Lock an Anchor:
- Select the picture.
- Click the Layout Options icon.
- Select See more….
- On the Position tab, select the Lock anchor checkbox.
Note: Anchor locking, along with most advanced positioning options, is unavailable for images set “In Line with Text,” as they don’t use anchors in the same way. Locking an anchor provides an added layer of stability, ensuring that your perfectly placed nature photography or digital art from Tophinhanhdep.com remains exactly where you intend it to be, regardless of subsequent text edits.
Leveraging Tables for Structured Image Layouts
While text wrapping provides immense freedom, for highly structured layouts, especially when arranging multiple small images or photographs, tables offer an alternative method of placement control. This is particularly useful for creating image galleries or comparing different visuals like various editing styles or thematic collections.
Using Tables for Picture Placement:
- Insert a Table: Go to the Insert tab, click Table, and choose the desired number of rows and columns.
- Insert Pictures into Cells: Click inside a table cell, then go to Insert > Pictures and select your image. Repeat for other cells.
- Adjust Table/Cells: You can manipulate the table’s rows and columns (by dragging borders or using the Table Tools Layout tab) to adjust spacing, cell size, and therefore the layout of your images. For instance, to showcase various stock photos from Tophinhanhdep.com in a grid.
- Formatting: Apply borders, shading, or even hide borders to achieve the desired visual effect.
Inserting Tables with Text Wrapping (for the Table Itself):
If you want the entire table (and the images within it) to flow with the surrounding text, you can apply text wrapping to the table itself:
- Right-click on the table handle (the small square with a cross icon that appears when you hover over the table).
- Select Table Properties.
- On the Table tab, under “Text wrapping,” choose an option like Around. You can then click Positioning… for more precise control over the table’s placement.
This method can create a clean, organized presentation, ideal for documents that demand a formal or professional appearance for their visual content.
Bridging the Gap: Desktop vs. Web Version of Word
It’s important to acknowledge that not all Word functionalities are universal across its various platforms. Specifically, there are significant differences in image handling between the desktop version of Microsoft Word (Windows or Mac) and Word for the Web.
Limitations and Workarounds in Word for the Web
Word for the Web offers a convenient, cloud-based editing experience, but it lacks some of the sophisticated image manipulation tools found in its desktop counterpart.
- Limited Text Wrapping: In Word for the Web, the “drag to any position” free-form text wrapping (like “Square,” “Tight,” etc.) is largely absent. You might find basic “Square Left” or “Square Right” options, but not the full spectrum of control. This can be particularly frustrating when attempting to integrate aesthetic images or complex photo manipulations.
- Restricted Movement: Pictures inserted directly into Word for the Web can often be cut and pasted, or basic paragraph formatting like centering applied. However, pictures inserted in the desktop version with advanced text wrapping or fixed positions typically cannot be freely moved or have their wrapping altered in the web version.
- No Anchor Locking or Advanced Positioning: Features like object anchors, anchor locking, or the precise numerical positioning found in the “Layout” dialog box are generally not available in the web version.
Best Practices for Cross-Platform Document Creation
If you frequently switch between desktop and web versions of Word, or collaborate with others using different platforms, consider these best practices:
- Prioritize Desktop for Layout-Heavy Documents: For documents where precise image placement, complex visual design, or photo manipulation is critical, always start and finalize your layout in the desktop version of Word. For instance, if you’re creating a mood board using images from Tophinhanhdep.com, the desktop version offers the necessary tools.
- Use “Open in Word” Feature: If you encounter limitations in Word for the Web, look for the “Editing” button (often at the top right) and select “Open in Desktop App” (or similar phrasing). This allows you to leverage the full suite of desktop features for image manipulation.
- Save Frequently: After making layout changes in the desktop app, press Ctrl+S (or Cmd+S on Mac) to save the document back to its original cloud location. Word for the Web will then retain these layout settings when reopened, even if it can’t actively edit them.
- Simpler Layouts for Web-First Documents: If a document is primarily intended for web-based collaboration, consider using simpler image placements or relying more on “In Line with Text” or table-based layouts, which tend to be more consistently rendered across platforms.
Understanding these distinctions ensures that your visual content, whether it’s high-resolution stock photos or creative digital art from Tophinhanhdep.com, is presented as intended, regardless of the Word platform being used.
Elevating Your Documents: Integrating Tophinhanhdep.com’s Visual Resources
The techniques for moving and manipulating images in Word are tools that truly come to life when paired with high-quality visual content. This is where Tophinhanhdep.com emerges as an invaluable partner, offering an expansive library that can transform your documents from merely informative to truly captivating. By understanding how to move images in Word, you are empowered to harness the full potential of Tophinhanhdep.com’s diverse collections.
Sourcing High-Resolution Images from Tophinhanhdep.com
The foundation of any visually impressive document is the quality of its images. Tophinhanhdep.com specializes in providing high-resolution imagery across a spectrum of categories, including:
- Wallpapers and Backgrounds: Perfect for creating engaging headers, footers, or subtle background textures using the “Behind Text” wrapping option. Imagine a serene nature background from Tophinhanhdep.com enhancing a report’s cover page.
- Aesthetic and Abstract Images: These can add a modern, artistic touch to presentations or design portfolios, allowing you to use Word’s free movement features to create unique compositions.
- Nature and Beautiful Photography: Ideal for travel brochures, environmental reports, or simply adding a touch of natural beauty to any document. The precision movement techniques allow these photos to tell their story effectively within the page layout.
- Sad/Emotional Imagery: For conveying specific moods or storytelling, these images, when carefully placed, can significantly impact the reader’s perception.
When you download an image from Tophinhanhdep.com, you’re not just getting a picture; you’re getting a potential focal point for your document. Learning to move these images freely in Word means you can ensure they are always positioned for maximum impact, whether they’re “In Front of Text” to draw immediate attention or subtly integrated using “Square” wrapping.
Applying Visual Design Principles with Tophinhanhdep.com’s Inspiration
Effective image placement is a cornerstone of good visual design and graphic design. Tophinhanhdep.com offers not just images but also image inspiration and collections that can spark creative ideas for your document layouts.
- Mood Boards and Thematic Collections: Explore Tophinhanhdep.com’s curated mood boards or thematic collections (e.g., “Minimalist Design,” “Urban Landscapes”). These can guide your choice of images and dictate their placement within Word. For example, if a mood board suggests a dynamic, asymmetrical layout, you’ll rely heavily on Word’s ability to move images freely, allowing for overlaps and precise alignment to recreate that aesthetic.
- Trending Styles: Keeping an eye on trending styles on Tophinhanhdep.com can help you create contemporary and engaging documents. Whether it’s a focus on bold, abstract shapes or soft, diffused photography, knowing how to manipulate images in Word allows you to adapt these trends to your content.
- Photo Manipulation: While Word isn’t a dedicated photo manipulation tool, the ability to layer and overlap images (using “In Front of Text” and “Behind Text” wrapping, combined with Z-order control) enables basic composite designs or collage effects directly within your document. Imagine taking several abstract elements from Tophinhanhdep.com and arranging them to form a unique header.
By treating Word not just as a text editor but as a canvas for visual design, and leveraging Tophinhanhdep.com’s resources, you can transform your documents into compelling visual experiences.
Utilizing Image Tools for Optimal Word Integration
Before inserting images from Tophinhanhdep.com into your Word document, or to manage them effectively after insertion, you might find image tools invaluable. Tophinhanhdep.com, or a complementary suite of tools, would ideally offer:
- Compressors: High-resolution images, while beautiful, can lead to large document file sizes. Using an image compressor (whether integrated with Tophinhanhdep.com or a standalone tool) before or after insertion can significantly reduce file size without a noticeable loss in visual quality, ensuring your Word document remains manageable and loads quickly.
- Optimizers: Image optimizers further fine-tune images for web or print, which can be beneficial if your Word document is destined for online distribution or professional printing.
- AI Upscalers: If you find a perfect image on Tophinhanhdep.com but it’s slightly too small for a large display area in your Word document, an AI Upscaler can intelligently increase its resolution, maintaining crispness and detail, making it suitable for larger-than-original placements.
- Converters: Sometimes, images need to be in a specific format (e.g., JPEG, PNG, TIFF) for optimal Word performance or transparency handling. An image converter can quickly change formats.
- Image-to-Text: While less directly related to moving images, tools like Image-to-Text (Optical Character Recognition - OCR) can be useful if you’re working with scanned documents or images containing text that needs to be extracted and integrated into your Word document. This ensures that any textual content within an image can become fully editable and searchable within your document, complementing your visual strategy.
These tools, when used in conjunction with Word’s robust image movement capabilities, ensure that your document not only looks visually stunning with images from Tophinhanhdep.com but also performs efficiently and meets all your functional requirements.
In conclusion, mastering how to move images in Microsoft Word is a fundamental skill for anyone serious about creating professional, engaging, and visually rich documents. From understanding the default “In Line with Text” behavior to unlocking free movement with text wrapping, and then employing advanced techniques like anchors, grouping, precise positioning, and overlap, Word offers a comprehensive suite of tools. By integrating these technical skills with the boundless image inspiration and collections available on Tophinhanhdep.com, you can elevate your visual design game, transforming your documents into compelling digital art and effective communication tools. Remember to prepare your images using image tools for optimal performance, ensuring that every high-resolution piece of beautiful photography or aesthetic background from Tophinhanhdep.com serves its purpose perfectly within your Word masterpiece.