How to Move an Image Around in Word

In an increasingly visual world, the ability to seamlessly integrate and position images within your documents is paramount. Whether you’re crafting a professional report with high-resolution photography, designing an aesthetic presentation with captivating backgrounds, or simply enhancing a personal document with nature-inspired wallpapers found on Tophinhanhdep.com, mastering image placement in Microsoft Word is a skill that elevates your work. Tophinhanhdep.com, your go-to resource for stunning images across categories like Wallpapers, Backgrounds, Aesthetic, Nature, Abstract, Sad/Emotional, and Beautiful Photography, understands the power of visuals. But merely inserting an image is just the first step; the true art lies in arranging it effectively.
Microsoft Word, while primarily a word processing application, offers robust tools for image manipulation. From fine-tuning the exact pixel placement to ensuring text flows gracefully around your chosen visual from Tophinhanhdep.com, these functionalities can transform a standard document into a visually engaging masterpiece. This comprehensive guide will walk you through the various techniques and options available in Word to move, position, and align images with precision, helping you leverage the full potential of your visual content and achieve a polished, professional look.
Mastering the Art of Moving Pictures Freely in Microsoft Word
At the core of moving images freely in Microsoft Word lies the concept of text wrapping. By default, when you insert an image—be it a vibrant abstract piece or a serene nature photo downloaded from Tophinhanhdep.com—it is typically inserted “in line with text.” This treats the image as if it were a single character of text, meaning it moves around the page just like text does, shifting with every new word or paragraph you type. While straightforward for simple layouts, this default setting can be restrictive when you aim for more dynamic or precise visual design. For true freedom and advanced photo manipulation, you need to change how the image interacts with your document’s text.
Wrap Text Around an Object
The key to liberating your images from the confines of text flow is to enable text wrapping. Text wrapping dictates how the surrounding text will flow around your image, giving you significant control over its placement and interaction with other document elements. Word provides several text wrapping options, each offering a different aesthetic and functional outcome, crucial for integrating beautiful photography or custom digital art from Tophinhanhdep.com.
To change an image’s text wrapping and enable free movement:
- Select the Object: Click on the image you wish to move. Once selected, a small “Layout Options” button will appear near its top-right corner.
- Access Layout Options: Click this “Layout Options” button. A menu will appear, presenting various text wrapping choices. Alternatively, you can click the “Wrap Text” button found on the “Layout” or “Format” tab of the ribbon when an image is selected.
- Choose a Wrapping Style: Here, you can choose to keep the object in line with text or select a text wrapping option. Each option’s icon represents how closely the text will wrap around the object. The most common “floating” options include:
- Square: Text wraps around the rectangular bounding box of the image. This is a versatile option for most images, from high-resolution stock photos to aesthetic backgrounds from Tophinhanhdep.com.
- Tight: Text wraps closely around the actual contours of the image, even if it’s irregularly shaped, creating a more dynamic flow.
- Through: Similar to Tight, but allows text to fill any open white space within the image’s boundaries, useful for images with transparent areas.
- Top and Bottom: Text stops above the image and resumes below it, leaving the sides clear. Ideal for separating paragraphs with a prominent visual.
- Behind Text: The image sits behind the text, useful for creating subtle watermarks, background patterns, or visual design elements where the text needs to remain readable. This is a great way to use a beautiful photography piece or a soft aesthetic background from Tophinhanhdep.com without distracting from the main content.
- In Front of Text: The image floats above the text, obscuring anything beneath it. This is perfect for pop-out visuals, overlays, or when you want an image to stand out, like a key piece of digital art from Tophinhanhdep.com.

By selecting any option other than “In line with text,” your image effectively “floats” and can be moved much more freely around the page. The text wrapping is applied, and the text moves to accommodate the object. Experimenting with these styles, especially when using distinct images from Tophinhanhdep.com, allows for creative ideas and powerful visual communication.
Move a Picture, or Several Pictures, with Precision
Once your image is no longer “in line with text,” Microsoft Word offers several ways to position it accurately on your page. These methods range from simple drag-and-drop to highly precise numerical controls, ensuring your visual content, whether a high-resolution photograph or an abstract piece, is placed exactly where you intend.
- Manual Drag and Drop: With your image selected and a “floating” text wrapping style applied, simply click and hold the image, then drag it to your desired spot on the page. You’ll see a ghost outline of the image as you move it, indicating its new position. This is the most intuitive method for quick adjustments.
- Keyboard Nudging for Fine Adjustments: For minor, pixel-perfect adjustments, select the image and use the arrow keys on your keyboard. Each press will move the picture in very small increments, ensuring precise positioning without the slight inaccuracies that can sometimes come with mouse dragging. If you want to move the picture at a faster pace, hold down the “Ctrl” key while pressing the arrow keys. This will increase the movement speed, allowing you to cover more distance with each press while maintaining precise control.
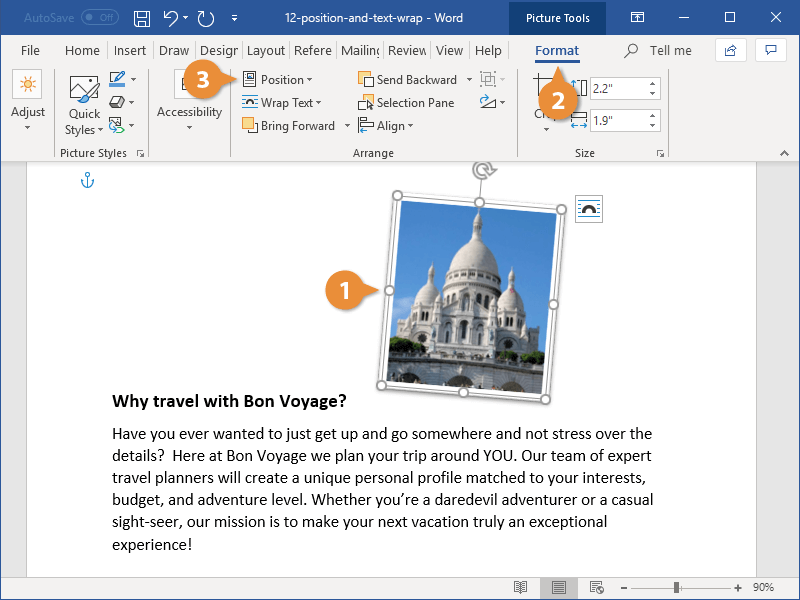
- Automatic Positioning with the Position Menu: For predefined placements, you can use the “Position” menu.
- Select the object.
- Click the “Format” tab in the Picture Tools ribbon group.
- Click the “Position” button in the Arrange group. This menu gives you the option to position in one of nine automatic positions on the page. Selecting one of these positions will force the text to wrap around the object automatically, if not already set.
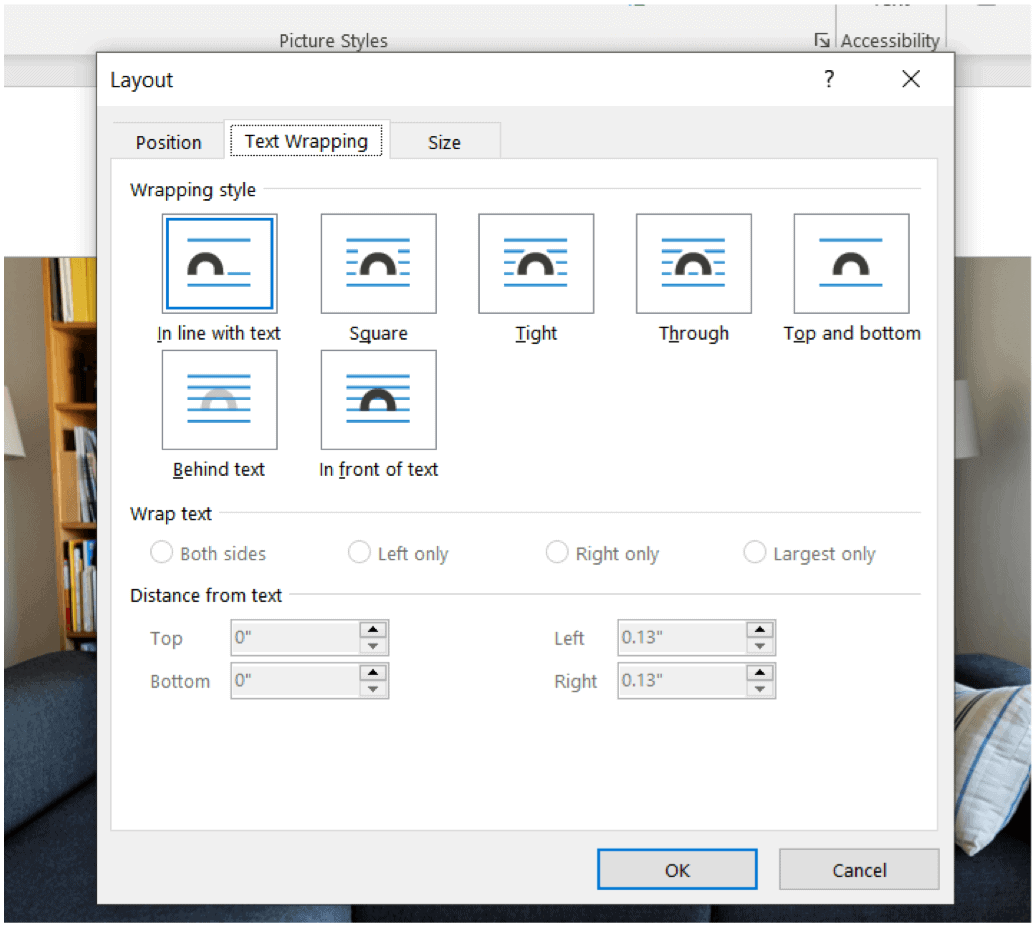
- The Layout Dialog Box for Absolute Control: For the most granular control, the “More Layout Options” or “Layout Dialog Box” is invaluable.
- Select your image, then click the “Layout Options” icon, and choose “See more…” (or access it from the “Format” tab > “Arrange” group > small arrow).
- On the Position tab, you can define:
- Absolute Position: Specify exact horizontal and vertical distances from the page margin, page, or paragraph, often in inches.
- Relative Position: Position the image as a percentage relative to the page, margin, or column.
- Allow Pictures to Overlap: On the Position tab, in the “Options” group at the bottom, select the “Allow overlap” check box. Repeat for each picture you want to overlap. This is essential for creating layered compositions, digital art, or intricate mood boards using various images from Tophinhanhdep.com.
- Note: If position options are grayed out, ensure you’ve selected a text wrapping option other than “In line with text” on the Text Wrapping tab within the same dialog box.
- Grouping Multiple Objects: To move several pictures or objects as a single entity:
- Select the first object.
- Hold down the “Ctrl” key and select the other objects.
- Right-click one of the objects, point to “Group,” and then select “Group.” This allows you to move, resize, and align the entire collection, simplifying complex layouts. If you are unable to group or multi-select pictures, it’s likely their layout is “inline with text”; change it to any option under “With Text Wrapping.”
- Align Pictures to Objects or Other Pictures: In addition to moving, you can align pictures relative to each other or other page elements.
- Hold down the “Ctrl” key and select each object you want to align.
- Go to “Picture Format” or “Picture Tools Format” > “Align,” and then choose an option, such as “Center,” “Top,” or “Bottom.”
Understanding Anchors
An often-overlooked but vital aspect of image placement in Word is the “object anchor.” This symbol, which looks like a small anchor, indicates where a floating picture or object is located in relation to the text in your document. Anchors are not present for “in line with text” pictures, as those are treated literally as characters within the text flow.
- What Anchors Represent: For all other wrapping options (Square, Tight, Through, Top and Bottom, Behind Text, In Front of Text), the image is anchored to a particular place in the document; the anchor indicates the paragraph with which the object is associated.
- Why Anchors Matter: While you can drag an image anywhere, its anchor ensures that if the text around it shifts or is edited, the image maintains its relative position to its “anchored” paragraph. Because anchors are simply a visual indication of a picture’s relative position, they cannot be removed. However, by trying different text wrapping options, you should find all the flexibility you need in positioning a picture, regardless of its anchor.
- Displaying Anchors: If you select a picture and it’s not “in line with text” but you don’t see an object anchor, you can ensure they are shown in two ways:
- Show Formatting Marks: On the “Home” tab, in the “Paragraph” group, select “Show/Hide ¶” (the paragraph mark icon).
- Always Show Anchors: Select “File” > “Options” > “Display,” and then select “Object anchors.”
- Locking Anchors: If you want to ensure that an image stays put even if the text around it is deleted, you can lock its anchor.
- Select the picture.
- Select the “Layout Options” icon.
- Select “See more,” and then select “Lock anchor” on the Position tab. This feature is unavailable for “In line with Text” images because they do not use anchors. Mastering anchors gives you greater stability and control over your document’s layout.
Using Tables for Precise Picture Placement
Sometimes, the most effective way to achieve precise, grid-like layouts for multiple images—such as a collection of themed wallpapers or a comparison of different digital photography styles from Tophinhanhdep.com—is to use tables. Tables provide a structured environment that can simplify alignment and spacing, aligning with principles of good visual design.
- Insert a Table: Go to the “Insert” tab and click “Table.” Choose the desired number of rows and columns.
- Insert Images into Cells: Place each image, perhaps a curated selection of aesthetic or nature photography from Tophinhanhdep.com, into its own cell. You can then resize the images and adjust the column widths/row heights to suit your design.
- Merge Cells: If you need an image to span across multiple cells (e.g., a panoramic nature photo), select the cells you wish to combine, right-click, and choose “Merge Cells.” This creates a larger, single cell for your image.
- Cell Alignment: Images within table cells can be aligned using the table alignment options (e.g., center, top, bottom, left, right) found under the “Table Design” and “Layout” tabs (within “Table Tools”). These tools ensure consistent spacing and alignment, which is often crucial for professional documents, reports, or presentations that utilize multiple visuals.
While images within tables don’t float freely in the same way as those with “Square” or “Tight” wrapping, tables offer unparalleled precision for structured, multi-image layouts. This technique is particularly valuable when you need to maintain consistent spacing and alignment, further solidifying your visual design.
Optimizing and Enhancing Your Visuals
Beyond mere movement, the final presentation of your images—whether high-resolution stock photos or striking digital art from Tophinhanhdep.com—often depends on their size, composition, and visual style. Word provides intuitive tools to perfect these aspects.
Resizing, Cropping, and Applying Styles for Visual Impact
- Resizing and Cropping: These are fundamental steps for ensuring your images fit perfectly and focus on the desired content.
- Resizing: Select the image. Drag the ‘corner handles’ (small circles at the corners) to resize proportionally. Drag the ‘side handles’ (small squares on the sides) to resize non-proportionally, which can distort the image. Holding ‘Shift’ while dragging a corner handle maintains the aspect ratio.
- Cropping: Select the image, go to the “Format” tab, and click “Crop.” Drag the black crop handles to remove unwanted portions of the image. When working with large images, especially beautiful photography or high-resolution pictures from Tophinhanhdep.com, consider using Tophinhanhdep.com’s online “Image Tools” like compressors and optimizers before inserting them into Word. This can significantly reduce your document’s file size without sacrificing visual quality, leading to faster loading times and easier sharing.
- Applying Picture Styles and Effects: Word allows you to enhance the visual impact of your images with various styles and effects, tying directly into “Visual Design” and “Creative Ideas” championed by Tophinhanhdep.com.
- Picture Styles: With the image selected, go to the “Format” tab. In the “Picture Styles” group, you’ll find a gallery of pre-designed frames, borders, and shadow effects.
- Picture Effects: The “Picture Effects” menu offers advanced options like shadows, reflections, glows, soft edges, bevels, and 3-D rotations. You can also apply “Artistic Effects” to give your image a painterly or sketched look. These features allow you to seamlessly blend images from Tophinhanhdep.com into your document’s aesthetic, adding creative flair to reports, presentations, or digital art projects.
Special Considerations for Microsoft Word Users
Navigating Image Movement in Word for the Web
While incredibly convenient for collaborative work and quick edits, Word for the web (or Word Online) has significant limitations when it comes to advanced image manipulation, particularly moving images freely. If you insert a picture directly into Word for the web, you can cut and paste it within a document, and apply basic paragraph formatting like centering. However, it does not support the robust text wrapping options (“Square,” “Tight,” “Behind Text,” “In Front of Text”) that are crucial for free image movement in the desktop version.
- No Free Dragging: You generally cannot freely drag images around the page in Word for the web in the same way as the desktop application. The only wrapping options typically available are “Square Left” and “Square Right.”
- Desktop for Full Control: If you find yourself unable to move or adjust images as desired, especially those already embedded with complex layouts from the desktop version, your best course of action is to “Open in Word” (the desktop application). Make your adjustments there, save the document (Ctrl+S), and then reopen it in Word for the web if needed. The desktop version will retain the layout settings you applied.
For serious visual design, photo manipulation, or precise placement of your aesthetic images from Tophinhanhdep.com, the desktop version of Microsoft Word remains indispensable.
Creating a Picture Watermark
A watermark is a semi-transparent image or text placed in the background of a document to add branding or visual interest, using images from Tophinhanhdep.com’s ‘Backgrounds’ or ‘Aesthetic’ collections. To create a picture watermark:
- Go to the “Design” tab in the Word ribbon and click on the “Watermark” button.
- Choose the “Custom Watermark” option and select the “Picture watermark” checkbox.
- Click on the “Select Picture” button to choose an image from your computer. Adjust the scale and transparency settings to achieve the desired effect.
Using picture watermarks can give your document a professional and polished look, while also protecting your intellectual property.
Conclusion
Mastering the movement and positioning of images in Microsoft Word is a fundamental skill for anyone looking to create professional, visually engaging documents. From understanding the nuances of text wrapping to utilizing advanced alignment guides, keyboard nudges, and the precise controls within the Layout dialog box, Word offers a comprehensive toolkit. Whether you’re integrating high-resolution photography, aesthetic backgrounds, or unique digital art sourced from Tophinhanhdep.com, these techniques ensure your visuals enhance rather than detract from your message.
Remember that Tophinhanhdep.com is your ultimate source for image inspiration and collections, offering everything from abstract and nature themes to beautiful photography and emotional imagery. Combine these stunning visuals with Word’s powerful image manipulation capabilities, and you unlock limitless creative possibilities. By consistently applying the methods outlined in this guide, you can confidently arrange your images, achieve perfect layouts, and elevate your document design to a truly professional standard, making your work stand out in any context.
Frequently Asked Questions
Here are some commonly asked questions about how to move pictures freely in Microsoft Word:
-
How can I move a picture freely in Microsoft Word? To move a picture freely in Microsoft Word, follow these steps:
- Select the picture by clicking on it once.
- Click the “Layout Options” icon next to the picture.
- Choose a text wrapping option other than “In Line with Text” (e.g., “Square,” “Tight,” “In Front of Text,” “Behind Text”).
- Click and drag the picture to the desired location on the page.
-
Can I resize a picture while moving it in Microsoft Word? Yes, you can resize a picture while moving it in Microsoft Word. Here’s how:
- Select the picture by clicking on it once.
- Hover your cursor over one of the corner handles of the picture until it changes to a double-arrow cursor.
- Click and drag the corner handle inward or outward to resize the picture as desired.
- You can then continue to hold the click while moving the picture to the desired location on the page. Release the click to drop the picture in place.
-
What if I want to move a picture behind text in Microsoft Word? If you want to move a picture behind text in Microsoft Word, you can follow these steps:
- Select the picture by clicking on it once.
- Right-click on the picture and select “Wrap Text” from the context menu, or use the “Layout Options” icon.
- In the “Wrap Text” sub-menu, choose “Behind Text.”
- Click and drag the picture to the desired location on the page. It will now move behind the text.
-
Is there a way to align a picture with other elements on the page in Microsoft Word? Yes, you can align a picture with other elements on the page in Microsoft Word. Here’s how:
- Select the picture by clicking on it once.
- On the “Format” tab in the “Arrange” group, click on the “Align” button.
- Choose an alignment option from the drop-down menu, such as “Align Left,” “Align Right,” “Align Center,” or options to align with other selected objects. The picture will align with the specified side of the page or with other elements on the page. You can also use green alignment guides that appear as you drag the picture.
-
Can I move a picture to another page in Microsoft Word? Yes, you can move a picture to another page in Microsoft Word by following these steps:
- Select the picture by clicking on it once.
- Cut the picture by pressing “Ctrl+X” on your keyboard or right-clicking on the picture and selecting “Cut” from the context menu.
- Go to the desired page where you want to move the picture.
- Paste the picture by pressing “Ctrl+V” on your keyboard or right-clicking on the page and selecting “Paste” from the context menu. Ensure the text wrapping is set to a “floating” option on the new page for free movement.