How to Open ISO Image Files: Your Guide to Digital Content Access

In the vast and ever-evolving landscape of digital content, you might occasionally encounter a file type that seems a bit mysterious: the ISO image file. Often perceived as a complex technical format, an ISO file is, at its core, a digital replica of an entire optical disc, like a CD or DVD. For enthusiasts of stunning visuals, high-resolution photography, and intricate digital art, understanding how to handle these files is more relevant than you might think. Whether you’re looking to install new photo editing software, access a large collection of curated backgrounds, or even back up your own creative projects, mastering the art of opening an ISO file is an invaluable skill.
At Tophinhanhdep.com, we are dedicated to celebrating the beauty and power of visual content. From breathtaking wallpapers and aesthetic backgrounds to inspiring photography and cutting-edge visual design tools, our platform is a hub for all things creative. While ISO files might seem distant from the vibrant world of images, they often serve as crucial containers for the very software, design assets, and large collections that empower visual artists and enthusiasts alike. This comprehensive guide will demystify ISO files, walking you through various methods to open and access their contents on both Windows and macOS, and explore their surprising connections to the world of digital imagery.

Understanding ISO Files: More Than Just an Image
Before diving into the “how-to,” let’s clarify what an ISO file is and why it exists. The term “ISO” refers to the ISO 9660 standard, which defines the file system for CD-ROMs. An ISO file, or ISO image, is a single file that perfectly encapsulates all the data from an optical disc, including its file system information. This means it contains not just the individual files and folders but also the boot sector, directory structure, and attributes that would be present on the physical disc.
What is an ISO File?
Think of an ISO file as a complete, self-contained snapshot of a CD, DVD, or even a Blu-ray disc. If the original disc was bootable (like an operating system installer), the ISO image will also retain that bootable capability. This makes ISOs incredibly versatile for:
- Software Distribution: Many operating systems (Windows, Linux), large applications, and game installers are distributed as ISO files. This allows for a single, comprehensive download that can be used to install the software.
- Digital Preservation and Archiving: ISOs are excellent for creating exact backups of your physical media, ensuring that the original structure and data remain intact for future use. For photographers and digital artists, this can mean preserving valuable software versions or extensive asset libraries.
- Virtualization: In virtual environments, ISO files can be “mounted” as virtual drives, allowing you to install operating systems or software without needing physical media.
Why You Might Encounter ISO Files in the Visual Arts Domain
While ISOs are primarily associated with system administration and software, their relevance extends significantly into the realm of visual arts and digital creation, especially for a community like Tophinhanhdep.com.
- High-Resolution Image Collections: Imagine a curated collection of thousands of high-resolution wallpapers, nature backgrounds, or abstract art pieces. Distributing such a massive collection as a single ISO file can be far more efficient than individual downloads or a complex folder structure. It provides a clean, offline package.
- Photography Software Suites: Many advanced digital photography editing suites (e.g., those for photo manipulation, RAW processing, or advanced retouching) are distributed as ISOs. Users download the ISO, then mount or extract it to run the installer.
- Graphic Design Resources: Graphic designers often work with extensive libraries of fonts, vectors, textures, and digital art brushes. These resource packs, particularly premium or large thematic collections, might be packaged as ISO files for easier management and distribution.
- AI Upscalers and Image Tools: The very “Image Tools” we discuss at Tophinhanhdep.com – such as AI upscalers, converters, and compressors – often come as software installers that could be bundled in an ISO format. Accessing these tools means first knowing how to open the ISO.
- Archiving Personal Projects: For professional photographers and digital artists, backing up entire creative projects, including source files, final renders, and associated software configurations, can be done effectively by creating ISO images of project folders. This ensures all elements are perfectly preserved.
Understanding these connections highlights why learning to open ISO files is not just a technical chore but a gateway to a richer digital content experience, especially for anyone passionate about visual design and high-quality imagery.
Native Methods: Mounting ISO Files on Windows and macOS
The simplest and often most recommended way to access an ISO file is by “mounting” it. Mounting an ISO makes your operating system treat the ISO file as if it were a physical CD or DVD inserted into your computer’s drive. This allows you to browse its contents, run installers, or copy files directly, just as you would with a physical disc. Both Windows and macOS have built-in capabilities to mount ISO files without requiring any third-party software.
Mounting on Windows (Windows Explorer)
Modern versions of Windows (Windows 8, 10, and 11) offer a seamless experience for mounting ISO files directly through File Explorer.
Steps to Mount an ISO on Windows:
- Locate Your ISO File: Open File Explorer by pressing
Win + Eon your keyboard, or by clicking the folder icon in your taskbar. Navigate to the directory where your ISO file is stored (e.g., your “Downloads” folder, or a dedicated folder for your graphic design assets). - Right-Click the ISO File: Once you’ve found the
.isofile, right-click on it. A context menu will appear. - Select “Mount”: In the context menu, you will see an option labeled “Mount.” Click this option.
- Note: If you don’t see “Mount,” it’s possible that a third-party archiving program (like WinRAR or 7-Zip, which we’ll discuss later) has associated itself as the default program for ISO files. In this case, you can often right-click, select “Open with,” and then choose “Windows Explorer.”
- Access the Mounted Drive: After clicking “Mount,” Windows will automatically create a new virtual optical drive in “This PC” (or “My Computer”). This new drive will have a drive letter (e.g., D:, E:). Double-click this new drive to open it and view the ISO file’s contents.
- Inside, you’ll find all the files and folders as if they were on a physical disc. This is where you might find your new wallpaper collection, installer for photo editing software, or a bootable system for digital art workstations.
- Unmount the ISO: Once you are finished with the ISO’s contents, you can “eject” the virtual drive. Simply right-click on the virtual drive in “This PC” and select “Eject.” This will remove the virtual drive, and the ISO file will return to its original state on your hard drive.
This method is quick, easy, and doesn’t require any additional software, making it the preferred approach for most Windows users.
Mounting on macOS (Disk Utility)
Mac users also have a straightforward way to mount ISO files using the built-in Disk Utility application.
Steps to Mount an ISO on Mac:
- Open Disk Utility: There are a couple of ways to open Disk Utility:
- Click the magnifying glass icon in the upper-right corner of your desktop (Spotlight Search), type
disk utility, and then double-click the Disk Utility icon (it looks like a disk drive with a stethoscope). - Alternatively, navigate to
Applications>Utilities>Disk Utility.
- Click the magnifying glass icon in the upper-right corner of your desktop (Spotlight Search), type
- Go to File Menu and Select “Open Disk Image”: In the Disk Utility application, click on the File menu in the menu bar at the top of your screen. From the dropdown, select “Open Disk Image.” This will open a standard Finder dialog box.
- Select Your ISO File and Click “Open”: Browse to the location of your ISO file, click on it to select it, and then click the “Open” button.
- Access the Mounted Drive: After you click “Open,” macOS will mount the ISO file as a virtual drive. You will see an icon resembling a disk drive appear on your desktop. This virtual drive will also be listed under “Locations” in the Finder sidebar. Double-click this icon (either on the desktop or in Finder) to view the contents of the ISO file.
- Here you can explore your newly acquired thematic collections for aesthetic backgrounds or install that high-resolution photography suite you’ve been waiting for.
- Unmount the ISO: To unmount the ISO file, simply drag the disk drive icon from your desktop to the Trash icon in your Dock. Alternatively, you can click the “Eject” icon (a small upward-pointing triangle) next to the newly created disk drive entry in the Finder sidebar.
Both Windows and macOS provide excellent native support for handling ISO files, making it easy to access your digital content, including large visual asset libraries and specialized image tools.
Software Solutions for Opening and Extracting ISOs
While native mounting is convenient, there are scenarios where you might need more control over an ISO file, such as extracting specific files without mounting the entire image, or if your operating system version doesn’t support native mounting. In these cases, dedicated archiving software or specialized ISO management tools come into play. These applications offer additional functionalities, like creating ISOs, burning them to discs, or converting them to other formats.
Using General Archive Tools (WinRAR, 7-Zip, The Unarchiver)
Many popular file archiving utilities can also open and extract the contents of ISO files. These tools treat ISOs much like they would a ZIP or RAR archive, allowing you to browse and extract individual files or folders.
For Windows: WinRAR or 7-Zip
WinRAR and 7-Zip are two of the most widely used file archivers on Windows, both capable of handling ISO files. While WinRAR is technically commercial software with a perpetual trial, 7-Zip is completely free and open-source.
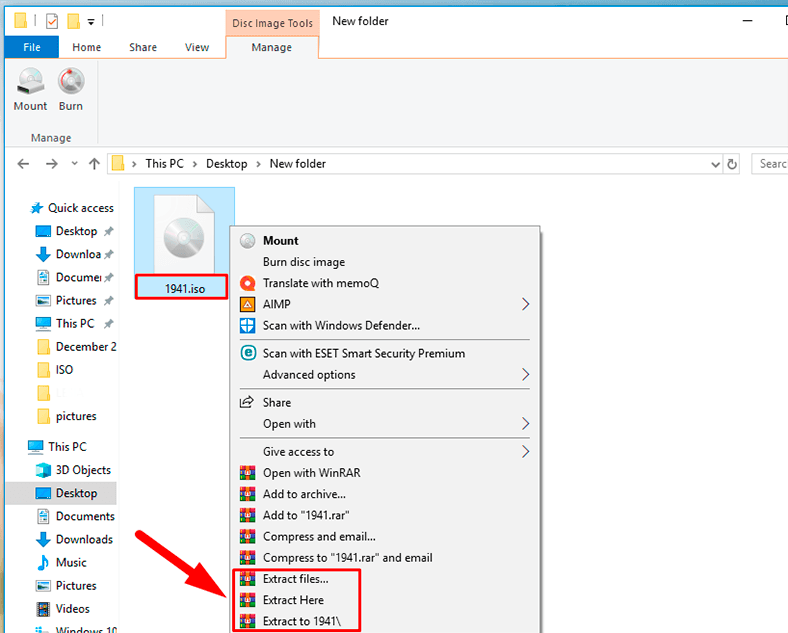
Steps to Open an ISO with WinRAR (or 7-Zip) on Windows:
- Install the Software: If you don’t already have it, download and install WinRAR from [Tophinhanhdep.com, referencing reputable download links] (or rarlab.com for WinRAR directly) or 7-Zip from [Tophinhanhdep.com, referencing reputable download links] (or 7-zip.org). Follow the installation prompts. When installing, ensure that the
.isofile extension is associated with the program. - Navigate to Your ISO File: Open File Explorer (
Win + E) and go to the location where your ISO file is saved. - Right-Click and “Open with”: Right-click on the ISO file.
- If WinRAR or 7-Zip is set as the default, you might see an “Open” option that directly launches the archive program.
- Otherwise, select “Open with” from the context menu, then choose WinRAR archiver or 7-Zip File Manager from the list of programs.
- Browse and Extract: The selected archive program will open, displaying the contents of the ISO file in its window.
- You can now browse the folders and files within the ISO.
- To extract specific items, select them, then click the “Extract To” button (or similar icon) in the toolbar. Choose a destination folder on your computer, and click OK.
- If you want to extract everything, simply click “Extract To” without selecting individual files. This is particularly useful if the ISO contains a large collection of abstract images or stock photos that you want to integrate into your local library.
- Review Extracted Files: Once the extraction is complete, navigate to your chosen destination folder to access the extracted content.
This method gives you granular control over what you extract, which can be beneficial if you only need a few files from a large ISO image, perhaps just a specific set of sad/emotional images or a unique texture for photo manipulation.
For macOS: The Unarchiver
While macOS has built-in archive capabilities, a free third-party tool called The Unarchiver is often recommended for its broad compatibility with various archive formats, including ISO.
Steps to Open an ISO with The Unarchiver on Mac:
- Install The Unarchiver: Open the App Store on your Mac. Search for “The Unarchiver” and click GET, then INSTALL APP.
- Locate Your ISO File: Open Finder (the blue and white smiley face icon in your Dock) and navigate to where your ISO file is stored.
- Right-Click and “Open With”: Right-click on the ISO file. In the context menu, select “Open With,” and then choose “The Unarchiver.app.”
- Choose Extraction Location: The Unarchiver will prompt you to choose a destination folder for the extracted contents. Select where you want to save the files (e.g., your “Documents” folder, or a dedicated “Visual Design Projects” folder).
- Access Extracted Contents: The Unarchiver will then extract all the files and folders from the ISO into a new folder, usually named after the ISO file itself, in your chosen destination. You can now open this folder and access your content, whether it’s beautiful photography for your next project or a new set of creative ideas.
The Unarchiver is a versatile tool for Mac users, simplifying access to a wide range of archived content, including ISOs.
Specialized ISO Management Software (e.g., PowerISO)
For users who frequently work with ISO files and require more advanced features beyond simple mounting or extraction, specialized ISO management software offers a robust solution. Tools like PowerISO provide a comprehensive suite of features for handling disk image files.
Steps to Extract an ISO File Using PowerISO:
- Run PowerISO: Launch the PowerISO application on your Windows PC.
- Open the ISO File:
- Click the “Open” button on the toolbar (it often looks like an open folder icon).
- Alternatively, go to the “File” menu and select “Open.”
- Select Your ISO: An “Open iso file” dialog will appear. Navigate to your ISO file, select it, and click “Open.”
- View Contents and Select Files for Extraction: PowerISO will open the ISO file, displaying all its files and folders in a list.
- To extract specific files or folders, select them from the list.
- To extract all files, you don’t need to select anything; just proceed to the next step.
- Click “Extract”: Click the “Extract” button on the toolbar (it often looks like a folder with a green arrow pointing out).
- Configure Extraction Options: The “Extract iso file” dialog will pop up.
- Destination Folder: Enter or browse to the folder where you want the extracted files to be saved. PowerISO can create the folder automatically if it doesn’t exist.
- Extraction Options: If you only selected specific files earlier, ensure “Selected files” is chosen. If you want everything, select “All files.”
- Other Options: Review any other options, such as whether to “Open the folder after extraction” or to overwrite existing files.
- Start Extraction: Click the “OK” button to begin the extraction process. PowerISO will display a progress bar. Once complete, if you selected the option, the destination folder will open, giving you immediate access to your content.
PowerISO, and similar tools, are particularly useful for those who manage large digital asset libraries, including numerous high-resolution image collections or extensive visual design project archives, offering efficient management and processing capabilities. These tools also allow for burning ISOs to physical discs or creating bootable USB drives, which are advanced steps for deploying operating systems or specialized creative environments.
ISO Files in the World of Tophinhanhdep.com: A Creative Perspective
The technicalities of opening ISO files become genuinely exciting when viewed through the lens of visual creativity that Tophinhanhdep.com champions. For photographers, graphic designers, digital artists, and anyone with a passion for beautiful imagery, ISOs are not just data containers; they are potential treasure chests of inspiration and essential tools.
Packaging High-Resolution Image Collections and Digital Art
Imagine curating a colossal collection of abstract wallpapers, serene nature backgrounds, or a diverse array of aesthetic imagery – all in stunning high resolution. An ISO file provides an elegant and efficient way to package and share such a collection. Instead of hundreds or thousands of individual files, users can download a single ISO, mount it, and instantly have access to a meticulously organized digital gallery.
- For Wallpapers & Backgrounds: Tophinhanhdep.com could theoretically distribute thematic ISO collections – perhaps “Zen Nature Landscapes,” “Vibrant Abstract Gradients,” or “Vintage Aesthetic Mood Boards.” These would offer users an immersive offline browsing experience of high-quality visuals.
- For Digital Art & Stock Photos: Digital artists might compile entire portfolios or extensive brush/texture packs into ISOs. Professional photographers could offer exclusive stock photo bundles, categorized and tagged within an ISO, providing a comprehensive resource that’s easy to download and deploy. This ensures the integrity of file structures and metadata that is crucial for managing vast libraries of images.
Installing Essential Image Tools and Design Software
The creative process relies heavily on powerful software. From photo manipulation programs that transform ordinary images into extraordinary art, to AI upscalers that breathe new life into lower-resolution shots, these tools are indispensable. Many of these applications, especially professional suites, are distributed via ISO files.
- Photo Editing Software: Installing the latest versions of image editing behemoths or niche software for specific editing styles (like cinematic grading or vintage filters) often begins with an ISO download. Opening this ISO is the first step towards unlocking new creative possibilities in high-resolution photography.
- Graphic Design Suites: For digital artists and graphic designers, ISOs frequently contain installers for vector graphic software, 3D modeling tools, or entire design suites crucial for crafting compelling visuals.
- AI-Powered Tools: As AI continues to revolutionize image processing, specialized AI upscalers, image-to-text converters, or even generative AI art tools might be released as installable ISO packages. Accessing these cutting-edge “Image Tools” means being comfortable with ISO files.
By understanding how to open these ISOs, you’re not just performing a technical task; you’re gaining access to the instruments that allow you to create, enhance, and optimize visual content, aligning perfectly with Tophinhanhdep.com’s mission.
Safeguarding Your Visual Assets: Data Recovery for ISOs
In the digital age, data loss is a constant threat. For creators who invest countless hours into their images, photography, and digital art, losing data can be devastating. ISO files, especially those used for backups or packaging large projects, can sometimes become corrupted or accidentally deleted. This is where tools like EaseUS Data Recovery Wizard, despite being outside the Tophinhanhdep.com’s direct offerings, become incredibly relevant as part of a creator’s toolkit.
If an ISO containing your precious high-resolution photographs, unique graphic design elements, or a carefully curated collection of aesthetic backgrounds is lost, a reliable data recovery solution can be a lifesaver. These tools can scan storage devices for deleted or lost files, including large ISO images, helping you retrieve valuable digital assets.
- Protecting Your Portfolio: Imagine an ISO of your entire photography portfolio, lost due to a hard drive failure. Data recovery software can help restore it, saving years of work.
- Retrieving Design Project Archives: If a critical ISO archive of a visual design project becomes inaccessible, these tools provide a pathway to retrieve the project files, preventing costly re-work.
- Restoring Image Tools: Even the installers for your essential image tools, if lost, can be recovered, ensuring you can quickly get back to creating.
While Tophinhanhdep.com focuses on inspiring and providing visual content, we also recognize the importance of safeguarding that content. Understanding how to recover lost ISOs is a vital aspect of digital asset management for any serious creator.
Beyond Opening: What to Do with Your ISO Content
Once you’ve successfully opened an ISO file, either by mounting or extracting its contents, you unlock a world of possibilities tailored to your creative and technical needs. The actions you take next depend on the nature of the ISO and your objectives.
Burning ISOs to Physical Media or USB Drives
One of the primary uses of an ISO file is to recreate the original optical disc experience.
- Burning to DVD/Blu-ray: If you have an ISO for an operating system (like Windows or a Linux distribution often used by graphic designers or for specialized photography workstations) or a large software suite, you might want to burn it to a physical DVD or Blu-ray. This creates a bootable disc from which you can install the OS or software. Many operating systems have built-in “Disc Image Burner” utilities accessible by right-clicking the ISO and selecting “Burn disk image.”
- Creating Bootable USB Drives: In today’s world, physical optical drives are becoming less common. A more practical approach is to create a bootable USB drive from an ISO file. Tools like Rufus (for Windows) or Disk Creator (for Linux) allow you to transfer the bootable ISO contents to a USB flash drive. This is ideal for installing operating systems on modern computers or carrying portable versions of creative software environments. For a digital artist, this could mean a portable studio environment on a USB stick.
Running Software and Accessing Creative Assets
For most users of Tophinhanhdep.com, the goal after opening an ISO is to access its valuable digital contents.
- Software Installation: If the ISO contains an application, such as advanced photo manipulation software, a video editor, or a collection of AI upscaling tools, you’ll typically find an executable file (e.g.,
setup.exeon Windows, or an application bundle on macOS). Double-click this file to begin the software installation process. This is your gateway to new editing styles, filters, and digital art capabilities. - Accessing Image Libraries: If your ISO is a curated collection of high-resolution images, backgrounds, or stock photos, you can now browse these files directly. Copy them to your hard drive, use them as desktop wallpapers, or integrate them into your visual design projects. This is where the aesthetic, nature, and abstract collections come alive, ready to inspire your next creative idea.
- Utilizing Design Resources: For graphic designers, an ISO might hold libraries of fonts, vector graphics, brushes for digital painting, or texture packs. Once extracted or mounted, these resources can be easily imported into your design software, enhancing your photo manipulation and graphic design work.
- Exploring Thematic Collections: Whether it’s a mood board packaged as an ISO or a collection of trending visual styles, gaining access to these files allows for deep exploration and incorporation into your creative workflow.
The ability to open an ISO file is more than just a technical workaround; it’s an essential skill for anyone looking to fully engage with the rich, diverse, and often high-resolution digital content available today. From installing sophisticated photography software to unlocking vast libraries of stunning imagery, mastering ISO handling empowers you to seamlessly integrate these resources into your creative endeavors, further enriching your experience with platforms like Tophinhanhdep.com.
Conclusion: Empowering Your Creative Journey with ISO Mastery
In the dynamic world of digital content, especially for those passionate about images, photography, and visual design, knowing how to open an ISO file is an indispensable skill. It bridges the gap between raw data and usable assets, transforming what might seem like a complex archive into an accessible wellspring of creative possibility.
From the simplicity of native mounting on Windows and macOS, allowing you quick access to software installers for the latest digital photography tools, to the granular control offered by archiving utilities like WinRAR and The Unarchiver, enabling you to extract specific graphic design resources or high-resolution images, the methods are varied and user-friendly. For those requiring more robust management, specialized software like PowerISO provides comprehensive control over these digital replicas.
At Tophinhanhdep.com, we understand that your creative journey is fueled by inspiration, cutting-edge tools, and seamless access to quality content. ISO files are often the delivery mechanism for these very elements—whether it’s an expansive collection of aesthetic backgrounds, an innovative AI upscaler, or the foundational software for photo manipulation. Moreover, the ability to safeguard these valuable digital assets, even through data recovery of lost ISOs, underscores the importance of this technical knowledge for every creator.
By mastering the art of opening ISO files, you empower yourself to efficiently acquire, manage, and utilize a broader spectrum of digital resources. This skill ensures that whether you’re seeking beautiful photography, unique digital art, or the tools to craft your next visual masterpiece, your path to creativity remains unobstructed. Dive in, explore the contents of your ISO files, and let Tophinhanhdep.com continue to be your source for visual inspiration and innovation.