How to Outline an Image in Illustrator: A Comprehensive Guide for Visual Excellence

In the dynamic world of visual design, the ability to manipulate and refine graphic elements is paramount. Among the foundational techniques, creating an outline around images, lines, strokes, or text in Adobe Illustrator stands out as a critical skill. This process, often referred to as “outlining,” serves various purposes, from ensuring design consistency across platforms to preparing artwork for specialized printing processes like stickers or custom merchandise. For anyone diving into graphic design, digital art, or even simply enhancing their photography through editing styles, understanding how to effectively outline elements in Illustrator is indispensable.
At Tophinhanhdep.com, we understand the importance of high-quality visuals, whether you’re seeking beautiful photography for your desktop, abstract backgrounds, or tools for image optimization. The principles of outlining discussed here tie directly into creating crisp, professional-grade visual assets that can elevate wallpapers, digital art, and even thematic collections. This guide will walk you through the precise steps to outline various elements in Illustrator, bridging the technical how-to with its broader applications in enhancing your visual creations.

The Core Concept: Understanding Outlines in Digital Design
Before diving into the practical steps, it’s essential to grasp what an outline in Illustrator truly represents and why it holds such significance in design workflows. It’s more than just a visible border; it’s a fundamental transformation that impacts scalability, editability, and print readiness.
What is an Outline in Illustrator?
In Adobe Illustrator, an “outline” generally refers to two primary operations, depending on the element you’re working with:
- Outline Stroke: When applied to a line or a shape’s border (stroke), this command converts the stroke itself into a filled shape. Instead of being a line with a specific thickness, it becomes a distinct vector object with defined boundaries. The original path that formed the center of the stroke disappears, and its thickness value becomes the dimensions of the new shape.
- Create Outlines (for Text): When applied to text, this command transforms editable text characters into vector shapes. Each letter ceases to be a font character and instead becomes a collection of paths that form its glyph. This means the text is no longer dependent on a specific font being installed on a computer.
Both operations are crucial for different reasons, but they share the common goal of converting dynamic, editable properties (like stroke thickness or font characters) into static, scalable vector paths.
Why is Outlining Crucial for Your Visual Projects?
The benefits of outlining extend across various aspects of visual design and image preparation, aligning perfectly with the diverse content offered on Tophinhanhdep.com:
- Consistency Across Platforms: Imagine creating a stunning piece of digital art with a unique font, only for it to display incorrectly on another computer because the recipient doesn’t have that font installed. Creating outlines for text eliminates this problem entirely. The text becomes a graphic element, ensuring your design looks exactly as intended, regardless of the system or software used to view or print it. This is vital for sharing high-resolution photography with overlays or complex graphic designs.
- Scalability without Quality Loss: Vector graphics are inherently scalable without pixelation. Outlining strokes and text transforms them into vector shapes. This means you can enlarge your design from a tiny icon to a huge billboard without any degradation in quality. This feature is critical for professional graphic design, branding, and preparing images for various sizes, from small aesthetic backgrounds to large format prints. It directly supports the need for high-resolution images and optimizing visuals.
- Enhanced Editability and Manipulation: Once a stroke or text is outlined, it can be manipulated like any other vector shape. You can use direct selection tools to edit individual points, reshape segments, or apply new fills and strokes to the newly created outlines. This opens up a world of creative possibilities for photo manipulation and generating unique creative ideas. For instance, you can create intricate decorative borders around elements or complex shadows, adding depth to your beautiful photography.
- Preparation for Manufacturing and Printing: For specialized applications, such as creating die-cut stickers, custom merchandise, or even preparing intricate digital art for specialized printing presses, outlines are essential. They provide a precise vector path that cutting machines or printing processes can follow, ensuring accurate production. This directly relates to developing visual design assets for real-world applications.
- Achieving Unique Visual Effects: Beyond practicalities, outlining is a powerful tool for visual design. It allows designers to create thick, bold text effects, add multiple borders, or combine elements in ways that wouldn’t be possible with standard strokes or live text. This contributes significantly to unique editing styles and visual design.
Mastering Outlines for Lines and Strokes
Creating outlines around lines and strokes is a fundamental operation that converts dynamic stroke properties into solid vector shapes. This method ensures consistent appearance regardless of scaling and opens up new avenues for detailed manipulation.
Preparing Your Lines and Shapes
Before you transform a stroke into an outline, it’s crucial to finalize its appearance. Once outlined, the original stroke properties—such as thickness, variable thickness profiles, or brush types—are no longer directly editable as a stroke.
- Select Your Drawing Tool: In Adobe Illustrator, you can create lines and shapes using various tools. For straight lines, opt for the Line Segment Tool (
\). For organic curves, the Pen Tool (P), Pencil Tool (N), or Brush Tool (B) are excellent choices. You can also start with basic geometric shapes like rectangles or circles and then modify their strokes. - Draw Your Line or Shape: Click and drag on your artboard to create the desired line or shape. If you’re drawing a shape and want a line around it, ensure the stroke color is active (the thick colored square in the upper-left corner of the interface) and select a color from the swatches.
- Refine Stroke Attributes:
- Thickness: Adjust the
Strokeweight using the dropdown menu in the Control panel or theStrokepanel. You can manually input a point size for precise control. - Variable Thickness Profile: Experiment with the
Variable Width Profileoptions, often found next to the stroke weight setting. These profiles allow you to create lines that vary in thickness along their path, adding a dynamic quality. The effect of these profiles becomes more pronounced with thicker strokes. - Brush Type: Explore the
Brushpanel to apply different artistic or calligraphic brush effects to your stroke. This can transform a simple line into a textured or stylized element. - Color: Ensure your stroke color is final.
- Thickness: Adjust the
Remember, once you proceed with outlining, these stroke properties will be “baked” into the new shape. A good practice, especially for complex visual design or photo manipulation projects, is to copy and paste a duplicate of your line or shape to the side of your artboard. This serves as an editable backup should you need to revert or make adjustments to the original stroke.
Executing the Outline Stroke
With your line or shape perfectly styled, the outlining process is straightforward:
- Select the Object: Use the Selection Tool (
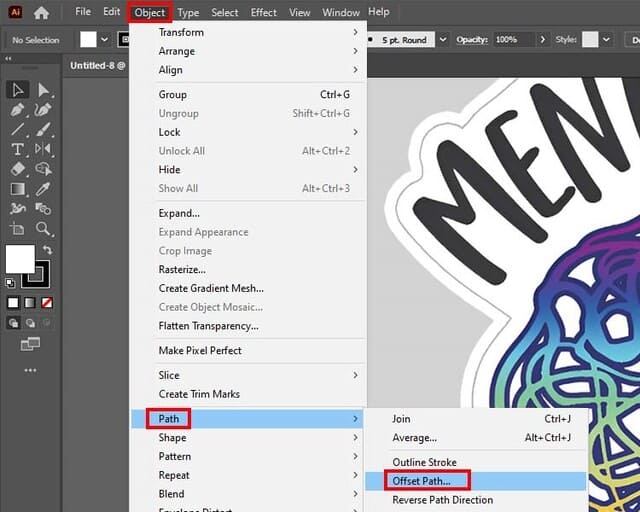
V), the black mouse cursor arrow at the top of the toolbar, to select the line or shape you wish to outline. - Access the Outline Stroke Command: Navigate to the main menu bar at the top of your screen and click Object > Path > Outline Stroke.
Upon executing this command, your original stroke instantly transforms into a closed path, a distinct vector shape. This new shape inherits the exact dimensions of the stroke you defined. You can now edit it like any other shape: fill it with new colors, apply gradients, or even add another stroke around its perimeter, creating a “stroke around a stroke” effect. This technique is invaluable for creating intricate borders for visual design elements, unique graphic design compositions, or adding polished touches to abstract images.
Crafting Outlines for Text for Seamless Typography
Outlining text in Illustrator is a fundamental step for ensuring typographic integrity across different systems and for opening up text to advanced graphic manipulation. It’s a key practice for anyone involved in professional visual design, from creating logos to designing detailed graphics for Tophinhanhdep.com.
Pre-Outline Text Adjustments
Before converting your text into outlines, it is absolutely vital to finalize all typographical settings. Once text is outlined, it ceases to be editable text; you cannot correct spelling, change fonts, or adjust traditional character properties.
- Activate the Text Tool: Select the Type Tool (
T), identifiable by its “T” icon in the left-hand toolbar. - Create Your Text: Click anywhere on the artboard to create a point type, or click and drag to define a text box for area type. Then, input your desired text.
- Set Text Color and Stroke (Optional): Use the solid color box in the Control panel or Properties panel to select a fill color for your text. If you wish to add a stroke around your text characters, use the adjacent stroke box. Note that this stroke, if present, will also need outlining separately if you want to convert it into a shape (similar to Method 1).
- Refine Typography Settings:
- Font Selection: Choose your desired font from the dropdown menu in the Control panel or
Characterpanel. - Font Style: Select a specific style (e.g., Bold, Italic, Regular) from the second dropdown menu next to
Characters. - Font Size: Adjust the point size using the third dropdown or by manually entering a value.
- Character and Paragraph Options: Access the
Characterpanel (Window > Type > Character) for fine-tuning leading (line spacing), kerning (space between specific letter pairs), tracking (overall character spacing), vertical and horizontal scale. For text alignment (left, right, center), use theParagraphpanel (Window > Type > Paragraph).
- Font Selection: Choose your desired font from the dropdown menu in the Control panel or
As with strokes, a highly recommended best practice for visual designers and digital artists is to copy and paste an editable version of your text somewhere off the artboard. This “live text” backup allows you to make future edits or reuse the font if needed without having to recreate it from scratch.
Converting Text to Outlines
Once you are completely satisfied with your text’s content, spelling, and typography, you can proceed to outline it:
- Select the Text Object: Use the Selection Tool (
V) to select the entire text block or individual text objects you want to convert. - Execute the Create Outlines Command:
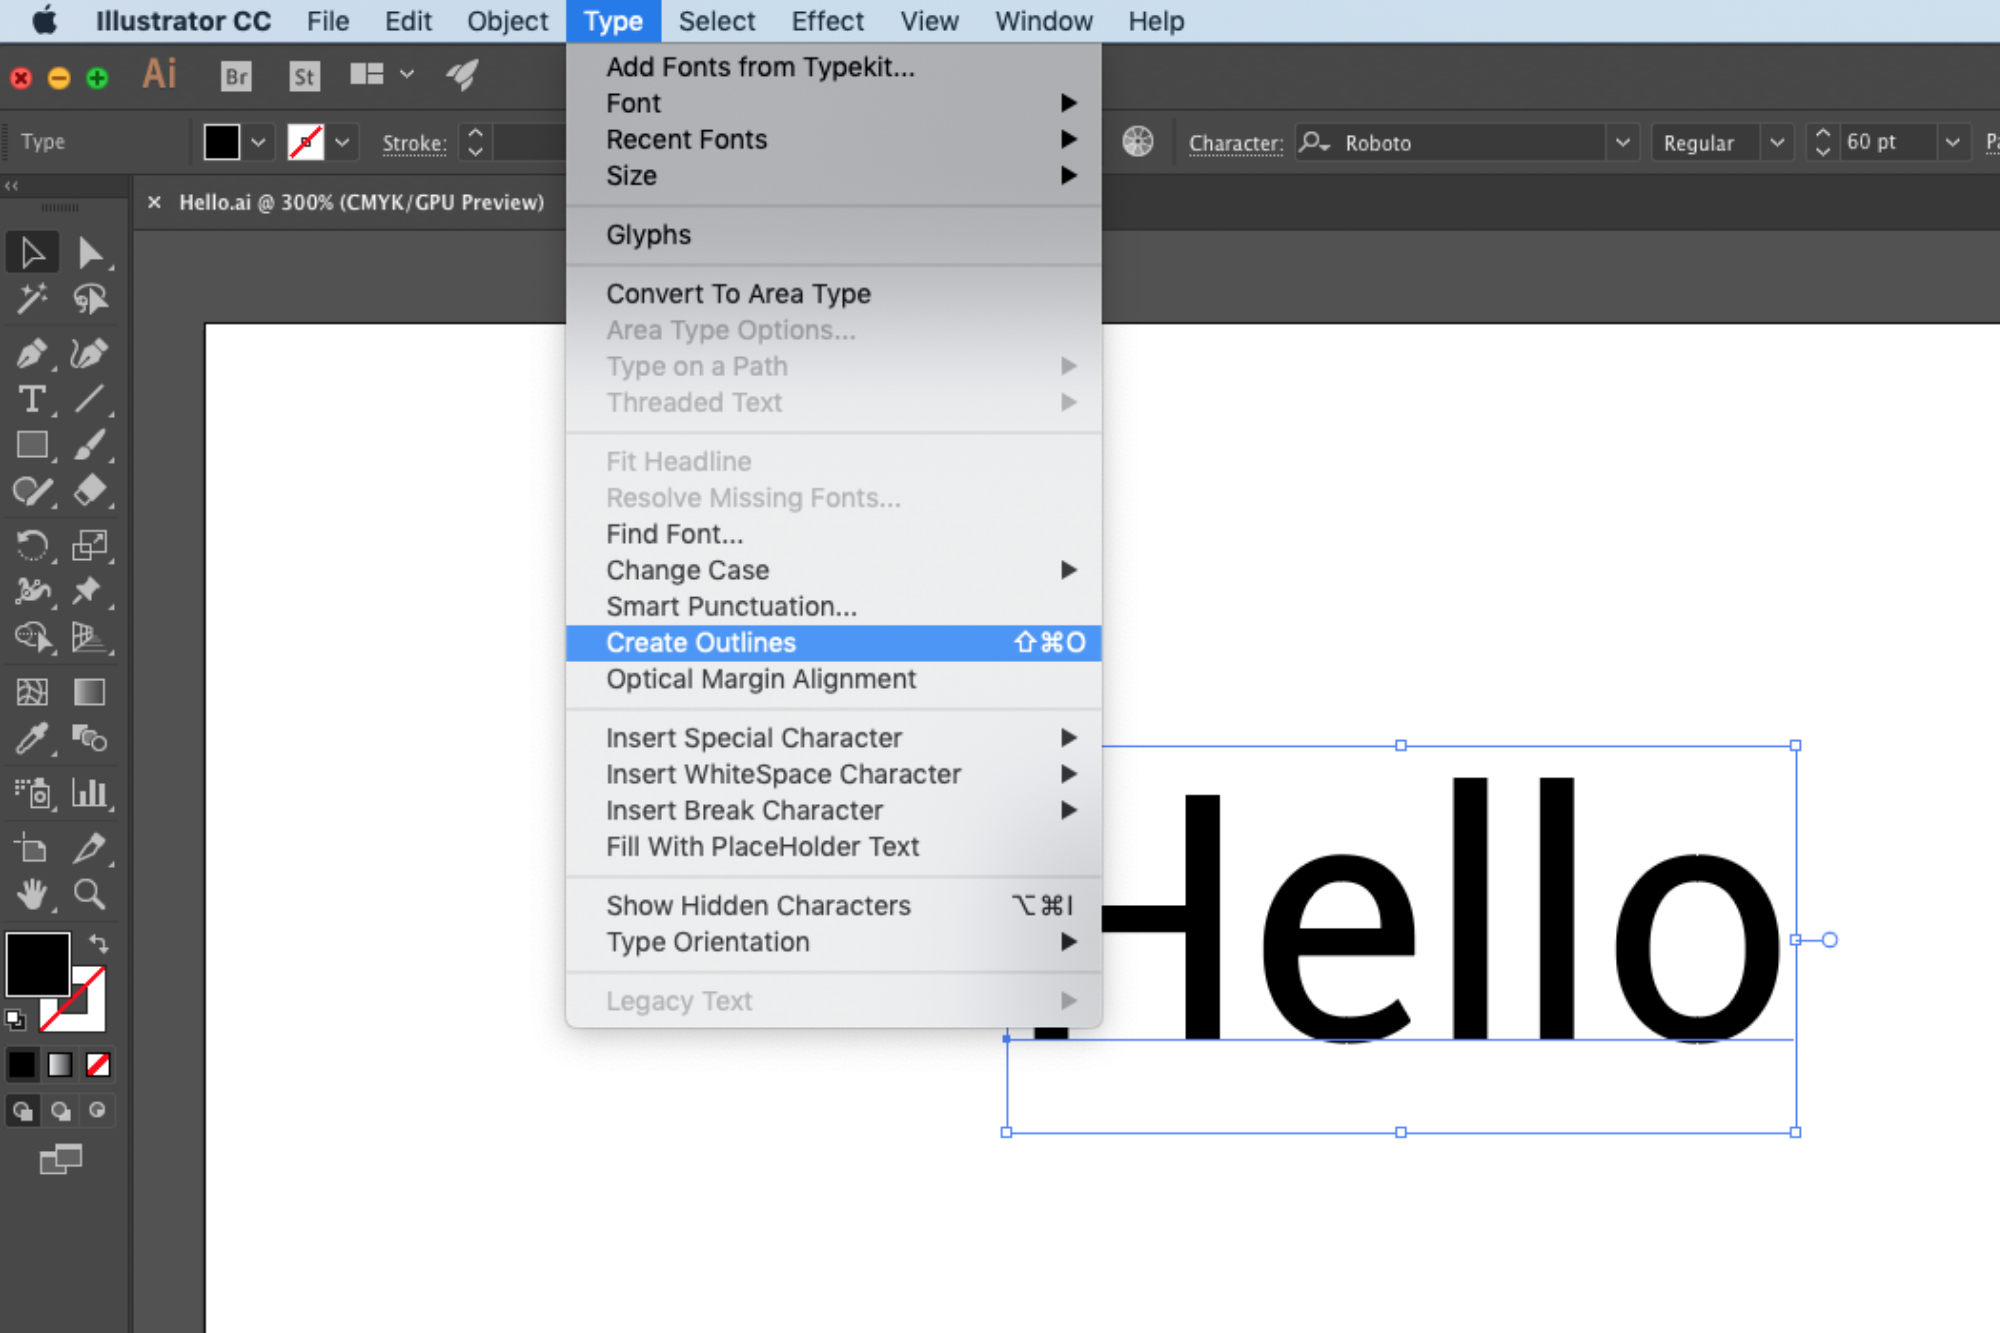
- Go to the main menu bar and click Type > Create Outlines.
- Alternatively, right-click (or Control-click on Mac) on the selected text and choose Create Outlines from the context menu.
- For an even faster workflow, use the keyboard shortcuts: Shift + Ctrl + O (Windows) or Shift + Cmd + O (Mac).
After this operation, your text will transform from editable font characters into a group of vector shapes. Each letter can now be manipulated as a graphic element, allowing for intricate photo manipulation, unique logo designs, or integration into complex digital art without worrying about font dependencies. If your original text also had a stroke, remember that this stroke is now also a separate outlined shape, and you can further manipulate it using the techniques from the “Mastering Outlines for Lines and Strokes” section.
Advanced Outlining Techniques and Their Applications in Visual Design
Outlining isn’t just about simple conversions; it’s a versatile tool that can be applied to more complex structures like groups and layers, and it plays a vital role in specific design applications, such as preparing sticker outlines.
Outlining Groups and Layers for Complex Compositions
When working with intricate visual designs, you often deal with multiple objects grouped or organized into layers. Illustrator offers flexible ways to apply outlining effects to these larger structures, which can be immensely useful for maintaining design consistency across aesthetic images or developing layered digital art.
-
Outlining a Group of Objects:
- Method 1: Direct Stroke Application: If you have a group of objects (selected and grouped by pressing
Ctrl+GorCmd+G), simply select the group and add a stroke through theControlpanel,Appearancepanel (Window > Appearance),Strokepanel, orPropertiespanel. This will apply a stroke around each individual object within the group. - Method 2: Group-Level Stroke in Appearance Panel: For an outline around the entire group as a single entity, select the group and open the
Appearancepanel. Click theAdd New Strokebutton. Then, importantly, drag this new stroke below “Contents” within theAppearancepanel. This tells Illustrator to apply the stroke to the collective boundaries of the group, rather than individual elements. - Method 3: Offset Path with Fill (for more control): In the
Appearancepanel, add a new fill, then drag it below “Contents”. With this fill selected, go toEffect > Path > Offset Path. You can set a positiveOffsetvalue to create an outline that extends outwards from the group’s boundary. This method offers dynamic control, as you can always re-select theOffset Patheffect in theAppearancepanel to adjust its value later. This is particularly powerful for creating distinctive borders for photo ideas or mood boards.
- Method 1: Direct Stroke Application: If you have a group of objects (selected and grouped by pressing
-
Outlining the Contents of a Layer: The principles for outlining groups can be extended to entire layers. In the
Layerspanel (Window > Layers), select the target layer (by clicking the small circle next to its name). Then, using theAppearancepanel, you can apply strokes or fills withOffset Patheffects in the same manner as you would for a group. Applying a stroke at the layer level will outline all objects within that layer, or dragging the stroke/fill below “Contents” in theAppearancepanel will outline the layer’s collective boundary. This approach is highly efficient for managing complex digital photography compositions or large graphic design projects.
Leveraging Outlines for Sticker and Merchandise Design
A common and highly practical application of outlining is in the preparation of artwork for custom stickers, labels, and other merchandise. As highlighted by experts at Tophinhanhdep.com, a well-defined outline is not just a visual element; it’s a critical guide for the cutting process.
- The Sticker Outline Explained: For products like die-cut or kiss-cut stickers, the outline serves as the “cut line”—a precise vector path that tells a machine where to cut the material. This often manifests as a characteristic white border around the design, which helps the sticker stand out and protects the artwork.
- Creating a Cut Path for Vector Artwork:
- Duplicate Layer: A best practice is to duplicate the layer containing your final artwork. This allows you to work on the cut line without altering your original design.
- Unite Objects: On the duplicate layer, select all vector objects and use the
Unitefeature in thePathfinderpanel (Window > Pathfinder). This combines all shapes into a single, cohesive form. - Offset Path for Border: Go to
Object > Path > Offset Path. This creates a new path at a specified distance from your united shape. This distance defines the width of your sticker’s border. A common recommendation, for instance, is a minimum of 0.07 inches to ensure visibility and clean cuts. - Convert to Stroke: After offsetting, the new path might be a filled object. Use the
Swap Fill and Strokeicon (small arrows above the fill/stroke color panel) to turn it into an outline stroke, ready to serve as your cut line. - Cleanup and Refinement: Use the
Pen Tool(P) to manually close any gaps or add specific border elements. TheSimplifypath option (Object > Path > Simplify) can help smooth out rough edges, while theDirect Selection Tool(A) allows for fine-tuning corner radiuses, typically between 0.025 and 0.03 inches for a pleasant look.
- Creating a Cut Path for Raster Artwork: If your design includes raster images (like high-resolution photography or beautiful photography from Tophinhanhdep.com), you’ll need an extra step to vectorize their shape:
- Image Trace: Place your raster image in Illustrator. Select it, and open the
Image Tracepanel (Window > Image Trace). Use settings that accurately capture the perimeter of your design, focusing on shape rather than color or detail. - Expand: Once traced, click
Expandin the Control panel to convert the traced result into editable vector paths. - Remove White Border: Image Trace often creates a white background or border. Right-click on the vectorized image,
Ungroup, and then select and delete the unwanted white background. - Follow Vector Steps: From this point, you can follow the “Unite Objects” and subsequent steps for vector artwork (Offset Path, Cleanup, etc.) to create your precise cut line.
- Image Trace: Place your raster image in Illustrator. Select it, and open the
Design Principles for Sticker Outlines: When designing sticker outlines, two factors are key:
- Width: The outline’s width dictates how prominent the border will be. A broader outline makes the design pop, while a narrower one offers a more subtle effect. For example, Tophinhanhdep.com often uses 0.085-inch borders on 3-inch stickers for optimal visual impact.
- Color: While white is a popular choice for its versatility and clean appearance, contrasting colors can also be effective. A light outline on a dark design creates a strong visual pull, making the sticker stand out against complex backgrounds. This choice can significantly influence the overall aesthetic and impact of your custom graphic design.
Integrating Outlining into Tophinhanhdep.com’s Ecosystem
The technical skills of outlining in Adobe Illustrator are not merely isolated functions; they are powerful tools that integrate seamlessly with the broader categories and goals of Tophinhanhdep.com, enhancing every facet of visual content creation.
Enhancing Aesthetic Images and Photography
Outlining plays a pivotal role in refining and elevating the aesthetic quality of images, backgrounds, and photography featured on Tophinhanhdep.com.
- Crisp Definition for Wallpapers and Backgrounds: Whether it’s a serene nature wallpaper or an intricate abstract background, sharp outlines can define elements within the image, preventing them from blending indistinctly. This adds depth and clarity, making the visual more engaging and professional. For instance, outlining foreground elements in a beautiful landscape photograph can make them “pop” against a blurred background, creating a more compelling composition.
- Stylization for Aesthetic and Emotional Images: For aesthetic or sad/emotional imagery, outlining can be used subtly to create a delicate border or boldly to frame a central motif. This helps in photo manipulation to draw the viewer’s eye and enhance the intended mood. For digital art, an outline might define characters or objects within a scene, making the artwork more impactful.
- Refining Beautiful Photography: When photography is combined with graphic elements—such as text overlays for quotes or decorative frames—outlining ensures these graphic additions are seamlessly integrated and visually polished. This is crucial for maintaining the high resolution and professional standard expected from stock photos and digital photography.
Optimizing for Image Tools and Digital Art
The practical applications of outlining directly contribute to the effectiveness of image tools and the creation of sophisticated digital art, which are core components of Tophinhanhdep.com’s offerings.
- Vectorization for AI Upscalers and Optimizers: When you outline text or strokes, you convert them into vector graphics. This is incredibly beneficial for tools like AI Upscalers and Image Optimizers. Vector elements can be scaled infinitely without losing quality, making them ideal for high-resolution output or preparing images for various uses without concerns about pixelation. This ensures that when an image is compressed or converted, its vector components remain pristine.
- Precision for Converters and Compressors: Outlined elements retain their sharp edges even after image converters change file formats or compressors reduce file size. This precision is essential for logos, icons, and text-heavy graphics, guaranteeing they maintain their integrity across different digital environments.
- Foundation for Graphic Design and Digital Art: Outlining is a cornerstone technique in graphic design and digital art. It allows artists to build complex compositions with distinct layers and elements. From creating intricate borders and shadow effects to preparing components for creative ideas, the ability to outline provides a fundamental level of control necessary for sophisticated visual creations. This technique is indispensable for developing unique editing styles and pushing the boundaries of photo manipulation.
Inspiring Creative Ideas and Thematic Collections
Outlining is not just a technicality; it’s a catalyst for creative ideas and a practical method for building cohesive thematic collections.
- Fueling Photo Ideas and Mood Boards: When brainstorming photo ideas or constructing mood boards, outlined elements can serve as flexible building blocks. Designers can quickly create variations of text, borders, or graphic motifs, allowing for rapid prototyping and exploration of different trending styles. Outlining facilitates the quick adaptation of elements to new contexts, supporting a dynamic creative process.
- Developing Thematic Collections: For thematic collections of images, digital art, or wallpapers, consistent outlining techniques can be used to unify disparate elements. For example, a collection of nature-themed illustrations might use a specific style of outlined text or stroke to provide a coherent visual language across all pieces. This creates a professional and curated look, enhancing the overall appeal of the collection.
- Exploring Trending Styles: Many trending visual styles, particularly in digital art and graphic design, rely on precise line work and typography. Mastering outlining allows designers to replicate, adapt, and innovate within these styles, ensuring their creations remain relevant and impactful. This continuous exploration of techniques keeps the content fresh and appealing, resonating with users looking for inspiration.
In conclusion, the ability to outline images, lines, strokes, and text in Adobe Illustrator is far more than a simple software trick. It’s a foundational skill that empowers designers and artists to create visually stunning, technically sound, and endlessly versatile graphic content. By applying these techniques, you can ensure your visual projects—from high-resolution photography to intricate digital art—are prepared for any platform, any scale, and any creative vision. As you explore the vast resources and inspirations on Tophinhanhdep.com, remember that the precision of an outline can be the invisible thread that ties your entire visual narrative together, making your creative ideas truly shine.