How to Outline an Image in Photoshop

In the dynamic world of digital imagery, the ability to make a subject truly pop or to frame an entire composition with a distinct border is an invaluable skill. Whether you’re a seasoned graphic designer, a passionate digital artist, or simply someone looking to enhance your beautiful photography, knowing “how to outline an image in Photoshop” is a fundamental technique. This comprehensive guide, brought to you by Tophinhanhdep.com, will walk you through various methods to create compelling outlines using Adobe Photoshop’s powerful tools. From solid color strokes to vibrant gradients and intricate textures, we’ll explore how to transform your images into captivating visual statements.
Outlining an image in Photoshop is streamlined and accessible, primarily leveraging the Layer Style Panel and its versatile “Stroke” option. These core tools empower you to define an outline around your entire image or a meticulously selected portion, all achievable within a few clicks. The applications are vast: enhance high-resolution stock photos, create eye-catching aesthetic wallpapers, or add a creative touch to your personal digital art projects. Tophinhanhdep.com emphasizes that mastering these techniques is key to elevating your visual design and contributing to stunning image collections.
To quickly outline an image in Photoshop, simply double-click on your desired layer to open the Layer Styles panel. From there, select the Stroke style, ensure its position is set to Outside, and then customize the color and width to achieve your desired aesthetic. This foundational knowledge opens the door to much more intricate and engaging visual effects, as we’ll delve into throughout this guide.
Outlining a Specific Subject in Photoshop
Often, the goal isn’t to outline the entire image but rather to draw attention to a particular subject within it. This technique is especially useful for creating impactful visual designs, highlighting products in stock photos, or isolating elements for innovative photo manipulation. Tophinhanhdep.com users frequently employ this method to craft unique backgrounds or mood board elements. While some foundational understanding of Photoshop’s selection tools is beneficial, we’ll guide you through the easiest and most efficient approach.
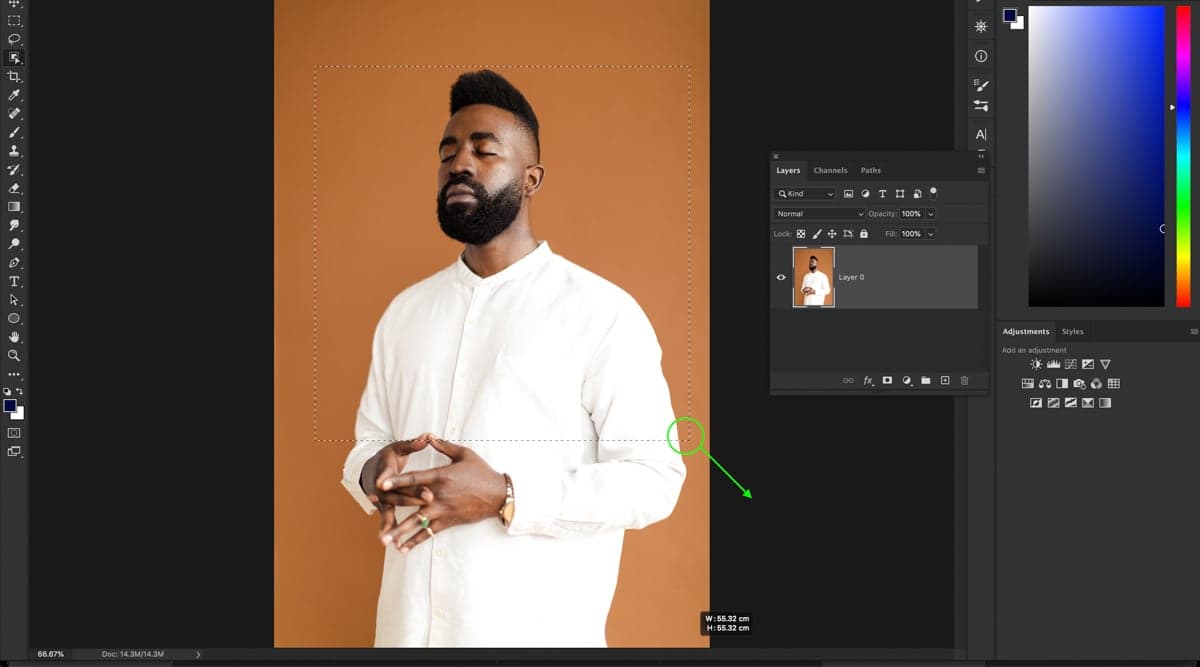
Step 1: Select Your Subject Using a Powerful Selection Tool
The first crucial step is accurately isolating the subject you wish to outline. Photoshop offers several robust selection tools, each suited for different scenarios. For optimal results, especially when working with high-resolution digital photography, precision is paramount.
- Object Selection Tool (Photoshop CC 2020 and newer): This is often the quickest and most intelligent choice. Activate it by pressing W or finding it in your toolbar. Set the Mode to “Rectangle” and check “Enhance Edge” and “Object Subtract” in the options bar. Simply click and drag a rectangular marquee around your subject; Photoshop’s AI will intuitively snap a selection to its contours. For subjects on solid, contrasting backgrounds, the “Select Subject” button in the options bar can perform this magic even faster.
- Quick Selection Tool (Older versions or complex edges): If you’re using an earlier Photoshop version or your subject has intricate details, the Quick Selection Tool (also accessed by W) allows you to paint over areas to select them. It’s excellent for quickly defining broad areas.
- Pen Tool (For ultimate precision and graphic design): For graphic design professionals or when absolute accuracy is required (e.g., for crisp lines in digital art or high-quality product outlines), the Pen Tool is unmatched. It allows you to create vector-based paths that can be converted into selections, offering unparalleled control over curves and sharp edges. This level of detail is often sought after for beautiful photography where every pixel counts.
Once your subject is surrounded by the “marching ants” (the animated dashed line indicating an active selection), meticulously review the selection. If any areas are incorrectly included or excluded, use the Magic Wand Tool (also under W) with its “Add to Selection” or “Subtract from Selection” modes to fine-tune the edges. Tophinhanhdep.com encourages users to invest time in precise selections, as this directly impacts the quality of the final outline and overall visual design.
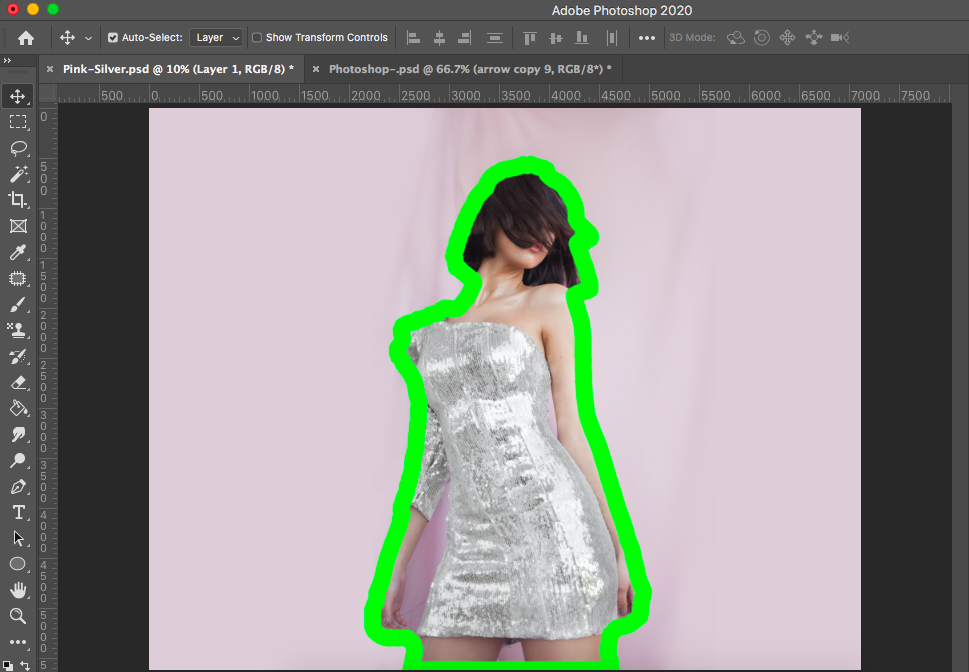
Step 2: Duplicate Your Selection Onto a New Layer
With your subject perfectly selected, the next step is to place this isolated element onto its own layer. This non-destructive editing practice is a cornerstone of professional photo manipulation and digital photography workflows, ensuring you can always revert to your original image.
Press Control + J (Windows) or Command + J (Mac). This powerful shortcut instantly duplicates your active selection onto a brand new layer. You’ll notice a new layer appear in your Layers panel, containing only your selected subject and a transparent background. This isolation is crucial because it allows you to apply effects, such as an outline, exclusively to the subject without affecting the rest of the image. This method is ideal for creating adaptable visual assets, perfect for Tophinhanhdep.com’s collections of aesthetic backgrounds or thematic imagery.
Step 3: Add a Stroke Layer Style to Your Subject
Now that your subject is on an independent layer, you can apply the outline effect. The “Stroke” layer style is incredibly versatile, offering various options to customize your border.
Double-click on the new layer (the one containing your duplicated subject) in the Layers panel. This action will open the comprehensive Layer Style window.
From the left-hand panel within the Layer Style window, select Stroke. Once selected, the right side of the window will display the Stroke options, allowing you to define your outline’s appearance. Configure the following settings for a crisp, visible outline:
- Size: This slider dictates the thickness of your outline. Adjust it based on your image’s resolution and the desired visual impact. A larger size creates a bolder border, ideal for graphic design elements or wallpapers, while a subtle stroke might be preferred for fine art photography.
- Position: For outlines around a subject, set this to Outside. This ensures the stroke expands outward from the subject’s edges, preventing it from encroaching on the subject itself. Other options include “Inside” (which draws the stroke within the subject’s boundary) and “Center” (which centers the stroke on the boundary line).
- Blend Mode: Leave this set to Normal for a standard, opaque outline.
- Opacity: Maintain 100% for a solid outline. You can reduce this if you desire a semi-transparent effect.
- Fill Type: For a basic outline, set this to Color. Click the adjacent color swatch to open the Color Picker. Here, you can choose any solid color. White, black, or a color complementary to your subject are popular choices for making elements stand out. Tophinhanhdep.com often features high-resolution images with outlines that leverage contrasting colors for maximum impact.
After adjusting these settings, click “OK” to apply the stroke. You will now observe a distinct outline around your subject. This technique is a fundamental building block for many creative ideas and photo manipulation projects found on Tophinhanhdep.com.
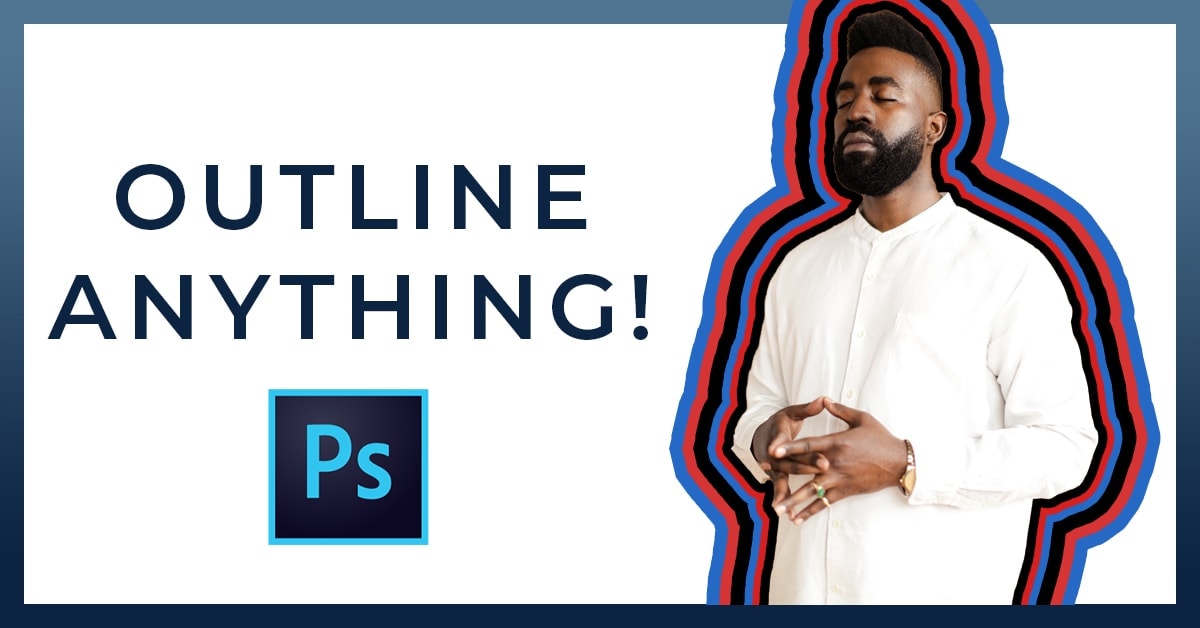
How to Outline an Image With Multiple Colors
A single-color outline can be elegant, but sometimes your visual design calls for something more dynamic. Adding multiple colors to your outline can create depth, visual interest, and a more vibrant aesthetic. This advanced yet easy technique allows you to layer strokes, bringing an artistic flair to your images, perfect for trending styles and digital art showcased on Tophinhanhdep.com.
Step 1: Add the First Stroke Using the Method Above
Before introducing multiple colors, ensure you have successfully applied your initial stroke using the steps outlined in the previous section (“Add a Stroke Layer Style to Your Subject”). This first outline will serve as the innermost layer of your multi-colored border. Choose its color and size carefully, as it will be visible beneath subsequent strokes.
Step 2: Add a New Stroke Effect in the Layer Style Window
With your Layer Style window still open (or re-opened by double-clicking the layer), navigate back to the “Stroke” options. To add a second, distinct outline, locate the plus (+) icon next to the “Stroke” entry in the left-hand styles list. Clicking this icon will instantly duplicate the existing “Stroke” effect, adding a new, independent stroke layer directly beneath the first one in the list.
Step 3: Customize the Second Stroke Using the Settings
Select the newly added “Stroke” layer in the Layer Style window. Now, you can customize its properties independently. The key to creating a multi-color effect is to adjust both the Size and the Color of this new stroke.
- Size: Critically, the second stroke must be larger than the first stroke. If it’s smaller or the same size, it will be hidden underneath the first stroke. Incrementally increase the “Size” slider until you see the second color appear around the first outline. Experiment with the thickness to achieve a balanced visual.
- Color: Click the color swatch and choose a new, distinct color for this second outline. Consider complementary colors, contrasting hues, or shades that align with your image’s overall palette or the aesthetic you’re aiming for.
- Position, Blend Mode, Opacity: Generally, keep these settings the same as your first stroke (Position: Outside, Blend Mode: Normal, Opacity: 100%) to maintain a clean, layered look.
Repeat these steps for as many additional colors as you desire. Each new stroke layer should be incrementally larger than the one beneath it to ensure all colors are visible. This technique is a staple in creative photo manipulation and graphic design, allowing you to produce stunning, layered effects for wallpapers, aesthetic backgrounds, and unique visual content on Tophinhanhdep.com.
How to Outline the Edges of an Image
Beyond highlighting specific subjects, you might often need to apply a border or frame to an entire photograph. This is a classic visual design element used to present images cleanly, separate them from backgrounds, or integrate them into thematic collections. Tophinhanhdep.com users find this particularly useful for creating cohesive galleries or standardized image presentations.
The process of outlining the entire image is simpler than outlining a subject, as it bypasses the need for initial subject selection.
- Duplicate Your Image Layer: Start by duplicating your primary image layer. This safeguards your original work and is a best practice in digital photography editing.
- If you have a single background layer: Select the layer and press Control + J (Win) or Command + J (Mac).
- If you have multiple layers and want to outline the composite image: Press Control + Alt + Shift + E (Win) or Command + Option + Shift + E (Mac). This creates a merged copy of all visible layers onto a new layer, perfect for applying a border to the final composition.
- Access the Layer Style Panel: Double-click on this newly duplicated (or merged) layer in the Layers panel to open the Layer Style window.
- Select the Stroke Style: From the left-hand panel, choose Stroke.
- Configure Stroke Settings for Full Image Outline:
- Position: For outlining the entire photo’s canvas edges, setting the position to Inside is often preferred. This keeps the border within the image dimensions. While “Outside” would also work, it might extend the canvas if you don’t have enough surrounding space, or it might be clipped if you’re working with a fixed canvas size. “Center” will straddle the edge.
- Size: Adjust the slider to determine the thickness of your border. This is entirely subjective and depends on your aesthetic preference and the context of the image, whether it’s a high-resolution wallpaper or a small graphic design element.
- Fill Type: Choose Color for a solid border, then select your desired color from the Color Picker. White, black, or a neutral tone often work well for traditional framing, though bold colors can create stunning graphic effects.
- Blend Mode & Opacity: Keep these at “Normal” and “100%” unless you specifically want a translucent or blended effect.
After confirming your settings, click “OK.” Your entire image will now feature a customized border. This simple yet effective technique can transform ordinary photographs into striking visual pieces, ready for use as aesthetic backgrounds, part of visual design projects, or curated collections on Tophinhanhdep.com.
How to Add a Gradient Outline to an Image
For those seeking an even more sophisticated and visually rich outline, Photoshop offers the ability to fill your stroke with a gradient. This technique adds a dynamic range of colors or tones to your border, creating depth, movement, and a truly artistic touch. Gradient outlines are particularly popular in modern digital art, creative photo manipulation, and for designing vibrant aesthetic images frequently featured on Tophinhanhdep.com.
The foundation for a gradient outline is an existing stroke. If you haven’t already, follow the initial steps to create a basic outline around your subject or entire image.
- Access Stroke Options: Ensure the Layer Style panel is open for the layer with your outline, and the “Stroke” option is selected in the left-hand menu.
- Change Fill Type to Gradient: Within the Stroke options, locate the “Fill Type” dropdown menu. Change this from “Color” to Gradient.
- Open the Gradient Editor: A gradient preview box will appear. Click directly on this box to launch the Gradient Editor.
- Create or Select Your Gradient:
- Using Presets: The Gradient Editor provides a range of pre-defined gradient folders (e.g., “Basics,” “Blues,” “Oranges,” “Neutrals”). Browse these collections and select a gradient that complements your image or desired visual design.
- Creating a Custom Gradient: To craft a unique gradient, click on the color stops (small squares) located at the bottom of the gradient preview bar. Clicking a color stop will display its current color, which you can then change using the Color Picker. You can add more color stops by clicking anywhere along the bottom of the gradient bar, allowing for multi-point gradients. Drag color stops to adjust the blend, and adjust the “Midpoint” diamonds between them to control the transition.
- Customize Gradient Appearance: Once you’ve defined your gradient colors, additional settings will appear in the Stroke options:
- Style: Choose the style of your gradient. “Linear” is a straight transition, “Radial” radiates from a center point, “Angle” sweeps around the perimeter, “Reflected” is a linear gradient mirrored, and “Diamond” creates a diamond shape. Experiment to see which best suits your visual design.
- Angle: For “Linear,” “Angle,” or “Reflected” gradients, adjust the “Angle” slider to control the direction of the color transition.
- Scale: This setting controls how condensed or spread out the gradient colors are. A small scale can create sharper, more distinct color bands, while a larger scale results in smoother, more subtle transitions, ideal for soft aesthetic looks.
- Reverse: Check this box to flip the direction of your gradient.
After perfecting your gradient outline, click “OK” in the Gradient Editor, then “OK” in the Layer Style panel. You’ll now see your outline transformed with a captivating gradient. This technique is a fantastic way to infuse your images with a touch of artistic flair, making them stand out in any collection, whether it’s high-resolution stock photos or personal digital art projects on Tophinhanhdep.com.
How to Outline an Image With a Texture
Taking visual design one step further, you can apply a texture or pattern to your image outline. This adds an incredible dimension, depth, and unique character that solid colors or gradients might not achieve. A textured outline can evoke a specific mood, enhance thematic collections, or simply add an element of creative surprise, making your images truly distinctive on platforms like Tophinhanhdep.com.
As with gradient outlines, you’ll need an existing stroke as your starting point. Ensure your initial outline (either around a subject or the entire image) has been created using the previous steps.
- Access Stroke Options: Open the Layer Style panel for the layer with your outline, and make sure “Stroke” is selected.
- Change Fill Type to Pattern: Within the Stroke options, change the “Fill Type” dropdown from “Color” or “Gradient” to Pattern.
- Select Your Pattern: A pattern preview box will appear. Click directly on this box to reveal Photoshop’s built-in pattern presets.
- Default Patterns: Photoshop includes various default patterns, often organized into categories like “Trees,” “Grayscale Paper,” or “Web Patterns.” Explore these to find a texture that suits your vision.
- Importing Custom Patterns: For truly unique textures, you can download free patterns online (from Tophinhanhdep.com or other reputable sources) or create your own. Photoshop allows you to easily import these patterns to expand your creative library.
- Customize Pattern Appearance: Once you’ve chosen a pattern, several options become available within the Stroke settings to fine-tune its appearance:
- Scale: This is one of the most important settings for patterns. Adjust the “Scale” slider to increase or decrease the size of the pattern within your outline. You might want a subtle, tightly packed texture or a larger, more pronounced pattern.
- Snap to Origin: Check this box if you want the pattern to align uniformly across your document.
- Link with Layer: This option, when checked, links the pattern’s position to the layer’s position. If you move the layer, the pattern moves with it.
- Angle: Although not explicitly mentioned in the reference, some pattern styles or versions of Photoshop might offer an angle control to rotate the pattern’s orientation, allowing it to line up better with your outline or create a more abstract effect.
After selecting your pattern and adjusting its scale and other properties, click “OK” in the Layer Style panel. Your image outline will now feature the chosen texture, adding a unique and tactile quality. This technique is a fantastic way to elevate your digital art and photo manipulation projects, producing visually rich compositions ideal for high-resolution backgrounds, inspiring mood boards, and trending styles that Tophinhanhdep.com is proud to showcase.
Enhancing Your Outlined Images with Tophinhanhdep.com’s Offerings
Mastering outlining in Photoshop is more than just learning a series of steps; it’s about unlocking creative potential in your visual design. The techniques discussed—from solid color and multi-color strokes to gradients and textures—provide a robust toolkit for enhancing any image. At Tophinhanhdep.com, we understand that outlining plays a critical role in various aspects of digital imagery and photography.
- Aesthetic & Nature Photography: Outlines can elegantly frame stunning landscapes or highlight a delicate subject in nature photography, transforming a simple photo into a captivating piece of aesthetic art.
- Abstract & Emotional Images: Bold, multi-colored, or textured outlines can amplify the impact of abstract compositions or convey deeper emotional resonance in sad/emotional imagery.
- Graphic Design & Digital Art: Outlines are fundamental in graphic design, used for logos, posters, web elements, and digital art to create clear distinctions, dynamic effects, and visual hierarchy.
- High-Resolution & Stock Photos: When preparing high-resolution stock photos, precise outlines can help showcase products or subjects, making them more versatile for commercial use.
- Image Inspiration & Collections: Outlined images are perfect candidates for mood boards, thematic collections, and trending styles. They add a professional polish and stylistic consistency that can inspire new photo ideas.
Once you’ve meticulously outlined your images to perfection using these Tophinhanhdep.com-approved methods, you might consider further optimization. Tophinhanhdep.com also offers a suite of Image Tools designed to refine your creations:
- Converters: Easily change image formats for different platforms or uses.
- Compressors & Optimizers: Reduce file sizes without compromising quality, ensuring your outlined images load quickly on websites or social media.
- AI Upscalers: Enhance the resolution of your images, making even older photos suitable for large-format display or high-definition screens, perfect for showcasing those crisp outlines.
- Image-to-Text: Extract text from your images for documentation or archiving, a useful feature for various digital photography and graphic design workflows.
Conclusion
Learning how to outline an image in Photoshop is a foundational skill that offers immense creative possibilities. By leveraging the Layer Style Panel and its versatile Stroke options, you can easily add depth, definition, and artistic flair to your photographs and digital art. Whether you choose a simple solid color, a vibrant gradient, or an intricate texture, the ability to control and customize your outlines is crucial for compelling visual design.
From highlighting subjects in your high-resolution digital photography to creating eye-catching elements for your next graphic design project or aesthetic background, outlines empower you to take your images to the next level. The non-destructive nature of Photoshop’s layer styles ensures that your original work remains untouched, allowing for endless experimentation and refinement.
Tophinhanhdep.com is dedicated to providing you with the knowledge and tools to achieve your creative goals. Explore our vast collections of wallpapers, backgrounds, and thematic imagery, and discover more photography and photo editing tips to continually enhance your visual masterpieces. Keep practicing these techniques, and watch as your images transform into truly extraordinary pieces of digital art.