Mastering Image Manipulation: Your Comprehensive Guide on How to Photoshop Images

Adobe Photoshop has long stood as the industry standard for image editing and graphic design, a powerful tool capable of transforming ordinary photographs into extraordinary visual statements. Whether you’re a seasoned professional or a curious beginner, understanding “how to photoshop images” unlocks a world of creative possibilities, from subtle retouches to elaborate photo manipulations. This comprehensive guide, drawing insights from leading experts and integrating the rich resources available on Tophinhanhdep.com, will walk you through essential techniques, advanced workflows, and creative inspirations to elevate your digital art.
At its core, Photoshop is about control. It allows you to refine, enhance, combine, and completely reimagine images. On Tophinhanhdep.com, we understand this pursuit of visual excellence. Our platform offers an extensive array of resources, including breathtaking Wallpapers, diverse Backgrounds, and curated collections of Aesthetic, Nature, Abstract, Sad/Emotional, and Beautiful Photography to fuel your projects. Beyond inspiration, Tophinhanhdep.com provides essential Image Tools like Converters, Compressors, Optimizers, and AI Upscalers to prepare your images for Photoshop, ensuring optimal quality and performance. Our sections on Photography delve into High Resolution and Stock Photos, while Visual Design covers Graphic Design, Digital Art, and Photo Manipulation, offering a holistic approach to your creative journey.

The Foundational Techniques of Image Manipulation
Before diving into complex composites, it’s crucial to grasp Photoshop’s fundamental principles. Every successful manipulation starts with precise selections and an understanding of layers. These are the building blocks upon which all advanced techniques are based.
Understanding Layers: The Canvas of Digital Editing
In Photoshop, every element you add or change exists on a separate layer. This non-destructive approach is paramount, allowing for endless revisions without altering the original image data. Imagine layers as transparent sheets stacked on top of each other. You can draw or place an image on one sheet, adjust its opacity, blend it with layers below, or rearrange its position, all without affecting the other sheets.
When you open an image, it typically starts as a “Background” layer. It’s often best practice to duplicate this layer (Layer > New > Layer from Background) or convert it into a regular layer to maintain the original image as a backup. This habit ensures that you can always revert to your starting point, no matter how many changes you make. This concept of non-destructive editing is further enhanced by Smart Objects, a powerful feature we will explore later.
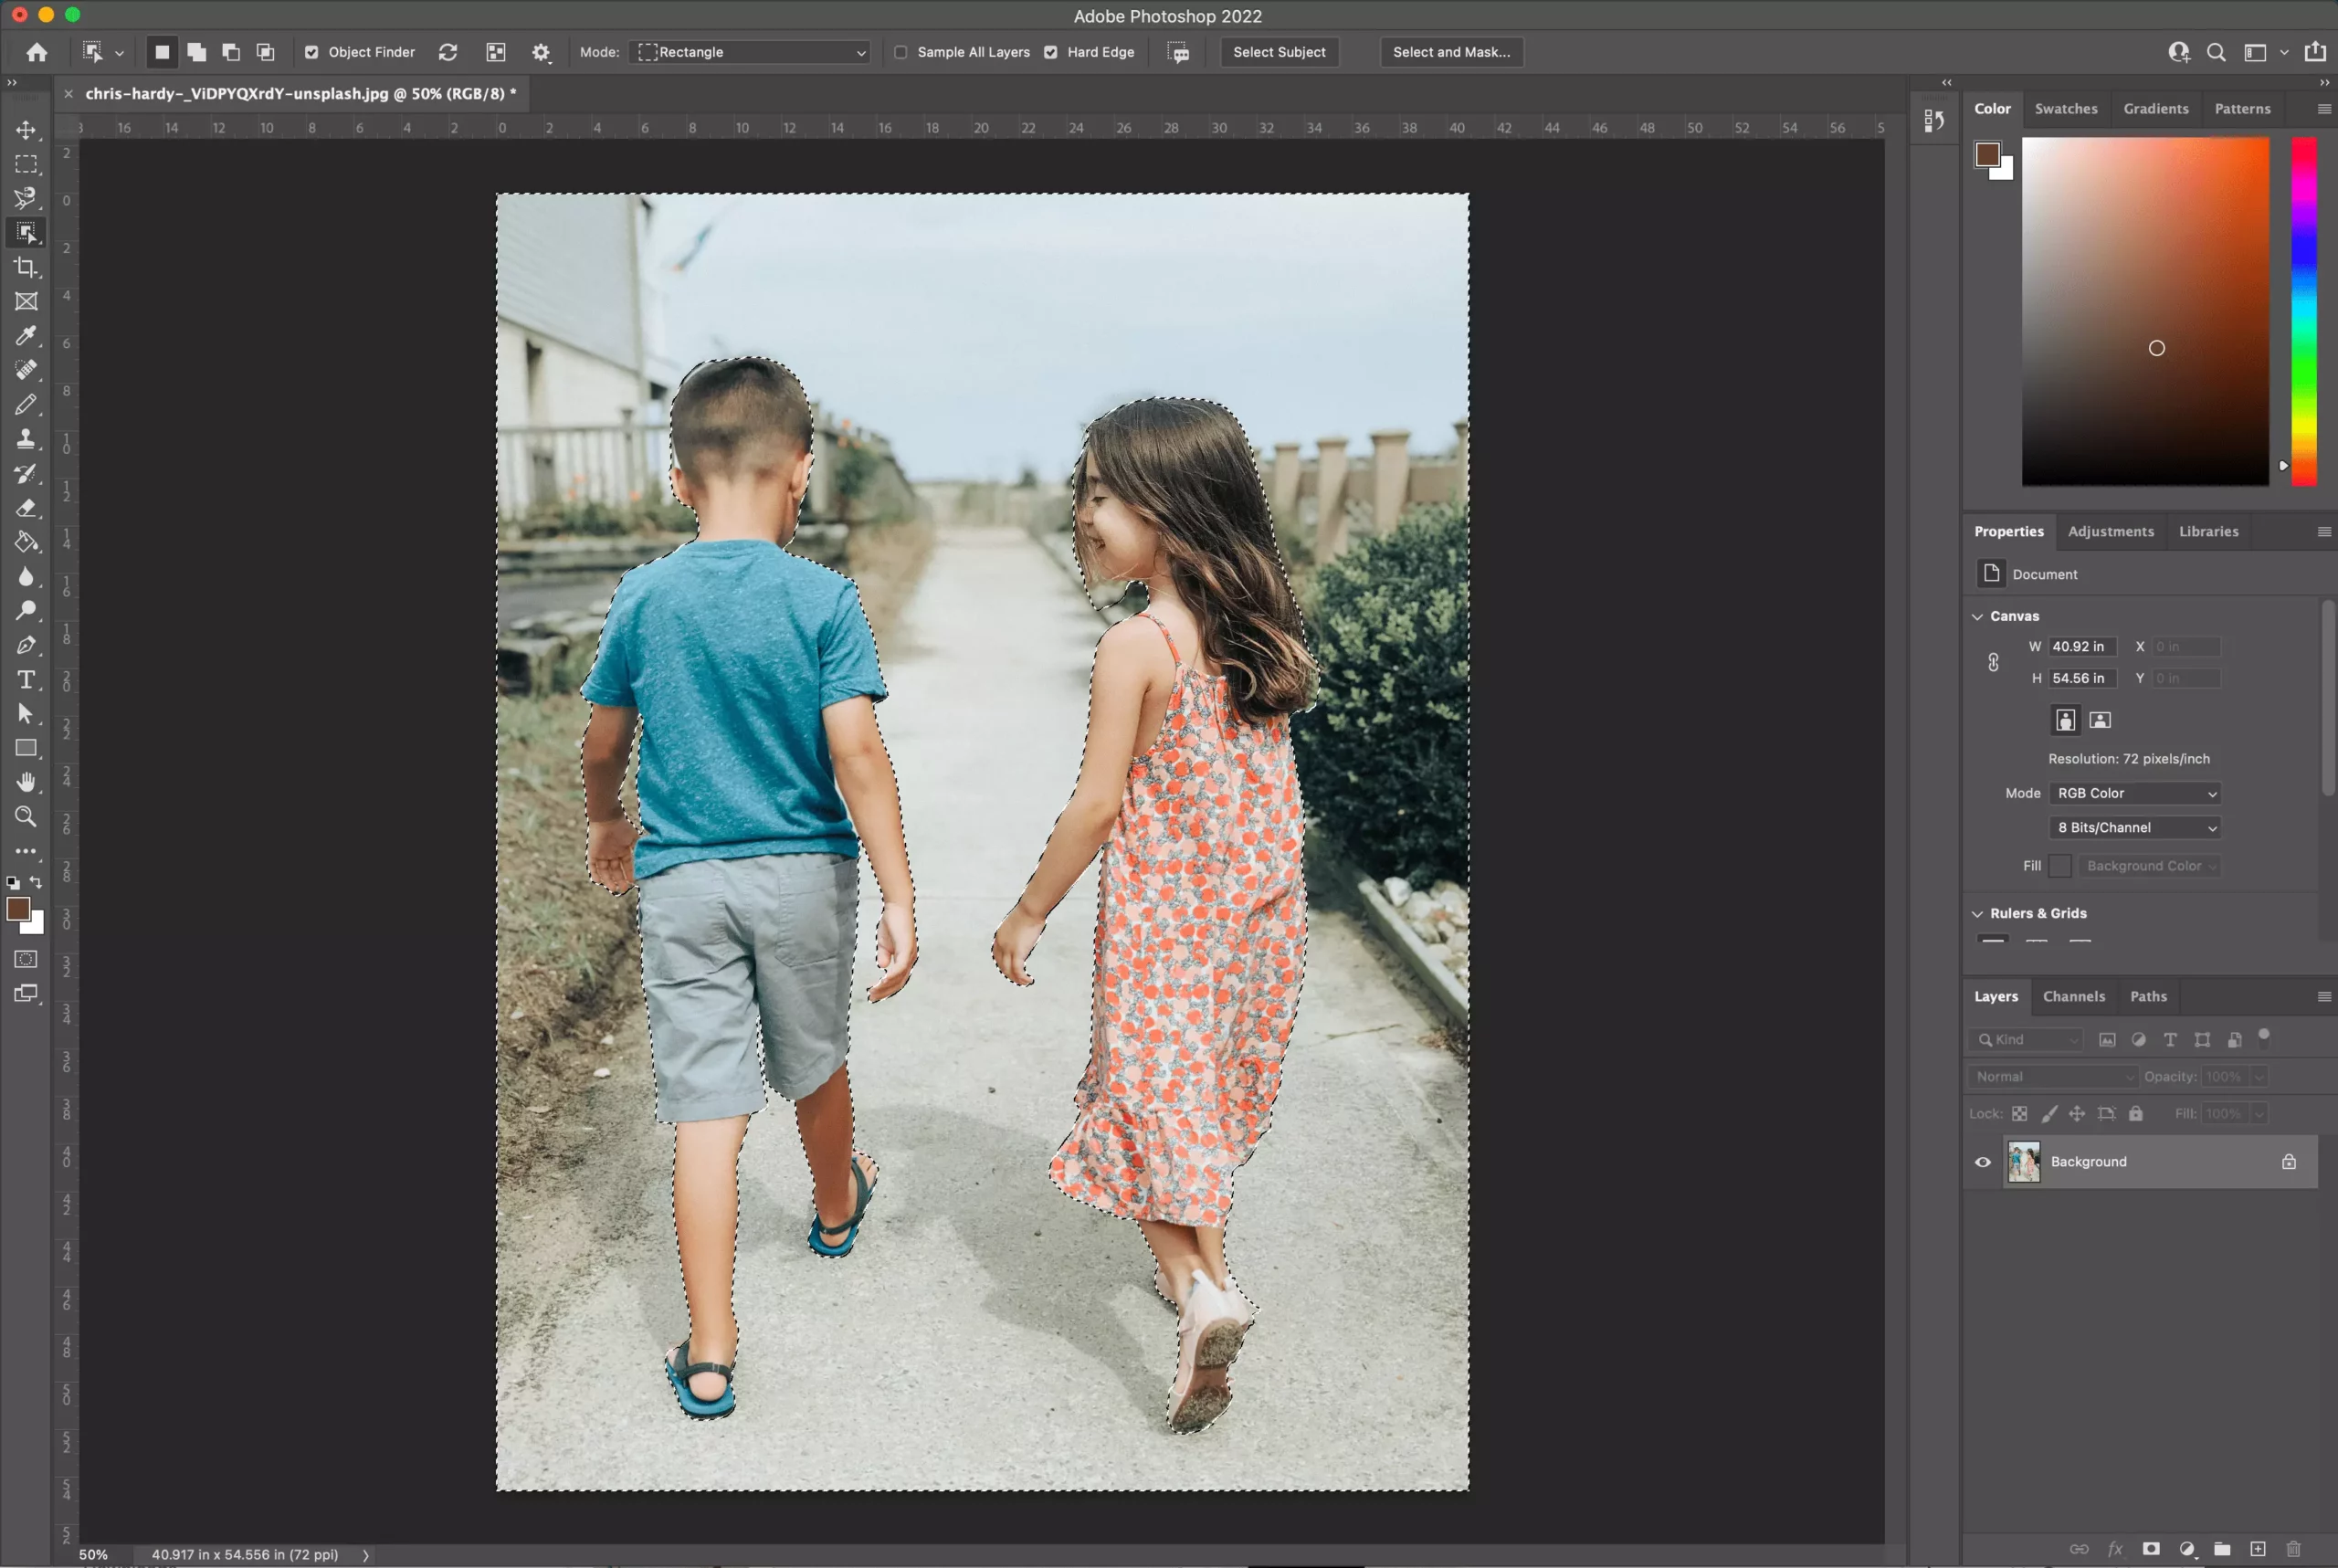
Precision Selection: Isolating Your Subject with Accuracy
One of the most frequent tasks in Photoshop is isolating a subject from its background. Whether you’re compositing a person into a new scene or cutting an object into a custom shape, a clean selection is the cornerstone of a believable result. Tophinhanhdep.com offers numerous high-resolution Stock Photos and Digital Photography examples perfect for practicing these techniques.
The Magic Eraser and Quick Selection Tool
For backgrounds with clean, uniform colors, Photoshop provides quick solutions. The Magic Eraser tool (found by clicking and holding the Eraser icon, or pressing Shift + E) can quickly remove a block-colored background with a single click. While fast, this method is destructive, meaning it permanently alters the pixels. Always duplicate your layer before using it.
A more versatile and often preferred tool for initial selections is the Quick Selection Tool. This brush-like tool intelligently detects edges as you paint over your subject, automatically extending the selection to cover similar tones and textures.
- How to Use: Select the Quick Selection Tool. Adjust your brush size using the square bracket keys (
[and]). Click and drag inside your subject. Photoshop will intelligently expand the selection. - Refining the Selection: If the selection extends too far, switch to the “Subtract From Selection” option in the top toolbar (or hold
Alt/Optionwhile brushing) to remove unwanted areas. - Inverting the Selection: Once your subject is perfectly selected, you often need to delete the background. You can inverse the selection (Cmd + Shift + I on Mac, Ctrl + Shift + I on Windows) to select everything but your subject, then press
BackspaceorDeleteto remove the background.
The Pen Tool: For Crisp, Vector-Based Paths
For subjects requiring extreme precision, especially those with sharp, defined edges, the Pen tool (P) is invaluable. It allows you to draw vector paths, which are infinitely scalable and editable, making them perfect for clean cut-outs.
- How to Use: Select the Pen tool. Click along the edge of your subject to create anchor points. To create curves, click and drag the mouse, manipulating the Bezier handles that appear. Hold
Alt/Optionto adjust individual handles for precise control over curves. - Connecting and Converting: Continue clicking around the entire subject until you connect the final point to the first. You can later add or edit anchor points and adjust curves using the Convert Point tool or Direct Selection tool.
- Making a Selection: Once your path is complete, right-click on the path and choose “Make Selection.” You can then convert this selection into a layer mask for non-destructive editing.
Refining Edges: The Art of Hair and Complex Selections
Dealing with intricate details like hair, fur, or wispy fabric can be a nightmare with traditional selection tools. This is where Photoshop’s “Select and Mask” workspace shines, offering dedicated tools for complex edge refinement.
- Initial Selection: Start with a rough selection of the head and hair using the Quick Selection tool.
- Enter Select and Mask: Click the “Select and Mask” button in the taskbar. This opens a dedicated workspace with various viewing modes (e.g., “On Layers” or “Overlay”) to help you see your selection clearly.
- Refine Edge Brush: The Refine Edge Brush tool is the star here. Paint along the edges of the hair. Photoshop intelligently detects the foreground and background, separating individual strands from the complex background.
- Adjustments: Experiment with sliders like “Radius” (expands or contracts the refinement area), “Smooth” (reduces jaggedness), “Feather” (softens edges), and “Shift Edge” (pushes the edge inwards or outwards) to achieve the most natural look.
- Output: Choose “Layer Mask” as the output option. This creates a mask that conceals the background non-destructively, allowing for further adjustments. This technique is a crucial part of Photo Manipulation and Digital Art.
Seamless Compositing: Merging and Integrating Elements
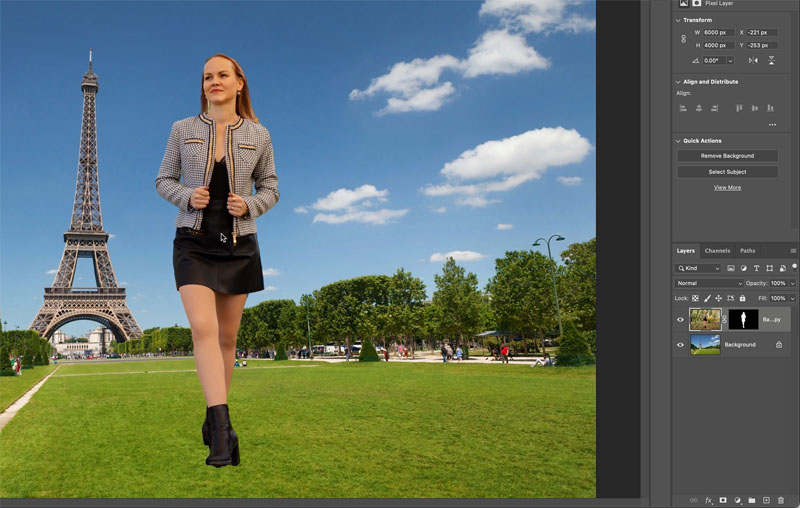
Once you’ve mastered selections, the real fun begins: combining multiple images to create a new scene. This involves dropping elements into a new background and ensuring they look like they belong there. This is a core aspect of Creative Ideas and Visual Design. Tophinhanhdep.com, with its wide range of Backgrounds and Aesthetic imagery, is an excellent resource for finding source material.
Merging Two Photos in Photoshop: Two Approaches
Merging photos in Photoshop can range from simple overlays to complex scene constructions. Let’s explore two effective methods:
Method 1: Quick Select and Placement
This method is ideal for extracting a clear subject (like a person or an animal) and placing it into a new scene.
- Select Images: Choose two images that you want to blend. As advised on Tophinhanhdep.com, consider matching perspectives, angles, lighting conditions, and resolution for a more convincing composite. If you’re swapping faces or editing blinking eyes, ensure models are facing the same direction.
- Open in Photoshop: Open both images in separate Photoshop tabs.
- Cut Out Your Subject:
- Duplicate the background layer of your subject image.
- Use the Quick Selection Tool to accurately select your subject. Refine as needed using the “Subtract From Selection” brush.
- Inverse the selection (Cmd + Shift + I / Ctrl + Shift + I).
- Press
BackspaceorDeleteto remove the background, leaving your subject on a transparent layer.
- Place Your Selection: Drag your subject layer from its tab directly into the tab of your new background image. You might need to hold the layer over the target tab until Photoshop switches to that image before dropping it.
- Initial Adjustments: Use Free Transform (Cmd + T / Ctrl + T) to resize and rotate your subject to match the perspective and scale of the new background. If necessary, flip the subject horizontally (Edit > Transform > Flip Horizontal) to match the direction of light or flow of the scene.
- Blending for Realism: Lighting and Color Harmonization
- Color Temperature: One of the most common inconsistencies is color temperature. Select your subject layer. Instead of creating a direct selection, use the Quick Selection tool to quickly select the entire subject layer (since the selection will be confined to that layer). Now, add an Adjustment Layer (e.g., Color Balance or Hue/Saturation) and ensure it’s clipped to your subject layer (hold
Alt/Optionand click between the adjustment layer and the subject layer in the Layers panel). Adjust the color balance to match the background’s hues. - Tonal Adjustments & Shadows: Realistic composites require matching light and shadow.
- Subtle Shadows: Create a new empty layer above your subject layer, clip it to the subject (Alt-click), and set its blend mode to “Multiply.” Paint with a soft, black brush (
B) in areas where shadows would naturally fall. Adjust the layer’s opacity for subtlety. - Dodge and Burn: For more controlled tonal adjustments, use the Dodge Tool (lightens) and Burn Tool (darkens) on a duplicate of your subject layer, or on a new layer filled with 50% gray and set to “Overlay” blend mode for non-destructive dodging and burning. Keep the “Exposure” setting low for gradual, convincing changes.
- Subtle Shadows: Create a new empty layer above your subject layer, clip it to the subject (Alt-click), and set its blend mode to “Multiply.” Paint with a soft, black brush (
- Harmonization Filter (Older PS Versions) / Blending techniques: While some older Photoshop versions had a “Harmonization” filter, modern blending relies more on careful color and tone matching using adjustment layers. The goal is to make the subject appear as if it was always part of the scene, considering ambient light, reflections, and environmental colors.
- Color Temperature: One of the most common inconsistencies is color temperature. Select your subject layer. Instead of creating a direct selection, use the Quick Selection tool to quickly select the entire subject layer (since the selection will be confined to that layer). Now, add an Adjustment Layer (e.g., Color Balance or Hue/Saturation) and ensure it’s clipped to your subject layer (hold
Method 2: Layer Mask for Precise Element Extraction
This method is highly effective for extracting smaller, more specific elements, or when the Quick Selection Tool struggles due to complex edges.
- Open Images: Drag and drop your “subject” photo directly onto your “background” photo in Photoshop. This creates a new layer for your subject image within the background document. Make preliminary size adjustments with Cmd + T / Ctrl + T.
- Create a Layer Mask: Select your subject layer. Click the “Add Layer Mask” icon (a rectangle with a circle inside) at the bottom of the Layers panel. This creates a white mask next to your layer thumbnail, revealing everything on that layer.
- Brush Away Unwanted Elements:
- Select the Brush Tool (
B). - Ensure your foreground color is black. Painting with black on a layer mask conceals parts of the layer.
- Carefully brush over the areas of the subject layer that you want to remove. Zoom in closely (
Cmd +orCtrl +) and adjust your brush size and hardness for maximum accuracy. - If you accidentally erase too much, switch your foreground color to white (
Xkey) and paint over the area to reveal it again.
- Select the Brush Tool (
- Perform Convincing Edits: Follow the same tonal and color adjustment steps as in Method 1 to integrate your extracted element seamlessly. Remember that with a layer mask, the Quick Selection Tool won’t automatically snap to your selection, so you’ll rely on your brush work to define the edges.
Removing Someone from a Photo
Sometimes, the goal isn’t to add, but to remove. Photoshop offers powerful tools for this, especially useful for tidying up Stock Photos or creating a cleaner Background.
- Content-Aware Fill: This tool attempts to intelligently replace a selected area by sampling surrounding pixels.
- How to Use: Make a selection around the person or object you want to remove (Lasso tool is good for this). Go to Edit > Fill, and select “Content-Aware Fill.”
- Limitations: While often impressive, its success depends heavily on the complexity of the background. Simple, repetitive patterns yield the best results.
- Patch Tool / Healing Brush / Clone Stamp Tool: For more control, especially with complex backgrounds, these tools are indispensable.
- Patch Tool: Select an unwanted area, then drag the selection to a “good” area to replace it.
- Healing Brush: Samples pixels from a source area and blends them with the texture, lighting, and shading of the target area.
- Clone Stamp Tool: This gives you the most control. Select the Clone Stamp tool (
S). HoldAlt/Optionand click to define a source point. Then, paint over the unwanted area. The tool clones the pixels from your source point. Use a soft brush and a low flow/opacity for a more natural blend. Always work on a duplicate layer.
Creative Cut-Outs and Shape Transformations
Beyond realistic composites, Photoshop empowers you to transform images into abstract shapes, adding a unique touch to Graphic Design and Digital Art projects. Tophinhanhdep.com provides excellent Abstract and Aesthetic imagery to experiment with these techniques.
Utilizing Clipping Masks for Creative Shapes
Clipping masks are a powerful, non-destructive way to constrain one layer’s visibility to the shape or transparency of another layer. This technique allows you to “cut” a picture into any custom shape, text, or even a pixel-based drawing.
- Prepare Your Image: Open your image in Photoshop. Convert the “Background” layer to a regular layer (Layer > New > Layer from Background) and name it appropriately.
- Create Your Shape:
- Select the Shapes tool from the toolbar, then choose the Custom Shape Tool.
- From the tool options bar, select a custom shape (e.g., a heart, star, or speech bubble). Tophinhanhdep.com has curated a wide range of Image Inspiration & Collections that can spark ideas for unique shapes.
- Draw your desired shape on the canvas. It will appear on a new “Shape Layer” above your picture layer.
- Arrange Layers: In the Layers panel (Window > Layers), drag the shape layer below your picture layer. The order is crucial: the picture layer must be directly above the shape layer.
- Create Clipping Mask: Right-click on the picture layer in the Layers panel and select “Create Clipping Mask” (in older Photoshop versions, this might be “Group with previous”).
- Result: Your picture layer is now “clipped” to the shape layer below it. Only the parts of the picture that overlap with the opaque areas of the shape layer will be visible. In the Layers panel, the clipped layer will be indented with an arrow pointing down to the shape layer, indicating they are linked.
- Independent Adjustment: Both layers remain independent. You can use the Move tool (
V) to adjust the size and position of either the picture within the shape or the shape itself, offering immense flexibility.
Graduated Transparency for Soft Edges
You can add a sophisticated touch to your cut-outs by introducing graduated transparency, making the edges fade out smoothly. This is excellent for Aesthetic and Beautiful Photography presentations.
- Rasterize the Shape Layer: Right-click the shape layer in the Layers palette and select “Rasterize Layer” (in Photoshop Elements, this is “Simplify Layer”). This converts the vector shape into pixels, allowing you to apply pixel-based filters.
- Apply Gaussian Blur: Go to Filter > Blur > Gaussian Blur.
- Adjust Radius: Set the “Radius” to a sufficiently high number (e.g., 30 pixels or more, depending on your image size and desired effect) and click OK.
- Fading Edges: Notice how the edges of your picture now subtly fade out, creating a soft, ethereal effect.
Adding Layer Effects to Cutouts
Further enhance your custom shapes with Photoshop’s robust layer styles, bringing depth and dimension to your Visual Design.
- Select Shape Layer: Select the shape layer (the clipping mask) in the Layers panel.
- Apply Layer Style: Go to Layer > Layer Style and choose an effect (e.g., “Drop Shadow” to add a realistic shadow, “Stroke” for an outline, or “Bevel & Emboss” for a dimensional look). In Photoshop Elements, go to Layer > Layer Style > Style Settings.
- Combine with Background: You can place a new background (e.g., a Wallpaper from Tophinhanhdep.com, a solid color, or a pattern fill layer) below the clipping group to complete your design.
Advanced Workflows and External Tools
Photoshop’s power is often amplified by integrating it with specialized plugins and maintaining an efficient workflow. For those working with high volumes of Digital Photography, these aspects are crucial.
Working with Smart Objects for Non-Destructive Editing
Smart Objects are Photoshop layers that contain raster or vector image data from source content, with all its original characteristics. This allows for non-destructive editing, meaning you can transform, scale, rotate, or apply filters to a Smart Object without permanently altering the original pixels. This is indispensable for Photo Manipulation and maintaining High Resolution quality.
There are two primary ways to convert layers into Smart Objects:
Method 1: Convert in Photoshop
- Open Image: Open your image in Photoshop.
- Convert for Smart Filters: In the Filter menu, select “Convert for Smart Filters.”
- Confirm: A dialog box will inform you about the conversion. Click OK. Your layer will now have a small icon in its thumbnail in the Layers panel, indicating it’s a Smart Object.
- Apply Filters: Now, when you apply any filter (Filter > [any filter]), it will be added as a “Smart Filter” layer effect below the Smart Object. You can double-click on the filter name to re-edit its settings at any time.
Method 2: Convert in a Plugin (e.g., Nik Collection)
Many third-party plugins, like those from DxO Nik Collection, integrate seamlessly with Photoshop’s Smart Object workflow. This allows you to apply complex enhancements and then re-edit them later.
- Open Image: Open your image in Photoshop.
- Launch Plugin: Go to Plugins > Nik Collection and select your desired plugin (e.g., Nik Color Efex).
- Apply Processing: Work on your image in the plugin.
- Apply as Smart Object: When you’re ready to apply the changes, click the “Apply” button. In the options that appear (often by clicking the second half of the Apply button), select “Smart Object.”
- Reversibility: The plugin will close, and your processed image will appear in Photoshop as a Smart Object with the plugin’s effect applied as a Smart Filter. You can double-click the plugin’s name in the Layers panel to reopen the plugin and re-edit your adjustments.
This non-destructive workflow is invaluable for experimenting with Editing Styles and ensuring flexibility in Digital Art projects.
Integrating External Plugins (e.g., Nik Collection Workflow)
Specialized plugins, like those in the DxO Nik Collection (Analog Efex, Color Efex, Dfine, HDR Efex, Sharpener, Silver Efex, Viveza), extend Photoshop’s capabilities dramatically, offering unique Editing Styles and effects. Tophinhanhdep.com can offer inspiration for the kinds of transformations these tools enable.
Key Workflow Features:
- Plugin Panels: From version 8 onwards, Nik Collection integrates directly into Photoshop’s UXP iconic panel system, allowing you to open, close, move, and rearrange panels like any other Photoshop panel.
- Preferences Panel: The Nik Preferences panel (accessible from the Plugins menu or within any Nik plugin) allows you to set default behaviors, such as whether to open all visible layers or just the active layer, and how masks are sent to plugins.
- Send as a Layer: Nik Collection plugins allow you to export intermediate editing steps as new layers back to Photoshop at any time. This enables you to combine multiple effects or switch between plugins while preserving each step.
- Mask Exchange: You can leverage Photoshop’s precise selection tools (including AI-based ones like Object Selection and Subject Selection) to create masks, and then import these masks directly into Nik Collection plugins for targeted local adjustments. This streamlines the process of applying selective enhancements.
- Nik HDR Efex in Merge Mode: This specialized plugin allows you to merge multiple bracketed exposures into a single High Dynamic Range (HDR) image directly from Photoshop, offering powerful tone-mapping capabilities for breathtaking Nature and Beautiful Photography.
Cultivating Your Visual Design Skills and Inspiration
Mastering Photoshop is not just about technical proficiency; it’s also about developing an eye for Visual Design, nurturing Creative Ideas, and finding Image Inspiration. Tophinhanhdep.com serves as a hub for all these elements, offering a vast repository of visual content and tools to enhance your skills.
Exploring Aesthetic and Thematic Collections
Tophinhanhdep.com categorizes images into various Image Inspiration & Collections, such as Aesthetic, Nature, Abstract, Sad/Emotional, and Beautiful Photography. These collections are perfect for:
- Mood Boards: Create visual mood boards before starting a project to define the desired look and feel.
- Thematic Collections: Explore themed galleries for project-specific inspiration, whether you need a serene Nature backdrop or a poignant Sad/Emotional atmosphere.
- Trending Styles: Stay updated with Trending Styles in photography and digital art to keep your work fresh and relevant.
Enhancing Workflow with Image Tools
Beyond Photoshop, efficient image handling is critical. Tophinhanhdep.com offers a suite of Image Tools that complement your Photoshop workflow:
- Image Converters: Easily change image formats (e.g., from HEIC to JPEG) before importing into Photoshop.
- Image Compressors & Optimizers: Reduce file sizes without significant loss of quality, crucial for web graphics or large projects.
- AI Upscalers: Enhance the resolution of smaller images, making them suitable for larger prints or more detailed manipulations in Photoshop, especially when working with Stock Photos that might need to fit specific High Resolution requirements.
- Image-to-Text Tools: Extract text from images, useful for research or incorporating specific typography into your designs.
The Broader Impact of Digital Photography and Graphic Design
Learning “how to photoshop images” extends beyond personal projects. It’s a skill fundamental to Digital Photography, enabling photographers to perfect their shots, correct flaws, and express their unique vision. In Graphic Design, Photoshop is used for creating advertisements, branding materials, website elements, and much more, blending images and text into cohesive visual narratives.
The journey to mastering Photoshop is continuous. There’s always a new technique to learn, a new effect to try, and new ways to combine tools to achieve truly unique results. The resources on Tophinhanhdep.com, from stunning Wallpapers and Backgrounds to practical Image Tools and rich Image Inspiration, are designed to support every step of your creative adventure. Embrace the learning process, experiment fearlessly, and let your imagination flourish as you transform images into compelling visual stories.