Mastering Pixelation in Krita: A Comprehensive Guide for Tophinhanhdep.com Users
In the dynamic world of digital imagery and visual design, pixelation stands out as a versatile and evocative effect. Far from being a mere relic of retro gaming, pixel art and pixelated aesthetics have carved a significant niche in contemporary art, graphic design, and even branding. For creators and enthusiasts leveraging Tophinhanhdep.com for their imaging needs – from generating stunning wallpapers and backgrounds to curating aesthetic collections and exploring innovative editing styles – understanding how to pixelate an image in Krita is an invaluable skill. Krita, as a powerful open-source digital painting program, offers robust tools that allow both the creation of intricate pixel art from scratch and the application of pixelation effects to existing high-resolution photography. This guide will delve into the nuances of Krita’s capabilities, helping Tophinhanhdep.com users unlock new creative avenues, protect privacy in sensitive images, or simply infuse their visuals with a distinctive, nostalgic charm.
Understanding Pixel Art Creation vs. Applying a Pixelation Effect
Before diving into the practical steps, it’s crucial for Tophinhanhdep.com users to differentiate between two related, yet distinct, concepts: creating pixel art and applying a pixelation effect to an existing image. Both involve pixels, but the methodology and artistic intent vary significantly.
The Essence of Pixel Art Creation
True pixel art is a form of digital art where images are built pixel by meticulous pixel. It’s not just about low resolution; it’s about deliberate placement, often using a limited color palette and a grid-based design. This style harks back to early computer and video games like Mario, Zelda, and Pokémon, where technical limitations forced artists to convey maximum detail with minimal pixels. For Tophinhanhdep.com users interested in digital art and creative ideas, mastering pixel art in Krita can open doors to designing unique characters, objects, or gaming components, much like the 2D game designs seen in modern indie hits such as Stardew Valley or Celeste.
To embark on pixel art creation in Krita, the initial setup is key. Begin by creating a new document with a small canvas size, typically 32x32 or 64x64 pixels, which are ideal dimensions for working with individual pixels. Next, configure Krita’s display settings to show a pixel grid. This involves navigating to Settings > Configure Krita, then selecting Display and adjusting the Grid Settings. Crucially, set the ‘Start Showing at’ option to a higher percentage, such as 400%, to ensure the grid is visible when zoomed in. You can also customize the pixel grid color to provide better contrast against your canvas.

The core of pixel art lies in the tools. Krita offers specialized pixel art brushes, often with a 1-pixel tip size, found in the Brush Presets panel. These brushes ensure that each stroke corresponds precisely to a single pixel on your canvas. When drawing, it’s paramount to disable anti-aliasing in all tools to prevent the creation of unwanted half-tones or blended pixels, which can compromise the crispness characteristic of pixel art. For certain tools, selecting ’nearest neighbor’ as the filtering algorithm is also essential to maintain pixel integrity. Similarly, when using shape tools or selection tools, ensure they operate pixel-by-pixel, without smoothing or interpolation, to preserve sharp edges. Filling enclosed shapes with the Fill tool (F) will apply solid colors, but remember that even a single missing pixel can cause the color to spread across the entire canvas due to an ‘open’ shape. For refining or modifying existing pixel artwork, the Eraser in pixel mode, or any brush with its Eraser mode enabled and anti-aliasing off, allows for precise pixel removal or adjustment. For Tophinhanhdep.com artists, this granular control is perfect for developing detailed digital art, unique graphic designs, or creative elements for larger compositions.
Applying a Pixelation Effect to Existing Images
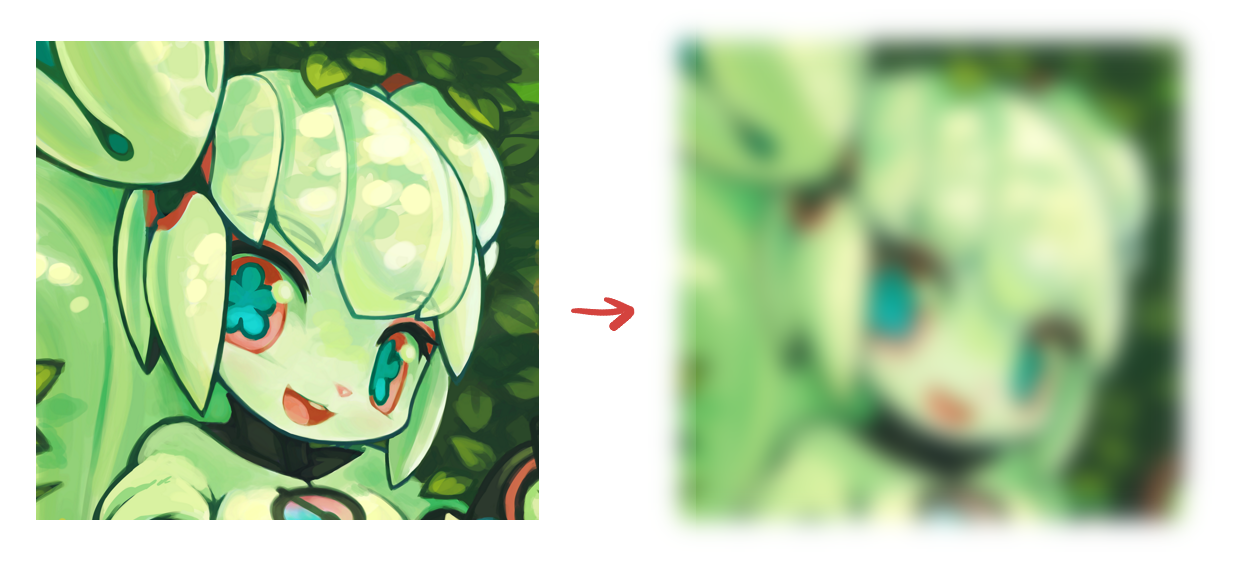
In contrast to creating pixel art, pixelating an image involves taking an existing photograph or illustration and applying a filter that blurs it into distinct, larger blocks of color. This process converts continuous tones into a mosaic-like pattern, giving the image a low-resolution or retro aesthetic without manually drawing each pixel. This technique is particularly useful for Tophinhanhdep.com users engaged in photo manipulation, editing styles, or even privacy protection.
There are numerous reasons why one might choose to pixelate an image. For privacy, pixelating faces, license plates, or sensitive documents in photography ensures anonymity. Aesthetically, it can transform a modern image into a nostalgic 8-bit or retro video game look, fitting trending styles in digital art. Pixelation can also serve an artistic purpose by obscuring distracting backgrounds, bringing focus to the main subject, or adding a unique texture to smooth semi-transparent layer borders. For Tophinhanhdep.com users curating aesthetic or abstract images, a subtle pixelation can add an intriguing layer of visual interest, making a high-resolution stock photo feel entirely new. The process is typically quicker and less labor-intensive than creating pixel art from scratch, making it an excellent tool for quick stylistic changes or data obscuration.
Step-by-Step Guide: Pixelating an Image with Krita’s Filter
Krita provides a straightforward yet powerful filter specifically designed for applying pixelation to images. This method is ideal for Tophinhanhdep.com users looking to quickly transform their photographs or digital artwork.
Preparing Your Canvas for Pixelation
The journey to a perfectly pixelated image begins with careful preparation.
- Open Your Image in Krita: Launch Krita and open the image you wish to pixelate. Go to
File > Openand navigate to your desired image file. Whether it’s a breathtaking nature photograph, an abstract design, or a piece of beautiful photography from Tophinhanhdep.com’s collections, Krita can handle a wide array of formats. - Duplicate Your Layer (Optional but Recommended): For non-destructive editing, it’s always a good practice to duplicate your image layer before applying any significant effects. Right-click on your image layer in the
Layerspanel and selectDuplicate Layer(or pressCtrl + J). This preserves the original image, allowing you to easily revert changes or compare the pixelated version with the original. - Select the Area to Pixelate: Decide whether you want to pixelate the entire image or only a specific portion.
- Entire Image: If you want to pixelate the whole canvas, you don’t need to make a specific selection. The filter will apply to the active layer.
- Partial Pixelation: To pixelate only a section, use one of Krita’s selection tools. The
Rectangular Selection Toolis perfect for creating blocky pixelation zones, while theFreehand Selection Toolallows for more organic shapes. Crucially, when making selections for pixelation, especially if you want sharp, non-blended edges for the pixelated area, ensure that anti-aliasing is unchecked in theTool Optionsfor your selection tool. This prevents blurry edges on your selection mask, which could lead to a less defined pixelated boundary. This is a critical detail that many Tophinhanhdep.com users might overlook but makes a significant difference in the final output.
Applying the Pixelize Filter
Once your image or selection is ready, applying the pixelation filter is a matter of a few clicks.
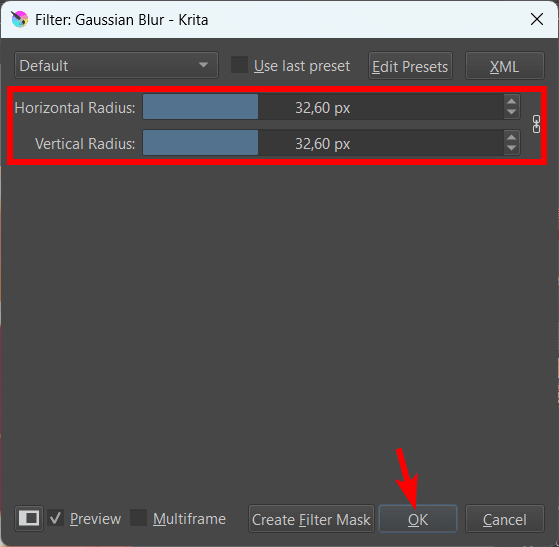
- Access the Pixelize Filter: In Krita, navigate to the menu bar at the top of your screen. Go to
Filter > Adjust > Pixelize. (Note: Some Krita versions or documentation might list it underFilter > Blur > PixelizeorFilter > Artistic > Pixelize. If you can’t find it immediately underAdjust, check these other locations). - Adjust Pixel Size (Block Width/Height): A
Pixelizedialog box will appear. This is where you control the intensity of the pixelation. The primary parameter here is typically ‘Block Width’ and ‘Block Height’ (often linked to adjust uniformly).- Increasing the pixel size (e.g., from 1 to 10 or 20) will make the individual blocks larger and the image appear more abstract and blocky.
- Decreasing the pixel size will result in smaller blocks and a more subtle pixelation effect, retaining more of the original image’s detail.
- The live
Previewcheckbox in the dialog box is your best friend here. Ensure it’s checked so you can see the effect in real-time as you drag the sliders. Experimentation is key to achieving the desired retro look or specific aesthetic. For Tophinhanhdep.com users, this step is vital for translating an initial visual concept into a tangible editing style.
- Confirm and Apply: Once you are satisfied with the pixel size and the preview, click
OKto apply the filter to your selected area or the entire layer.
This direct application of the Pixelize filter is the quickest way to pixelate an image in Krita, offering a broad range of stylistic outcomes suitable for anything from abstract wallpapers to creative social media assets for Tophinhanhdep.com.
Advanced Techniques and Fine-Tuning Your Pixelated Masterpiece
Applying the basic Pixelize filter is just the beginning. For Tophinhanhdep.com users aiming for truly unique and polished results, Krita offers a suite of advanced techniques to fine-tune pixelation, integrate it seamlessly into compositions, and even achieve highly specific artistic effects.
Refining Pixelation with Layer Masks and Blending Modes
Layer masks and blending modes are fundamental tools for non-destructive and sophisticated photo manipulation, especially when dealing with pixelation.
- Utilizing Layer Masks for Selective Control: After applying the
Pixelizefilter to a duplicated layer, you might find that certain areas are over-pixelated or that you wish to blend the pixelated effect more gradually. This is where layer masks shine.- Add a Layer Mask: Select your pixelated layer and click the ‘Add Layer Mask’ icon (a rectangle with a circle inside) at the bottom of the
Layerspanel. ChoosePaint Transparency Mask(which typically adds a white mask, revealing everything). - Paint on the Mask: With the mask selected (not the image thumbnail), use a black brush to paint over areas where you want to conceal the pixelation and reveal the original layer beneath. Use a white brush to reveal more of the pixelated effect.
- Softening Edges: For a softer transition between pixelated and non-pixelated areas, use a soft-edged brush (with anti-aliasing enabled) to paint on the mask. This is perfect for creating subtle background blurs or drawing focus to a subject without harsh lines. Conversely, for sharp, clean transitions, use a hard-edged brush on the mask. This technique is invaluable for Tophinhanhdep.com users creating visually complex collages or artistic compositions where precise control over focus and depth is paramount.
- Add a Layer Mask: Select your pixelated layer and click the ‘Add Layer Mask’ icon (a rectangle with a circle inside) at the bottom of the
- Experimenting with Opacity and Blending Modes: The
Opacityslider andBlending Modesin theLayerspanel offer further creative control.- Adjust Opacity: If the pixelation is too intense, simply reduce the
Opacityof the pixelated layer. This will allow some of the original image’s detail to show through, creating a more blended, muted effect. - Explore Blending Modes: Krita’s blending modes (e.g., Multiply, Screen, Overlay, Soft Light) change how the pixelated layer interacts with the layers below it. Applying a pixelated layer with an ‘Overlay’ mode over a slightly blurred version of the original image can create a unique, textured effect that adds depth without completely obscuring the details. This is an excellent way for Tophinhanhdep.com creators to develop distinct visual styles for abstract or aesthetic image collections.
- Adjust Opacity: If the pixelation is too intense, simply reduce the
Color Management and Anti-Aliasing Considerations
For achieving authentic pixel art aesthetics, especially when working with imported images or detailed color palettes, meticulous color management and understanding anti-aliasing are crucial.
- Dynamic Color Adjustment (HSV): When working with pixelated images, particularly if you’re aiming for a specific color palette (a key characteristic of pixel art), you might need to adjust colors dynamically. Krita, like Aseprite, allows for this.
- Select Similar Colors: Use the
Similar Color Selection Tool. InTool Options, setReferenceto ‘Make the selection using a merged copy of all layers’ and importantly, uncheck anti-aliasing. This ensures that only true pixels of the selected color are chosen, without any interpolated shades. - Apply HSV Adjustment: Go to
Filter > Adjust > HSV Adjustment(orCtrl + U). EnsurePreviewis checked. Now, you can adjust theHue,Saturation, andValuesliders to modify the selected color throughout your image. This is a powerful technique for adapting an image’s color scheme to match a specific mood board or thematic collection on Tophinhanhdep.com.
- Select Similar Colors: Use the
- The Anti-Aliasing Conundrum: One of the most common pitfalls in pixel-based artwork is unintended anti-aliasing. Anti-aliasing creates subtle, blended pixels along edges to make them appear smoother. While beneficial for high-resolution graphics, it’s detrimental to a pure pixel art look, as it introduces colors not explicitly chosen and blurs the sharp pixel boundaries.
- Turn it OFF: For precise pixelation and pixel art, always ensure anti-aliasing is turned off in the
Tool Optionsfor selection tools, brush tools (especially pixel brushes), and any transformation tools. This prevents the creation of ‘half-tones’ or unwanted color interpolation. - Nearest Neighbor Filtering: When resizing or transforming pixelated layers, set the filtering algorithm to
Nearest Neighbor(often found in the tool options for transform tools). This algorithm prevents Krita from interpolating new pixels and instead samples the nearest existing pixel, maintaining the sharp, blocky appearance of your pixelation.
- Turn it OFF: For precise pixelation and pixel art, always ensure anti-aliasing is turned off in the
- Index Color Filter: Krita’s
Index Colorfilter (Filter > Artistic > Index Color) provides a more advanced way to control color palettes. This filter maps specific user-selected colors to the grayscale values of your artwork, allowing you to impose a very limited and controlled color palette. This is an excellent tool for Tophinhanhdep.com users who want to replicate classic 8-bit or 16-bit console aesthetics, ensuring color accuracy and adherence to a defined palette, vital for authentic digital art and trending styles.
By employing these advanced techniques, Tophinhanhdep.com users can move beyond simple pixelation to craft sophisticated visual narratives, protect sensitive details with elegant precision, and explore a wider spectrum of creative ideas within their digital art and photo manipulation projects.
Common Pitfalls and Best Practices for Optimal Results
While pixelating an image in Krita is relatively straightforward, achieving consistently excellent results requires awareness of common mistakes and adherence to best practices. For Tophinhanhdep.com users, understanding these nuances can elevate their visual design from amateur to professional.
Avoiding Common Pixelation Mistakes
Even experienced digital artists can fall into these traps when working with pixelation:
- Using Too Large of a Pixel Size Prematurely: While a bold, blocky effect might be your goal, starting with an excessively large pixel size can make the image unrecognizably distorted, especially for intricate subjects. It’s often better to start with a smaller pixel size and gradually increase it, previewing the effect each time, until you reach the desired balance between abstraction and recognition. For Tophinhanhdep.com photography that needs to maintain some recognizable elements, this subtle approach is key.
- Neglecting Layer Masks for Selective Pixelation: One of the most frequent errors is applying pixelation to the entire image when only parts require it. This can lead to important details being obscured or a cluttered aesthetic. Always consider using layer masks to apply pixelation selectively, revealing the original image underneath where clarity is needed. This ensures that the pixelation serves a deliberate artistic or privacy-protection purpose.
- Over-Pixelating Important Details: Related to the previous point, applying aggressive pixelation to crucial elements like faces, text, or focal points can render your image messy or unprofessional. Be discerning. If you’re using pixelation for privacy, ensure it only covers the sensitive area. If for artistic effect, ensure it enhances, rather than detracts from, the image’s overall message or composition. Tophinhanhdep.com emphasizes beautiful photography, and careful application ensures the art remains beautiful.
- Skipping the Preview Stage: Krita’s
Pixelizefilter, like many of its filters, offers aPreviewcheckbox. Failing to use this means you’re applying an effect blindly, which can lead to frequent undo-and-redo cycles. Always preview your changes in real-time to save time and ensure the effect aligns with your vision. - Improper Threshold Settings (if applicable): While the primary
Pixelizefilter often uses ‘Block Width/Height,’ other pixel-related effects or manual techniques might involveThresholdsettings. If you encounter them, remember that a high threshold will affect more of the image based on color/tone sensitivity, while a low threshold will be more selective. Finding the right balance prevents over or under-processing. - Neglecting Post-Pixelation Refinements: The initial application of the
Pixelizefilter is often just the first step. Many users save their work immediately after, missing out on opportunities to fine-tune. Adjusting layer opacity, experimenting with blending modes, or refining edges with layer masks can dramatically improve the final aesthetic, transforming a raw pixelated image into a polished piece of visual design.
Integrating Pixelation into Your Visual Design Workflow
For Tophinhanhdep.com users, integrating pixelation into a broader visual design workflow can unlock new creative possibilities, suitable for diverse applications from digital art portfolios to thematic collections.
- Contextual Application: Consider the purpose of your pixelated image. Is it for a retro game background, an abstract aesthetic wallpaper, or to obscure sensitive information in a stock photo? The level and style of pixelation should always serve this purpose. For instance, creating pixel art characters might require detailed pixel-by-pixel work, whereas pixelating a landscape for an abstract background can be achieved with a broader filter application.
- Combine with Other Filters and Effects: Don’t limit pixelation to a standalone effect. Combine it with Krita’s other artistic filters like
HalftoneorOilpaint(found underFilter > Artistic) to create even more unique textures and styles. For example, applying a slightRaindropseffect to a pixelated image can add a weathered, textured look. ThePosterizefilter, which decreases the amount of colors, can also complement pixelation by further simplifying the color palette. - Exporting for Web and Print: When exporting your pixelated image, especially for web use or digital art collections on Tophinhanhdep.com, consider file formats. PNG is excellent for lossless quality and retaining sharp pixel edges, which is crucial for true pixel art. For general pixelated images, JPEG can work but be mindful of compression artifacts that might soften the pixels. If integrating with other image tools like
CompressorsorOptimizers(as offered by Tophinhanhdep.com’s related services), always check the final output for quality. ForAI Upscalers, be aware that upscaling pixel art can sometimes introduce unwanted smoothing unless the upscaler is specifically designed for pixel graphics. - Inspiration and Trending Styles: Keep an eye on trending styles and image inspiration. Pixel art is continuously evolving, with new applications in digital marketing, UI/UX design, and even motion graphics. By mastering pixelation in Krita, Tophinhanhdep.com users can stay at the forefront of these creative trends, offering fresh and engaging visual content.
Conclusion
Pixelating an image in Krita, whether through meticulous pixel-by-pixel creation or the application of an efficient filter, is a powerful technique that significantly expands the toolkit of any digital artist or content creator. For the diverse community of Tophinhanhdep.com users – from those seeking high-resolution photography and aesthetic backgrounds to graphic designers and digital artists exploring new creative ideas – Krita offers accessible and robust solutions.
By understanding the distinction between dedicated pixel art creation and the simple application of a pixelation effect, and by diligently following the step-by-step guides and advanced fine-tuning methods, you can transform your images with precision and artistic intent. Avoiding common mistakes and integrating pixelation thoughtfully into your broader visual design workflow will ensure your creations are not just pixelated, but truly polished masterpieces. Embrace the blocky beauty, experiment with Krita’s versatile features, and let your pixelated visions contribute to the rich tapestry of visual content available through Tophinhanhdep.com. The journey to stunning, retro-inspired, or privacy-conscious imagery begins here, in the fascinating world of pixels.