How to Pixelate an Image in Photoshop: A Comprehensive Guide for Digital Artists and Photographers
Pixelation, once a limitation of early digital graphics, has evolved into a versatile and impactful artistic technique in the realm of digital photography and visual design. Whether you’re looking to protect privacy, create a retro 8-bit aesthetic, or add a unique abstract touch to your images, Adobe Photoshop offers powerful tools to achieve this effect. At Tophinhanhdep.com, we understand the nuances of image manipulation and strive to provide resources for every aspect of visual creativity, from high-resolution photography to creative editing styles. This guide will delve into various methods for pixelating images in Photoshop, exploring both built-in features and powerful plugins, and even touching upon how to reverse unwanted pixelation.
![]()
Understanding Pixelation: Why and When to Apply This Effect
Pixelation is the visible display of individual pixels, typically large and blocky, that make up a digital image. Instead of a smooth, continuous tone, the image appears as a grid of distinct colored squares. This effect isn’t just a flaw; it’s a deliberate artistic choice with numerous applications in visual design and digital art.
The Dual Purpose of Pixelation: Privacy and Aesthetic
One of the most common practical uses for pixelation is privacy protection. In an age where images are shared instantly across countless platforms, blurring or pixelating a face or sensitive information is crucial. For instance, if you capture a street scene that inadvertently includes identifiable individuals, applying a pixelation filter allows you to share the image while safeguarding their anonymity. This is particularly relevant for journalistic or documentary photography, where ethical considerations often require anonymization. The goal here is often to “remove the identity of a face,” as highlighted in various digital photography tutorials, reminding us of the importance of responsible image sharing.
Beyond privacy, pixelation serves a rich aesthetic purpose. It can transform a conventional image into something strikingly artistic, evoking nostalgia for early video games like Minecraft, or creating a contemporary, abstract look. This falls perfectly into the “Aesthetic” and “Abstract” categories of images featured on Tophinhanhdep.com. Digital artists and graphic designers frequently employ pixelation to:
- Create a retro or vintage feel: The 8-bit styling instantly transports viewers back to the early days of computing and gaming.
- Add an abstract or surreal quality: By breaking down an image into its fundamental components, pixelation can distort reality, inviting a different interpretation.
- Generate unique visual textures: The blocky nature of pixels can create an interesting texture that can be utilized in various graphic design projects or digital art pieces.
- Emphasize digital themes: In advertising or visual content related to technology, “digital pixel” effects are often used to reinforce the digital nature of a product or concept, making it a staple in various creative ideas and thematic collections.
The Fundamental Principle: Pixels as Building Blocks
At its core, every digital image is composed of tiny squares of color called pixels. When an image is pixelated, these individual pixels are intentionally enlarged or grouped into larger, uniform blocks of color. This process effectively reduces the perceived resolution and detail, causing the image to appear less defined and more “blocky.” Understanding this fundamental principle is key to effectively manipulating pixelation in Photoshop, allowing you to control the size and intensity of these visual building blocks to achieve your desired effect.
Standard Pixelation Techniques in Photoshop
Photoshop offers straightforward methods to pixelate an image, primarily through its Filter Gallery. These techniques are easily accessible and provide a good starting point for both basic anonymization and creative effects.
Basic Mosaic Filter for Quick Pixelation
The simplest way to pixelate an image in Photoshop is by using the Mosaic filter. This built-in filter is ideal for quick applications, such as blurring a specific area for privacy or applying a uniform pixelated style across an entire image.
Here’s a step-by-step guide:
- Load Your Image: Open your desired image in Adobe Photoshop. You can find high-resolution images or stock photos suitable for experimentation on Tophinhanhdep.com.
- Select the Area (Optional, for Selective Pixelation): If you only want to pixelate a specific part of your image, like a face or a sensitive object, you’ll need to make a selection first.
- Choose the Lasso Tool (found on the left selection column, often second from the top).
- Click and drag to draw a selection around the area you wish to pixelate. A dotted line (marching ants) will indicate your selection. This technique ensures that only the selected area is affected, maintaining the clarity of the rest of your image.
- Pro Tip: For more precise selections, explore tools like the Quick Selection Tool or Pen Tool, especially for intricate shapes.
- Access the Mosaic Filter:
- Navigate to the top menu bar.
- Click on Filter.
- Hover over Pixelate.
- Select Mosaic.
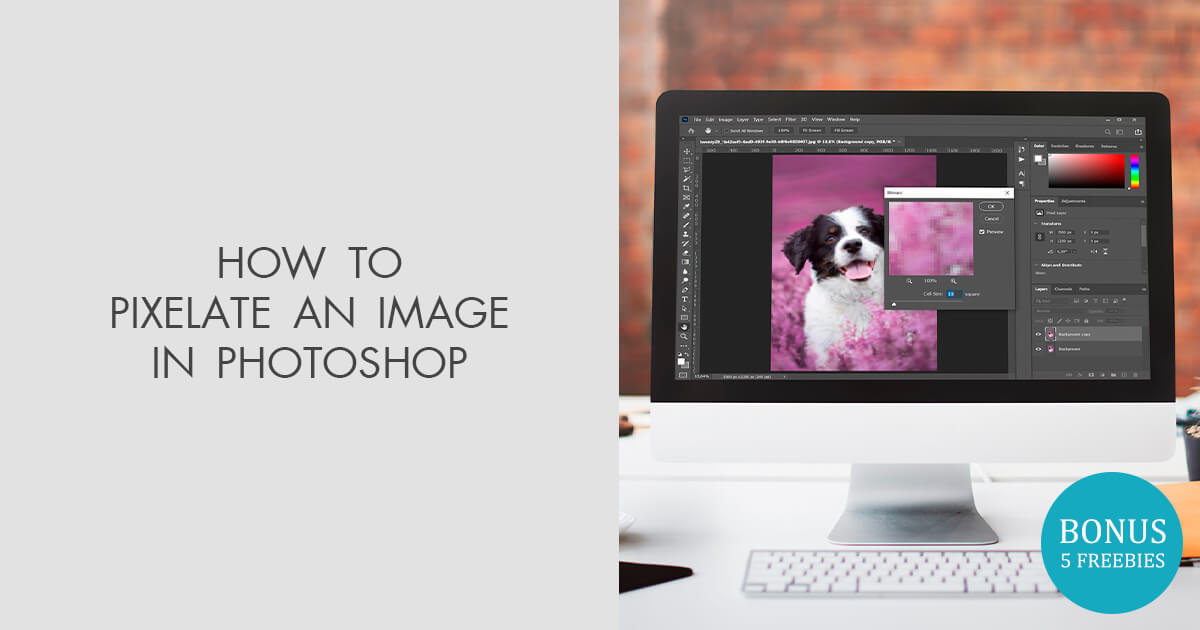
- Adjust Cell Size: A “Mosaic” dialog box will appear. At the bottom of this box, you’ll find a slider labeled Cell Size.
- This slider controls the size of the individual pixel blocks (squares).
- Drag the slider to the right to increase the cell size, resulting in fewer but larger pixels, making the image more abstract or blurred.
- Drag the slider to the left for smaller, more numerous pixels, leading to a subtler pixelation.
- Photoshop provides a live preview, allowing you to see the effect as you adjust the slider. A cell size of 15 is a common starting point, but the optimal value depends on your image’s resolution and your desired effect. Larger images may require a larger cell size to achieve noticeable pixelation.
- Apply the Filter: Once you’re satisfied with the preview, click OK to apply the Mosaic filter to your selection or the entire layer.
Selective Pixelation for Focused Effects
For targeted applications, the ability to selectively pixelate is invaluable. This technique ensures that the core subject or relevant areas of your image remain clear while specific elements are obscured or artistically altered. This aligns with the “Photo Manipulation” aspect of visual design, where precision is key.
The steps outlined above (especially Step 2) cover the basics of selective pixelation using the Lasso tool. However, for more advanced control and non-destructive editing, consider these enhancements:
- Duplicate the Layer: Before making any selections or applying filters, it’s always good practice to duplicate your background layer (Ctrl+J / Cmd+J). This preserves your original image and allows for more flexibility during editing.
- Smart Objects: Convert your duplicated layer to a Smart Object (Right-click layer > Convert to Smart Object). This allows you to apply filters non-destructively, meaning you can adjust or remove the Mosaic filter settings at any time without permanently altering the pixel data.
- Layer Masks: After applying the Mosaic filter to an entire layer (preferably a Smart Object), you can add a layer mask. Then, use a black brush to paint over areas where you don’t want the pixelation to show, effectively “erasing” the effect from those parts while keeping it active elsewhere. Conversely, if you started with a selection, you could save that selection as a layer mask for easier refinement.
These techniques provide greater control and allow for more refined visual designs, ensuring your pixelation serves its intended purpose without compromising other elements of your beautiful photography.
Advanced Digital Pixel Effects for Creative Visual Design
Beyond basic pixelation for privacy, Photoshop empowers users to create sophisticated “digital pixel” effects that blend pixelated and original elements, offering a wide range of creative possibilities for graphic design and digital art. These methods explore layer masks, opacity, and blend modes to achieve dynamic and visually engaging results, perfectly fitting the “Visual Design” and “Creative Ideas” categories on Tophinhanhdep.com.
Blending Pixelated and Original Layers with Layer Masks
One of the most powerful techniques for advanced pixelation involves combining a pixelated layer with the original image using a layer mask. This allows for seamless transitions and localized control over the effect.
- Duplicate the Background Layer: Open your image and duplicate the Background layer (Ctrl+J / Cmd+J). This new layer, often named “Layer 1,” will become your pixelated layer.
- Pixelate the Duplicate Layer: Apply the Mosaic filter to “Layer 1” as described in the previous section (Filter > Pixelate > Mosaic). Adjust the Cell Size to your preference. Now you have a fully pixelated version of your image.
- Add a Layer Mask: With “Layer 1” selected in the Layers palette, click the Add Layer Mask icon (a rectangle with a circle inside) at the bottom of the palette. A white thumbnail will appear next to your layer thumbnail, indicating an active layer mask.
- Select the Gradient Tool: Choose the Gradient Tool from the Tools palette (or press G).
- Set Foreground/Background Colors: Ensure your Foreground color is black and your Background color is white. If not, press D to reset them to default, then X to swap if necessary (since layer masks default to white foreground).
- Apply a Gradient to the Mask:
- In the Options Bar, confirm the “Foreground to Background” gradient is selected (typically the first option).
- Click and drag your mouse across the image where you want the blend between the pixelated and original layers to occur. For instance, dragging a horizontal line across a face will create a transition where one half is pixelated and the other is clear.
- The black part of the gradient on the mask will reveal the original image from the layer below, while the white part will show the pixelated layer. The grey areas will create a smooth fade.
This method allows you to create effects where parts of the image seem to emerge from a pixelated shroud, offering a powerful visual narrative that aligns with various photo ideas and mood boards found on Tophinhanhdep.com.
Harnessing Opacity and Blend Modes for Dynamic Results
Once you have a pixelated layer, you can further refine its impact by adjusting its opacity and experimenting with blend modes. These settings can dramatically alter the appearance of the pixelation, allowing for subtle integrations or bold, transformative effects.
- Adjusting Opacity:
- With your pixelated layer (“Layer 1”) selected, locate the Opacity slider in the top right corner of the Layers palette.
- Lowering the opacity (e.g., to 75% or less) will allow the original image on the layer below to partially show through the pixelated layer. This creates a softer, more integrated effect where the pixelation becomes a translucent overlay rather than a complete obfuscation. This technique can add a dreamlike quality or a sense of digital distortion that’s both present and ethereal.
- Experimenting with Blend Modes:
- Reset the opacity of your pixelated layer back to 100% to fully appreciate the impact of blend modes.
- In the Layers palette, click on the Blend Mode dropdown menu (usually set to “Normal” by default) in the top left corner.
- Cycle through different blend modes like Darken, Lighten, Overlay, Hard Mix, Multiply, or Screen. Each blend mode interacts with the underlying layer’s pixels in unique ways, creating entirely new visual outcomes.
- Darken: Keeps only the darker pixels from either layer.
- Lighten: Keeps only the lighter pixels from either layer.
- Hard Mix: Can create posterized, high-contrast effects with strong color shifts.
- The effect can range from subtle textural enhancements to dramatic color shifts and abstract interpretations. For instance, using “Hard Mix” can transform an image into something akin to graphic novel art, showcasing the versatility required for various digital art and photo manipulation projects.
By combining layer masks with opacity and blend modes, you gain unparalleled control over your digital pixel effects, moving from simple modifications to complex visual designs that captivate and inspire.
Enhancing Pixelation with Third-Party Photoshop Plugins
While Photoshop’s native Mosaic filter is effective, third-party plugins can extend its capabilities, offering more granular control and unique features. These tools are often developed by digital photography enthusiasts for specific functionalities that streamline workflows and push creative boundaries.
Exploring the “Pixelate” Plugin for Greater Control
One such plugin, simply named “Pixelate,” offers an enhanced alternative to Photoshop’s standard Mosaic filter. It expands upon the basic functionality by introducing features that provide a higher degree of customization for pixelation effects.
Key features of a specialized “Pixelate” plugin typically include:
- Cell Outline: A significant addition is the ability to add and customize an outline around each pixel cell. You can often choose a custom color and adjust the intensity of these outlines, which is invaluable for creating stylized, game-like graphics or emphasizing the pixel structure for a technical imaging effect.
- Horizontal and Vertical Cell Sizes: Unlike the standard Mosaic filter which applies a uniform cell size, a dedicated plugin might allow independent adjustment of horizontal (X-axis) and vertical (Y-axis) cell sizes. This enables non-proportional pixelation, leading to rectangular instead of square pixels, opening up new artistic possibilities. A “Lock Horiz/Vert” option might also be available for proportional pixelation when desired.
- Color Modes: Professional workflows often require support for various color depths. A robust plugin will typically support both 8 bits/channel and 16 bits/channel color modes, ensuring compatibility with high-quality images and complex projects.
- Real-time Display and Preview: Modern plugins often feature real-time display options and accurate preview scaling, allowing artists to see the effect instantly as they adjust parameters, significantly speeding up the creative process.
These advanced controls make such a plugin an “indispensable tool” for both technical imaging effects and creative 8-bit styling, catering to detailed digital photography and graphic design needs.
Installation and Compatibility for Seamless Integration
Installing a third-party plugin for Photoshop is generally a straightforward process designed for seamless integration into your existing workflow.
- Download the Plugin: Typically, you’ll download the plugin as a
.zipfile from the developer’s website. - Extract Contents: Unzip the downloaded file. Inside, you’ll usually find an
.8bffile, which is the Photoshop plugin file. - Place in Plugin Folder: Copy the
.8bffile into your Adobe Photoshop’s plugin folder. The exact location varies slightly depending on your Photoshop version and operating system.- For Photoshop CS6 and older, it might be in
Program Files\Adobe\Adobe Photoshop CSX\Plug-ins. - For Photoshop CC (versions 2013-2019 or later), plugins are often stored in a shared folder like
Program Files\Common Files\Adobe\Plug-Ins\CC. - It’s a good practice to create a sub-folder (e.g.,
Richard Rosenman Filters) within the Plug-ins folder to keep your plugins organized. - Crucially, ensure you place 64-bit plugins into the corresponding 64-bit Photoshop plugin folder if you’re using a 64-bit version of Photoshop.
- For Photoshop CS6 and older, it might be in
- Launch Photoshop and Access: After installation, launch Adobe Photoshop. Open an image and navigate to Filter in the top menu bar. You should see a new entry, often under the developer’s name (e.g., “Richard Rosenman”), with the plugin listed (e.g., “Pixelate”).
- If the filter appears grayed out, it might not support your image’s current color depth (e.g., trying to use a 16-bit plugin on an 8-bit image or vice-versa), or you might be using an incompatible host application.
- Compatibility Considerations: Always check the plugin’s compatibility information regarding operating systems (e.g., Windows 11, 10, 8, 7, Vista, XP 64-bit versions) and host applications (e.g., Adobe Photoshop CS5 or higher, Photoshop Elements, Illustrator, CorelDRAW, Corel Painter, Paint Shop Pro). Note that some plugins may not be compatible with Mac OS.
Integrating these specialized tools into your image editing arsenal, available from resources like Tophinhanhdep.com, allows for more sophisticated visual design and photo manipulation, pushing the boundaries of what’s achievable with digital photography.
Reversing the Effect: How to Fix a Pixelated Image in Photoshop
While this guide focuses on how to pixelate an image, it’s equally important for any digital photography enthusiast or visual designer to know how to fix pixelated images. Unintended pixelation often occurs when low-resolution photos are resized, zoomed in, or shared across platforms, causing individual pixels to stretch and the image to become blurry and grainy. At Tophinhanhdep.com, we recognize the challenge of maintaining image quality, especially when working with diverse sources like social media or various camera types.
Fixing a pixelated image in Photoshop is a common task, particularly for those involved in product photo editing or high-resolution photography. While Photoshop isn’t a magic wand that can conjure missing detail, it offers powerful tools to mitigate the effects of pixelation and improve image quality.
Leveraging Sharpening Tools to Restore Clarity
One primary method for combating pixelation involves using Photoshop’s sharpening tools. The goal here is to enhance edge contrast and make the image appear crisper, thus reducing the perceived blurriness caused by stretched pixels.
- Insert Your Pixelated Image: Open your low-resolution or pixelated image in Photoshop.
- Increase Image Size (Initial Step): Pixelated images are often low-resolution. To give Photoshop more “data” to work with, you might need to increase the image size. Go to Image > Image Size (or Ctrl+Alt+I / Cmd+Opt+I). Increase the dimensions, but be aware that this can initially introduce more blur.
- Duplicate Layer: Always work on a duplicate layer (Ctrl+J / Cmd+J) to preserve your original image.
- Apply Surface Blur: On the duplicate layer, apply Filter > Blur > Surface Blur. This filter blurs the image while preserving edges, which can help smooth out blocky areas without losing all detail. Adjust the Radius (how far Photoshop searches for similar pixels to blur) and Threshold (how different pixels must be to be excluded from the blur) until you achieve a smoother appearance.
- Apply Smart Sharpen: After blurring, apply Filter > Sharpen > Smart Sharpen. This is a more sophisticated sharpening tool than standard “Sharpen.”
- Amount: Controls the intensity of the sharpening effect.
- Radius: Determines the size of the pixels around edges that are affected by sharpening. A smaller radius sharpens smaller details, while a larger radius sharpens broader edges.
- Reduce Noise: This setting helps prevent the sharpening from exacerbating existing noise or introducing new artifacts. Adjust these sliders carefully to enhance details without over-sharpening, which can introduce halos or more grain.
- Add a Layer Mask and Refine: If the sharpening effect is too strong or affects areas you didn’t intend, add a layer mask to your sharpened layer. Invert the mask (Ctrl+I / Cmd+I to fill it with black) and then use a white brush to selectively paint back the sharpening effect only where it’s needed, for example, on facial features or product details.
- Color Balance (Optional): Pixelation and resampling can sometimes affect color. If needed, use an Adjustment Layer > Color Balance to fine-tune your image’s colors.
Reducing Noise and Grain for Smoother Images
Another effective approach to fix pixelation, often intertwined with sharpening, is noise reduction. Pixelated images frequently exhibit digital noise and grain, especially if they’ve been enlarged.
- Duplicate Layer: Start with a duplicate layer (Ctrl+J / Cmd+J).
- Apply Gaussian Blur (Alternative to Surface Blur): Instead of Surface Blur, you can try Filter > Blur > Gaussian Blur. Apply a very small radius (e.g., 0.5-1.5 pixels) just enough to subtly smooth out some of the harsh pixel edges. Be cautious not to over-blur and lose all detail.
- Apply Noise Reduction: Follow with Filter > Noise > Reduce Noise.
- Strength: Controls the overall intensity of noise reduction.
- Preserve Details: Balances noise reduction with detail retention. Increase this to keep more fine details.
- Reduce Color Noise: Targets color speckles that often appear in low-light or low-quality images.
- Sharpen Details: A built-in sharpening option to compensate for detail loss during noise reduction. Adjust these settings to find the optimal balance for your specific image.
- Despeckle (Quick Fix): For a quick, aggressive noise reduction, you can also use Filter > Noise > Despeckle. This blurs areas of high contrast while preserving overall structure.
While both sharpening and noise reduction methods have their merits, many professionals on Tophinhanhdep.com find that a combined approach, often starting with careful sharpening, yields the most satisfying results for most pixelated images. The choice often depends on the specific characteristics of the image and the degree of pixelation.
Tophinhanhdep.com’s Free Action for Quick Fixes
Recognizing the common need to quickly fix pixelated images, Tophinhanhdep.com offers a free Photoshop action based on the “Sharpening Tools” method. Photoshop actions are sequences of recorded steps that can be replayed with a single click, automating complex editing processes.
Our free Photoshop action allows you to apply a carefully calibrated set of sharpening and blurring steps to your image instantly. Simply install the action in Adobe Photoshop CC, click the “play” button, and watch as your pixelated image is transformed. While the default settings are optimized for a wide range of images, we encourage users to “play with the settings and find the sweet spot for your image” to achieve personalized, professional-grade results. This tool embodies our commitment to providing easy-to-use image tools that empower users to achieve beautiful photography and high-resolution quality, even from imperfect starting points.
Pixelation in the Broader Context of Digital Imaging and Visual Design
Pixelation, whether applied intentionally or corrected, stands as a testament to the dynamic nature of digital imaging. It’s a powerful effect that bridges technical understanding with creative expression, making it a valuable subject within the diverse offerings of Tophinhanhdep.com.
Pixelation as a Tool for Visual Storytelling and Art
In visual storytelling, pixelation can convey a sense of mystery, censorship, or a digital past. It can represent a transition into a virtual world or abstract a scene to emphasize emotion over detail. For digital artists, it’s a fundamental technique for creating pixel art, retro game aesthetics, or unique graphic design elements. When exploring “Image Inspiration & Collections” or “Thematic Collections” on Tophinhanhdep.com, you’ll find that pixelation often features in trending styles and creative ideas, demonstrating its enduring appeal in art and visual communication. From aesthetic wallpapers to abstract backgrounds, the effect adds a distinct character.
Tophinhanhdep.com: Your Resource for Image Transformation
At Tophinhanhdep.com, we are dedicated to being your comprehensive resource for all things related to images and visual design. Our extensive categories—including Wallpapers, Backgrounds, Aesthetic, Nature, Abstract, Sad/Emotional, and Beautiful Photography—showcase the sheer variety and potential of digital imagery. Our focus on “Photography” covers everything from high-resolution captures and stock photos to diverse digital photography techniques and intricate editing styles.
Furthermore, we provide crucial “Image Tools” such as converters, compressors, optimizers, and AI upscalers, helping you manage and enhance your image assets. For those passionate about “Visual Design,” we offer insights into graphic design, digital art, photo manipulation, and creative ideas that can elevate your projects. Finally, our “Image Inspiration & Collections” offer photo ideas, mood boards, thematic collections, and trending styles to spark your creativity.
Understanding how to pixelate an image in Photoshop, and conversely, how to fix a pixelated image, forms a vital part of this ecosystem. These skills empower you to transform images, protect privacy, and unleash artistic vision, making your digital creations truly stand out. Explore Tophinhanhdep.com for more tutorials, tools, and inspiration to master the art of image transformation.