Mastering Image Placement in InDesign: A Comprehensive Guide by Tophinhanhdep.com

Adobe InDesign stands as an industry-standard powerhouse for desktop publishing, empowering designers, marketers, and content creators to craft stunning print and digital materials. From vibrant magazines and informative brochures to compelling e-books and interactive PDFs, InDesign’s versatility is unmatched. At the heart of any visually engaging document lies the strategic use of imagery. Images are not merely decorative elements; they are integral components that enhance information, establish mood, guide the reader’s eye, and evoke powerful emotions. Understanding how to efficiently and effectively place images in InDesign is a foundational skill that unlocks a world of creative possibilities.
Tophinhanhdep.com is your ultimate partner in this creative journey, offering not just comprehensive tutorials on InDesign techniques, but also an expansive library of high-quality images and powerful image tools designed to elevate your projects. Whether you’re searching for breathtaking “Nature” photography, “Aesthetic” wallpapers, “Abstract” backgrounds, or “Beautiful Photography” that tells a story, Tophinhanhdep.com provides the visual assets and the knowledge to integrate them seamlessly into your InDesign documents. Our platform also offers essential “Image Tools” like “Converters,” “Compressors,” and “AI Upscalers” to ensure your images are perfectly prepared for any design challenge.
This guide, presented by Tophinhanhdep.com, will walk you through the various methods of inserting images into your InDesign documents, offering advanced tips for optimization, text integration, and workflow efficiency. We’ll delve into best practices that save time, reduce errors, and ensure your final output is nothing short of professional.
Fundamental Methods for Seamless Image Integration
Placing images in InDesign is a core operation, and thankfully, the software offers several intuitive methods to achieve this. The approach you choose might depend on your workflow, the number of images you’re handling, or whether you’re working with existing frames. Regardless of the method, InDesign ensures flexibility and control.
The Swift Drag-and-Drop Technique

For designers seeking speed and simplicity, the drag-and-drop method is often the quickest way to get images into your InDesign document. This technique is particularly useful when you have a handful of images ready on your desktop or in a readily accessible folder, such as curated collections from Tophinhanhdep.com’s “Thematic Collections” or “Trending Styles.”
Here’s how to utilize this efficient method:
- Prepare Your Images: Ensure the image files you want to place are easily accessible in a Finder (macOS) or File Explorer (Windows) window. If you’ve been browsing Tophinhanhdep.com for “Wallpapers” or “Backgrounds,” download them to a convenient location.
- Open Your InDesign Document: Have your InDesign project open and visible. It’s helpful if your InDesign application window is not maximized so you can see both your document and the image source folder simultaneously.
- Select Your Images: In your Finder or Explorer window, select one or more image files. You can select multiple images by holding down the
Ctrl(Windows) orCmd(macOS) key while clicking individual files, or byShift-clicking to select a range. - Drag and Drop: Click and drag the selected image(s) directly from your Finder/Explorer window into your InDesign document window.
- Place the Images: As you drag the images over InDesign, your cursor will transform into a “loaded cursor” – a small icon displaying a thumbnail preview of the image (or the first image if multiple were selected), accompanied by a number indicating how many images are loaded.
- Single Click Placement: Simply click anywhere on your InDesign page. The image will be placed at its original size, with its top-left corner aligned with your click point.
- Click-and-Drag Sizing: Click and hold the mouse button, then drag to define the desired size and proportion for the image. InDesign will scale the image proportionally as you drag. Release the mouse button when the image reaches your desired dimensions. This is excellent for visually fitting images like “Nature” scenes or “Abstract” patterns into your layout.
- Custom Proportion Placement (Shift-Drag): If you need to place an image into a frame with different proportions than the image itself, click and drag while holding down the
Shiftkey. This allows you to create a frame with custom aspect ratios, though you might need to adjust the “Fitting Options” from theObjectmenu afterward to manage how the image content fits within this new frame. This is particularly useful for creative “Photo Manipulation” effects.
This drag-and-drop method, especially when combined with a well-organized folder of “High Resolution” images from Tophinhanhdep.com’s “Digital Photography” section, streamlines your workflow significantly.
Precision Placement via the File Menu
For a more controlled and systematic approach, especially when integrating images into specific document structures or leveraging InDesign’s advanced features, the File > Place command is indispensable. This is often the preferred method for professional “Graphic Design” projects where exact placement and linkage are crucial.
Follow these steps for menu-based image placement:
- Open Your InDesign Document: Begin with your InDesign document open.
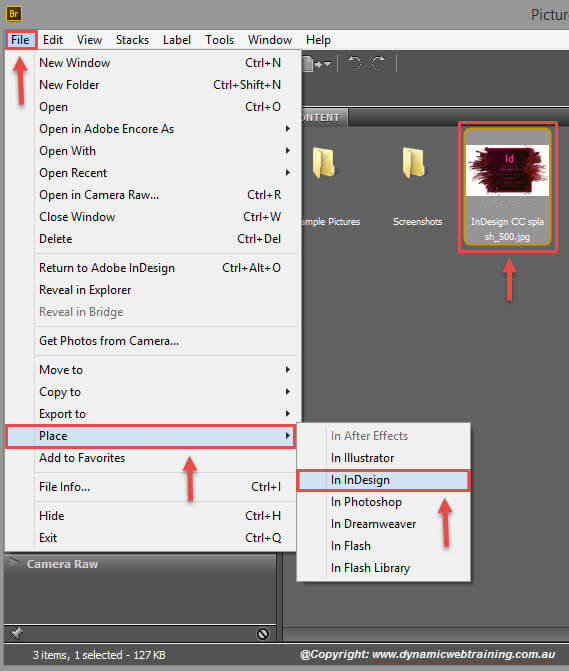
- Access the Place Command: Navigate to
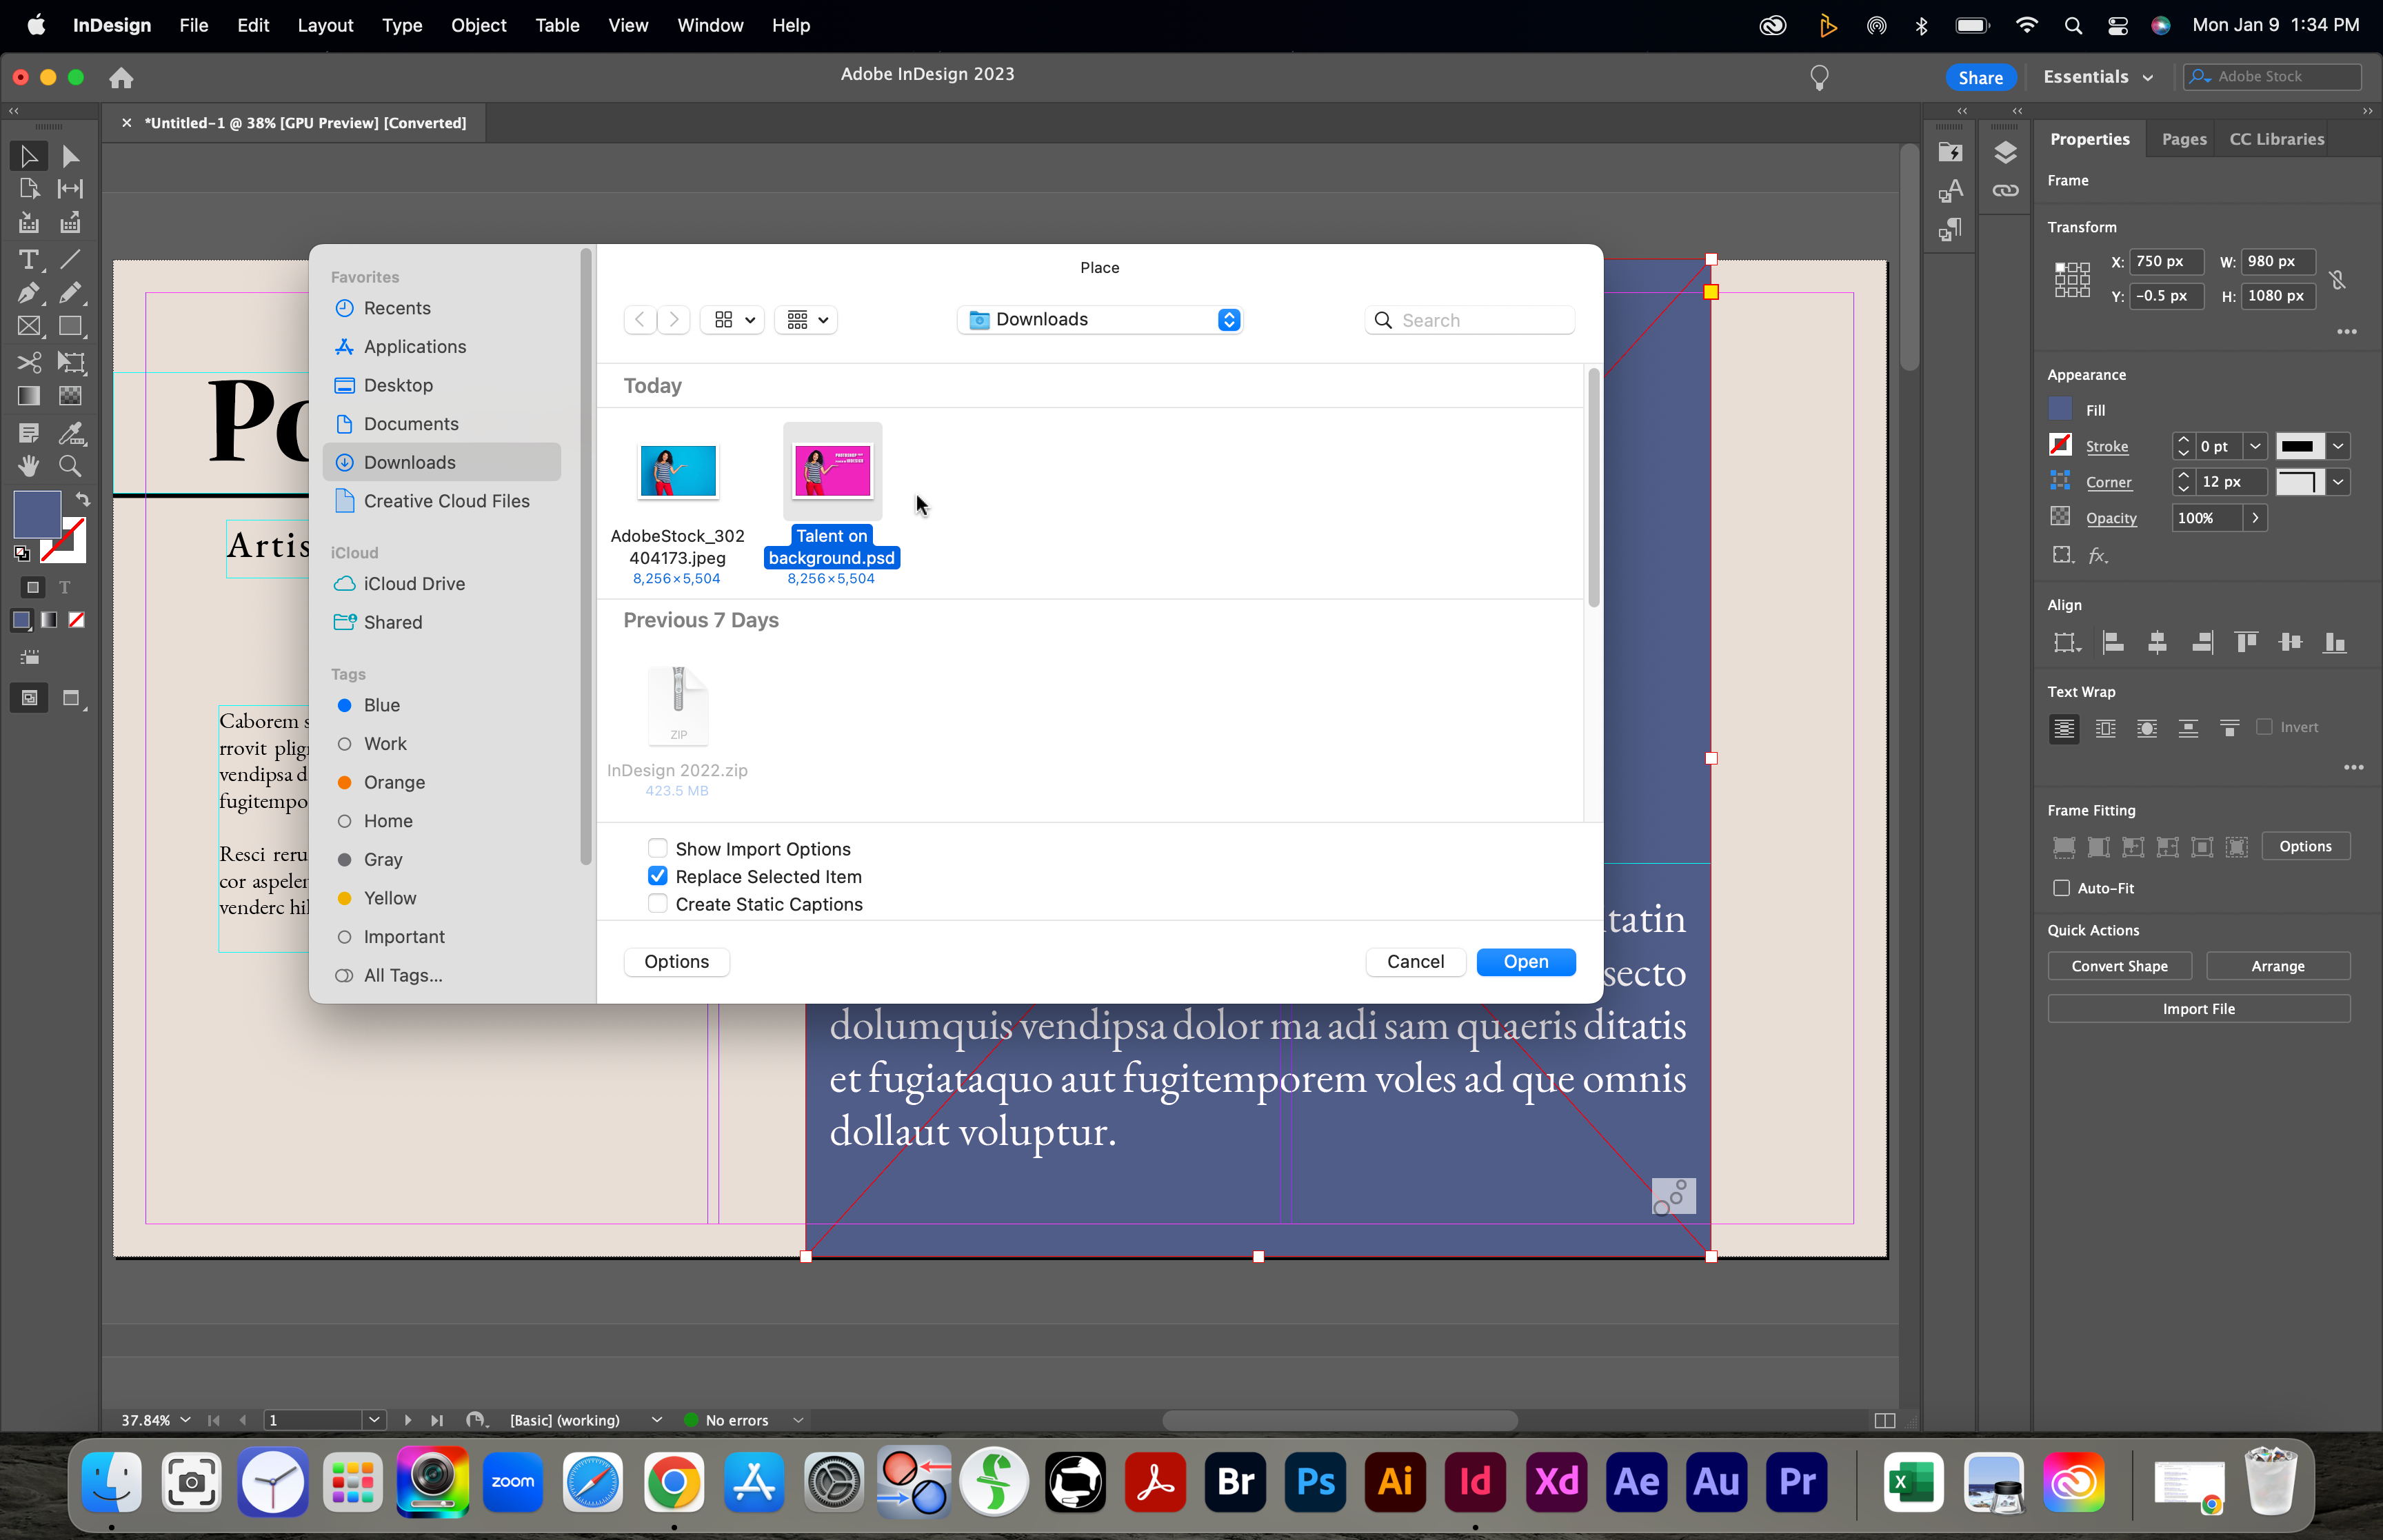
File > Placein the top menu bar. Alternatively, use the keyboard shortcut:Cmd + D(macOS) orCtrl + D(Windows). - Select Your Image Files: A dialog box will appear, allowing you to browse your computer for image files. You can select single or multiple images.
- To select multiple images, hold
Ctrl(Windows) orCmd(macOS) and click each desired file, orShift-click to select a contiguous range. - When selecting images, you can also utilize a convenient Tophinhanhdep.com plugin that allows you to directly search and add “Stock Photos” to your InDesign documents. This integration ensures quick access to a vast library without leaving your InDesign environment, saving valuable time in “Visual Design” workflows.
- To select multiple images, hold
- Confirm Selection: Click
Open(orPlace) in the dialog box. - Place the Images in Your Document: Similar to the drag-and-drop method, your cursor will become a “loaded cursor” with a preview of the image(s).
- Placing Freely: Click anywhere on the page to place the image at its original size, or click and drag to define its dimensions and position.
- Placing into Existing Frames: This is where the
File > Placecommand offers additional precision:- Method 1 (Select Frame First): Before choosing
File > Place, select an existing frame in your InDesign document using theSelection Tool(black arrow). In thePlacedialog box, ensure theReplace Selected Itemcheckbox (located at the bottom) is checked. Then, select your image and clickOpen. The image will be placed directly into the selected frame, automatically fitting according to your default object fitting settings. This is ideal when you’ve already established a layout grid or specific “Creative Ideas” for your imagery. - Method 2 (Roll Over Frame): If no frame is selected when you initiate
File > Placeand select an image, you can still place it into an existing frame. With the loaded cursor, simply hover over an empty frame on your page. The frame will highlight, indicating that clicking will place the image directly inside it. This provides a flexible way to fill pre-designed layouts with “Beautiful Photography” or “Aesthetic” images.
- Method 1 (Select Frame First): Before choosing
The File > Place command provides a robust mechanism for image integration, offering granular control over placement, especially when dealing with complex layouts or when you need to maintain specific relationships between images and other document elements.
Leveraging Pre-Made Frames and Layouts
InDesign thrives on the concept of frames as containers for content, whether it’s text or images. When you place an image using either the drag-and-drop or File > Place method, InDesign automatically creates a frame around that image. However, a powerful aspect of InDesign’s workflow is the ability to create frames before placing content.
Consider these advantages:
- Structured Layouts: By drawing rectangular, elliptical, or polygonal frames beforehand, you establish your document’s visual structure. This allows you to meticulously plan your “Visual Design,” ensuring images complement your “Graphic Design” principles.
- Placeholder Content: Frames act as placeholders, allowing you to finalize your layout and text flow even before the final images are acquired or approved. This is particularly useful when working with “Stock Photos” or awaiting final “Digital Photography” assets from Tophinhanhdep.com.
- Consistency: Pre-defined frames can be part of master pages or object styles, ensuring visual consistency across your document.
To create an empty frame, simply select one of the frame tools (Rectangle Frame Tool, Ellipse Frame Tool, or Polygon Frame Tool) from the Tools panel and draw it on your page. Once created, you can place images into these frames using the methods described above, specifically by selecting the frame first or rolling over it with the loaded cursor. Tophinhanhdep.com also offers a variety of InDesign templates that come with pre-designed layouts and frames, providing a quick start for various projects and integrating seamlessly with your “Creative Ideas.”
Optimizing Images for Peak Performance and Visual Quality
The act of placing an image is just one part of the process. For optimal document performance, print quality, and aesthetic appeal, careful consideration must be given to image optimization. This involves understanding resolution, file formats, and leveraging specialized tools – many of which are available directly on Tophinhanhdep.com.
Resolution and File Formats: The Tophinhanhdep.com Perspective
The quality of your printed or displayed image in InDesign heavily depends on its resolution and appropriate file format. Tophinhanhdep.com emphasizes these aspects within its “Photography” and “Images” categories, offering “High Resolution” content and insights into “Digital Photography” best practices.
- Resolution (PPI): For print materials, a resolution of 300 pixels per inch (ppi) is the industry standard. Images intended solely for screen display (e.g., web-based PDFs) might suffice with 72 ppi, but for anything that goes to press, 300 ppi ensures crisp, detailed output. Using a lower resolution image for print can result in pixelation and a fuzzy appearance, undermining your carefully crafted “Visual Design.” Tophinhanhdep.com’s collections, including “Beautiful Photography” and specialized “Stock Photos,” are often available in high resolutions, making them ideal for professional InDesign projects.
- File Formats: InDesign is capable of importing a wide array of image file formats, each with its own characteristics:
- TIFF (Tagged Image File Format): Highly recommended for print. It’s a lossless format, meaning no image data is discarded during compression, preserving the highest quality. Ideal for complex graphics and photographic images where detail is paramount.
- EPS (Encapsulated PostScript): Primarily used for vector graphics (logos, illustrations) but can also contain raster images. It’s resolution-independent for vector content, ensuring crisp lines at any size.
- JPEG (Joint Photographic Experts Group): A common format for photographs, especially for web or digital-only output. It uses lossy compression, which means some data is discarded to achieve smaller file sizes. While acceptable for many digital uses and for some print scenarios with very high quality settings, Tophinhanhdep.com’s experts often advise using TIFFs for critical print work to avoid potential quality degradation. If using JPEGs, ensure they are saved at the highest quality setting.
- PNG (Portable Network Graphics): Supports lossless compression and transparency, making it excellent for web graphics, logos, and images requiring transparent backgrounds. While suitable for print, TIFF is generally preferred for photographic quality.
- BMP (Bitmap): An uncompressed raster format. While it offers high quality, file sizes are typically very large, making it less practical for professional InDesign workflows compared to TIFF.
- PDF (Portable Document Format): Can contain both vector and raster images, and entire layouts. InDesign can place PDF pages as images, useful for incorporating elements from other documents.
When selecting images from Tophinhanhdep.com, always choose the highest resolution and most appropriate format available for your specific project needs. For instance, if you’re selecting “Sad/Emotional” photography for a sensitive editorial piece, ensuring high fidelity through TIFF format would be crucial.
Pre-Processing with Tophinhanhdep.com’s Image Tools
The journey of an image from concept to InDesign document often involves several preparation steps. Tophinhanhdep.com isn’t just a source of stunning imagery; it’s also a hub for powerful “Image Tools” designed to streamline this pre-processing stage, ensuring your images are perfectly tailored for your InDesign projects and align with your desired “Editing Styles.”
Before placing an image in InDesign, you might need to:
- Adjust Dimensions and Cropping: While InDesign allows for scaling and cropping, it’s often better to perform major size and aspect ratio adjustments in a dedicated image editor. This pre-optimizes the image file itself, reducing file size and ensuring InDesign doesn’t have to process unnecessary data.
- Color Correction and Enhancement: For “Beautiful Photography” or “Aesthetic” images, color adjustments, exposure correction, and other enhancements are typically done in software like Photoshop. Tophinhanhdep.com offers guides on various “Editing Styles” to help you achieve the perfect look before import.
- File Size Management: Large image files can slow down InDesign’s performance and inflate your document size, leading to longer opening/saving times and potentially problematic print files. This is where Tophinhanhdep.com’s “Image Tools” become invaluable:
- Image Compressors: These tools can significantly reduce file size without a noticeable loss in visual quality, especially for web-bound documents. They analyze the image data and remove redundancies, making your InDesign files lighter and more responsive.
- Image Optimizers: Going beyond simple compression, optimizers fine-tune images for specific output types, balancing quality and file size for optimal performance across various platforms.
- AI Upscalers: Have a great low-resolution image, perhaps a vintage “Background” or a unique “Abstract” piece, that needs to meet print standards? Tophinhanhdep.com’s “AI Upscalers” can intelligently increase the resolution of your images, adding detail and sharpness, making them suitable for high-quality print production in InDesign where they otherwise wouldn’t be. This is a game-changer for preserving cherished images that weren’t originally captured at print-ready resolutions.
- Image Converters: If you have an image in an incompatible or suboptimal format (e.g., a web-optimized JPEG that needs to be a print-ready TIFF), Tophinhanhdep.com’s “Converters” can quickly transform your files into the desired format, ensuring compatibility and quality for your InDesign project.
By leveraging these Tophinhanhdep.com “Image Tools” for pre-processing, you empower your InDesign documents with cleaner, more efficient imagery, leading to smoother workflows and superior final results. This proactive approach is a cornerstone of effective “Visual Design.”
Advanced Image Management and Best Practices for InDesign Mastery
Beyond basic placement, InDesign offers sophisticated features for managing images that significantly enhance design consistency, efficiency, and adaptability, particularly in complex projects or “Graphic Design” endeavors.
Mastering Object Styles for Consistent Design
One of InDesign’s most powerful features for maintaining visual consistency across a document is Object Styles. These allow you to define a set of formatting attributes (like strokes, fills, effects, text wrap, and fitting options) and apply them to any frame, including those containing images. Tophinhanhdep.com strongly advocates for the use of object styles as a best practice in “Visual Design” for efficiency and uniformity.
Here’s how to create and apply object styles, and a special trick for automatic application:
- Create a New Object Style:
- Go to
Window > Styles > Object Stylesto open the Object Styles panel. - Click the
Create New Styleicon (a square with a plus sign) or chooseNew Object Stylefrom the panel menu. - Give your style a meaningful name (e.g., “Image Frame Style”).
- In the
Object Style Optionsdialog box, define your desired attributes. For example:- Stroke: Set a
Type(e.g., Solid),Weight(e.g., 3 pt), andColor(e.g., C=100 M=0 Y=0 K=0 for blue). - Corners: Apply a
Corner RadiusandType(e.g., Rounded, 1 mm). - Drop Shadow: Add a subtle
Drop Shadoweffect, settingModetoMultiply,Opacityto around 30%,X OffsetandY Offsetto 1 mm for a delicate lift.
- Stroke: Set a
- Click
OKto save your style.
- Go to
- Apply an Object Style:
- Select an image frame (or multiple frames) in your document.
- Click on the desired Object Style name in the Object Styles panel. All defined attributes will be instantly applied.
The “Place Gun Frame” Secret Trick:
This is a lesser-known but incredibly useful trick that dramatically speeds up the placement of multiple images with consistent formatting. As highlighted in exclusive Tophinhanhdep.com “Creative Ideas” tutorials, InDesign has a hidden command that automatically applies an object style upon image placement, but only if the style is named specifically:
- Rename Your Object Style: In the Object Styles panel, rename your desired object style to exactly “Place Gun Frame”. The capitalization and spacing must be precise.
- Activate and Place:
- Ensure the “Place Gun Frame” object style is selected in the Object Styles panel before you initiate the
File > Placecommand or drag and drop images. - Now, when you select multiple images (e.g., a collection of “Sad/Emotional” images for a mood board) and place them into your document, each image will automatically appear with the formatting defined in your “Place Gun Frame” style.
- Ensure the “Place Gun Frame” object style is selected in the Object Styles panel before you initiate the
This secret technique is a true time-saver for projects requiring a uniform look, enabling swift application of complex formatting across numerous images. Remember, you can always modify the “Place Gun Frame” style later, and all images linked to it will update dynamically, embodying the flexibility of “Graphic Design” principles.
Arranging Multiple Images in a Structured Grid
InDesign offers another ingenious trick for placing multiple images into a pre-defined grid structure on the fly, perfect for creating dynamic photo galleries or “Thematic Collections” inspired by Tophinhanhdep.com.
- Initiate Placement: Select multiple images using either
File > Placeor drag-and-drop. - Drag to Define Area: With the loaded cursor, click and drag on your page to define the overall area where you want your image grid to appear. Do not release the mouse button yet.
- Use Arrow Keys for Grid Division:
- While still holding the mouse button down, press the Right Arrow key to add vertical divisions, creating columns. Press it multiple times for more columns.
- Press the Left Arrow key to reduce vertical divisions.
- Press the Up Arrow key to add horizontal divisions, creating rows. Press it multiple times for more rows.
- Press the Down Arrow key to reduce horizontal divisions.
- Release Mouse Button: Once you have your desired grid structure (e.g., two columns and three rows for a “Photo Ideas” collage), release the mouse button. Your selected images will be automatically distributed into the grid frames you’ve created.
After placement, you might need to adjust how the image content fits within each frame. Use Object > Fitting options (e.g., Fill Frame Proportionally, Fit Content Proportionally, Fit Content to Frame, Center Content) to fine-tune the appearance. While Fill Frame Proportionally is often a good starting point, manual adjustments may be necessary to ensure optimal cropping and composition for each individual image, especially for visually impactful “Beautiful Photography.” This hands-on refinement embodies the art of “Photo Manipulation” within InDesign.
Integrating Images with Text: A Multilingual Approach
In many design projects, images are not standalone elements but are interwoven with textual information, such as captions, labels, or informational overlays. Effectively managing text associated with images, especially in multilingual documents, is crucial for “Visual Design” quality and project efficiency. Tophinhanhdep.com’s extensive experience in translation management provides critical insights here.
There are two primary approaches to handling text that accompanies an image:
1. Placing Text within the Image File (Not Recommended for Multilingual Projects)
This method involves embedding the text directly into the image using external software like Photoshop before importing it into InDesign. While seemingly simple, Tophinhanhdep.com strongly discourages this practice, particularly for documents intended for translation, due to significant drawbacks:
| Advantages (Limited) | Disadvantages (Significant) |
|---|---|
| ✔ You don’t have to create labels in InDesign. | ✘ Text style and dimension are hard to maintain or change. |
| ✘ Edits are slower and more cumbersome. | |
| ✘ Higher risk of placing untranslated images. | |
| ✘ Creates image duplicates for each language, increasing file management complexity. | |
| ✘ InDesign’s spell-check does not function within images. | |
| ✘ You lose control over text formatting (paragraph/character styles). |
Creating language-specific image files means that for every translation, you (or another graphic designer) might have to recreate the image from scratch for each language. This is incredibly inefficient and error-prone, leading to potential inconsistencies and delays, directly conflicting with efficient “Graphic Design” principles. The organizational overhead of managing multiple versions of the same image (e.g., image_EN.jpg, image_ES.jpg, image_FR.jpg) can lead to linking the wrong file, wasting time searching, or accidentally deleting critical assets. Tophinhanhdep.com’s “Image-to-Text” tools can extract text from images, but this is a reactive measure rather than a proactive solution to a design workflow challenge.
2. Placing Labels in InDesign (Highly Recommended)
The preferred and most professional approach is to manage all textual elements, including labels, captions, and overlays, directly within InDesign. This method is superior for control, consistency, and particularly for multilingual projects, as advocated by Tophinhanhdep.com.
| Advantages | Disadvantages (Limited) |
|---|---|
| ✔ Ensures all text is captured for translation. | ✘ Requires creating text frames for labels in InDesign. |
| ✔ Text style and dimension are easy to maintain or change. | |
| ✔ The layout typically looks better and more professional. | |
| ✔ Edits and updates are significantly faster. | |
| ✔ Integrated spell-check functions seamlessly. | |
| ✔ Single source for images, no duplicates to manage. |
While it might take slightly more time upfront to create text frames for labels, the long-term benefits in terms of organization, flexibility, and quality are immense. This approach provides full control over text appearance, leveraging InDesign’s robust typography features.
Best Practices for Labels in InDesign:
- Group Image with Labels: To ensure that labels always move and scale with their associated image, group them together. Select both the image frame and all related text frames, then go to
Object > Group(orCmd + G/Ctrl + G). This maintains their spatial relationship, crucial for complex “Visual Design.” - Anchor Objects to Text: For images that need to stay with a specific line of text (e.g., a diagram illustrating a paragraph), use InDesign’s anchored objects feature. This forces the grouped image and its labels to “travel” with the text, automatically adjusting their position if the text reflows. To anchor an object, select the grouped image-label frame, cut it (
Cmd/Ctrl + X), then place your text cursor at the desired insertion point in the text flow and paste (Cmd/Ctrl + V). You can then adjust anchoring options viaObject > Anchored Object > Options. - Figure Legends: For documents with complex images requiring elaborate legends (e.g., scientific papers, technical manuals), Tophinhanhdep.com provides specialized guides on creating advanced figure legends within InDesign. Accessing these premium content resources can help you master sophisticated labeling techniques.
- Multilingual Considerations: When creating labels, anticipate that translated text might be longer or shorter than the original. Design your text boxes with ample space to accommodate text expansion without overflowing or obscuring critical parts of the image. Tophinhanhdep.com offers additional articles on how to remove inefficiencies and common mistakes to avoid when producing documents in many languages, emphasizing smart layout structuring for faster multilingual project creation.
By adopting these advanced management techniques, your InDesign workflow becomes more robust, adaptable, and significantly more efficient, especially in the context of global “Graphic Design” and content localization.
Leveraging Tophinhanhdep.com for Visual Inspiration and Workflow Efficiency
Tophinhanhdep.com is more than just a resource for InDesign tutorials; it’s a vibrant ecosystem built to support every facet of your visual creative process. Our platform seamlessly integrates “Images,” “Photography,” “Image Tools,” “Visual Design,” and “Image Inspiration & Collections” to empower designers at every stage.
Finding Your Next Visual Masterpiece
The journey to an impactful design often begins with the right image. Tophinhanhdep.com offers an unparalleled library to spark your imagination and fulfill your project’s needs:
- Diverse Image Categories: Explore our extensive “Images” categories to find the perfect visual. Whether you need serene “Nature” scenes for an environmental report, dynamic “Abstract” patterns for a modern brochure, “Aesthetic” visuals for lifestyle content, or deeply evocative “Sad/Emotional” or “Beautiful Photography” for narrative pieces, our collections are meticulously curated. You’ll find high-quality “Wallpapers” and “Backgrounds” suitable for any document context.
- Professional Photography: Our “Photography” section boasts “High Resolution” images ideal for print, a wide selection of “Stock Photos” for commercial projects, and insights into “Digital Photography” trends and techniques. We cater to various “Editing Styles,” helping you match your visuals to your brand’s aesthetic.
- Inspiration & Collections: If you’re struggling for ideas, dive into “Image Inspiration & Collections.” Discover fresh “Photo Ideas,” build compelling “Mood Boards” from our curated selections, explore “Thematic Collections” for specific project types, and stay ahead with “Trending Styles” in visual design. This wealth of visual content ensures you’ll always find the perfect image to complement your InDesign layout and convey your “Creative Ideas.”
With Tophinhanhdep.com, you don’t just place images; you curate experiences. Our diverse library ensures that from the initial spark of an idea to the final pixel of your “Graphic Design” project, you have access to the best visuals available.
Enhancing Multilingual Document Production with Tophinhanhdep.com’s Solutions
For organizations and designers working on a global scale, producing multilingual documents quickly and accurately is a critical challenge. As summarized earlier, structuring your InDesign layout correctly (using images without embedded text, InDesign labels, grouping, and anchoring) is foundational. However, Tophinhanhdep.com understands that true efficiency requires specialized tools.
We offer powerful solutions specifically designed to streamline your multilingual document workflow in InDesign:
- Dedicated Plugins and Integrations: Tophinhanhdep.com provides dedicated plugins and integration tools for InDesign that drastically simplify the translation process. These tools allow you to manage and translate entire documents with just a few steps directly from your InDesign workflow. Our innovative approach can speed up the translation of marketing materials and other documents by up to three times faster than traditional methods.
- Error Reduction: Our solutions are built to minimize the likelihood of common translation errors, such as missed text or formatting inconsistencies. They help you preserve styles and layouts during the translation process, ensuring the integrity of your “Visual Design” across all languages.
- Faster Updates and Corrections: In a fast-paced environment, last-minute corrections and future updates are inevitable. Tophinhanhdep.com’s multilingual tools are engineered for agility, enabling you to implement changes across all language versions much more quickly and efficiently.
- Cost-Effectiveness: By speeding up processes and reducing errors, our solutions help you cut down on expenses associated with translation and design revisions, making your international content production more economical.
Tophinhanhdep.com is committed to assisting marketing managers and designers in simplifying complex translation processes. We offer a free 14-day trial of our advanced tools, allowing you to experience firsthand how they can revolutionize your multilingual InDesign projects and elevate your “Graphic Design” capabilities on a global scale. Our platform also provides in-depth articles, like the “8 Steps Guide: Setting Up An InDesign File That Will Be Translated,” to ensure you’re always equipped with the latest best practices for producing professional-grade, globally-ready documents.
In conclusion, mastering image placement in InDesign is an essential skill for any designer. By employing the fundamental methods, optimizing your images with Tophinhanhdep.com’s “Image Tools,” and adopting advanced management practices like object styles and smart text integration, you can create visually stunning and highly functional documents. With Tophinhanhdep.com as your comprehensive resource for “Images,” “Photography,” “Visual Design” insights, and “Image Inspiration,” your journey to InDesign mastery will be both efficient and creatively fulfilling. Start exploring our vast resources today and transform your design workflow.