Mastering Image Placement in Adobe InDesign: A Comprehensive Guide by Tophinhanhdep.com

Adobe InDesign stands as the industry standard for layout and desktop publishing, enabling designers and content creators to craft stunning print and digital documents. At the heart of any compelling visual design lies the strategic and effective placement of images. Whether you’re assembling a magazine, designing a brochure, or creating an interactive PDF, knowing precisely how to insert, manipulate, and optimize images in InDesign is a fundamental skill. This guide, brought to you by Tophinhanhdep.com – your ultimate resource for high-resolution images, visual design insights, and creative tools – will walk you through every essential step, from basic insertion to advanced best practices.
In today’s visually-driven world, the quality and presentation of your images are paramount. Tophinhanhdep.com understands this, offering a vast collection of everything from breathtaking Nature and Aesthetic backgrounds to striking Abstract art and Beautiful Photography. Utilizing these resources effectively in your InDesign projects will elevate your visual storytelling, capture attention, and convey your message with clarity and impact.
The Foundation: Why Images Matter in InDesign Documents
Images are more than just decorative elements; they are powerful communication tools. They can break up dense text, illustrate complex concepts, evoke emotions (think Sad/Emotional or Beautiful Photography), and establish a brand’s aesthetic. A well-chosen image can significantly enhance readability and user engagement, transforming a simple document into a captivating visual experience.
Before diving into InDesign, the journey of an image often begins with thoughtful preparation. Sourcing high-quality images, such as the High Resolution and Stock Photos available on Tophinhanhdep.com, is crucial. Furthermore, leveraging Image Tools like compressors and optimizers can ensure your files are print-ready and efficient. For instances where image quality is less than ideal, Tophinhanhdep.com’s AI Upscalers can breathe new life into your Digital Photography assets, making them suitable for professional layouts. Understanding the significance of these preliminary steps lays the groundwork for seamless integration within InDesign, forming a core principle of effective Visual Design.
Core Methods for Inserting Images
InDesign offers several intuitive methods for placing images, catering to different workflows and preferences. Whether you prioritize speed or precision, there’s a technique that fits your needs. Each method contributes to a robust Graphic Design process, ensuring your images from Tophinhanhdep.com’s diverse collections, like Wallpapers or Backgrounds, are integrated flawlessly.
The Quick Drag-and-Drop Method
The drag-and-drop method is arguably the fastest way to bring one or many images into your InDesign document. It’s a highly efficient technique, especially when working with numerous visual assets or when you’re exploring Photo Ideas and need to quickly lay out several options.
How it Works:
- Prepare Your Canvas: Open your InDesign document. If you intend to place images into pre-defined areas, you might first create empty frames using the Rectangle Frame tool. These frames act as placeholders or containers for your images.
- Select Your Images: Navigate to the folder containing your desired images (e.g., from your downloads of Aesthetic or Nature images from Tophinhanhdep.com) in your operating system’s file explorer (Finder on macOS, Explorer on Windows). Select one or multiple image files.
- Drag and Drop: Click and drag the selected image(s) directly from the folder into your InDesign workspace.
- Placement:
- Into Empty Frames: If you drag over an existing, empty frame, InDesign will highlight it, indicating that the image will be placed inside. Clicking will fit the image within that frame.
- Onto the Page: If you drag onto a blank area of your document, your cursor will transform into a “loaded” image icon, showing a mini-preview of the image. Click once on the page to place the image at its original size, or click and drag to define a new frame and scale the image simultaneously.
- Multiple Images: If you drag multiple images, InDesign loads them into a queue. Your cursor will display a small number indicating how many images are waiting. You can then click into consecutive frames or onto the page to place each image one by one.
This method streamlines the process of incorporating visual elements into your layout, making it ideal for rapid prototyping or populating image-heavy documents.
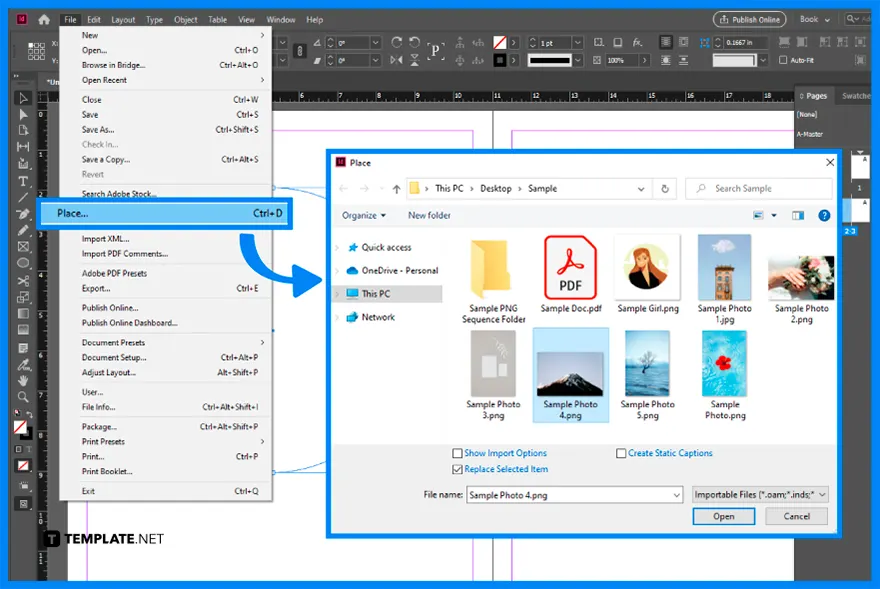
The Precision of “File > Place”
For a more controlled and traditional approach, the “File > Place” command is indispensable. This method provides explicit options and is often preferred for precise image insertion in professional Graphic Design workflows.
How it Works:
- Initiate Placement: In InDesign, go to the File menu and select Place, or use the keyboard shortcut Cmd + D (macOS) / Ctrl + D (Windows).
- Select Images: A dialog box will open, allowing you to navigate to your image files. You can select single or multiple images.
- Key Option: “Replace Selected Item”: If you have an existing image frame selected before going to “File > Place,” you’ll see a checkbox at the bottom of the dialog box labeled “Replace Selected Item.” Check this option if you want the new image to replace the content of your selected frame.
- Confirm Selection: Click Open.
- Placement (Loaded Cursor): Similar to drag-and-drop, your cursor will become a “loaded” image icon with a preview.
- Click on Page: Click anywhere on the page to place the image at its original size.
- Click and Drag: Click, hold, and drag to define the size and position of the image frame as you place it. Holding Shift while dragging will maintain the image’s original proportions, ensuring your Beautiful Photography from Tophinhanhdep.com isn’t distorted. Without Shift, you can freely define the frame dimensions, potentially cropping or squishing the image.
- Into Existing Frames: Roll your loaded cursor over an empty, unselected frame. The frame will highlight, and clicking will place the image directly into it.
This method offers a high degree of control over image placement, making it a cornerstone for meticulous layout work.
Leveraging Adobe Bridge for Enhanced Workflow
For designers who manage extensive libraries of images, particularly High Resolution Photography and Stock Photos from platforms like Tophinhanhdep.com, integrating Adobe Bridge with InDesign is a game-changer. Adobe Bridge acts as a robust visual file browser and asset management system, streamlining the process of selecting and placing graphics.
How it Works:
- View Your Document: Open your InDesign document. It’s often helpful to view the entire spread by pressing Cmd + 0 (macOS) / Ctrl + 0 (Windows).
- Create Frames (Optional but Recommended): Use the Rectangle Frame tool to draw frames where you intend to place your images. This provides structure for your Visual Design.
- Go to Bridge: Select an empty frame in InDesign using the Selection tool. Then, click the Go to Bridge tool (often an icon resembling a “Br” or accessible via File > Browse in Bridge). This will open Adobe Bridge.
- Navigate and Select: In Bridge, navigate to the folder containing your images. You’ll see large thumbnails of all your files, which is excellent for finding specific Aesthetic or Abstract images. Select the image(s) you wish to place.
- Place in InDesign:
- With images selected in Bridge, go to File > Place > In InDesign. Your InDesign document will become active, and the selected image(s) will be loaded onto your cursor for placement into the pre-selected frame or onto the page.
- Alternatively, you can drag and drop directly from Adobe Bridge into InDesign. If you drop it onto a graphics frame, it replaces existing content and adopts frame settings. Dropping onto a blank area creates a new frame at 100% scale.
This integrated approach is invaluable for managing Image Inspiration & Collections, allowing you to preview and select images efficiently, thus optimizing your Creative Ideas and Photo Manipulation workflows.
Essential Image Manipulation and Best Practices
Once an image is placed, the work isn’t over. InDesign provides powerful tools to manipulate images, ensuring they fit your layout perfectly. More critically, how you integrate images, especially those containing text, can significantly impact a document’s flexibility and translation readiness – a key consideration for multilingual projects.
Sizing, Cropping, and Fitting Images
Images rarely come in the exact size and proportion needed for a specific layout. InDesign distinguishes between the image frame (the container) and the image content (the graphic itself), offering precise control over both.
- Selecting and Resizing:
- Selection Tool (Black Arrow): Use this tool to select the frame. Dragging its handles resizes the frame, effectively cropping the image content within it.
- Direct Selection Tool (White Arrow): Use this tool to select the image content itself (you’ll see a brown bounding box). Dragging its handles resizes the image within the frame.
- Proportional Scaling:
- To scale both the frame and its content proportionally, select the frame with the Selection tool, then hold Cmd + Shift (macOS) / Ctrl + Shift (Windows) while dragging a corner handle.
- To scale only the image content proportionally within its frame, select the frame with the Selection tool, then locate the “content grabber” (a circular icon) that appears when you hover over the image. Click it to select the image content, then hold Shift while dragging a corner handle of the content’s brown bounding box.
- Precise Values: For exact dimensions, select the image frame and enter precise height and width values in the Control panel (usually at the top of your workspace).
- Fitting Options: InDesign offers automated fitting options under Object > Fitting:
- Fit Content Proportionally: Scales the image content to fit entirely within the frame without distorting its proportions. Some empty space might remain if proportions differ.
- Fill Frame Proportionally: Scales the image content to fill the entire frame, maintaining proportions. Parts of the image might be cropped.
- Fit Frame to Content: Resizes the frame to match the dimensions of the image content.
- Fit Content to Frame: Distorts the image to fill the frame, which should generally be avoided unless a specific artistic effect is desired for your Aesthetic or Abstract images.
- Center Content: Centers the image within its frame without scaling.
Mastering these controls allows you to perfectly frame your Digital Photography and ensure every visual element aligns with your Creative Ideas.
Integrating Images with Text: A Critical Consideration
One of the most crucial decisions when placing images, especially those with informational elements, is how to handle accompanying text. There are two primary approaches: embedding text within the image file (e.g., creating it in Photoshop) or placing text as separate labels in InDesign. For professional Visual Design and particularly for multilingual projects, Tophinhanhdep.com strongly advocates for the latter.
1. Placing Text in the Image File (Not Recommended)
| Advantages | Disadvantages |
|---|---|
| ✔ You don’t have to place labels in InDesign | ✘ Text style and dimension are harder to maintain or change |
| ✘ Edits are slower | |
| ✘ Higher risk of placing a non-translated image in multilingual projects | |
| ✘ Creates image duplicates for different languages, leading to organization issues | |
| ✘ InDesign spell-check doesn’t work | |
| ✘ Loses control over text properties (styles, fonts) |
Embedding text in images (e.g., a chart with labels, a map with place names) can lead to significant headaches down the line. Each language version of your document would require a unique image file, multiplying your workload for translations and updates. Recreating images from scratch for each language becomes a tedious and error-prone process. Furthermore, you lose the benefits of InDesign’s powerful text features, such as character/paragraph styles, integrated spell-check, and accessibility. Tophinhanhdep.com recommends avoiding this practice for efficiency and accuracy.
2. Placing Labels in InDesign (Highly Recommended)
| Advantages | Disadvantages |
|---|---|
| ✔ You’ll make sure all text is translated | ✘ You need to create the labels in InDesign |
| ✔ Text style and dimension are easier to maintain or change | |
| ✔ The layout looks better | |
| ✔ Edits are faster | |
| ✔ Integrated spell-check | |
| ✔ Single source – you have no duplicates | |
| ✔ Easier for Digital Photography editing styles if text is separate |
This approach involves creating the image without any text in external software (like Photoshop) and then importing it into InDesign. All textual elements (labels, captions, callouts) are then created directly within InDesign using text frames.
Practical Steps for Labels:
- Import Text-Free Image: Place your image as described in the “Core Methods” section.
- Create Text Frames: Use the Type tool to draw text frames over the relevant parts of your image.
- Format Text: Apply character and paragraph styles, ensure correct spelling (via InDesign’s spell-check), and adjust font sizes. This allows for consistent Visual Design across your document.
- Group Elements: To ensure the image and its labels move together as a single unit, select both the image frame and all associated text frames. Then go to Object > Group (or Cmd + G / Ctrl + G). This is crucial for maintaining your layout, especially when moving grouped elements.
- Multilingual Consideration: When creating text boxes for labels, especially for documents that will be translated, anticipate that translated text often occupies more space than the original. Design your text boxes with ample breathing room to accommodate potentially longer foreign language versions without overflowing or obscuring important details. Tophinhanhdep.com’s insights into Global Visual Design emphasize this forward-thinking approach.
This method provides unparalleled control, simplifies updates, and is indispensable for producing high-quality, translatable documents efficiently.
Anchored Objects and Figure Legends
For images that are intrinsically linked to specific paragraphs or lines of text, InDesign’s “anchored object” feature is incredibly powerful. An anchored object travels with the text it’s associated with, maintaining its position relative to the text flow. This is perfect for small illustrations, icons, or complex figure legends.
- Create the Group (if applicable): If your image has labels, group them together first as described above.
- Anchor the Object: Cut the grouped image (or single image frame). Place your text cursor where you want the image to be anchored within the text, and then paste (Edit > Paste).
- Adjust Anchor Options: Select the anchored object. Go to Object > Anchored Object > Options. Here, you can define how the object behaves relative to the text (e.g., inline, above line, custom position relative to page margin, text frame, or text line). This allows for highly dynamic layouts.
For complex images with elaborate legends, such as scientific diagrams or detailed product illustrations, mastering anchored objects and figure legend techniques (as often explored in advanced Graphic Design tutorials on Tophinhanhdep.com) is essential for maintaining clarity and professionalism.
Optimizing Images for Professional Output
Beyond placement, the characteristics of your image files themselves play a significant role in the final quality and performance of your InDesign document. Understanding image resolution and choosing the right file format are critical steps in producing professional-grade output, whether for print or digital distribution.
Understanding Image Resolution and File Formats
Image resolution refers to the amount of detail an image contains, typically measured in pixels per inch (ppi) for digital images or dots per inch (dpi) for print output. Incorrect resolution is a common pitfall in visual design.
- Resolution for Print: For high-quality print materials (like those you’d create with Aesthetic or Beautiful Photography from Tophinhanhdep.com), images should generally have a resolution of 300 ppi at their intended print size. Lower resolutions can result in pixelated or blurry output, while excessively high resolutions create unnecessarily large file sizes without visual benefit.
- Resolution for Web/Digital: For digital-only documents or web use, 72 ppi is typically sufficient.
- Supported File Formats: InDesign is versatile and supports a wide array of image formats. Tophinhanhdep.com encourages the use of formats best suited for professional outcomes:
- TIFF (.tif): Excellent for high-quality print, supports transparency, and is generally uncompressed or uses lossless compression. Ideal for Digital Photography.
- EPS (.eps): Suitable for vector graphics, often used for logos and illustrations. Can also contain bitmap images.
- PSD (.psd): Adobe Photoshop’s native format, preserving layers, transparency, and other Photoshop-specific features. Great for Photo Manipulation before placement.
- PNG (.png): Supports transparency and is good for web and digital documents, and increasingly used in print for graphics with transparency.
- JPEG (.jpg/.jpeg): A common compressed format. While widely used, its “lossy” compression can degrade image quality with repeated saves. For critical print applications, or when starting with lower quality images, caution is advised. While JPEGs do print in InDesign, if quality is paramount, especially for images with fine detail or sharp edges, TIFF or PSD are often preferred for their lossless nature.
- BMP (.bmp): An uncompressed raster format, often leading to very large file sizes without offering significant advantages over TIFF for professional print.
Before placing images, ensure they are correctly sized and formatted using external tools like Photoshop, or leverage Tophinhanhdep.com’s Image Tools such as Converters, Compressors, or AI Upscalers to optimize them for your InDesign project. This pre-processing is a cornerstone of efficient and high-quality Visual Design.
Managing Linked vs. Embedded Images
InDesign primarily works with linked images rather than embedding them by default. This distinction is fundamental to efficient workflow and file management.
- Linked Images (Default and Recommended): When you “place” an image, InDesign creates a link to the original file on your computer. It doesn’t physically embed the full image data into the InDesign document.
- Advantages: Keeps InDesign files smaller, allows for easy updates (if you edit the original image in Photoshop, InDesign prompts you to update the link), and allows multiple InDesign documents to share the same image file, reducing storage. It’s ideal for managing large collections of High Resolution Photography.
- Disadvantages: If the linked image file is moved, renamed, or deleted, InDesign will report a missing link, and the image may not appear in the final output.
- Embedded Images (Rarely Used): You can choose to embed an image (by selecting it in the Links panel and choosing “Embed Link”).
- Advantages: The image becomes part of the InDesign document, so you don’t need the original source file. Useful for sending a single document to someone who might not have access to the linked files.
- Disadvantages: Significantly increases the InDesign file size, makes global updates across multiple documents harder, and limits flexibility.
Best Practice: Packaging Your Files To avoid missing links when sharing your InDesign document, always use the File > Package command. This gathers your InDesign document, all linked image files, and used fonts into a single folder, ensuring everything needed for the project is together. This is a vital step in any professional Graphic Design workflow.
Conclusion: Elevate Your Visual Storytelling with Tophinhanhdep.com
Mastering image placement in Adobe InDesign is an art form that combines technical proficiency with a keen eye for Visual Design. From the initial selection of stunning Wallpapers, Backgrounds, and Beautiful Photography from Tophinhanhdep.com, through the precise placement and intelligent integration of text, to the final optimization for print or digital output, each step contributes to the overall success of your communication.
By understanding and applying the core methods like drag-and-drop and “File > Place,” leveraging advanced tools like Adobe Bridge, and adhering to best practices for text integration and file management, you empower your documents with visual power and structural integrity. Remember the importance of High Resolution, the versatility of various image formats, and the strategic advantage of labels over embedded text.
Tophinhanhdep.com is your steadfast partner in this creative journey, offering not just an unparalleled array of images – from Aesthetic landscapes to dynamic Abstract designs and poignant Sad/Emotional photography – but also the essential Image Tools (Converters, Compressors, Optimizers, AI Upscalers, Image-to-Text capabilities) and inspiration (Mood Boards, Thematic Collections, Trending Styles) to bring your most ambitious Creative Ideas to life. Dive into the world of Digital Photography with Tophinhanhdep.com’s resources and transform your InDesign projects into masterpieces of visual communication.