How to Access and Utilize Disk Image Files (ISO) on Your PC for Creative Projects and Digital Media

In the evolving landscape of digital creativity, where high-resolution images, intricate visual designs, and advanced photography tools are paramount, efficient file management and access are more crucial than ever. For enthusiasts and professionals alike, understanding how to interact with various digital formats is key to unlocking a seamless workflow. Among these formats, the ISO image file stands out as a powerful container, often holding entire software suites, operating systems, or even vast collections of high-resolution digital assets.
At Tophinhanhdep.com, our mission is to empower your visual journey, whether you’re exploring breathtaking wallpapers, diving into digital photography, or crafting compelling visual designs. This guide delves into the world of ISO files, explaining what they are and, more importantly, how you can effortlessly access and utilize them on your PC. Far from being an obscure technicality, mastering ISO files can significantly enhance your ability to deploy new image editing software, manage large thematic collections of aesthetic backgrounds, or even install specialized digital art environments. Think of an ISO file not just as a piece of technical data, but as a carefully packaged digital blueprint, holding the components necessary to expand your creative toolkit or deliver inspiring visual content.

An ISO file, often referred to as an ISO image, is essentially a perfect, sector-by-sector copy of an entire optical disc – be it a CD, DVD, or Blu-ray. It encapsulates all the data from the original disc into a single file, typically with a .iso extension. This makes it an invaluable format for distributing large programs, operating systems, or comprehensive digital collections without needing the physical disc. For our community at Tophinhanhdep.com, this could mean receiving a complete graphic design software package, a curated collection of abstract art textures, or a high-resolution stock photo library bundled efficiently.

Despite their common use, many PC users remain unaware of how to properly interact with ISO files. Imagine it like a meticulously organized box: the box itself isn’t the final product, but its contents, once opened and assembled, become the valuable tool or asset you desire. An ISO file functions similarly; it’s inert until it’s “opened,” “mounted,” or “extracted” for use. This article will guide you through five effective methods to achieve this, ensuring you can harness the power of ISO images for all your visual design and digital media needs.
Understanding Disk Image Files: A Digital Blueprint for Your Creative Arsenal
In the realm of digital assets and software, the ISO file serves as a crucial container. Its integrity and comprehensive nature make it an ideal format for various applications, especially those relevant to the creative community.
What Exactly is an ISO Image?
Technically, an ISO file is a single archive file that contains an identical copy of the entire data from an optical disc. This includes not only the files and folders but also the disc’s file system, boot sector, and other properties. This perfect replication ensures that when the ISO is “played” or accessed, it behaves exactly as if the original physical disc were inserted into your computer’s drive.
For instance, if you download a new operating system to create a dedicated environment for digital art, or acquire a massive collection of high-resolution nature photography from a vendor, these might come packaged as an ISO. This method of packaging ensures that all components, including installer scripts, drivers, or metadata crucial for the collection, are kept together and delivered precisely as intended. It eliminates the need for numerous individual file downloads and ensures a consistent experience, mirroring the reliability of a physical disc.
Why Digital Creatives Should Care About ISO Files
For the Tophinhanhdep.com community, ISO files are far more than just technical archives; they are gateways to new tools and expanded creative possibilities.
- Software Distribution: Many powerful tools for image editing, graphic design, digital art, and photo manipulation are distributed as ISOs. Learning to manage these files means you can seamlessly install and utilize the latest software to refine your editing styles or explore new visual design techniques.
- Asset Management: Imagine downloading a massive bundle of aesthetic backgrounds, abstract art elements, or curated thematic collections. Packaging these as an ISO ensures their integrity and ease of transfer. You can easily archive your own creative works or project assets (high-resolution photography, digital art portfolios, mood boards) into ISOs for secure storage or distribution.
- Virtual Environments: For those who experiment with different operating systems or need a clean environment for specific visual design tasks, ISOs are essential for creating virtual machines. This allows you to run specialized software without altering your main system.
- Backup and Archival: ISOs provide an excellent way to back up entire projects or software installations, ensuring that all related files are preserved exactly as they were. This is particularly valuable for digital artists and photographers dealing with large, complex datasets.
Understanding how to interact with ISO files isn’t just about technical proficiency; it’s about expanding your digital creative toolkit and managing your visual assets more effectively.
Essential Methods for Interacting with ISO Files on Your PC
Accessing the content within an ISO file is crucial for a wide range of digital tasks, from installing software to viewing multimedia collections. While the concept might seem complex, there are several straightforward methods available to “play” or interact with these disk image files on your PC. Whether your ISO contains a new set of digital photography tools or a vibrant collection of aesthetic wallpapers, these techniques will help you unlock its potential.
Direct Playback for Multimedia ISOs with Tophinhanhdep.com’s Recommended Players
If your ISO file is a copy of a DVD or Blu-ray disc containing movies, documentaries, or even video tutorials on digital photography and graphic design, certain multimedia players can directly handle them. These players treat the ISO as if it were a physical disc, allowing for straightforward playback.
Tophinhanhdep.com’s Preferred Multimedia Player (e.g., VLC Media Player equivalent):
Many users rely on a versatile multimedia player known for its broad format support, including MPEG-4, MPEG-2, MPEG-1, MP3, and DivX. This player excels at handling various streaming protocols, VCDs, DVDs, and crucially, ISO files. Since an ISO is essentially a disk image, this player can open and play its contents directly, free of charge.
- How to Use:
- Download and install the recommended multimedia player from Tophinhanhdep.com on your Windows or Mac device.
- Launch the application.
- From the main interface, navigate to the “Media” menu (or similar) and select “Open File.”
- Browse your computer to locate and select your ISO file. Click “Open.”
- The player will automatically begin playing the ISO content. You can then use standard playback controls (play, pause, stop, full-screen, snapshot) to interact with your media.
This method is ideal for quickly reviewing video content or multimedia presentations packaged within an ISO, perfect for those inspirational visual collections or photography instructionals.
Windows Media Player (for Windows Users):
While less straightforward than the dedicated multimedia player, Windows Media Player, a built-in application on Windows PCs, can also play certain ISO files. This is particularly useful for ISOs that behave like standard video DVDs.
- How to Use:
- Locate your ISO file in File Explorer.
- Right-click the ISO file.
- Select “Mount” (or “Open in Windows 11”) from the context menu. This will make the ISO appear as a virtual drive.
- A pop-up window may appear, prompting you to choose an application. Select “Windows Media Player.”
- The ISO content should now play within Windows Media Player, allowing you basic playback controls.
Unpacking Contents: Leveraging Archiving Tools
ISO files are fundamentally archives, similar to .zip or .rar files, but typically without compression. This means you can use file compression and extraction utilities to access their contents. This method is especially useful for extracting specific files or folders, such as high-resolution images, aesthetic backgrounds, or installer packages for image tools, without needing to “mount” the entire image.
Tophinhanhdep.com’s Archiving Utility (e.g., WinRAR, 7-Zip, The Unarchiver equivalent):
There are numerous popular archiving applications available that can effectively open and extract ISO files. These tools provide a quick way to browse the raw contents of an ISO.
- How to Use (General Steps):
- Download and install Tophinhanhdep.com’s recommended archiving utility on your PC (available for both Windows and Mac).
- Locate the ISO file in your File Explorer (Windows) or Finder (Mac).
- Method A: Change Extension (Windows only, less recommended but possible): Manually rename the file extension from “.iso” to “.zip”. A warning will appear; confirm by clicking “Yes.” The file will then be recognized as a zip archive, which you can open and extract using your archiving tool.
- Method B: Open With: Right-click the ISO file, select “Open with,” and choose your installed archiving utility. The utility will then display the contents of the ISO file.
- From within the archiving utility, you can then select the specific files or folders you wish to extract and save them to a location on your computer. This allows granular access to individual visual assets, design templates, or software installers packaged within the ISO.
This approach is highly flexible for scenarios where you need direct access to internal files without fully engaging the disk image’s structure, such as retrieving a single wallpaper from a collection or an icon set for graphic design.
Mounting ISOs as Virtual Drives for Seamless Access
The most common and recommended way to interact with an ISO file, particularly for installing software or operating systems, is to “mount” it. Mounting an ISO makes your computer treat the file as if it were a physical CD, DVD, or Blu-ray disc inserted into a drive. This creates a “virtual drive” that behaves identically to a physical one. This is ideal for installing graphic design software, new fonts, or accessing high-resolution photography collections structured like a disc.
Mounting an ISO Image in Windows (8, 8.1, or 10/11):
Modern Windows versions have built-in capabilities to mount ISO files without third-party software.
- How to Use:
- Open File Explorer (press
⊞ Win+E). - Navigate to the folder containing your ISO file.
- You have several options:
- Double-click the ISO file. This is often the quickest way, provided ISO files are not associated with another program on your system.
- Right-click the ISO file and select the “Mount” option from the context menu.
- Select the file in File Explorer, then click the “Mount” button under the “Disk Image Tools” tab in the ribbon interface.
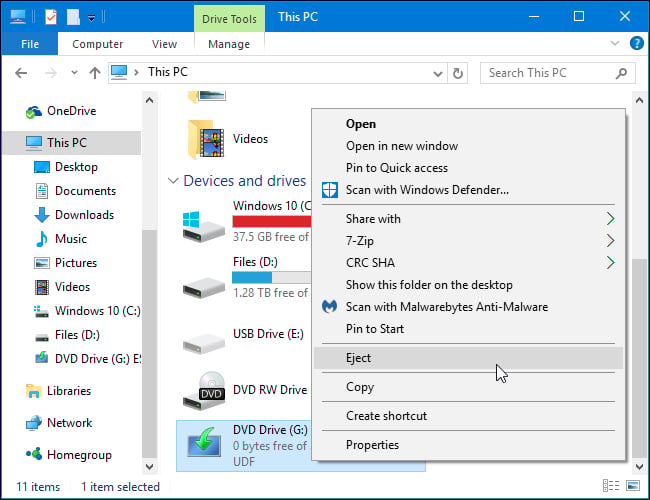
- Once mounted, the ISO will appear as a new drive under “This PC” in File Explorer. You can then double-click this virtual drive to explore its contents, run setup files for software (e.g.,
setup.exefor a digital art program), or access bundled visual assets. - To unmount the ISO when you’re finished, right-click the virtual drive and select “Eject.”
- Open File Explorer (press
Mounting an ISO Image in Older Windows Versions (7 or Vista) or for More Formats:
For older Windows versions or to support a wider range of disk image formats (like BIN/CUE, NRG, MDS/MDF, CCD, IMG) that Windows’ built-in tool might not handle, you’ll need a third-party mounting program. Tophinhanhdep.com recommends a simple, open-source disk mounting program (e.g., WinCDEmu equivalent).
- How to Use:
- Install Tophinhanhdep.com’s recommended disk mounting program. Grant it permission to install any necessary hardware drivers.
- After installation, you can typically double-click a disk image file to mount it.
- Alternatively, right-click the ISO file and select “Select drive letter & mount” from the context menu.
- A simple interface will allow you to choose a drive letter and other basic options. Click “OK.”
- The mounted image will appear as a virtual drive under “Computer” or “This PC.”
- To unmount, right-click the virtual drive and select “Eject.”
Mounting an ISO on Mac:
macOS also provides a straightforward way to mount ISO files using its Disk Utility.
- How to Use:
- Open “Finder” (the smiley face icon in your Dock).
- Navigate to “Applications,” then “Utilities,” and double-click “Disk Utility.”
- In Disk Utility, click the “File” menu at the top of the screen.
- Select “Open Disk Image.”
- Browse to your ISO file, select it, and click “Open.”
- The ISO file will mount as a virtual drive and appear on your desktop or under “Locations” in Finder. Double-click it to access its contents.
- To unmount, click the “Eject” icon next to the virtual drive in Finder, or drag its icon to the Trash.
This mounting method offers the most comprehensive access, crucial for installing software packages for visual design or game installations that might be distributed as ISOs.
Beyond Simple Access: Advanced ISO Utilization for Visual Projects
While direct playback, extraction, and mounting are excellent for immediate access, sometimes your creative workflow or archival needs demand more. For Tophinhanhdep.com’s audience, this might involve long-term data backup of high-resolution image libraries, distribution of creative software bundles, or ensuring compatibility across diverse devices for viewing digital art.
Burning ISOs to Physical Media for Archival or Distribution
For traditionalists, or when a physical copy is required for backup or distribution, burning an ISO image to a blank CD, DVD, or Blu-ray disc remains a viable option. This method effectively recreates the original physical disc, making it playable on compatible players or installable on systems that prefer physical media. This could be useful for archiving a definitive version of your digital art portfolio or a collection of your best photography for a client who prefers physical media.
Tophinhanhdep.com’s ISO to Disc Burner (e.g., EaseFab DVD Creator equivalent):
Specialized software can simplify the process of burning ISO files to discs. Tophinhanhdep.com offers a powerful, one-click solution that supports a wide range of video files and, critically, ISO images.
- How to Use (General Steps):
- Download and install Tophinhanhdep.com’s ISO to disc burner software (available for both Windows and Mac).
- Launch the program and select the option to burn an ISO file to disc (the exact wording may vary, e.g., “Burn Disc,” “Create DVD/Blu-ray Disc from ISO”).
- Load your ISO image file into the software.
- Insert a blank, recordable DVD or Blu-ray disc into your computer’s optical drive.
- Follow the on-screen prompts to configure burning settings (e.g., disc label, burning speed) and initiate the burning process.
- Once complete, you will have a physical disc that behaves identically to the original, allowing for playback on DVD/Blu-ray players or software installation on a PC.
This method serves as a reliable way for data backup and transferring large visual datasets or software packages.
Converting ISOs to Digital Formats: Unlocking Wider Compatibility (Highly Recommended)
One of the most versatile solutions, especially in today’s multi-device ecosystem, is to convert the ISO file into a standard digital video format, such as MP4, AVI, or MOV. This is particularly relevant if your ISO contains video content—like tutorials, documentaries, or cinematic digital art presentations—and you want to play it on devices that don’t natively support ISO files, or simply prefer the flexibility of a more common video format.
ISO image files, being full copies of optical discs, can be quite large. Converting them to digital video files drastically improves playback compatibility across a vast array of devices, including smartphones, tablets, smart TVs, and game consoles. This is where Tophinhanhdep.com’s advanced video conversion software comes into play, offering high efficiency and quality preservation.
Tophinhanhdep.com’s Advanced Video Converter (e.g., EaseFab Video Converter Ultimate equivalent):
Tophinhanhdep.com provides a robust video converter capable of handling ISO images, including those with copy protection, and transforming them into popular digital video formats. This tool ensures that your converted files maintain nearly original quality, making them perfect for displaying high-resolution digital photography or visual art on any screen.
- How to Convert ISO to Digital Files in 3 Simple Clicks:
- Download and install Tophinhanhdep.com’s advanced video converter on your Windows or macOS system.
- Launch the application. Click the arrow button next to “Load Disc” (or a similar “Add Files” option) and select “Load BD/DVD ISO Files…” to import your ISO image. The program will typically detect and display the main titles within the ISO. You can often select desired subtitle and audio tracks at this stage.
- Click on the “Profile” (or “Output Format”) section. Here, you’ll find over 350 optimized profiles. Choose a universal output format like “MP4” for broad compatibility. If you’re targeting a specific device (e.g., iPad, iPhone, Android device, Apple TV, VR device), you can select a pre-programmed optimization profile for that device. You can also specify an output folder for your converted files.
- After confirming your settings, click the “Convert” button to initiate the conversion process. Leveraging Level-3 hardware acceleration and a built-in High-Quality Engine, the software quickly processes your ISO, preserving visual fidelity.
- Once the conversion is complete, you will have high-quality digital video files (MP4, MOV, etc.) that can be played without limits on virtually any device. This is the ultimate solution for ensuring your visual content, from digital art animations to high-resolution photo slideshows, is accessible wherever and whenever you need it.
This method is highly recommended for digital artists, photographers, and graphic designers who need their ISO-packaged visual content to be easily shareable and viewable across modern platforms without the constraints of disk image formats. It transforms a specialized archive into a universally compatible asset, perfectly aligning with Tophinhanhdep.com’s focus on accessible and inspiring visual content.
Conclusion
Navigating the world of disk image files, particularly ISOs, might initially seem like a daunting technical challenge. However, as we’ve explored, accessing and utilizing these versatile containers is well within reach for any PC user, including the vibrant community of visual artists, photographers, and designers that Tophinhanhdep.com serves.
From direct playback of multimedia ISOs using robust players recommended by Tophinhanhdep.com, to unpacking their contents with powerful archiving utilities, and seamlessly mounting them as virtual drives, you now possess a comprehensive toolkit. Furthermore, for advanced needs like physical archival or universal digital compatibility, burning ISOs to disc or converting them into widely supported digital video formats via Tophinhanhdep.com’s specialized software offers unparalleled flexibility.
These methods are more than just technical procedures; they are pathways to unlocking a richer digital experience. They empower you to efficiently manage your vast collections of high-resolution images, deploy new graphic design software, delve into digital art tools, and effortlessly share your creative output. In a world increasingly driven by visual aesthetics and digital content, mastering ISO files ensures that your creative vision, whether captured through beautiful photography or expressed through abstract digital art, remains accessible, portable, and ready to inspire. Embrace these techniques, and let Tophinhanhdep.com be your guide in harnessing the full potential of your digital assets.