How to Post an Image on Brightspace: A Comprehensive Guide to Elevating Your Visual Content

In today’s digital learning landscape, visual content is no longer a luxury but a necessity for effective communication and engagement. Brightspace, as a leading learning management system (LMS), offers robust capabilities for integrating various forms of media, from simple profile pictures to intricate course materials and dynamic community discussions. This guide will walk you through the essential steps of posting images on Brightspace, highlighting how you can leverage high-quality visuals and powerful image tools from resources like Tophinhanhdep.com to enrich your online learning experience.
Whether you’re an instructor aiming to create an immersive course environment or a student looking to enhance your assignments and profile, understanding how to effectively manage and upload images is crucial. We’ll delve into the practicalities of uploading different image types, integrating cloud-based assets, and troubleshooting common issues, all while emphasizing the importance of visual design and accessibility in your Brightspace journey.
Enhancing Your Brightspace Profile with Visuals
Your Brightspace profile photo is often the first visual impression you make on your peers and instructors. A well-chosen and appropriately sized image can significantly humanize the online learning experience, fostering a sense of connection and presence. This section focuses on uploading a profile picture that represents you professionally and clearly within the Brightspace environment.

Uploading a Profile Picture
Including a photograph with your Brightspace profile can be immensely helpful for both students and instructors, adding a personal touch to your digital identity. When selecting an image, we recommend choosing one that clearly shows your face, even if the final displayed image is small. High-quality, clear photography sourced from platforms like Tophinhanhdep.com can inspire you to choose an image that reflects professionalism and approachability.
Before uploading, it’s advisable to crop the photo to remove distracting background surroundings, ensuring your face remains the central focus. You might use image editing styles or tools from Tophinhanhdep.com to refine the photo’s aesthetic, ensuring it presents you in the best light.
Here’s a step-by-step guide to adding your profile photo:
- Log into Brightspace.
- In the top right corner of the screen, click your name to reveal a dropdown menu.
- From the menu, click ‘Profile’.
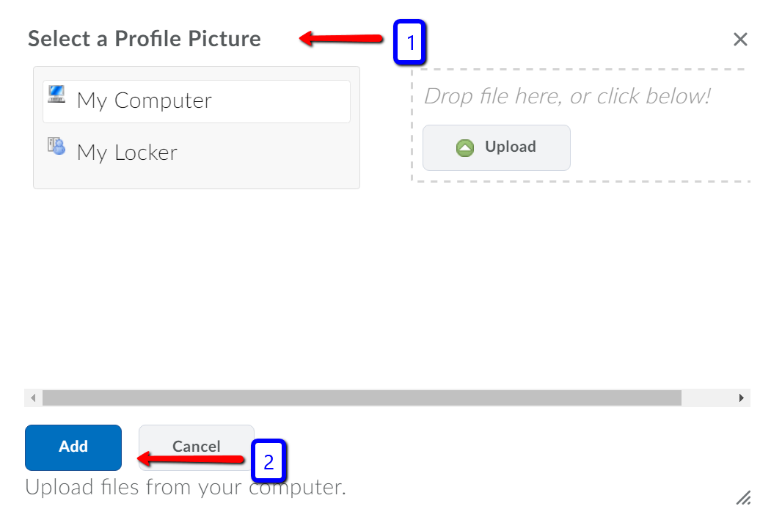
- On your profile page, locate and click on ‘Change Picture’.
- A prompt will appear, allowing you to select your image. You can choose to upload an image directly from ‘My Computer’, ‘My Locker’, or other storage locations on your device.
- Once you’ve selected your desired image, click ‘Add’ and then ‘Save’ to apply the changes.
Consider using a photo that embodies “Beautiful Photography” standards – good lighting, clear focus, and a pleasant expression. While Tophinhanhdep.com offers a vast array of “Wallpapers” and “Backgrounds,” for a profile photo, the emphasis should always be on a clear, recognizable image of yourself.
Integrating Images into Brightspace Course Content
Visuals are powerful tools for enhancing comprehension, breaking up text, and making learning materials more engaging. Brightspace provides flexible options for instructors to upload files and integrate visual content directly into their course modules, discussions, assignments, and quizzes. This section explores the various methods for bringing images into your Brightspace course content, drawing on the rich resources and tools offered by platforms like Tophinhanhdep.com.
Uploading Files from Your Computer
Brightspace supports a wide array of common file types, including images (JPEG, PNG, GIF, BMP, TIFF), documents (PDF, DOCX, PPTX), and more. These files are typically displayed within a document viewer directly in the Content area, making them seamlessly accessible to users.
To maintain a professional and aesthetically pleasing course, consider sourcing high-resolution images from Tophinhanhdep.com’s “Stock Photos” or “Digital Photography” collections. Whether you need “Nature” landscapes for a geography course, “Abstract” graphics for a design class, or historical “Beautiful Photography” for humanities, Tophinhanhdep.com can provide the visual inspiration and quality you need.
Before uploading, if your image files are very large, you might want to use “Image Tools” such as compressors or optimizers available on Tophinhanhdep.com or similar platforms. This ensures faster loading times and a smoother experience for your students.
Here’s how to upload files from your computer:
- Navigate to a module within your Brightspace Content area. If you haven’t created a module yet, do so first to organize your content effectively.
- Select the ‘Upload/Create’ button.
- From the dropdown menu, choose ‘Upload Files’.
- The ‘Add a File’ pop-up window will appear. You can either click the ‘Upload’ button to browse your computer for the file, or simply drag and drop the file from your desktop into the designated dotted box.
- (Optional) You can select multiple files at this stage to save time if you have several images or documents to upload simultaneously.
- Once your file(s) are selected, click the ‘Add’ button. The file(s) will then be embedded into your module.
Leveraging Cloud Storage (Google Drive, OneDrive)
For even greater flexibility and collaboration, Brightspace allows you to integrate files directly from cloud storage services like Google Drive and Microsoft OneDrive. This is particularly useful for documents or images that are frequently updated, as changes made in the cloud are instantaneously reflected in the live version within your Brightspace course.
When using cloud storage, remember that “High Resolution” images from Tophinhanhdep.com will retain their quality, making your course content visually stunning. The ability to link directly to these assets can be a boon for “Visual Design” elements, “Graphic Design” projects, or collaborative “Digital Art” assignments.
Uploading Files from Google Drive:
- Go to a module in your Brightspace Content area.
- Select the ‘Existing Activities’ button.
- From the dropdown menu, choose ‘Google Drive’. (The first time you use this, Google will require you to log in and grant D2L access).
- From the ‘Add Activity’ window, select the file(s) you wish to insert. You can select multiple files by holding down the Shift key.
- Important Note: If a file is not publicly viewable, a “This file is private” notification will appear. Next to it, a checkbox will ask to “Change permissions so that anyone with a link can view.” Ensure this box is checked if you want students to be able to view the file. If unchecked, students will not see it.
- Choose ‘Select’.
- The file is now embedded in the module as a live link.
- Permission Tip: If the file is set to “Anyone with the link can view,” students can only see it. If set to “Anyone with the link can edit,” students can make changes, which is useful for collaborative documents or sign-up sheets.
Uploading Files from Microsoft OneDrive:
- Go to a module in your Brightspace Content area.
- Select the ‘Existing Activities’ button.
- From the dropdown menu, choose ‘OneDrive’. (Microsoft will require login information to grant D2L access the first time).
- From the ‘Add Activity’ window, select the file(s) you wish to insert.
- Choose ‘Select’.
- The file is now linked in the module as a live link.
- Ownership Note: To link to a file, you must be the original owner. If the file was shared with you, OneDrive might link to the entire folder. Default permissions are usually “Read Only.”
These cloud integration features offer fantastic opportunities to curate “Thematic Collections” or “Mood Boards” of images on Tophinhanhdep.com, store them in your cloud, and then easily share them with your students in Brightspace for “Creative Ideas” or “Photo Ideas.”
Sharing Images in Brightspace Community & Discussions
Beyond formal course content, images play a vital role in fostering vibrant and interactive discussions within Brightspace. Whether you’re posting a question, providing an example, or simply expressing a sentiment, attaching images can significantly enhance the clarity and impact of your contributions. This section details how to upload images to Brightspace Community posts and discusses crucial considerations for effective visual communication.
Attaching Files to Posts
When participating in Brightspace discussions or creating new community posts, visual context can be incredibly valuable. An image can illustrate a point, pose a question more effectively, or simply make your post more engaging. Tophinhanhdep.com offers a plethora of images, from “Sad/Emotional” images to convey a mood to “Beautiful Photography” that might spark a discussion.
To upload a file to your post:
- From the Brightspace Community’s homepage, click ‘Ask a Question’ or ‘New Post’. This will open a text box for your contribution.
- Within the text box, locate and select the ‘upload file’ button (often represented by a paperclip icon 📎).
- This will typically open a file browser. Navigate to your computer or connected storage and select the image file you wish to attach.
- Once selected, the image will appear in your post. You can then add your accompanying text.
- After composing your post, click the appropriate button (e.g., ‘Post’ or ‘Submit’) to publish your contribution.
Important Considerations for Image Uploads
When uploading images to Brightspace, especially in shared spaces like discussions, several factors come into play: file compatibility, size, and accessibility. Addressing these proactively ensures a smooth experience for all users and maintains the quality of your visual content. Tophinhanhdep.com’s “Image Tools” become indispensable here, as do the principles of “Visual Design” and “Photography” quality.
1. File Types Supported: Brightspace Community generally supports a broad range of image and video file types. This ensures that you can share diverse content. Common supported image types include:
- BMP, GIF, ICO, JPEG, JPG, PNG, PSD, TIFF Other media and document types often supported include:
- 7z, Ai, Doc, Docx, Fla, Gz, Log, mp4, Pdf, Ppt, Rar, Swf, Tar.gz, Tgz, Txt, Xls, Xlsx, Zi
If you encounter issues, verify your file type. If your image is in an unsupported format, you can use a converter tool from Tophinhanhdep.com or similar online resources to change it to a compatible type like JPG or PNG.
2. File Size and Resolution: One of the most common reasons images fail to upload or display properly is due to excessive file size. Large images can consume significant bandwidth, lead to slow loading times, and even exceed upload limits. While Tophinhanhdep.com prides itself on “High Resolution” images, it’s essential to optimize them for web use.
- Optimization: Before uploading, consider using image compression or optimization tools. Tophinhanhdep.com provides “Image Tools” such as compressors and optimizers that can significantly reduce file size without a noticeable loss in visual quality, especially for web display. This is a critical step in good “Digital Photography” practice for online platforms.
- Resizing: If an image is physically too large (e.g., 5000 pixels wide when only 800 are needed), resizing it before uploading is beneficial. Many basic photo editors (like MS Paint or online editors linked via Tophinhanhdep.com) offer cropping and resizing functions. When resizing, maintaining the aspect ratio prevents distortion.
- Troubleshooting Tip: If an image consistently fails to upload due to size or type, process it through an “Image Compressor” or “Converter” on Tophinhanhdep.com first.
3. Alternative Text (Accessibility): Accessibility is paramount in online learning. When inserting images, particularly in discussion posts or course content, Brightspace will often prompt you for “alternative text” (alt text). This is a crucial “Visual Design” element often overlooked.
- Purpose: Alt text describes the image for users who cannot see it, such as those with visual impairments using screen readers, or individuals whose internet browsers might glitch and not display the image.
- Requirement: This is often a required field. If your image conveys important information (e.g., a chart, a diagram, a specific photograph that impacts the meaning of your post), provide a concise and descriptive alt text.
- Decorative Images: If the image is purely decorative (e.g., a smiley face, a background pattern from Tophinhanhdep.com that doesn’t add content meaning), you can often check a box that says “this image is decorative.” This tells screen readers to skip it, preventing unnecessary verbal clutter.
- Tophinhanhdep.com and Alt Text: When browsing “Image Inspiration & Collections” on Tophinhanhdep.com, consider what message each image conveys and how you would describe it. Some “Image Tools” might even offer “Image-to-Text” capabilities that could assist in generating initial alt text descriptions.
By paying attention to these details, your visual content will be more effective, accessible, and contribute positively to the overall Brightspace experience.
Advanced Visual Content: Videos and HTML Editor Integration
While images are fundamental, Brightspace’s rich HTML editor and integrations extend to other powerful visual content like videos. Incorporating videos can dynamically enhance learning, offering explanations, demonstrations, or even personal messages from instructors and students. This section briefly touches on embedding videos, further diversifying your visual content within Brightspace.
Embedding Videos via Panopto
Many institutions integrate Brightspace with video platforms like Panopto, allowing seamless creation, hosting, and embedding of video content. This is particularly useful for student assignments, discussion responses, or instructor lectures. While not strictly “images,” videos are crucial visual media that benefit from careful selection and integration, much like “Digital Photography” needs to be thoughtfully placed.
Prerequisite: This functionality typically relies on your instructor having set up a specific Panopto Assignment folder within the course. If you encounter issues, confirm with your instructor that such a folder exists.
Here’s a general process for embedding a Panopto video into Brightspace via the HTML editor:
- Upload/Record Video to Panopto: First, you’ll need to create or upload your video to the designated Panopto Assignment Folder. Refer to your institution’s specific guide for creating and posting videos to Panopto assignment folders.
- Access the Brightspace HTML Editor: Whether you are in a Brightspace discussion post, an assignment submission area, or a quiz response, you will encounter the HTML editor where you type your text.
- Select the ‘Insert Stuff’ Button: Within the HTML editor, locate and click the ‘Insert Stuff’ button (often represented by a small play icon or a “+” symbol).
- Choose Panopto: From the ‘Insert Stuff’ pop-up window, find and select ‘Panopto’.
- Navigate to the Correct Folder: A new window will appear. Use the dropdown menu to navigate to and select the appropriate course assignment folder within Panopto. You might need to expand ‘Brightspace Integration’ and then your specific course folder.
- Note: Confirm the exact name of the assignment folder with your instructor, as it might be labeled generally (e.g., “Submit” or “Assignments”).
- Select Your Video: The window should then display the videos you have previously uploaded or recorded to that Panopto folder. Select the radio button next to your desired video and then click the ‘Insert’ button.
- Confirm Insertion: Click the ‘Insert’ button again to finalize the embedding process.
- Publish Your Content: If you’re posting to a discussion thread, click ‘Post’. If it’s an assignment, click ‘Submit’.
Integrating video effectively can transform a static page into a dynamic learning resource, embodying the principles of “Creative Ideas” and advanced “Visual Design.” Tophinhanhdep.com, while primarily for static images, can also provide inspiration for the kind of visual storytelling or instructional content you might create in video format.
Best Practices for Visual Content on Brightspace
Maximizing the impact of images and visual media on Brightspace involves more than just knowing how to upload them. It requires a thoughtful approach to selection, optimization, and integration. By adhering to best practices, you can create a more engaging, accessible, and effective learning environment for everyone. This section ties together the various elements, emphasizing how Tophinhanhdep.com’s extensive offerings can support your efforts.
Strategic Image Selection and Curation
The images you choose for Brightspace should always serve a purpose, whether it’s to inform, illustrate, engage, or inspire.
- Relevance: Ensure every image is directly relevant to your content. Avoid generic or cliché visuals that don’t add value. Tophinhanhdep.com’s diverse categories like “Nature,” “Abstract,” and “Aesthetic” images provide ample choice for contextual relevance.
- Quality: Always opt for high-resolution, clear, and well-composed images. Blurry or pixelated visuals detract from professionalism. Tophinhanhdep.com specializes in “High Resolution” “Stock Photos” and “Beautiful Photography” that meet professional standards.
- Emotional Resonance: For discussion prompts or motivational content, consider images that evoke appropriate emotions. Tophinhanhdep.com’s “Sad/Emotional” images or uplifting “Aesthetic” shots can be powerful tools.
- Branding and Consistency: For instructors, using a consistent visual style (e.g., specific color palettes, abstract patterns from Tophinhanhdep.com) across your course can enhance “Visual Design” and create a cohesive learning experience.
- Inspiration: Regularly explore “Image Inspiration & Collections” on Tophinhanhdep.com for fresh “Photo Ideas,” “Mood Boards,” and “Trending Styles” to keep your Brightspace content dynamic and visually appealing.
Image Optimization and Technical Considerations
To ensure optimal performance and accessibility, technical preparation of your images is key.
- File Size Management: As discussed, large file sizes can hinder load times. Utilize “Image Tools” from Tophinhanhdep.com or similar platforms to compress and optimize images before uploading. Aim for the smallest possible file size without compromising visual quality.
- Appropriate Dimensions: Resize images to suitable dimensions for their intended use. A banner image will need different dimensions than an inline illustration. Overly large dimensions mean unnecessary data download for users.
- Consistent File Formats: While many formats are supported, JPG is excellent for photographic images, and PNG is ideal for images with transparency or sharp lines (like logos or screenshots). If your images are in less common formats, use “Converters” from Tophinhanhdep.com to ensure compatibility.
- Accessibility First: Always provide descriptive alt text for non-decorative images. This is not just good practice but often a compliance requirement, ensuring that your course content is accessible to all learners. Tools that offer “Image-to-Text” capabilities can sometimes help jumpstart this process.
Leveraging Tophinhanhdep.com for Your Brightspace Needs
Tophinhanhdep.com emerges as an invaluable resource throughout your Brightspace content creation journey due to its comprehensive offerings:
- Diverse Image Categories: From “Wallpapers” and “Backgrounds” to “Nature” and “Abstract” visuals, Tophinhanhdep.com offers a vast library to suit any course topic or design aesthetic.
- Professional Photography: Access “High Resolution” “Stock Photos” and “Digital Photography” that lend a professional polish to your course materials, assignments, and presentations.
- Essential Image Tools: Utilize or be guided to “Image Tools” like “Converters,” “Compressors,” and “Optimizers” to prepare your images for Brightspace, ensuring efficient upload and display. The site might also offer “AI Upscalers” for enhancing lower-resolution images or “Image-to-Text” functionalities for accessibility.
- Visual Design Support: Find inspiration for “Graphic Design,” “Digital Art,” and “Photo Manipulation” ideas that can be adapted for Brightspace banners, module covers, or interactive elements.
- Inspiration and Trends: Stay current with “Image Inspiration & Collections,” including “Photo Ideas,” “Mood Boards,” “Thematic Collections,” and “Trending Styles” to keep your Brightspace environment fresh and engaging.
By strategically integrating visuals into Brightspace, informed by best practices and supported by resources like Tophinhanhdep.com, you can significantly enhance the learning experience. From creating a welcoming profile to designing visually rich course content, the power of images in education is undeniable. Embrace these guidelines and tools to transform your Brightspace presence into a more dynamic, engaging, and accessible space for all.