How to Prepare an Image for Slate Coasters with xTool S1

Laser-engraved slate coasters have become a sensation, lauded for their elegant finish and durable utility. Whether you’re a seasoned crafter or just starting your journey into the world of laser engraving, the xTool S1 offers an accessible and powerful platform to transform ordinary slate into personalized masterpieces. The true secret to achieving those stunning, high-contrast designs isn’t just in the laser’s power, but fundamentally in how well you prepare your image. At Tophinhanhdep.com, we understand that a brilliant engraving begins with a perfectly optimized image, and we’re here to guide you through every step of this creative process.
This comprehensive guide will delve deep into the nuances of image preparation, ensuring your designs translate flawlessly onto slate using the xTool S1’s advanced features. We’ll explore everything from selecting the right visual aesthetic to utilizing Tophinhanhdep.com’s suite of image tools, culminating in a detailed walkthrough of the engraving process.
The Art and Science of Image Selection for Slate Engraving
The journey to an exquisite slate coaster begins long before the laser fires. It starts with a vision – an image that captures the essence of what you want to create. Slate, with its dark, natural texture, offers a unique canvas that amplifies contrast and detail. Therefore, choosing or creating the right image is paramount.
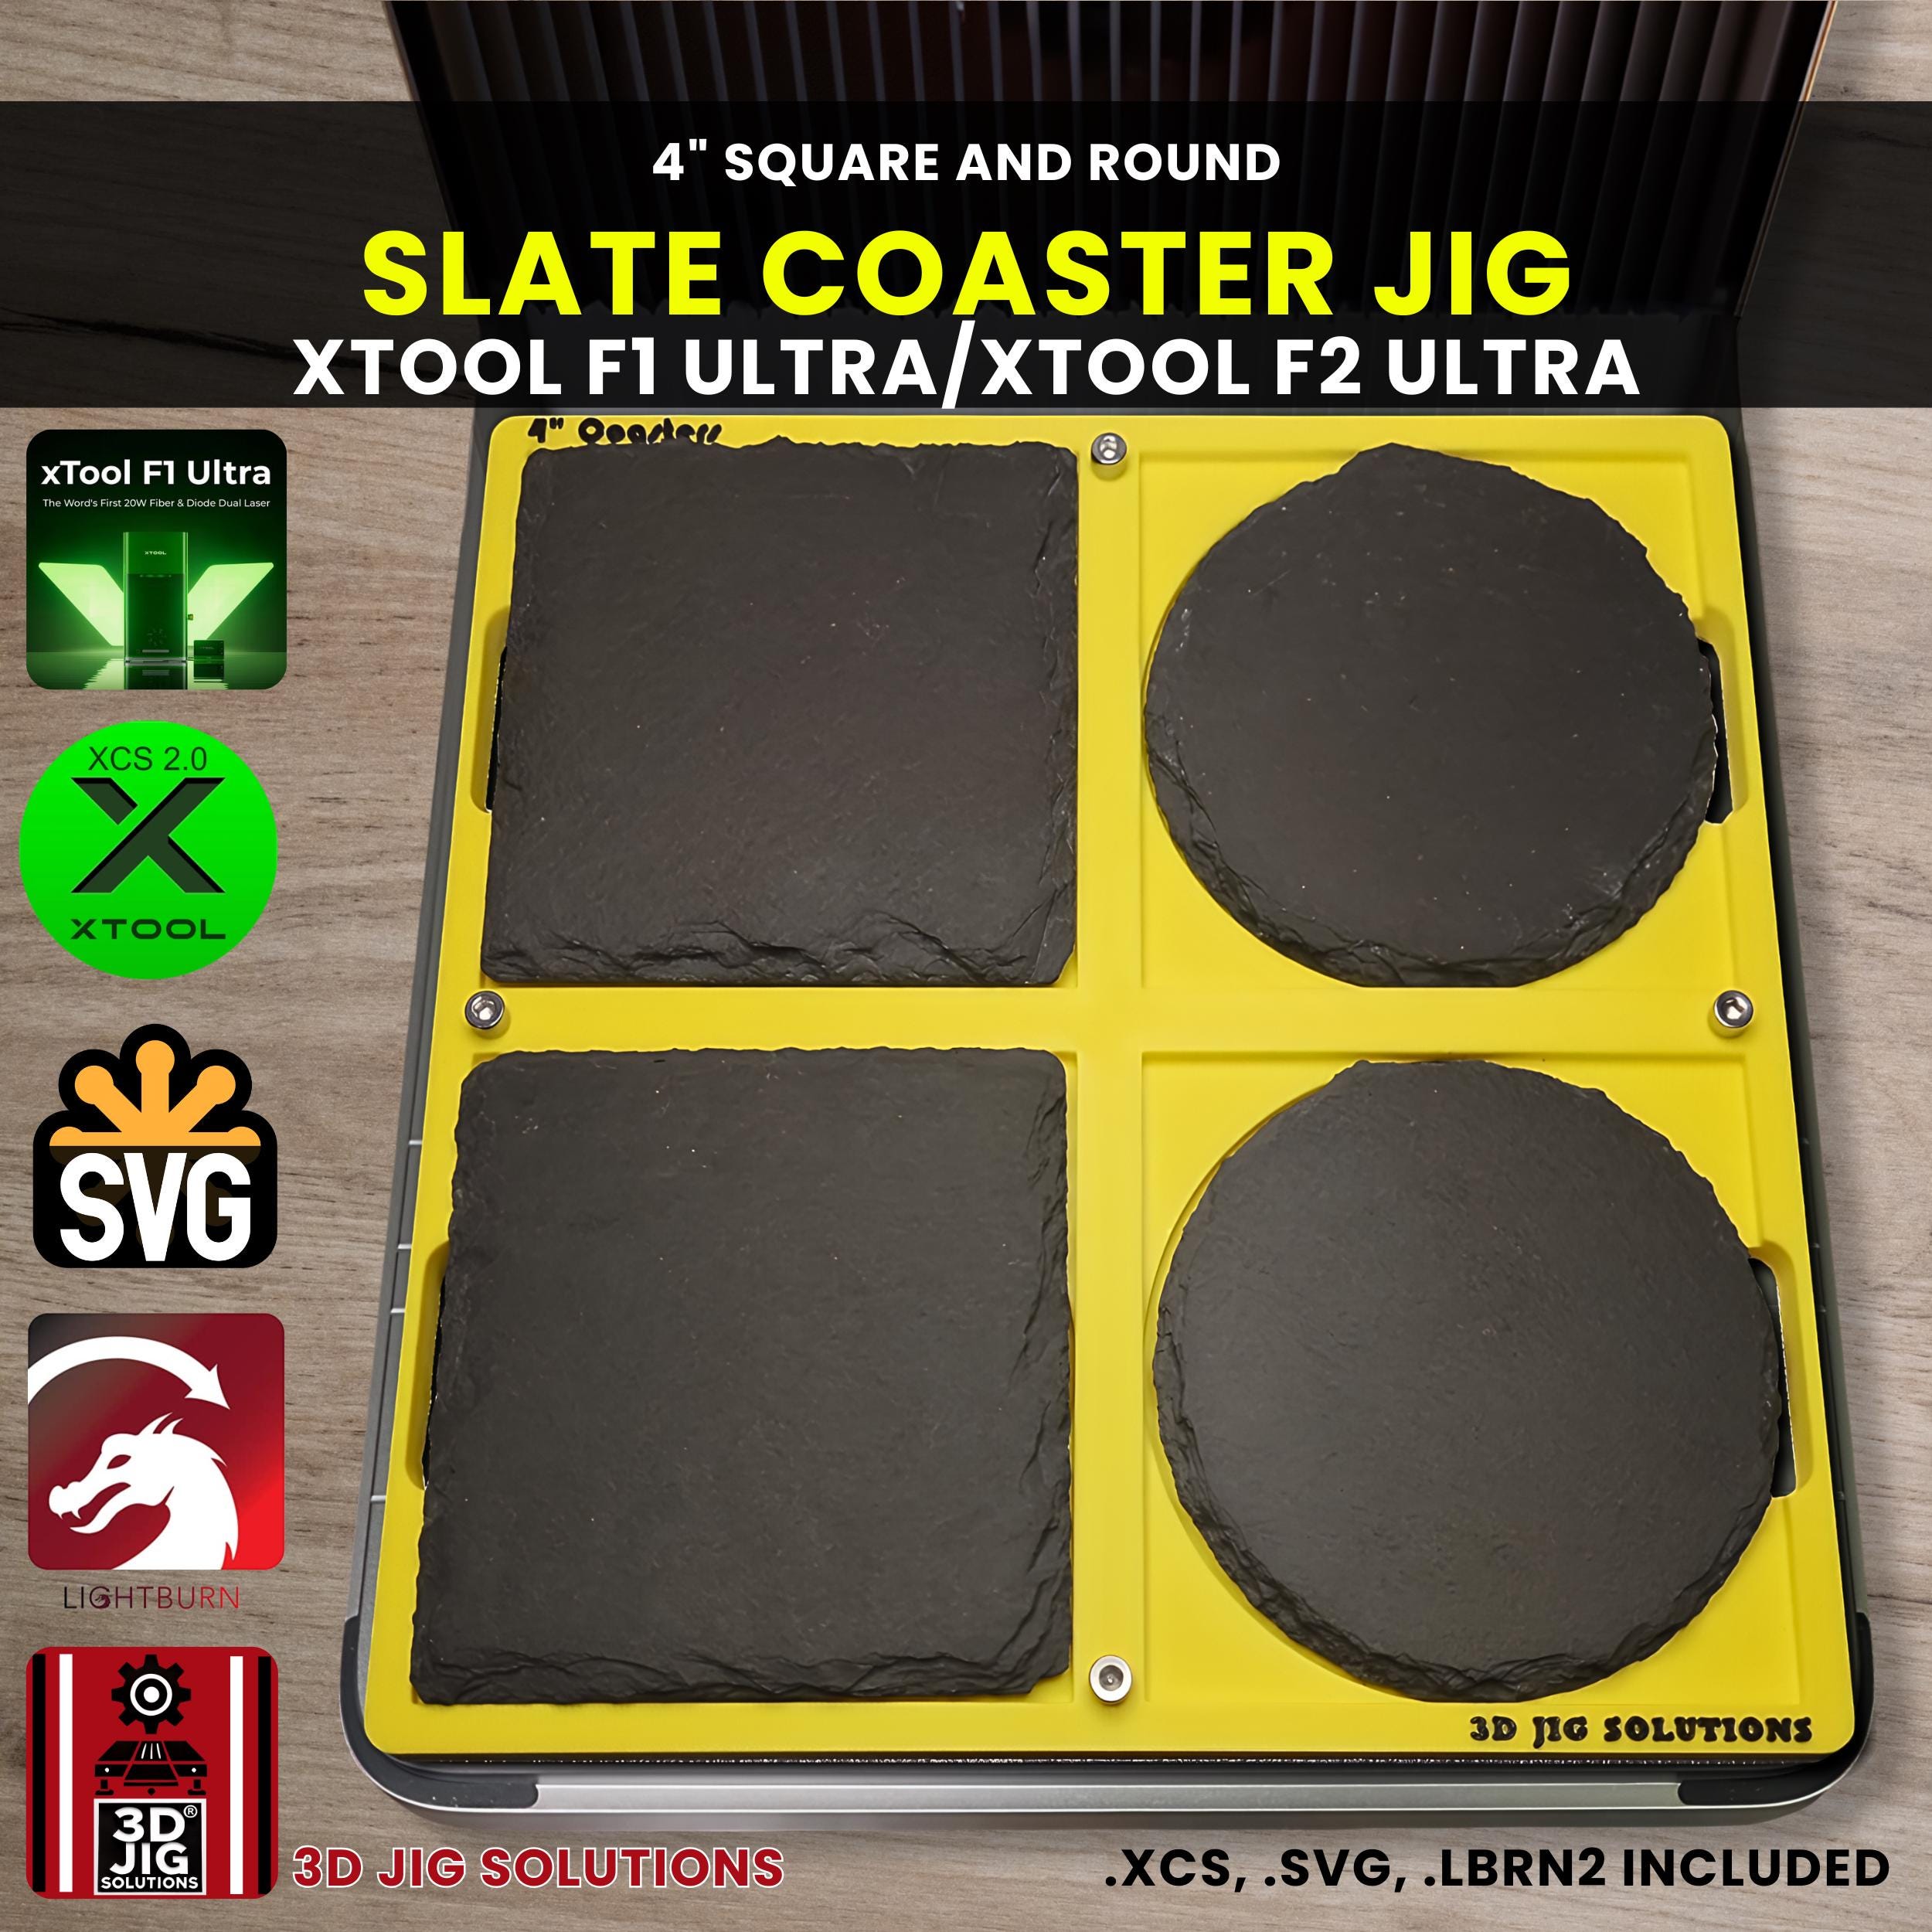
Image Quality and File Formats: The Foundation of a Great Engraving
When considering an image for slate engraving, quality and format are non-negotiable. Slate responds best to designs with clear lines and stark contrast, making vector graphics (like SVG files) an ideal choice. Vector files are resolution-independent, meaning they can be scaled to any size without losing sharpness or pixelating. This is crucial for maintaining crisp edges on intricate designs.
However, if your vision involves a photograph or a more complex bitmap image, it’s still entirely possible to achieve stunning results. The key lies in selecting high-resolution images. Low-resolution images, often characterized by pixelation, will produce a blurry or muddy engraving. At Tophinhanhdep.com, we advocate for starting with the highest possible resolution for any bitmap image you intend to engrave. This aligns with our core focus on high-resolution photography and digital imaging best practices.

For slate, which traditionally engraves in shades of white or light gray against its dark background, grayscale images often yield the most impactful results. Converting a color image to grayscale allows you to manipulate its contrast and brightness more effectively, ensuring the laser interprets distinct tonal variations accurately. This preparation is a fundamental aspect of digital photography editing styles that we champion.
Consider the diverse categories of images available on Tophinhanhdep.com:
- Aesthetic & Beautiful Photography: These categories are perfect for intricate nature scenes, elegant patterns, or stunning landscapes that can be simplified into a high-contrast engraving.
- Nature & Abstract: Abstract patterns or stylized natural elements can create captivating, unique coasters. Their inherent lines and forms often translate well to vector graphics.
- Sad/Emotional Images: While less common for coasters, if a poignant visual is desired, selecting an image with strong emotional impact and clear lines will allow the sentiment to come through in the engraving.
- Wallpapers & Backgrounds: Often high-resolution, these can provide excellent source material for patterns or subtle background textures on your coasters.
Sourcing and Conceptualizing Your Designs
Once you understand the technical requirements, the creative possibilities explode. Where can you find or create these ideal images?
- Stock Photos and Digital Photography: Tophinhanhdep.com offers a vast collection of high-resolution stock photos and curated digital photography that can serve as excellent starting points. Many images can be adapted, cropped, or edited to fit your coaster design. For those interested in digital photography, learning to capture images with strong contrast and clear subjects is an invaluable skill for engraving.
- Vector Bundles and Pre-made Designs: For simpler, graphic designs, ready-made vector bundles are a fantastic resource. The example provided in the reference material uses a “Texas outline SVG bundle,” illustrating how thematic collections can be readily applied. Tophinhanhdep.com’s design library offers a diverse range of pre-made engraving files, from monograms and quotes to decorative patterns, categorized under “Image Inspiration & Collections” and “Thematic Collections.”
- AI Design Tools: For those seeking bespoke designs in a flash, cutting-edge AI design tools, such as the AI design tool available on Tophinhanhdep.com, can generate engraving-ready files from simple text prompts. This innovative approach falls under “Visual Design” and “Creative Ideas,” pushing the boundaries of digital art creation.
- Personal Creations: If you’re skilled in graphic design or digital art, creating your own unique images gives you complete control. This is where your personal creative ideas truly shine, allowing for photo manipulation and customized graphics.
No matter the source, always consider the final medium. A design that looks stunning on a screen might need adjustments to truly pop on the dark, textured surface of slate. This iterative process of visual design and conceptualization is key to successful laser crafting.
Essential Image Preparation with Tophinhanhdep.com’s Tools
Once you have your chosen image, it’s time to prepare it specifically for the xTool S1 and the slate material. This involves more than just resizing; it’s about optimizing the image’s properties to interact perfectly with the laser. Tophinhanhdep.com provides a suite of image tools designed to help you achieve professional-grade results.
Optimizing Images for Engraving Clarity
For bitmap images, contrast is your best friend. The laser creates the engraving by removing tiny flakes of slate, revealing a lighter color underneath. If your image lacks strong contrast between light and dark areas, the engraving will appear faint or indistinct.
- Contrast Adjustment: Use an image editing software or Tophinhanhdep.com’s built-in image optimizers to enhance the contrast. Dark areas should be as close to black as possible, and light areas as close to white, within the bounds of maintaining detail. This ensures a vibrant “bright” engraving without needing any post-processing coatings, a tip directly from the original content’s best practices.
- Sharpening: For photographic images, a touch of sharpening can help define edges and details that might otherwise get lost. However, be careful not to over-sharpen, as this can introduce unwanted artifacts or noise into the image.
- Grayscale Conversion: As mentioned, converting to grayscale is often beneficial. When converting, experiment with different methods (e.g., luminance, average) to see which best preserves the crucial details and contrast in your image.
- File Format Conversion: If your design isn’t already an SVG, you might consider converting it, especially for logos or line art. Tophinhanhdep.com’s image converters can help transition between formats, ensuring compatibility with your laser software.
- AI Upscaling: If you start with a lower-resolution image but it’s the perfect design, don’t despair! Tophinhanhdep.com’s AI upscalers can intelligently increase image resolution, adding detail and sharpness, making it suitable for engraving that otherwise might have been pixelated. This leverages advanced AI to enhance digital photography.
The Importance of Material Testing
Even with the most perfectly prepared image, engraving success hinges on finding the optimal laser settings for your specific laser and your specific batch of slate. Slate, being a natural material, can have variations in hardness and composition that affect how it reacts to the laser. Skipping this step is a common pitfall for beginners.
Tophinhanhdep.com, echoing expert advice, cannot stress this enough: run a material test. This involves engraving a small “Smart Test Array” onto a scrap piece of slate (or an inconspicuous area of a coaster if scraps are unavailable) using varying combinations of power, speed, passes, and lines per centimeter (LPC).
- Power: Controls the intensity of the laser beam. Too low, and the engraving will be faint; too high, and it might chip the slate or create excessive debris.
- Speed: Determines how quickly the laser head moves. Slower speeds generally result in deeper, more pronounced engravings.
- Passes: The number of times the laser goes over the same area. Multiple passes can deepen an engraving but also increase processing time and potential for heat-related issues.
- Lines Per Centimeter (LPC): Also known as DPI (dots per inch), this setting determines the density of the laser lines. Higher LPC means a finer, more detailed engraving, but also longer processing times.
The goal is to find settings that produce a bright, clean engraving without excessive charring or damage. The original content provides example settings for an xTool S1 40W (power 30, speed 220, pass 1, lines 200), which can serve as a starting guide, but your own test is crucial for fine-tuning. This methodical approach to digital photography and visual design ensures predictable and high-quality results.
It’s also worth noting the advice on coatings: while polyurethane can “brighten up” plaques, it’s generally “useless” for functional slate coasters as it removes their moisture-absorbing properties. Achieving a bright engraving should come from dialing in your settings, not from an external coating.
Precision Engraving with the xTool S1: From Design to Coaster
With your image meticulously prepared and your laser settings dialed in, it’s time to bring your design to life on slate using the xTool S1. This machine is renowned for its user-friendly interface and precision features, making it an excellent choice for crafting.
Setting Up Your Workspace and Material
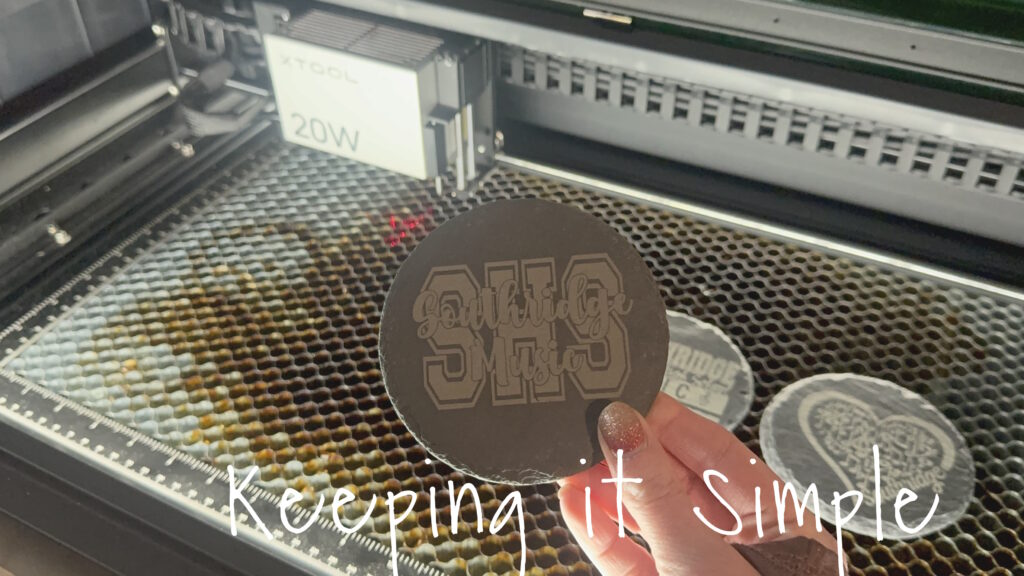
Begin by placing your slate coasters securely on the laser bed. You can use the slats or a honeycomb work area. If using a jig, place the jig first, then the coasters into their designated slots. Jigs, like those found on Tophinhanhdep.com, are invaluable for batch processing and ensuring consistent, precise alignment for multiple 4x4 inch slate coasters.
The xTool S1’s Pin-Point Positioning™ system simplifies the placement process. Start by positioning the laser head’s crosshair over one of your items. For the xTool S1, you can simply press the auto distance measure icon, and the machine will automatically calculate and set the correct focal distance, ensuring your laser is perfectly focused for the engraving. This eliminates guesswork and potential focusing errors that could mar your project.
Leveraging the xTool S1’s Pin-Point Positioning™ System
The xTool S1 stands out with its Pin-Point Positioning™ system, an unparalleled feature for precise design placement without the need for an integrated camera. This system has evolved to offer four distinct marking options: rectangle, circle, pentagon, and line, providing immense flexibility for various coaster shapes.
Let’s walk through the batch processing of multiple circular slate coasters, a common application:
- Initiate Marking: In the xTool Creative Space (XCS) software, click “start marking.”
- Select Shape: Choose the “circle” marking option, then press the green button on the machine to confirm.
- Define Coaster 1:
- Move the laser module’s crosshair to the top-leftmost position of your first coaster. Press the start button on the machine to lock in the first point of the vector.
- Move the crosshair to the bottom-rightmost position of that same coaster. Press the machine’s start button again to lock in the boundary, creating a square or rectangle around the coaster on the screen.
- For circular coasters, a key tip for centering involves using a measuring tape to find the exact center of the coaster, then positioning the laser module’s red crosshair precisely at that center point. The red crosshair will then appear on your XCS screen, making it incredibly easy to align your circular design perfectly within the marked area.
- Select “end marking” for this coaster.
- Repeat for All Coasters: Repeat this process for every coaster on the laser bed. Once all items are marked, select “done.”
The marked areas will now appear in your XCS workspace. You can then drag each of your prepared designs into its respective marked area. An important note here: you are not lining up the designs with each other; rather, you are lining up each individual design within each individual marked area. This streamlined process ensures that each engraving is perfectly centered and aligned on its respective coaster, even when batch processing.
This method also indirectly addresses issues like thickness variations, as each coaster’s distance is measured individually, and the design is placed relative to that specific coaster’s marked area. While the XCS software can only set one focus value for the entire project, the precise Pin-Point Positioning™ and auto-measure feature minimize impact from minor variations. For more significant thickness variations, manually adjusting the focus for each coaster or using advanced features (if available in future updates or alternative software like Lightburn with Z-offsets) might be considered, but the S1’s system provides remarkable accuracy for typical slate coaster variations.
Applying Your Optimized Settings in XCS
With your coasters positioned and marked, and your designs loaded into their respective areas:
- Import Design: Drag your SVG (or other prepared image file) into the XCS workspace.
- Set Process Type: Ensure the design is set to “engraving.”
- Enter Parameters: Input the optimized settings (power, speed, passes, and lines per centimeter) that you determined during your material testing. For example, the previously mentioned Tophinhanhdep.com settings for xTool S1 40W: power 30, speed 220, pass 1, lines 200. The XCS material library for “Rock Coaster” can also offer a guided starting point.
- Frame (Optional) & Process: You can opt to “frame” the design to visually verify its placement before starting, or skip directly to “process.” Stay near the laser during operation.
Once the job is complete, carefully remove the engraved slate coasters. Wipe them gently with a dry cloth to remove any residue or dust from the engraving process. As noted earlier, there is NO NEED TO SEAL for functional coasters.
Post-Engraving Care and Expanding Your Craft
Congratulations! You’ve successfully prepared an image and engraved stunning slate coasters with your xTool S1. The process is not just about the technical steps but also about the creative journey and the satisfaction of seeing your visual design come to life.
Beyond Coasters: Diverse Laser Craft Projects
The skills and knowledge gained from creating slate coasters are highly transferable to a myriad of other laser craft projects. The xTool S1, with its versatility, opens doors to countless creative possibilities. Tophinhanhdep.com constantly features new ideas and tutorials, spanning:
- Plaques and Keepsakes: Apply similar image preparation and engraving techniques to create personalized slate plaques for gifts or home decor.
- Wood Engraving and Cutting: Explore cutting and engraving wood for custom signs, decorative items, or intricate puzzles. Examples like a “Highland Cow Door Sign Laser Cut Project” (with free SVG) are great inspirations found on Tophinhanhdep.com.
- Acrylic Projects: While diode lasers like the xTool S1 have some restrictions (primarily opaque acrylic), CO2 lasers (like the xTool P2) or even the 40W S1 can handle various acrylic tasks, including cutting and engraving. Tophinhanhdep.com offers guides on handling intimidating materials like “mirror acrylic.”
- Innovative Applications: Explore unique projects such as integrating laser engraving with screen printing, a craft brought into the 21st century with tools like the xTool Screen Printer. Or, for crafters, the xTool M1 ULTRA combines engraving with printing, cutting, foiling, and embossing. Even specialized tasks like tumbler engraving are made easier with tools like the WeCreat Vista, featuring its patented FlipLaser design.
The world of laser crafts is vast and exciting, offering endless opportunities for digital art, visual design, and creative expression. Tophinhanhdep.com remains your ultimate resource for discovering new photo ideas, exploring thematic collections, and mastering image tools to elevate every project.
In conclusion, transforming a digital image into a tangible, beautiful slate coaster with the xTool S1 is an immensely rewarding experience. By understanding the principles of image selection, leveraging Tophinhanhdep.com’s powerful image preparation tools, and mastering the precision features of your laser, you can achieve consistent, high-quality results every time. Keep experimenting, keep creating, and let Tophinhanhdep.com be your guide in the dynamic world of visual design and laser crafting.