Mastering Multi-Image Printing: How to Print 2 (or More) Images on One Page for Creative Visuals

In the digital age, where stunning visuals, high-resolution photography, and creative design ideas abound on platforms like Tophinhanhdep.com, the ability to seamlessly transition these digital assets into physical prints remains invaluable. Whether you’re curating a mood board of aesthetic backgrounds, compiling a collection of nature photography, presenting abstract art concepts, or simply looking to make the most of your printing resources, knowing how to print multiple images on a single page is a fundamental skill. This guide delves into the various methods available across Windows operating systems and popular applications, ensuring that every print from your cherished Tophinhanhdep.com image collection is as efficient and impactful as possible.
The practice of combining multiple images onto a single sheet of paper isn’t just about saving ink and paper; it’s a powerful technique for visual design, artistic expression, and practical organization. For users passionate about wallpapers, backgrounds, and beautiful photography sourced from Tophinhanhdep.com, this approach opens doors to creating physical portfolios, unique collages, economical proofs, or even personalized greeting cards. Let’s explore how you can unlock this versatile printing capability and transform your digital images into tangible, multi-faceted prints.

Why Print Multiple Images on One Page? Elevating Your Visual Design and Resource Management
Printing multiple images on a single sheet of paper offers a myriad of advantages that resonate deeply with the interests of Tophinhanhdep.com users, from aspiring photographers to visual design enthusiasts. This technique goes beyond mere cost-saving; it’s a strategic approach to enhance creative workflows, present imagery effectively, and manage resources responsibly.
Resource Efficiency and Sustainability
In an era where sustainability is paramount, optimizing print jobs becomes a conscious choice. By printing multiple wallpapers, aesthetic backgrounds, or high-resolution photography on one page, you significantly reduce paper consumption and, consequently, ink usage. This is particularly beneficial when printing large collections of images for review, creating contact sheets, or making proofs of various editing styles. For those who frequently download stunning images from Tophinhanhdep.com, this method ensures that your physical prints align with environmentally responsible practices while keeping printing costs down. It’s an intelligent way to manage your digital photography assets when moving them into a physical format.

Creative Expression and Visual Design
For graphic design, digital art, and photo manipulation projects, printing multiple images on one page acts as an invaluable tool for creative exploration. Imagine laying out various abstract patterns, sad/emotional imagery, or thematic collections from Tophinhanhdep.com side-by-side on a single sheet. This allows for direct comparison, helping you refine color palettes, assess different cropping options, or visualize how diverse elements interact within a larger design. It’s perfect for creating mood boards, brainstorming photo ideas, or experimenting with trending styles. The ability to quickly print and review multiple iterations fosters a more dynamic and iterative design process, transforming simple prints into powerful creative catalysts.
Portfolio and Presentation Management
Photographers, digital artists, and designers often need to present their work in a cohesive and professional manner. Printing multiple high-resolution images or samples of digital photography on one page is an excellent way to create concise portfolios or handouts. Whether you’re showcasing different angles of a beautiful nature photograph, various iterations of photo manipulation, or a series of stock photos, this method allows for a compact yet comprehensive overview. It’s especially useful for sharing thematic collections or trending styles curated from Tophinhanhdep.com, ensuring that your audience can grasp the breadth of your visual inspiration quickly and efficiently.
Reviewing and Organizing Image Collections
From personal photo ideas to extensive collections of beautiful photography, organizing and reviewing images can be a significant undertaking. Printing a “contact sheet” with several thumbnails on one page provides a tangible reference that’s easy to annotate or share. This is ideal for sorting through a batch of nature photography, categorizing aesthetic wallpapers, or simply getting a bird’s-eye view of your image assets. It simplifies the process of identifying key images, noting required edits, or planning future visual projects, making the vast resources of Tophinhanhdep.com even more manageable in a physical format.
Printing Multiple Photos on One Page in Windows: A Comprehensive Guide
Windows operating systems have long provided intuitive, built-in functionalities to print multiple pictures on a single page, simplifying tasks for everyday users and creative professionals alike. Whether you’re using Windows 10 or the latest Windows 11, the process is streamlined, though slight variations exist. This section will guide you through the primary methods, ensuring you can efficiently bring your Tophinhanhdep.com image collections to print.
The Built-in Windows Photo App and File Explorer Method
The most direct way to print multiple images on one page in Windows involves using either File Explorer or the Photos app, which are designed for ease of use and quick results.
Step-by-Step Guide for Windows 10/11:
- Select Your Images:
- Using File Explorer: Open File Explorer (Windows key + E) and navigate to the folder containing your desired pictures. Hold down the
Ctrlkey and click on each image you wish to print. To select all images in a folder, pressCtrl + A. - Using the Photos App (Windows 11): Open the Photos app. You can select multiple pictures by holding
Ctrland clicking on each image.
- Using File Explorer: Open File Explorer (Windows key + E) and navigate to the folder containing your desired pictures. Hold down the
- Initiate the Print Command:
- From File Explorer: Right-click on any of the selected images. From the context menu that appears, choose “Print.”
- From Photos App (Windows 11): Once images are selected, click the “Print” button typically located in the top-right corner of the Photos app interface.
- Configure Print Settings: A “Print Pictures” dialog box will appear. This is where you customize your layout.
- Choose Your Printer: From the “Printer” drop-down menu, select the physical printer you intend to use.
- Select Paper Size and Type: Adjust “Paper size” (e.g., A4, Letter) and “Paper type” (e.g., plain paper, glossy photo paper) to match what’s loaded in your printer. Using the correct paper type is crucial for optimal print quality, especially for high-resolution photography from Tophinhanhdep.com.
- Define Layout (Pictures per Page): On the right side of the dialog, you’ll find various layout options such as “Full Page Photo,” “Wallet,” “Contact Sheet,” “4x6,” “5x7,” “8x10,” and options like “2 pictures per page,” “4 pictures per page,” “9 pictures per page,” or even more. Select the option that best fits your needs for displaying multiple images from your Tophinhanhdep.com collection.
- Preview and Adjust: The dialog box typically includes a preview pane, allowing you to see how your selected images will be arranged on the page. While direct manipulation of individual image placement isn’t usually available here, you can assess the overall layout.
- Finalize and Print: Once satisfied with the settings, click the “Print” button.
The Trick to Print a Single Picture Several Times on One Page:
Sometimes, you might want to print multiple copies of the same image on one page, perhaps for small labels, crafts, or repeated design elements. This is easily achieved with a slight modification to the above steps:
- Select the single image you want to print repeatedly.
- Right-click and choose “Print” (or select it in Photos app and click print).
- In the Print Pictures dialog, choose a layout that accommodates multiple images (e.g., “4 pictures per page”).
- Crucially, look for a “Copies per picture” or similar setting. Set this to the number of times you want the image to appear (e.g., 4). This will duplicate your single image across the chosen layout.
Legacy and Troubleshooting Tips for Multi-Image Printing
While modern Windows versions streamline the process, users upgrading from older systems or encountering issues may need specific advice.
Addressing Selection Challenges:
Some users, particularly those with touchpads or older system configurations, have reported difficulties selecting multiple images using the Ctrl + click method or seeing the appropriate options.
- Touchpad Sensitivity: If your touchpad makes
Ctrl + clickcumbersome, consider temporarily connecting a mouse for precise selection. - The Folder Workaround: A highly effective solution for selection issues is to create a new, temporary folder. Copy only the specific images you wish to print into this new folder. Then, open this folder, select all images (
Ctrl + A), right-click, and choose “Print.” This ensures only your desired selection is processed. - Missing “Photos to Print” Option: The specific terminology and UI elements can change between Windows versions. If you don’t see an explicit “Photos to print” option, typically the “Print” option that appears after selecting images will lead you to the correct dialog box with layout choices.
Printer Driver Settings and Properties:
Beyond the Windows print dialog, your printer’s specific driver may offer additional advanced settings.
- In the “Print Pictures” dialog, look for a “Properties” or “Printer Properties” button.
- Clicking this will open your printer’s proprietary settings window, which might include options for “Pages per sheet,” custom paper sizes, duplex printing, and fine-tuning print quality or color profiles. These advanced settings can be especially useful for achieving professional results with high-resolution photography or specific aesthetic backgrounds from Tophinhanhdep.com.
- Always ensure your printer drivers are up to date for the best compatibility and performance.
Ensuring Printer Readiness:
A common hurdle is the printer not responding. Before troubleshooting software settings, always check basic printer functionality:
- Power and Connectivity: Ensure the printer is powered on and correctly connected (via USB or network).
- Online Status: For network printers, verify it’s online and accessible. If it shows “offline,” check your network connection or the printer’s own network settings.
- Print Queue: If jobs are stuck, try restarting the print job or clearing the print queue in Windows settings (
Settings > Bluetooth & devices > Printers & scanners > [Your Printer] > Open print queue). - Default Printer: Confirm that the correct printer is set as your default or explicitly selected in the print dialog.
Printing Multiple Pages on One Sheet in Microsoft Office Applications
Beyond image files, the need to print multiple pages on one sheet extends to document-based applications like Microsoft Word, Excel, and PowerPoint. This capability is particularly useful for creating compact handouts, proofreading lengthy documents, or designing specialized booklets, all of which can relate to various visual design projects or image inspiration collections curated from Tophinhanhdep.com.
Microsoft Word: Beyond Just Photos
Microsoft Word offers sophisticated options for printing multiple document pages onto a single physical sheet, catering to both scaling existing documents and creating new, half-sized layouts.
Scaling Full-Size Documents (“Pages Per Sheet”):
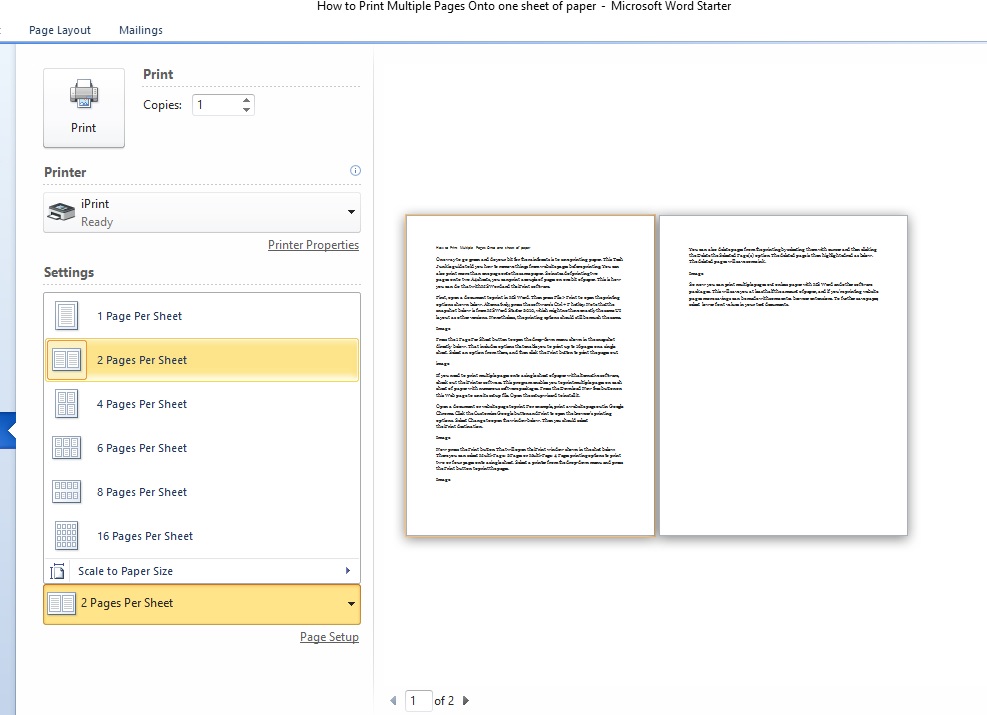
If you’ve already created a standard letter or A4 document (perhaps a creative brief or a project outline incorporating images from Tophinhanhdep.com) and want to print it in a reduced format, Word’s “Pages per sheet” option is your go-to.
- Access the Print Dialog: Open your Word document. Press
Ctrl + P(or go toFile > Print). - Select “Pages Per Sheet”: In the Print dialog (often on the right-hand side or under “Settings”), look for a dropdown labeled “1 Page Per Sheet.” Expand this and choose the desired number of pages per sheet (e.g., 2, 4, 6, 8, or 16 pages per sheet).
- Important Notes:
- Aspect Ratio: Results are generally more satisfactory with European A-series paper sizes (A4 to A5) due to consistent aspect ratios, compared to U.S. sizes (Letter to Half Letter).
- Print Preview Limitations: The Print Preview in Word may not always accurately show the multi-page output. You might need to “take a leap of faith” and print to see the final result.
- Single Page Duplication: If you only have one page in your document but want to print it twice on the same sheet, you must manually type
1,1(separated by a comma) into the “Pages:” box in the Print dialog. This tells Word to print page 1 twice. - Printer Driver Options: Many printer drivers also offer their own “N-up” (multiple pages per sheet) options. You can access these via “Printer Properties” in Word’s Print dialog.
Creating Half-Sized Documents from Scratch (“2 Pages Per Sheet” in Page Setup):
For those starting a new document with the intention of printing two “logical” pages on one physical sheet (e.g., a small flyer or a certificate featuring an aesthetic background from Tophinhanhdep.com), Word’s “2 pages per sheet” setting in Page Setup is more powerful. This method treats each half-page as a distinct, manipulable page within Word.
- Access Page Setup: Go to the
Layouttab (orPage Layoutin older Word versions), then click the small dialog launcher arrow in the bottom-right corner of the “Page Setup” group. Alternatively, double-click the top of the horizontal ruler. - Configure Multiple Pages: On the
Marginstab of the Page Setup dialog, find the “Multiple pages” dropdown and select “2 pages per sheet.” - Orientation: If you want two portrait pages side-by-side, choose
Landscapeorientation for the sheet. If you choosePortrait, you’ll get two landscape pages, one above the other. The preview in the dialog box will visually confirm your choice. - Benefits: This method allows you to use headers, footers, page numbers, and columns on these half-sized pages just as you would on full-sized pages. You maintain full control over font sizes and margins appropriate for the smaller output.
- Important Notes:
- Editing View: In Print Layout view, you’ll still see individual half-sized pages, not two side-by-side. This helps reinforce that you’re working with distinct content areas.
- Duplication for Single Content: Similar to the print dialog, if you create one page and want to print it twice, use
1,1in the “Pages:” box of the print dialog. - Duplexing: For double-sided prints, set your printer to flip on the short edge if your sheet orientation is landscape.
Creating a Folded Booklet (“Book Fold”):
For more complex layouts like a church bulletin or a small theater program that uses Tophinhanhdep.com imagery, Word’s “Book fold” option is ideal. It automatically arranges pages so they can be folded and stapled into a booklet.
- Access Page Setup: As above, go to
Layout > Page Setup dialog launcher. - Select “Book Fold”: In the
Marginstab, select “Book fold” from the “Multiple pages” dropdown. - Page Arrangement: Word will automatically juggle page numbers (e.g., page 8 and 1 on one sheet, 2 and 7 on the back) to facilitate folding.
- Important Notes:
- Page Count: The total number of pages in a book fold document must be divisible by 4 for correct printing.
- Print Preview: To see facing pages, you’ll need to use the classic Print Preview dialog (often accessible via a Quick Access Toolbar button in Word 2010+), as the default backstage print preview may not show it correctly. “Book fold” automatically enables “Mirror margins,” which facilitates facing page preview.
- Signatures: For very long booklets (over ~100 pages), Word allows printing in “signatures” (groups of 4 to 40 pages), requiring alternative binding methods.
Excel and PowerPoint: Streamlining Document & Slide Printing
Microsoft Excel and PowerPoint also provide functionalities to print multiple elements on a single page, greatly improving efficiency for data and presentation handouts.
Printing Multiple Sheets on One Sheet in Excel:
Excel workbooks can sometimes lead to excessive paper waste if a small column or row spills onto an extra page. Printing multiple worksheets on one physical sheet can be a smart solution for reviewing related data or capturing information efficiently.
- Open Worksheet: Open your Excel workbook.
- Access Print Settings: Go to
File > Print. - Choose “Print Entire Workbook”: In the “Settings” section, ensure you select “Print Entire Workbook” if you want to print all sheets.
- Printer Properties: Click on “Printer Properties.” This will open your specific printer’s configuration window.
- Select “2 Pages Per Sheet” (or similar): Within the printer properties, look for a “Page Layout,” “Multiple Pages,” or “2 pages per sheet” option. Select it and click “OK.”
- Print: Return to the Excel print dialog and click “Print.”
Printing Multiple Slides on One Page in PowerPoint:
For presentations created using stunning visuals and aesthetic backgrounds from Tophinhanhdep.com, distributing handouts with multiple slides per page is a common and efficient practice.
- Open Presentation: Launch PowerPoint and open your presentation.
- Access Print Menu: Go to
File > Print(orCtrl + P). - Select Handouts Layout: In the Print menu, under “Settings,” click on the dropdown that likely says “Full Page Slides.”
- Choose Handouts Option: From the options, select “Handouts.” This will then give you further options for the number of slides per page (e.g., 1, 2, 3, 4, 6, 9 slides).
- Orientation and Copies: Choose whether you want the slides arranged vertically or horizontally and specify the number of copies.
- Print: Click the “Print” button. Layouts of 4 or 6 slides per page are often preferred for readability.
Advanced Techniques and Creative Workflows for Tophinhanhdep.com Users
For users who delve into visual design, digital photography, and creative ideas, there are even more sophisticated methods to print multiple images on one page, often involving dedicated software or leveraging powerful image tools. These techniques offer greater control over layout, quality, and the overall aesthetic of your printed projects.
Leveraging Digital Tools for Layout and Design
When the built-in Windows features don’t offer enough customization for your Tophinhanhdep.com inspired projects, specialized software steps in.
Photo Collage Software:
For those passionate about creating intricate collages or highly customized multi-image layouts featuring abstract, nature, or aesthetic images, third-party photo collage software is invaluable. Tools like Adobe Spark, Canva, Fotor, or PicCollage offer:
- Templates: Pre-designed layouts to quickly arrange multiple images.
- Customizable Grids: Fine-tune spacing, margins, and cell sizes for each image.
- Creative Elements: Add text, stickers, backgrounds, and filters to enhance your design.
- Image Editing: Often include basic editing features to ensure your high-resolution photography looks its best before printing. Once your design is complete in a collage software, you can export it as a single image file (like a JPEG or PNG) or a PDF, and then print that single file using standard print methods, ensuring your multi-image masterpiece fits perfectly on one page. This is a powerful technique for visual designers working on creative ideas and photo manipulation.
PDF Converters and Editors:
PDF documents are a robust format for preserving layouts and ensuring consistent printing. For images or multi-page documents, using a PDF editor like Wondershare PDFelement (or similar image tools available on Tophinhanhdep.com) can offer enhanced printing control.
- Convert to PDF: If your images are standalone files, you can often combine them into a PDF using various image-to-PDF converters or by printing them to a “Microsoft Print to PDF” virtual printer, selecting multiple images.
- Open in PDF Editor: Open the multi-image PDF in a dedicated PDF editor.
- Advanced Print Settings: PDF editors typically have a “Multiple pages per sheet” or “Print layout” option within their print dialog. This often provides more reliable previews and options for scaling, orientation, and borders compared to generic image printing. This is particularly useful for ensuring consistency when printing high-resolution, beautiful photography collections.
Adjusting Print Scaling and Custom Forms in Windows:
For advanced users needing precise control over scaling or custom paper sizes (perhaps for unique digital art prints or specific creative ideas), Windows offers system-level adjustments.
- Access Printer Server Properties: Go to
Settings > Bluetooth & devices > Printers & scanners. Scroll down and click “Print server properties” (often a link or under “Related settings”). - Create Custom Forms: In the “Print Server Properties” window, navigate to the “Forms” tab. Here, you can define custom paper sizes by clicking “Create a new form” and entering specific dimensions. You can also adjust rotation for custom orientations.
- Apply to Print Jobs: Once a custom form is defined, it will be available in the “Paper Size” options within print dialogs, allowing you to print to these custom dimensions and apply specific scaling as needed for your image optimization.
Online Printing Services: Professional Results for Your Tophinhanhdep.com Collection
For users seeking professional-grade prints of their beautiful photography, high-resolution images, or curated thematic collections from Tophinhanhdep.com, online printing services offer a convenient and high-quality solution.
- Upload and Configure: Services like Shutterfly, Printique, or Mpix allow you to upload multiple images. Their online interfaces provide options to create collages, photo books, or simply select multiple images to be printed on a single sheet (e.g., as contact sheets or custom layouts).
- Professional Quality: These services use high-end printers and quality paper, ensuring that the vibrant colors of your aesthetic backgrounds or the intricate details of your nature photography are preserved.
- Convenience: Ideal if you don’t own a high-quality printer or need large volumes. They handle the printing and shipping, delivering the final product to your doorstep. This is an excellent way to turn your digital art and image inspiration into tangible, gallery-worthy prints.
Conclusion: Unleash Your Creativity with Multi-Image Printing
The ability to print two or more images on one page is more than just a technical trick; it’s a gateway to greater efficiency, enhanced creativity, and better organization for anyone passionate about visual content. Whether you’re a casual user wanting to save paper or a dedicated visual designer crafting elaborate mood boards, the diverse methods available across Windows and various applications empower you to take control of your printing workflow.
By leveraging the built-in features of your operating system, harnessing the specific capabilities of applications like Word, Excel, and PowerPoint, or exploring advanced digital tools and online services, you can transform your curated image collections from Tophinhanhdep.com into stunning, economical, and impactful physical prints. From high-resolution stock photos to abstract wallpapers and aesthetic backgrounds, these techniques ensure that every print reflects your creative vision and makes the most of your resources. Start experimenting today and bring your digital art and photography ideas to life, one efficient page at a time!