How to Print 4 Images on One Page: A Comprehensive Guide for Windows, macOS, and Creative Projects

In today’s digital age, we capture and store an unimaginable number of images, from stunning landscapes and abstract art to cherished memories and aesthetic backgrounds. While the convenience of digital viewing is undeniable, there’s a unique satisfaction in holding a physical print. Whether you’re curating a mood board for a graphic design project, assembling a portfolio of high-resolution photography, or simply saving paper by printing multiple family photos, knowing how to efficiently print several images on a single page is an invaluable skill. This guide from Tophinhanhdep.com will walk you through the process on both Windows and macOS, and even touch upon professional image manipulation techniques, ensuring your prints are not just convenient, but also align with your visual design and creative ideas.
The Versatility of Multi-Image Printing: Why Tophinhanhdep.com Recommends It
Printing multiple images on one page isn’t just about saving ink and paper; it’s a powerful technique that unlocks a myriad of creative and practical possibilities. At Tophinhanhdep.com, we understand the diverse needs of our users, from those seeking beautiful photography for their walls to digital artists exploring new visual designs. This method caters to all, transforming your digital image collections into tangible assets.
Practical Applications for Everyday Users
For the everyday user, printing multiple images on a single sheet offers immediate benefits. Imagine you have a collection of wallpapers or backgrounds you’ve downloaded from Tophinhanhdep.com and want to see how they look in print before committing to a larger, single-image print. By placing four or more on one page, you can easily compare aesthetics, color palettes, and overall impact. This is particularly useful for sad/emotional or nature photography, where subtle tones and compositions are critical. You can quickly generate small proofs, often referred to as “contact sheets” or “thumbnail sheets,” allowing for quick physical sorting and review without wasting resources. It’s also an excellent way to compile thematic collections – perhaps all the beautiful photography from a recent trip, or a series of abstract images for inspiration.

Enhancing Creative and Visual Design Work
For those deeply involved in photography and visual design, the ability to print multiple images per page is a cornerstone of efficient workflow and creative exploration. Professional photographers often need to create high-resolution contact sheets to review a session’s output with clients, making preliminary selections for stock photos or digital photography projects. Graphic designers use these multi-image layouts to develop mood boards, physically arranging various visual elements, textures, and aesthetic inspirations to inform their creative ideas. Digital artists can print out different iterations of their work or reference images, facilitating hands-on photo manipulation and design iteration. From planning complex photo album layouts to sketching out ideas for an exhibit, having small, tangible versions of your images allows for a more fluid and intuitive design process than endless scrolling through digital files. Tophinhanhdep.com’s extensive library of images and resources on photography and visual design becomes even more useful when you can physically engage with your selected visuals in this manner.

Step-by-Step: Printing Multiple Photos on Windows
Windows operating systems, whether you’re on an older Windows 7 or the latest Windows 11, provide built-in functionality to print multiple photos on one page. While the exact interface might vary slightly between versions, the core process remains intuitive. If you’ve upgraded from Windows 7 and are missing the familiar “Photos to print” option, don’t fret – the functionality is still there, often under a slightly different name or accessed via a contextual menu.
Utilizing Windows’ Default Photo Printing Features
The easiest way to print multiple images on one page in Windows involves using the system’s native photo printing capabilities, which require no additional software.
- Organize Your Images: Start by placing all the images you intend to print on one page into a single folder. This simplifies the selection process. Tophinhanhdep.com suggests organizing your images by themes – be it nature, abstract, or aesthetic backgrounds – to make your printing projects more focused.
- Select Your Photos: Open File Explorer and navigate to the folder containing your pictures. To select multiple photos:
- For Adjacent Photos: Click on the first photo, then hold down the
Shiftkey and click on the last photo in the sequence. - For Non-Adjacent Photos: Hold down the
Ctrlkey (Control key) and click on each individual photo you wish to select. A checkbox will appear when you hover over each file, making selection easier. - Troubleshooting: If you’re using a touchpad and struggling to select multiple non-adjacent pictures, some users find it helpful to create a temporary folder with only the desired images. Once you’ve selected your desired images (for example, four pictures), proceed to the next step.
- For Adjacent Photos: Click on the first photo, then hold down the
- Initiate the Print Command: Right-click on one of the selected photos. A contextual menu will appear.
- Find the Print Option:
- In Windows 10/11, you should see a “Print” option directly in the right-click menu.
- If “Print” isn’t immediately visible (especially in Windows 11), select “Show more options” first. This will reveal a longer context menu where you will find the “Print” option.
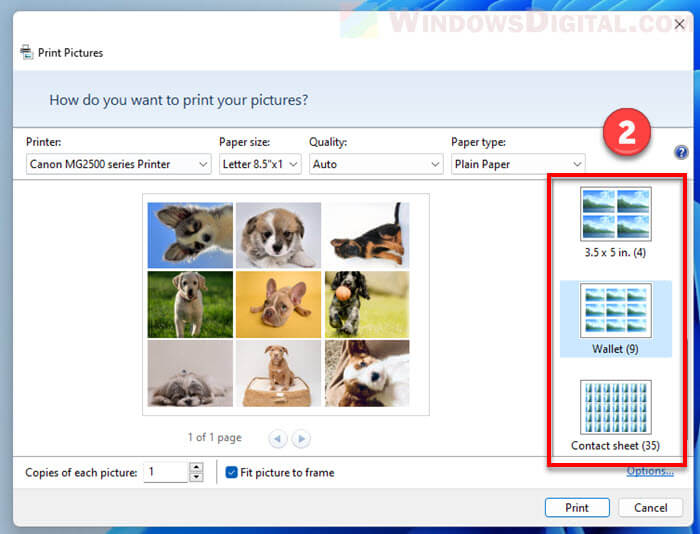
- Configure Print Settings: Clicking “Print” will open the “Print Pictures” dialog box. This is where you configure your layout and printer settings:
- Printer Selection: At the top, ensure your desired printer is selected.
- Paper Settings: Choose the appropriate paper size (e.g., A4, Letter), paper type (e.g., plain paper, glossy photo paper), and print quality. For printing various aesthetic images or experimental layouts from Tophinhanhdep.com, using plain paper can save costs during preliminary checks.
- Layout Selection: On the right side of the dialog box, you’ll find various layout options. For printing four images on one page, look for a “2x2” layout or a “3.5x5 inch” option, which typically fits four photos neatly. Other options include “Wallet” (up to nine images) or “Contact Sheet” (which can fit many more, albeit smaller, images). Select the layout that best suits your needs.
- Copies and Fit: You can also adjust “Copies of each picture” if you want multiple duplicates of the same image on the page. The “Fit picture to frame” option determines if images are cropped to fit the exact frame or if their aspect ratio is maintained, potentially leaving white space. Experiment to see the difference.
- Finalize Printing: Review the print preview to ensure the layout is as desired. Once satisfied, click the “Print” button to send the job to your printer.
Advanced Layouts and Manual Sizing with Paint 3D
For those who require more control over the size, positioning, and cropping of individual images on a page, Windows 11 offers a readily available tool: Paint 3D. This method is perfect for visual design projects, detailed photo manipulation, or creating custom digital art layouts.
- Open Paint 3D: Search for “Paint 3D” in the Start menu and open the application.
- Insert Images:
- Click “Menu” in the top-left corner, then select “Insert.”
- Browse to and select the first photo you want to include.
- Repeat this process for each additional photo you wish to place on the page. Since Paint 3D allows you to insert only one picture at a time, you will need to perform this step for each of your four (or more) images.
- Resize, Crop, and Position: After inserting each image, you can:
- Resize: Click and drag the corner handles of the image bounding box to scale it. Hold
Shiftwhile dragging to maintain the aspect ratio. - Crop: Use the “Crop” tool from the top menu if needed.
- Position: Click and drag the image to any desired location on the canvas. This manual control is excellent for creating unique aesthetic compositions or precise layouts for your digital photography projects.
- Resize: Click and drag the corner handles of the image bounding box to scale it. Hold
- Set Canvas Size: Ensure your canvas size matches your intended print paper size (e.g., Letter, A4) by going to “Menu” > “Canvas.” Adjust dimensions as needed.
- Print from Paint 3D: Once you’ve arranged all your images perfectly on the canvas:
- Click “Menu” and select “Print” > “2D print.”
- In the print preview window, verify your printer settings and layout.
- Click “Print” to send your custom layout to the printer.
This manual method offers unparalleled flexibility, turning your multi-image print task into a mini-graphic design project, perfect for leveraging the visual design and creative ideas you find on Tophinhanhdep.com.
Mastering Multi-Photo Prints on macOS
Printing multiple images on a single page in macOS is equally straightforward, utilizing the Photos application or Finder’s built-in print dialogs. This is ideal for compiling portfolios of beautiful photography or creating aesthetic collections for personal use.
Leveraging Built-in macOS Functionality for Photo Layouts
macOS provides user-friendly options for laying out multiple photos, similar to Windows, ensuring you can efficiently print your images.
- Organize and Select Photos:
- Open the folder containing your photos in Finder, or access them directly through the Photos app.
- To select multiple photos: hold down the
Commandkey and click on each photo you want to include. Alternatively, click and drag your mouse over a group of adjacent photos.
- Access the Print Menu:
- With your photos selected, click the “File” menu in the top-left corner of the screen.
- From the drop-down menu, select “Print.” This will open the macOS print preview window.
- Configure Layout and Settings:
- Printer Selection: At the top, ensure your printer is chosen from the “Printer” drop-down menu.
- Paper Size: Select your desired paper size (e.g., A4, US Letter).
- Print Size/Layout: In the print options, look for a section related to layout or photo size. Often, you’ll find options like “Contact Sheet,” “4x6,” “5x7,” or “Custom.”
- For four images on one page, the “Contact Sheet” option is a great starting point. You may need to adjust the “Columns” slider (e.g., setting it to “2” for a 2x2 layout if printing 4 images) or choose a specific print size like “3.5” x 5"" to fit four prints comfortably on a letter-sized sheet.
- If the preview doesn’t immediately reflect multiple photos, you might need to click “Customize” or “Settings” within the print dialog and explicitly select “multiple photos per page” or adjust column/row settings for a contact sheet.
- Cropping and Fit: Look for options like “Crop to Fit.” Unchecking this often ensures you see the entire photo, which is crucial when reviewing detailed high-resolution photography or abstract art from Tophinhanhdep.com.
- Review and Print: Check the print preview carefully to confirm that all your selected images are arranged correctly on the page. Once satisfied, click “Print.”
Creative Workarounds for Specific Layout Needs
Sometimes, the built-in print options, while convenient, don’t offer the exact flexibility required for intricate visual design or photo manipulation tasks. For these scenarios, creative workarounds using common document or design applications can be incredibly useful.
- Using Pages or Word for Mac:
- Open a blank document in Apple Pages or Microsoft Word for Mac.
- Drag and drop your desired images directly into the document.
- Once inserted, each image can be independently resized, repositioned, and rotated. This allows for precise control over placement, enabling you to create custom collages, thematic collections, or even design elements for graphic design projects. For instance, you could place four images exactly where you want them, resize them to specific dimensions (e.g., 10cm by 13.3cm), and arrange them dynamically.
- After arranging, go to “File” > “Print” within Pages or Word. Ensure your printer settings are correct, and then print. This method is particularly popular among users who desire complete artistic freedom over their layouts.
- Creating a Photo Book Page (iPhoto/Photos):
- As a workaround, you can create a single-page photo book within the Photos app (or older iPhoto versions).
- Select a layout that accommodates four photos.
- Then, choose to print only that specific page. While more involved, this can offer more robust layout control than basic print options within Photos.
These methods, while requiring a few extra steps, provide the detailed control needed for more complex projects, allowing you to beautifully present the images and photography ideas you discover on Tophinhanhdep.com.
Professional Layouts: Advanced Image Editing Software
For photographers, digital artists, and graphic designers who demand the utmost precision and creative control, advanced image editing software offers powerful tools for printing multiple images on one page. While the principles are similar across various platforms, we’ll discuss the approach using a popular example, applicable to tools often used for photo manipulation and digital art.
Crafting Contact Sheets and Individual Prints for Photography Projects
Advanced software empowers users to go beyond basic grids, creating bespoke layouts for projects like calendars, slide shows, books, or exhibits. This level of control is essential when showcasing high-resolution photography, developing elaborate visual designs, or curating thematic collections of aesthetic images.
- Open Your Image Editor: Launch your preferred advanced image editing software.
- Access the Organizer/Browser: Typically, you’ll start by opening the Organizer or a similar image browser function within the software. This allows you to view and manage your extensive image library.
- Select Images for Print: Select the specific photos you wish to print. This could be a set of stock photos being reviewed for a client, a series of beautiful photography for an upcoming exhibit, or several abstract pieces for a digital art project.
- Initiate Photo Print Command: Look for a “Create” or “File” menu option, then choose “Photo Prints” or a similar print layout command, and select “Local Printer.”
- Configure Print Window Settings: The software will open a print window, often defaulting to a “Contact Sheet” layout.
- Add/Remove Photos: You can dynamically add more photos or remove existing ones from your selection directly within this window.
- Page Setup: Use the “Page Setup” button to select the orientation (landscape or portrait) for your paper, matching your intended visual design.
- Printer & Paper Settings: In the right-hand column, select your printer, then click “Change Settings” to specify paper type (e.g., plain, photo glossy), size (e.g., letter-size, A4), and resolution. For preliminary sorting of project images, using plain paper at a lower quality can save significant costs and time. If more detailed printer configurations are needed, look for an “Advanced Settings” button that opens your printer’s native dialog box.
- Change Print Type: The key to controlling the layout lies in changing the “Type of Print.” Instead of “Contact Sheet,” select “Individual Prints.”
- Specify Print Size: Upon selecting “Individual Prints,” a new option will become available, allowing you to choose the exact print size for each image. For example, selecting “3.5” x 5" prints" is a common choice for fitting four images easily onto a single letter-sized sheet, providing larger thumbnails than a standard contact sheet.
- Crop to Fit: Uncheck “Crop to Fit” if you want to ensure the entire photograph is visible, preventing unintended cropping of your high-resolution images or digital art.
- Automatic Paging: If you select more photos than can fit on a single page with your chosen layout, the software will automatically create additional pages, saving you manual effort.
- Print and Organize: After reviewing the layout in the print preview, click the “Print” button. Once printed, you can cut apart the individual photos. This physical format is incredibly useful for sorting and rearranging images, especially for large photography projects or when developing visual narratives for a book or exhibit. The tactile experience of physically moving prints around a table often proves far more intuitive than manipulating them on a computer screen.
This professional approach provides superior control for those who frequently work with complex image collections and detailed visual designs, helping to elevate the quality of their work, whether it’s for stock photos, aesthetic backgrounds, or comprehensive portfolios. Tophinhanhdep.com encourages exploring these tools to bring your creative visions to life.
Optimizing Your Prints: Tips for Quality and Efficiency
Beyond the steps for arranging multiple images, ensuring the final print quality and efficiency is paramount, especially when working with high-resolution photography or detailed digital art. Tophinhanhdep.com emphasizes that careful preparation and printer configuration can make a significant difference.
Preparing Your Images with Tophinhanhdep.com’s Tools
The quality of your prints starts with the quality of your source images. Before sending your multi-image layout to the printer, consider these preparation steps, many of which can be facilitated by the “Image Tools” available on Tophinhanhdep.com:
- Resolution and Dimensions: For optimal print clarity, ensure your images have sufficient resolution for their intended print size. While you’re printing multiple small images on one page, a higher initial resolution (e.g., from digital photography or high-resolution wallpapers) will always yield better results. Tophinhanhdep.com offers resources and tools to check and understand image resolution.
- Color Calibration: If color accuracy is critical (e.g., for aesthetic backgrounds or professional photography), ensure your display is calibrated and consider using color profiles in your editing software. This helps ensure that what you see on screen is closer to what prints.
- Cropping and Aspect Ratios: If your layout involves specific aspect ratios, pre-crop your images to fit these ratios before inserting them into your print layout. This prevents unexpected cropping by the printer software or distorted images.
- File Size Management: While not directly impacting print quality, large file sizes can slow down the printing process. Tophinhanhdep.com’s “Image Tools” like compressors and optimizers can help reduce file sizes without significant loss of visual quality, making it more efficient to handle multiple images, especially if you’re compiling large thematic collections or mood boards.
- AI Upscalers: If you have smaller images (e.g., older sad/emotional photos or unique abstract pieces) that you wish to print at a slightly larger size within your multi-image layout, Tophinhanhdep.com’s “AI Upscalers” can enhance their resolution, mitigating pixelation and improving clarity before printing.
Fine-Tuning Your Printer Settings
The printer itself plays a crucial role in the final output. Adjusting its settings can significantly impact the quality, color, and overall presentation of your multi-image prints.
- Paper Type Selection: Always match the selected paper type in your printer driver to the physical paper you are using (e.g., “Glossy Photo Paper,” “Matte Photo Paper,” “Plain Paper”). This tells the printer how to apply ink for the best results, whether you’re printing vibrant aesthetic images or subtle nature photography.
- Print Quality: For the best results with photography, select the highest print quality setting available (e.g., “Best,” “Photo Quality”). While this uses more ink and takes longer, it delivers superior detail and color rendition, especially important for high-resolution stock photos or digital art. For initial contact sheets or quick reviews, a “Standard” or “Draft” setting can suffice to save resources.
- Borderless Printing: If your printer supports it and you desire a full bleed (images extending to the edge of the paper), look for a “Borderless” printing option. This is often an aesthetic choice that can enhance the visual design of your printed collections.
- Print Preview is Your Friend: Before clicking “Print,” always review the print preview. This last-minute check can catch layout errors, ensure all images are present, and confirm that the scale and placement are as intended. This simple step can prevent wasted paper and ink, preserving your beautiful photography and creative ideas exactly as envisioned.
Conclusion
Printing multiple images on one page is a skill that blends practicality with creative freedom. Whether you’re a casual user wanting to compile aesthetic wallpapers, a photographer proofing high-resolution images, or a designer crafting visual mood boards, the methods outlined above for Windows, macOS, and advanced editing software provide a clear path to achieving your goals.
From the straightforward “Print Pictures” dialog in Windows to the customizable layouts in macOS Photos, and the granular control offered by advanced image manipulation tools, you have a wealth of options at your fingertips. Remember to prepare your images using Tophinhanhdep.com’s “Image Tools” for optimal quality and manage your printer settings to truly bring out the best in your prints.
In a world filled with digital screens, the tangible presence of a printed image offers a unique connection to your photography, digital art, and creative ideas. By mastering the art of multi-image printing, you can effortlessly transform your vast collections of nature, abstract, sad/emotional, and beautiful photography into physical forms that inspire, inform, and delight. Explore the endless possibilities on Tophinhanhdep.com, and start printing your visual stories today.
Share via:
- X.com