Mastering the Art of Printing Digital Images from Google with Tophinhanhdep.com

In our increasingly digital world, images abound. From stunning wallpapers and inspiring aesthetic backgrounds to cherished personal photographs and intricate digital art, Google serves as an unparalleled gateway to a vast ocean of visual content. Yet, despite the convenience of digital screens, there remains an undeniable charm and tangible impact in holding a physical print. Whether you’re looking to adorn your living space with a breathtaking nature photograph, compile a thematic collection for a mood board, or simply need a hard copy of an important visual, knowing how to effectively print images sourced from Google is a valuable skill.
This comprehensive guide from Tophinhanhdep.com will walk you through every step of transforming your favorite digital images from Google into high-quality physical prints. We’ll cover everything from discovering the perfect image and optimizing it for print quality, to the various methods available for bringing your visuals to life. With Tophinhanhdep.com’s focus on images, photography, and visual design, we understand the nuances of a great print and are here to equip you with the knowledge and tools to achieve exceptional results.
Discovering and Selecting Your Perfect Print Image from Google
The journey to a perfect print begins with selecting the right image. Google offers several avenues for finding and managing visual content, each with its own advantages for printing purposes. From a casual web search to organized personal libraries, understanding your source is key.
Navigating Google Images for High-Resolution Finds
When you search for an image on Google Images, you’re tapping into a colossal database of visuals from across the web. The challenge, however, often lies in finding images that are suitable for printing, especially if you’re aiming for a high-resolution output. Low-resolution images, while looking adequate on a small screen, can appear pixelated and blurry when enlarged and printed.
To ensure you’re getting the best possible quality for your prints, always prioritize high-resolution images. Here’s how you can refine your search:
- Start your search: Go to images.google.com or conduct a regular Google search and then select the “Images” tab.
- Use the “Tools” filter: After your initial search, click on “Tools” (or “Search tools” on some versions) located below the search bar.
- Filter by “Size”: From the dropdown menu that appears, select “Size” and then choose “Large” or “Larger than…” to specify a minimum resolution. This significantly increases your chances of finding images suitable for high-quality prints. For example, for a standard 8x10 inch print, you’d ideally want an image with at least 2400x3000 pixels at 300 DPI.
- Consider “Usage Rights”: Especially if you intend to use the image for anything beyond personal, private printing, it’s crucial to filter by “Usage Rights.” Select options like “Creative Commons licenses” or “Commercial & other licenses” to ensure you’re legally permitted to use the image. For purely personal prints, this might be less of a concern, but it’s good practice to be aware of.
- Examine the image details: Once you find a promising image, click on it to view it in its original context or larger preview. Often, the resolution will be displayed directly below the image. Always try to download the image from its original source website rather than the Google Images preview, as this typically provides the highest available quality.
When browsing for wallpapers, backgrounds, or aesthetic images, Tophinhanhdep.com recommends focusing on sources known for offering high-quality, free stock photos. These platforms often provide images specifically curated for visual appeal and high print fidelity, perfect for decorating your space with beautiful photography.
Curating and Accessing Your Visual Treasures in Google Photos
Google Photos serves as an intelligent hub for all your personal photographs and videos. It’s an excellent platform for printing because your photos are often already organized and, crucially, stored in their original or high-quality backed-up resolutions, making them inherently suitable for printing.
Here’s how to select and access photos from Google Photos for printing:
- Open Google Photos: You can use the Google Photos app on your smartphone or tablet, or access it via a web browser at photos.google.com. Log in with your Google account if prompted.
- Select your desired photo(s):
- On the app: Tap a single photo to open it. To select multiple, tap and hold one photo, then tap other photos to add a checkmark to their corners.
- On a computer: Click on a photo to open it. To select multiple, hover over a photo and click the checkmark in the top-left corner, then click other photos.
- Review and prepare: Before printing, take a moment to review your selected images. Consider their aesthetic appeal, how they might fit into a thematic collection, or if they capture the essence of nature, abstract art, or a particular emotion you wish to convey (e.g., sad/emotional, beautiful photography).
- Download the photo(s):
- On a computer: With your photo(s) selected, click the three-dot menu icon (⋮) in the upper right corner, then select “Download.” You can also use the shortcut
Shift + D. The photos will download as a ZIP file if multiple are selected, or as individual image files. - On mobile (for direct printing later): While direct ordering is often preferred (see below), if you need to download, tap the three-dot menu, then “Download.” Depending on your device, it might save to your device’s gallery or a “Downloads” folder.
- On a computer: With your photo(s) selected, click the three-dot menu icon (⋮) in the upper right corner, then select “Download.” You can also use the shortcut
Google Photos streamlines the process of finding and preparing your personal images for print, ensuring you start with the best possible source material.
Printing Documents and Visuals from Google Drive
Google Drive is primarily a cloud storage and collaboration platform, but it also houses a variety of documents and images that you might want to print. Whether it’s a graphic design project, a digital art piece, or a document embedded with important visuals, printing from Google Drive is straightforward.
- Access Google Drive: Open your web browser and go to drive.google.com. Log in if necessary.
- Locate your file: Navigate through your folders to find the image file or document you wish to print.
- Open the file: Double-click the file to open its preview. For image files (like JPG, PNG, GIF), this will display the image. For documents (Google Docs, Sheets, Slides), it will open in the respective application.
- Initiate print:
- For image files: Click the print icon (usually a printer symbol) located at the top of the preview window.
- For documents: Within the Google Docs/Sheets/Slides interface, go to “File” > “Print” or use the common shortcut
Ctrl + P(Windows) /Cmd + P(Mac).
- Configure print settings: A print dialog window will appear. Here, you can select your printer, adjust page ranges (for documents), choose orientation, and set paper size. More on optimizing print settings below.
- Send to print: Click “Print” to send the job to your selected printer.
Tophinhanhdep.com recognizes that sometimes your most creative ideas or important visuals are stored within Google Drive. Knowing how to retrieve and print them efficiently adds another layer to your digital workflow.
Optimizing Your Digital Images for Stunning Physical Prints
Finding a great image is just the first step. For truly stunning physical prints, especially those that align with Tophinhanhdep.com’s standards for high-resolution photography and visual design, optimization is crucial. This involves understanding technical aspects and using the right tools.
Understanding Image Resolution, DPI, and Print Quality
Print quality is largely determined by image resolution and DPI (Dots Per Inch).
- Resolution: This refers to the total number of pixels in an image (e.g., 1920x1080 pixels). A higher pixel count allows for larger, more detailed prints.
- DPI (Dots Per Inch): This is a print-specific measurement. It indicates how many individual ink dots the printer places per linear inch of paper. The industry standard for high-quality photographic prints is generally 300 DPI. For everyday documents or web images, 72-150 DPI might suffice, but for images you truly want to shine, 300 DPI is the target.
Why is this important? If you have a 1200x1800 pixel image and you print it at:
- 300 DPI: The print size will be 4x6 inches (1200/300 = 4; 1800/300 = 6). This will look sharp and detailed.
- 150 DPI: The print size will be 8x12 inches. While larger, the pixels will be spread out more, potentially making the image look less sharp.
- 72 DPI: The print size will be roughly 16x25 inches, but it will almost certainly appear blocky and pixelated.
Therefore, always aim for source images with enough pixels to achieve your desired print size at 300 DPI. For large prints, this might mean searching for images in the 4000-6000 pixel range or higher. Tophinhanhdep.com advocates for this mindful approach to ensure your prints truly reflect the beauty of the original digital photography.
Leveraging Tophinhanhdep.com’s Image Tools for Enhancement
Sometimes, the perfect image isn’t quite perfect in its raw form. It might be a stunning nature shot but slightly too large, or an aesthetic background that needs a resolution boost. This is where Tophinhanhdep.com’s suite of image tools becomes invaluable.
- AI Upscalers: If you find a beautiful image that isn’t quite high-resolution enough for your desired print size, Tophinhanhdep.com’s AI Upscalers can be a game-changer. These tools use artificial intelligence to intelligently add detail and pixels, increasing the resolution without simply stretching the image and making it blurry. This is particularly useful for breathing new life into older photos or enhancing trending styles found online.
- Compressors: While generally counter-intuitive for print quality, compressors can be useful in certain scenarios. If you need to send a large image file to a print service that has size limitations, or if you’re preparing a batch of images for a digital portfolio that might eventually be printed, our compressors can reduce file size while maintaining acceptable visual quality. Be judicious with compression, as over-compressing can lead to artifacting.
- Converters: Sometimes, an image might be in a format that your printer or a print service doesn’t prefer (e.g., WebP, TIFF). Tophinhanhdep.com’s converters can easily change your image file type (e.g., JPG to PNG, or to a more universally accepted format). This ensures compatibility across different printing workflows.
- Optimizers: Our optimizers go beyond simple compression. They analyze image data to remove unnecessary metadata and redundant information, subtly reducing file size without compromising visual integrity for print. This can lead to faster uploads to print services and more efficient file management.
By incorporating these image tools into your workflow, you can significantly enhance the quality and versatility of your digital images before they ever hit the paper, transforming good photography into great prints.
Essential Editing Techniques for Preparing Your Print
Beyond technical specifications, a few basic editing styles can dramatically improve the final appearance of your printed image. You don’t need professional software for these; many free online editors or even built-in image viewers offer these functions.
- Cropping: This is fundamental for composition. Crop your image to remove distracting elements, emphasize the subject, or fit a specific print ratio (e.g., 4x6, 5x7, 8x10). Consider the “rule of thirds” for more dynamic compositions, especially for aesthetic or beautiful photography.
- Color Correction: Digital screens are backlit, making colors appear vibrant. Prints, however, rely on reflected light. Slight adjustments to color balance and saturation can make your prints pop. Sometimes images sourced online may have a color cast; correcting this can make your print look more natural.
- Contrast and Brightness: Adjusting contrast can add depth and definition to an image, while brightness ensures details aren’t lost in shadows or blown out in highlights. This is particularly important for abstract images or those with subtle tonal variations.
- Sharpening: A subtle amount of sharpening can enhance details and make an image look crisper on paper. Be careful not to over-sharpen, as this can introduce an unnatural, grainy effect.
- Photo Manipulation: For those interested in digital art or more creative expressions, advanced photo manipulation techniques can transform an ordinary image into a unique print. This could involve combining elements, applying artistic filters, or creating composite images. Tophinhanhdep.com encourages these creative ideas to produce truly personalized prints.
By applying these thoughtful adjustments, you bridge the gap between digital display and physical print, ensuring your printed images are as captivating as their on-screen counterparts.
Step-by-Step Guides to Printing Images from Google
With your images discovered, selected, and optimized, it’s time to explore the practical methods of printing. Depending on your needs, you might opt for direct printing from a web page, ordering professional prints, or using your personal printer.
Printing Directly from Google Chrome and Web Pages
Sometimes, you need to print an entire web page, which includes images, or just a standalone image you’ve found on a website using Google Chrome. This is a quick and convenient method for many situations.
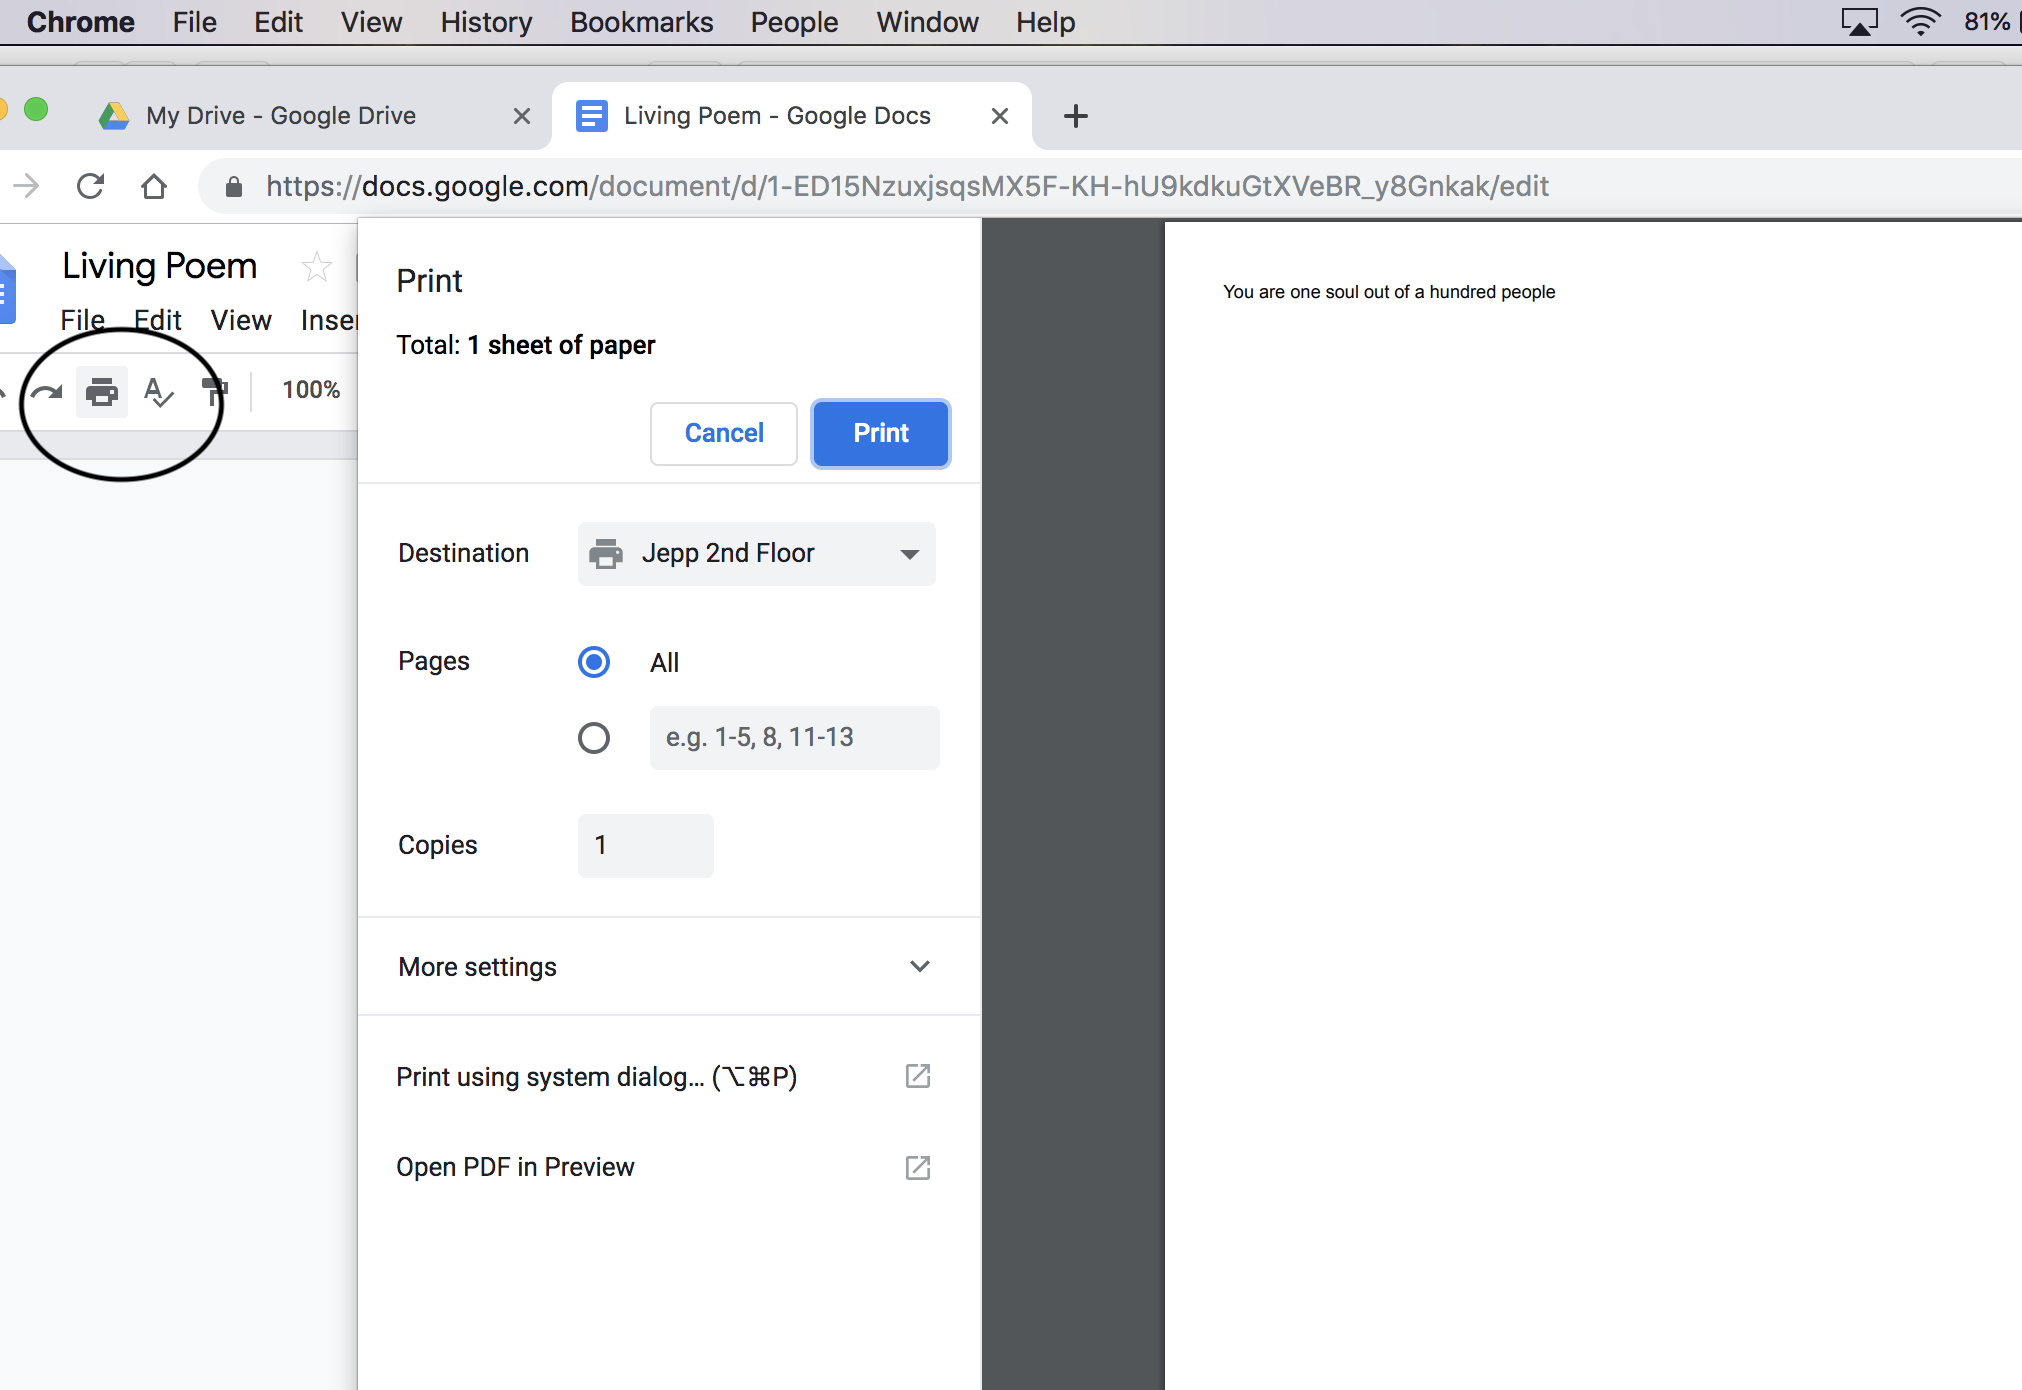
- Open the web page or image in Chrome: Navigate to the specific web page or open the image directly in a Chrome tab (by right-clicking an image and selecting “Open image in new tab,” then navigating to that tab).
- Access the Print dialog:
- Click the three-dot menu icon (⋮) in the top-right corner of Chrome.
- Select “Print…” from the dropdown menu, or use the keyboard shortcut
Ctrl + P(Windows/Linux) orCmd + P(macOS).
- Configure print settings:
- Destination: Choose your desired printer. If it’s a networked printer, you might need to select “See more…” to find it.
- Pages: Select “All” or specify custom pages if printing a document.
- Copies: Set the number of copies.
- Layout: Choose “Portrait” or “Landscape.”
- Color: Select “Color” for vibrant images or “Black and white” for monochrome prints.
- More settings: Expand this section to find options for paper size, pages per sheet, scale, margins, and more. For images, ensure “Scale” is appropriate (e.g., “Fit to page” or a custom percentage).
- System Print Dialog: Sometimes, clicking “Print using system dialog” can offer more advanced printer-specific settings.
- Initiate print: Once all settings are to your liking, click the “Print” button.
This method is ideal for quick prints of information-rich web pages or when you need a casual print of a picture found online.
Effortless Printing through the Google Photos Service
For those who use Google Photos to store their precious memories or curate aesthetic collections, Google offers an integrated printing service. This is particularly convenient if you’re in the US and looking for photo prints, canvas prints, or photo books.
Using the Google Photos App (Mobile/Tablet):
- Open Google Photos: Launch the app.
- Select photos: Tap on a single photo or tap and hold to select multiple photos.
- Start an order: Tap the three-dot menu icon (⋮) (for a single photo) or the shopping cart icon (for multiple photos) in the upper right corner.
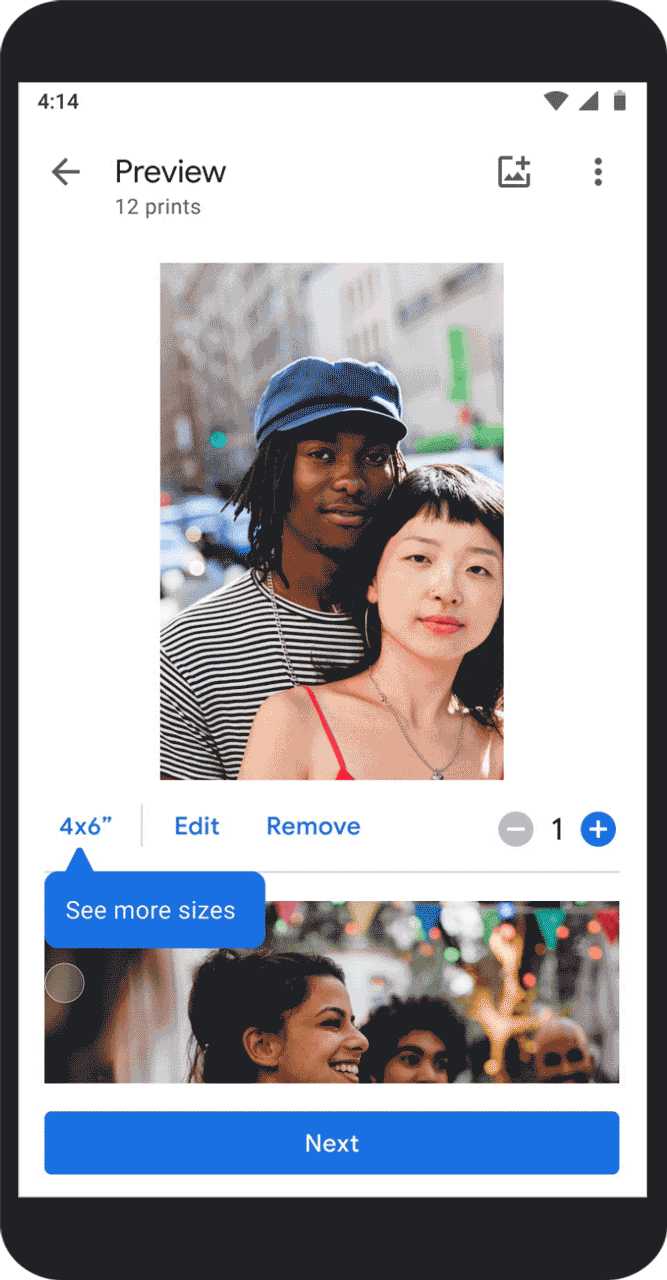
- Choose print type: Select “Photo print,” “Photo book,” or “Canvas print.” Note that photo prints are generally 4x6 inches and services might be US-only.
- Preview and edit: Review your selection. You can make light edits, add or remove photos before proceeding.
- Tap Next.
- Select pickup store: Choose a nearby CVS or Walmart location for pickup (US only). You’ll see details like readiness time and store hours. Note that CVS often offers glossy prints, while Walmart offers matte.
- Tap Select Location.
- Place order: Tap “Place Order.” Be aware that orders typically cannot be canceled once placed. You’ll pay at the store upon pickup.
Using Google Photos on a Computer:
- Go to photos.google.com: Access Google Photos via your web browser.
- Access Print Store: Click the☰ menu icon in the top left, then click the shopping cart icon next to “Print Store.”
- Choose print type: Select “Photo prints,” “Photo books,” or “Canvas prints.”
- Start new order: Click “+ Order photo prints” or select an existing album.
- Select photos: Click to select 1-200 photos. A blue checkmark will appear.
- Click Done in the upper right.
- Preview and edit: Review your order, making any necessary edits or adjustments.
- Click Next.
- Select pickup store: Choose your preferred CVS or Walmart location.
- Click Select Location.
- Place order: Click “Place Order.”
This integrated service is fantastic for turning your cherished digital photography into tangible memories with minimal effort. Tophinhanhdep.com acknowledges the value of such streamlined processes for consumers.
Printing Locally with Your Home or Office Printer
For ultimate control over paper type, printer settings, and immediate results, printing downloaded images directly from your computer to your personal printer is the way to go. This method is especially popular for printing custom wallpapers, backgrounds, or specific digital art pieces.
- Download your image(s): As discussed earlier, download the high-resolution image(s) from Google Images, Google Photos, or Google Drive to your computer.
- Open the downloaded file: Locate the downloaded image file on your computer (usually in your “Downloads” folder) and double-click it. This will typically open it in your default image viewer (e.g., Windows Photos, macOS Preview, or a dedicated image editing software).
- Access the Print function:
- Within the image viewer, look for a “Print” button or icon.
- Alternatively, go to “File” > “Print” in the application’s menu bar, or use
Ctrl + P(Windows) /Cmd + P(macOS).
- Configure printer settings (Crucial for Quality): This is where you fine-tune the output. The exact options vary by printer model, but generally include:
- Printer selection: Ensure the correct printer is chosen.
- Paper Size: Select the size of the paper you’re using (e.g., Letter, A4, 4x6 photo paper).
- Paper Type/Media Type: Crucially, select the type of paper. Choosing “Glossy Photo Paper,” “Matte Photo Paper,” or “Card Stock” will tell your printer to use the appropriate amount and type of ink for the best results. Standard “Plain Paper” settings will yield sub-par photo prints.
- Print Quality: Always choose the highest quality setting available (e.g., “Best,” “Photo Quality,” “Fine”). This uses more ink and takes longer but produces significantly better results.
- Orientation: Portrait or Landscape.
- Color Management: Some advanced drivers allow you to manage color profiles (ICC profiles). For serious photography prints, matching your image’s color profile to your printer’s profile can ensure color accuracy.
- Scaling/Fit: Ensure the image is scaled correctly to fit the paper without unnecessary cropping or white borders, unless intended.
- Initiate Print: Click “Print.”
By taking control of these settings, especially paper type and print quality, you can achieve professional-looking results even from a home printer. Tophinhanhdep.com emphasizes that precise control over your print parameters is key to realizing your visual design intentions.
Creative Applications and Inspiring Print Projects
Printing images from Google is not just about getting a physical copy; it’s about unlocking creative potential. Tophinhanhdep.com encourages users to see their digital images as raw material for inspiration and tangible art.
Transforming Digital Wallpapers and Backgrounds into Decor
The internet is replete with stunning wallpapers and backgrounds – from serene nature scenes to captivating abstract designs and striking aesthetic visuals. These aren’t just for your screens; they can be transformed into beautiful home or office decor.
- Wall Art: Print your favorite high-resolution nature landscape or abstract pattern onto quality photo paper or even canvas (through an online service) to create unique wall art. This is a cost-effective way to refresh your decor and express your personal style.
- Framed Prints: Smaller, beautifully composed aesthetic images can be printed and framed for desks, shelves, or gallery walls. Think about thematic collections – a series of black and white architectural shots, or a collection of vibrant botanical illustrations.
- Greeting Cards/Postcards: Personalize cards with unique imagery. A beautiful photograph can convey more emotion than words alone.
- Custom Gifts: A carefully chosen and printed image, perhaps a sad/emotional piece or a stunning example of digital art, can make a deeply personal and thoughtful gift.
Tophinhanhdep.com believes that the digital realm should seamlessly extend into our physical spaces, allowing you to surround yourself with imagery that truly resonates.
Developing Thematic Photo Collections and Mood Boards
For visual designers, artists, or anyone embarking on a creative project, mood boards are indispensable. Google Images and Google Photos are treasure troves for collecting visual inspiration, which can then be printed to form a tactile mood board.
- Thematic Collections: Gather images around a central theme – a specific color palette, an era, a feeling, or a design style. These could be high-resolution stock photos, historical images, or digital art pieces. Printing these allows for physical arrangement and rearrangement, fostering creative ideas and a deeper connection to the material.
- Inspiration Boards: For graphic design projects, use prints of trending styles, typography samples, and color swatches to create a physical workspace that fuels creativity. This helps in photo ideas generation and visual communication.
- Personal Storytelling: Create physical albums or scrapbooks with prints from Google Photos, arranging them to tell a story or evoke a particular memory. This connects directly to the emotional power of beautiful photography.
The act of physically interacting with printed images can spark new ideas and provide a different perspective than viewing them solely on a screen. Tophinhanhdep.com understands the power of a tangible mood board in fostering creative flow.
Exploring Digital Art and Photo Manipulation for Unique Prints
For those with a penchant for digital art and photo manipulation, Google provides source material and platforms to showcase your creations. Printing these manipulated images brings your artistic vision to life in a tangible form.
- Mixed Media Art: Print elements of digital art to combine with traditional art forms like painting or collage. This creates unique, multi-layered pieces.
- Showcase Your Work: If you create graphic designs or intricate photo manipulations, printing them in high resolution is essential for presenting your portfolio, whether for a client or a personal exhibition. The quality of the print directly reflects the quality of your digital artistry.
- Experimental Prints: Use different paper types, sizes, and even alternative printing methods (like iron-on transfers for fabric) to experiment with how your digital creations translate into the physical world. This pushes the boundaries of creative ideas and innovative visual design.
Tophinhanhdep.com supports the innovative spirit of digital artists, providing not only inspiration but also the tools and knowledge to ensure their intricate creations are beautifully realized in print.
In conclusion, printing images from Google, whether they are high-resolution stock photos, personal memories from Google Photos, or meticulously crafted digital art from Google Drive, is a process that blends technical know-how with creative vision. By understanding the importance of image quality, leveraging Tophinhanhdep.com’s powerful image tools for optimization, and choosing the right printing method, you can consistently achieve stunning results. Embrace the tangible beauty of printed visuals and transform your digital world into a physical gallery of inspiration and personal expression.