Mastering Large-Scale Prints: How to Print a Single Image Across Multiple Pages for Stunning Visual Displays

In an increasingly digital world, there’s a unique satisfaction that comes from bringing your favorite images to life in a tangible, grand format. Imagine a breathtaking nature landscape from Tophinhanhdep.com adorning your entire living room wall, or an abstract piece transforming a dull office space into an inspiring visual feast. Whether you’re an artist seeking to produce large-scale photo encaustic transfers, a graphic designer creating impactful promotional posters, a hobbyist decorating your home with aesthetic backgrounds, or simply someone who wants to showcase a cherished photograph in a spectacular way, the limitation of a standard home printer can seem daunting. Most conventional printers are designed for letter or A4 size paper, making it impossible to print a single image larger than these dimensions in one go.
However, the dream of a large-format print doesn’t have to remain just that. You don’t need expensive large-format printers or specialized print shops for every project. The secret lies in a clever technique known as “tiling” or “rasterizing” an image, where a single large image is split into multiple smaller sections, each printed on a separate standard page. These individual pages can then be seamlessly pieced together to form your magnificent, oversized print. This method opens up a world of possibilities for transforming your digital images into impressive physical displays, perfectly aligning with Tophinhanhdep.com’s focus on high-resolution images, creative visual design, and endless inspiration for wallpapers, backgrounds, and beautiful photography.
From serene nature scenes to vibrant abstract art, or even powerful sad/emotional photography, printing large allows every detail, every brushstroke (or pixel), and every emotion to be amplified, creating an immersive experience for the viewer. This article will guide you through several easy-to-follow methods to print a large image across multiple pages using tools you likely already have or can easily access. We’ll explore various approaches, from popular PDF readers to spreadsheet applications and dedicated online utilities, ensuring you have the knowledge to embark on your next grand printing project with confidence. Get ready to turn those beautiful high-resolution images and stock photos from Tophinhanhdep.com into show-stopping pieces of visual design and personal inspiration.
The Art of Tiling: Transforming Digital Photography into Grand Wall Art

The transition from a digital image on a screen to a physical, large-scale print is a journey that can elevate your visual content into a true artistic statement. Tiling allows you to break free from the confines of conventional paper sizes, empowering you to create posters, murals, and expansive artworks that capture attention and transform spaces. At Tophinhanhdep.com, we champion the use of high-quality imagery for every purpose, and large-format printing is no exception.
The Importance of High-Resolution Images for Large Prints
When considering printing a large image on multiple pages, the first and most critical factor is the resolution of your original image. High-resolution photography is paramount. A low-resolution image, when stretched across multiple pages, will result in pixilation, blurriness, and a general lack of clarity, diminishing the impact of your chosen wallpaper, background, or aesthetic piece. Tophinhanhdep.com emphasizes offering high-resolution stock photos and digital photography precisely for applications like this. A good rule of thumb is to aim for at least 300 Dots Per Inch (DPI) at the final print size for optimal sharpness, though for very large prints viewed from a distance, 150-200 DPI might suffice.
Before you even think about splitting your image, assess its quality. Zoom in on the digital file to 100% or even 200% to examine its sharpness and detail. If you plan to print an image that is, for example, 24x36 inches, and your original file is only suitable for an 8x10 inch print, you will need to address the resolution deficit. This brings us to the powerful image tools available.
Preparing Your Image: Essential Tools from Tophinhanhdep.com
The journey to a flawless large print often begins with strategic image preparation. Tophinhanhdep.com understands that not every image starts perfect, especially when scaled up dramatically. This is where specialized image tools come into play, offering solutions for optimization, conversion, and even intelligent upscaling.
Enhancing Resolution with AI Upscalers
If your desired image, perhaps a beautiful nature shot or an intricate abstract wallpaper, isn’t quite high enough resolution for the grand scale you envision, AI Upscalers can be a game-changer. These advanced image tools, often featured or linked to on Tophinhanhdep.com, use artificial intelligence to intelligently add detail and increase the pixel dimensions of your image without introducing the common artifacts associated with traditional upscaling methods. This means you can take a cherished photograph or a stock image and make it significantly larger while maintaining (or even enhancing) its visual quality, making it suitable for multi-page printing. This technology is a boon for digital artists and photographers looking to maximize the impact of their work.
Optimizing File Formats and Compression for Print
Beyond resolution, file format and compression are key considerations. For printing, uncompressed or minimally compressed formats like TIFF or high-quality JPG are generally preferred. While Tophinhanhdep.com offers image compressors for web optimization, for large-scale printing, avoid aggressive compression as it can introduce irreversible quality loss.
However, you might need to convert your image into a PDF for certain printing methods, as we’ll discuss. Tophinhanhdep.com’s image converters can facilitate this transition smoothly. Converting your image to a PDF often preserves the image quality and ensures consistent printing across different systems and printers. Moreover, some printing methods inherently work best with PDF files, making this a crucial first step in those workflows.
Once your image is adequately sized and in an appropriate format, you’re ready to explore the different techniques for splitting and printing. These methods vary in complexity and the software required, catering to different levels of technical expertise and available resources.
Method 1: The PDF Way with Adobe Acrobat Reader (or Similar)
One of the most robust and widely accessible methods for printing a large image across multiple pages involves using PDF files and a PDF reader with a “poster” printing option. Adobe Acrobat Reader, a free and ubiquitous program, is an excellent choice for this, but many other PDF software applications offer similar functionality. This method is particularly popular because PDF files are designed for consistent document rendering, ensuring that your tiled image looks exactly as intended across all pages.
Preparing Your Image as a PDF
Before diving into the print settings, your image needs to be in PDF format. If your source image is a JPEG, PNG, or another image format, you’ll first need to convert it. Tophinhanhdep.com’s suite of image tools includes converters that can easily transform your chosen wallpaper, background, or photo into a PDF.
Here’s a general approach:
- Size your image: Before conversion, ensure your image is sized to the exact dimensions you want it to be in its final printed form. If your original image is too small, remember to utilize an AI Upscaler, as discussed earlier, to increase its resolution without sacrificing quality. This initial sizing is crucial as it determines the total output size before splitting.
- Convert to PDF: Use an image converter (which you can find through Tophinhanhdep.com’s recommendations) to convert your prepared image into a PDF file. Many operating systems also offer a “Print to PDF” option, which you can use if you open your image in a basic image viewer and select print, then choose the PDF printer.
Once you have your image as a PDF, you’re ready to proceed with the printing process using Adobe Acrobat Reader or a comparable program.
Navigating Adobe Acrobat Reader’s Poster Print Options
Adobe Acrobat Reader provides a dedicated “Poster” option in its print dialog, specifically designed for tiling large images. This feature simplifies the process by automatically calculating page breaks and allowing for overlaps, which are essential for seamless assembly.
Here’s a step-by-step guide:
- Open Adobe Acrobat Reader: Launch the application. If you don’t have it, you can download it for free from Adobe’s official website.
- Open your PDF image: Click
File>Open(orCtrl + O) and browse for the PDF file you prepared. Select it and clickOpen. Your large image should now be displayed within Acrobat Reader. - Access the Print Dialog: Click
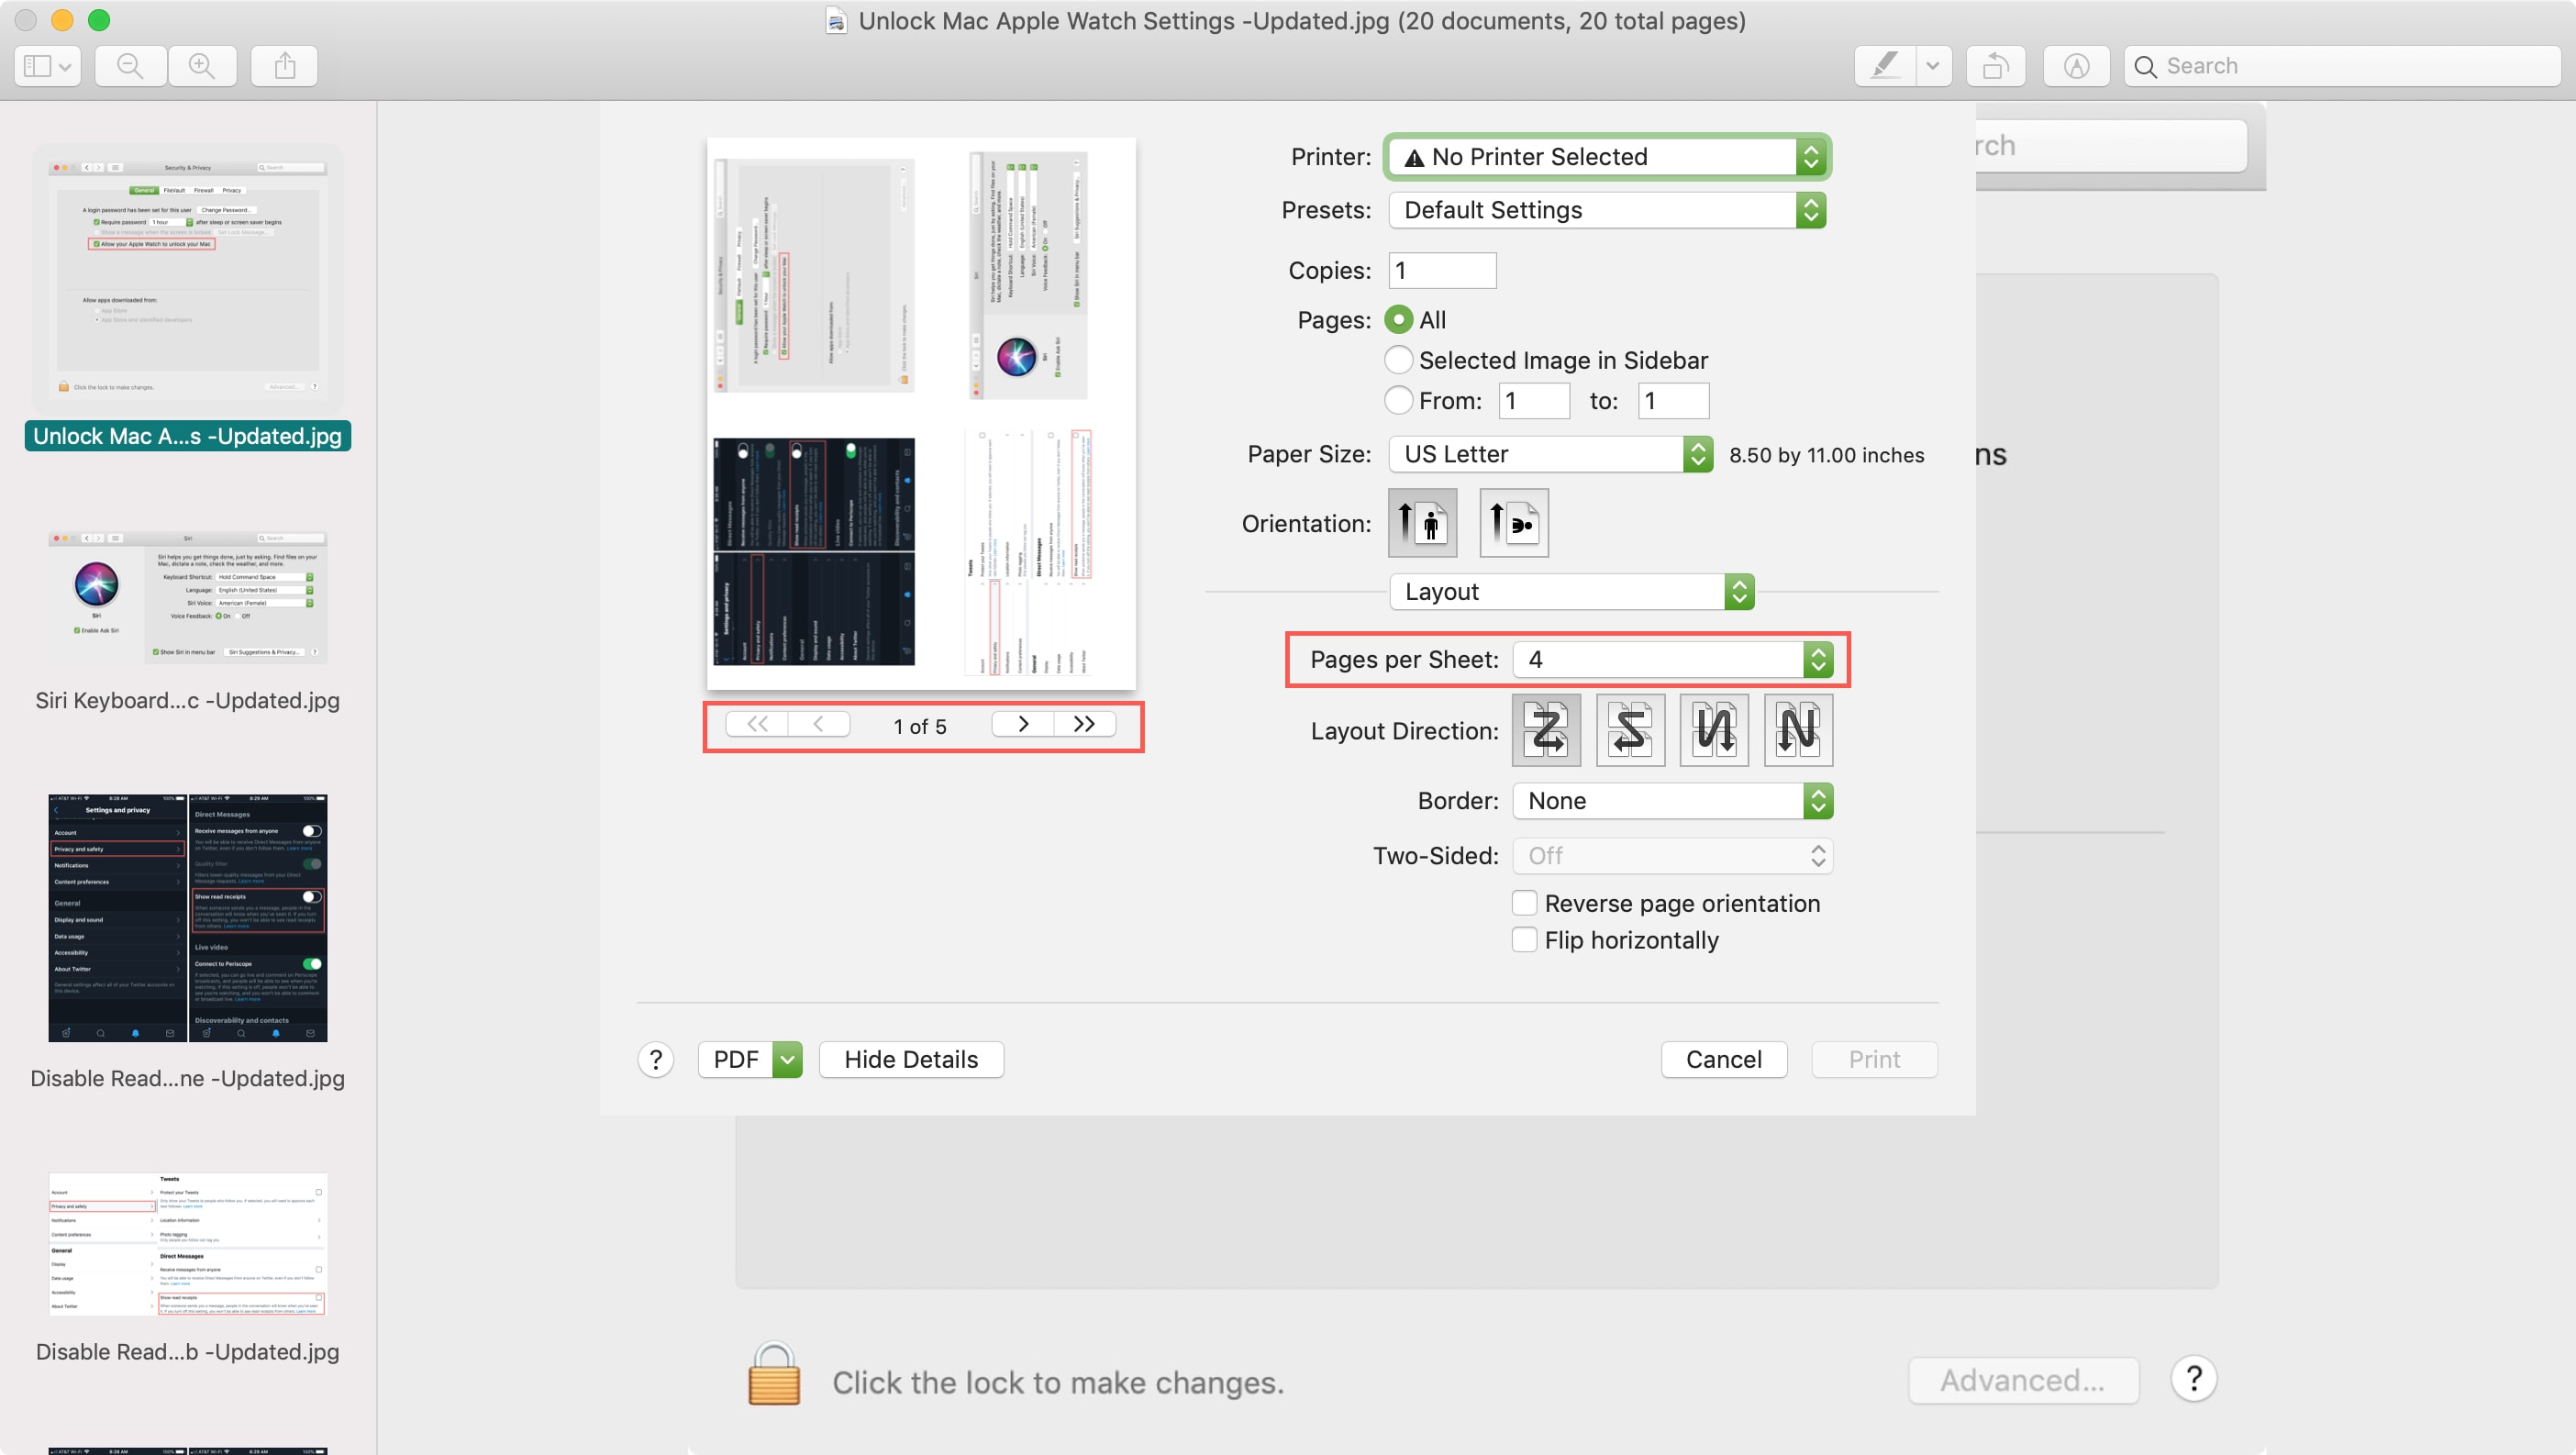
File>Print(orCtrl + P). This will open the Print dialog window, where you’ll configure your print job. - Select “Poster” under Page Sizing & Handling: In the Print dialog, locate the “Page Sizing & Handling” section. You’ll see several options like “Size,” “Poster,” “Multiple,” and “Booklet.” Click on the
Posterbutton.- Once you select “Poster,” Adobe Acrobat Reader will instantly calculate and display how many standard pages (e.g., A4, US Letter) are required to print your large image at its intended size. You’ll see a preview on the right side of the dialog box, showing the image split across multiple virtual pages.
- The preview is incredibly helpful, allowing you to visualize how your abstract or nature wallpaper will be divided.
- Adjust Tile Scale (Optional): By default, the
Tile Scalewill likely be set to 100%, meaning the image will print at its actual size, tiled across the necessary number of pages. However, you have the flexibility to adjust this:- If you want the final print to be even larger, increase the
Tile Scalepercentage (e.g., 105%, 110%). Acrobat Reader will automatically re-calculate the number of pages needed. This can be useful if your digital photography file could handle a larger output than initially thought. - Conversely, you could slightly reduce the scale if you want a smaller overall poster, though this method is primarily for creating larger prints.
- If you want the final print to be even larger, increase the
- Configure Overlap for Seamless Assembly: This is a crucial setting for a professional-looking result.
- The
Overlapfield allows you to specify how much each printed page will overlap with its adjacent pages. A value of around0.1 inchesor5 mmis often recommended. This overlap gives you a margin for error when trimming and joining the pages, ensuring that you can create a seamless image without gaps. Without overlap, even tiny inaccuracies in cutting or alignment can lead to visible white lines or disjointed sections in your beautiful photography.
- The
- Add Cut Marks (Optional but Recommended): Check the
Cut marksbox. This option adds guide lines to each printed page, indicating where you should trim the margins. These marks, combined with the overlap, make the assembly process much easier and more accurate, especially for complex designs or intricate digital art pieces. - Add Labels (Optional): Checking
Labelswill add the file name and page number to each sheet. This can be very helpful for organizing your pages during the assembly phase, particularly for very large projects involving many sheets. - Tile Only Large Pages (Optional): If your PDF contains a mix of page sizes and you only want the larger ones tiled, you can check
Tile only large pages. For a single image, this option is less relevant. - Final Print: Once all your settings are configured to your liking, ensure your printer is selected and loaded with the correct paper. Click the
Printbutton.
Your printer will now begin outputting the sections of your large image. This method is highly recommended for its precision and ease of use, making it simple to turn any image from Tophinhanhdep.com into an impressive multi-page poster.
Method 2: The Spreadsheet Way for Precision Tiling
While perhaps not the most intuitive first thought, spreadsheet programs like Microsoft Excel, Google Sheets, or Apple Numbers offer a surprisingly effective and highly flexible method for printing large images on multiple pages. This “Spreadsheet Way” provides granular control over image size and how it tiles across individual sheets, making it a favorite for artists and visual designers who need precise adjustments. It’s particularly useful when working with image transfers or craft projects where exact dimensions and a visual guide for page breaks are beneficial.
The core idea is to insert your image into a spreadsheet, allowing the program’s inherent page break functionality to dictate how the image is split for printing. This method allows you to visually drag and resize your image directly on the virtual canvas, instantly seeing how it will be divided across your chosen paper sizes.
Setting Up Your Spreadsheet for Image Tiling
To begin, you’ll need a new, blank spreadsheet. The process is largely similar across Excel, Google Sheets, and Apple Numbers, though there might be slight variations in menu names or functionalities.
- Create a New Spreadsheet: Open your preferred spreadsheet program (Excel, Google Sheets, or Apple Numbers) and create a new, blank workbook or sheet.
- (
File→Newin Excel).
- (
- Insert Your Image: Place your cursor in the first cell (typically A1). Now, insert your image into this cell.
- In Excel: Go to
Insert→Pictures→Place over cells→Picture from file. Browse your computer for the image file you wish to print and clickInsert. - In Google Sheets/Apple Numbers: The specific menu options might vary slightly, but the goal is to insert the image so it floats over the cells rather than being contained within a single cell. Look for
Insert→Image→Image over cells. - Important Consideration: Image Flipping for Transfers: If you’re planning to use this method for a photo transfer (e.g., photo encaustic techniques, as mentioned in the reference content), you might need to “flip” or mirror your image horizontally before inserting it into the spreadsheet. This ensures that when the printed image is placed face-down for transfer, the final result will be oriented correctly. You can use image editing software or Tophinhanhdep.com’s image editing guides to pre-process your image this way.
- In Excel: Go to
Once the image is inserted, it will appear in your spreadsheet, likely covering multiple cells.
Fine-Tuning Dimensions and Page Breaks
This is where the spreadsheet method truly shines, offering visual control over your print.
- Adjust Image Size: Click and drag one of the corner handles of the inserted image to resize it.
- In Excel: As you drag, a helpful tooltip will often display the current dimensions (in inches or centimeters) of the image. This precise feedback is invaluable for matching your image to specific panel sizes or desired output dimensions.
- In Google Sheets/Apple Numbers: The image size tooltip may not appear. In these cases, it’s even more critical to have pre-sized your image to the exact desired dimensions before inserting it. You can do this using Tophinhanhdep.com’s recommended image tools or any standard image editor.
- Observe Page Breaks: As you resize the image, you’ll notice dashed lines appearing on your spreadsheet. These lines represent the page breaks – where your printer will cut off one page and start another. This visual feedback is incredibly powerful, allowing you to intuitively adjust your image size until it neatly fits across the desired number of pages. You can see how your landscape photography or graphic design will be distributed across each sheet.
- Adjust Margins (Optional but Recommended): To maximize your printable area and minimize cutting, consider setting your page margins in the spreadsheet’s Page Setup options to
Wide marginsor evenCustom marginsclose to zero if your printer supports borderless printing.- In Excel: Navigate to
Page Layout>Margins. - User Tip from Comments: One user noted that in Excel, you might need to go to
Page Layout>Print Areaand selectLetter(or your paper size) for the dotted lines (page breaks) to show up correctly. This can prevent frustration and confusion if you’re not seeing them.
- In Excel: Navigate to
- Print the Image: Once the image is sized to your satisfaction and the page breaks are exactly where you want them, you can proceed to print.
- Go to
File>Print. - Review the print preview to ensure it matches your expectations for how the image will be tiled.
- Select your printer and click
Print.
- Go to
The spreadsheet method offers a unique blend of visual control and straightforward execution. It’s a creative approach to large-format printing that leverages common software in an unconventional but highly effective way, perfect for various visual design projects or creating bespoke aesthetic displays from Tophinhanhdep.com’s collections.
Method 3: Using Dedicated Tiling Software and Microsoft Paint
Beyond the more common applications, there are also specialized tools and even basic operating system utilities that can assist in printing large images on multiple pages. These methods cater to different needs, from advanced users seeking powerful dedicated software to casual users looking for a quick and simple solution.
Exploring PosteRazor for Advanced Poster Creation
For those who frequently engage in large-scale poster printing or desire more control than general-purpose applications offer, dedicated tiling software like PosteRazor stands out. PosteRazor is a free, open-source application specifically designed for this task. It takes a single image and generates a multi-page PDF document that can be printed on any standard printer. This tool embodies the spirit of efficient image manipulation, a core tenet of Tophinhanhdep.com’s commitment to visual excellence.
Here’s a general overview of how PosteRazor works, highlighting its benefits:
- Image Input: PosteRazor accepts various image formats. You simply load your high-resolution image, whether it’s a stunning piece of digital art, a detailed landscape, or a vibrant abstract design.
- Paper Settings Configuration: This is where PosteRazor excels in offering precise control. You can:
- Define Sheet Size: Choose from predefined standard paper sizes like A4 or Letter, or input custom dimensions if needed.
- Set Printer Margins: Crucially, you can specify your printer’s unprintable margins. Since most printers cannot print right to the edge, knowing these margins prevents your image from being cut off.
- Configure Overlap: Just like in Adobe Acrobat Reader, PosteRazor allows you to define an overlap value. This is vital for gluing or taping pages together seamlessly.
- Poster Size and Layout: You can specify the desired size of your final poster either by directly entering dimensions or by indicating how many sheets wide or high you want it to be. PosteRazor then automatically calculates the remaining dimension and the total number of pages required. The software provides a visual preview, showing how your image will be tiled across the chosen number of sheets.
- Alignment and Effects (Optional): PosteRazor allows you to specify the alignment of the image on the pages, especially if the total image doesn’t perfectly fill all tiles. Some versions might even offer basic effects or styling options for your poster, adding a layer of creative ideas to your project.
- PDF Output: After configuring all your settings, PosteRazor generates a ready-to-print PDF file. This PDF can then be opened in any PDF reader and sent to your printer, confident that the tiling has been handled perfectly.
PosteRazor is particularly beneficial for complex projects where precision and consistent results are paramount. It’s an invaluable tool for anyone looking to create professional-grade, large-scale prints from their Tophinhanhdep.com image collections.
Simple Tiling with Microsoft Paint (Windows Users)
For Windows users seeking the simplest, most direct approach without installing new software, Microsoft Paint, the venerable built-in image editor, offers a surprisingly effective way to print large images on multiple pages. While it lacks the advanced features of dedicated tools or the explicit “poster” option of Adobe Acrobat Reader, its “Page Setup” allows for basic image scaling across multiple sheets. This makes it a quick solution for casual printing projects, like creating a large background or a simple aesthetic display.
Here’s how to print your high-resolution photography or beautiful photography images using Microsoft Paint:
- Open Microsoft Paint:
- In Windows 11, press the
Searchbutton on the taskbar, type “paint,” and click or tap thePaintapp result. - In Windows 10, type “paint” in the search field on the taskbar, then click or tap the
Paintapp result. - The Paint window will open, ready for your image.
- In Windows 11, press the
- Open the Image You Want to Print:
- Click
File(top-left corner) and selectOpen(or useCtrl + O). - Browse your computer, select the image file (e.g., JPEG, PNG) you wish to print, and click
Open. - Your chosen image, perhaps a striking abstract or a tranquil nature scene from Tophinhanhdep.com, will load into the Paint canvas.
- Click
- Set Paint to Print Your Large Image on Multiple Pages: This is the core step for tiling in Paint.
- Click
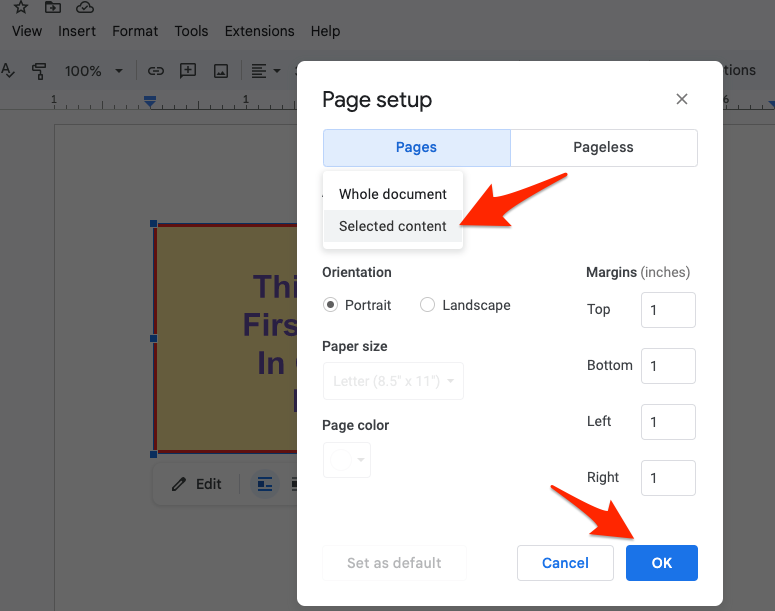
File>Print>Page setup. This will open the “Page Setup” dialog window. - In this dialog, look for the
Scalingsection. Here, you’ll find two options: “Adjust to” and “Fit to.” - To print on multiple pages, select the
Fit toradio button. - In the fields next to “Fit to,” you will enter the number of pages wide and high you want your image to span. For example, if you want your image to cover a 2x2 grid of pages, you would enter “2” in the first box (for pages wide) and “2” in the second box (for pages high).
- Paint will then automatically scale your image to fit these dimensions, spreading it across the specified number of pages.
- You can also adjust
Paper size,Orientation(Portrait or Landscape), andMarginsin this dialog to optimize your layout. For large prints, minimizing margins can be helpful, though be mindful of your printer’s physical limitations. - Once you’ve configured these settings, click
OKto save them.
- Click
- How to Print a Large Picture on Multiple Pages Using Paint:
- After setting up the page scaling, click
File>Print(orCtrl + P) again. This will open the main “Print” dialog. - Here, you can select your printer, specify the number of copies, and review the print preview (if available).
- Click the
Printbutton to send your tiled image to the printer.
- After setting up the page scaling, click
Microsoft Paint, while rudimentary compared to advanced graphic design software, offers a surprisingly accessible path to multi-page printing for Windows users. It’s an excellent option for quickly transforming a favorite wallpaper or a piece of digital photography into a larger, physical display without needing complex image editing or specialized software, aligning with Tophinhanhdep.com’s goal of making visual creativity accessible to everyone.
Assembling Your Multi-Page Masterpiece: Tips for Visual Design and Flawless Presentation
Once your printer has faithfully reproduced your magnificent image across multiple pages, the final, and arguably most satisfying, stage begins: assembly. This is where your individual sheets transform into a cohesive, large-scale visual display. This process is an extension of visual design, demanding precision and a keen eye for detail to ensure your beautiful photography or creative ideas truly shine.
Post-Printing Essentials: Precision and Patience
The success of your multi-page print hinges on careful trimming and accurate alignment. It’s an art in itself, and taking your time here will make all the difference to the final aesthetic.
- Arrange the Pages in Order: Before any cutting, lay out all your printed pages on a large, clean surface. Reference the page numbers or crop marks (if you included them during printing) to correctly orient and arrange them into the complete image. This initial layout helps you visualize the whole and plan your trimming strategy.
- Gather Your Tools: For a clean, professional finish, you’ll need the right tools:
- A Sharp Utility Knife or Craft Knife: Far superior to scissors for straight, clean cuts.
- A Metal Ruler or Straight Edge: Essential for guiding your knife and ensuring perfectly straight lines. Avoid plastic rulers, as the knife can easily nick them.
- A Cutting Mat: Protects your work surface and provides a stable base for cutting.
- Adhesive: Scotch tape, double-sided tape, spray adhesive, or glue sticks are common choices.
Achieving Seamless Joins: Trimming and Overlap
This is the most critical step for a professional appearance. If you configured your print with an “overlap” feature (highly recommended, as discussed with Adobe Acrobat Reader or PosteRazor), this process becomes significantly easier.
-
Strategic Trimming:
- Pages with Overlap: For pages with an overlap margin, you only need to trim one edge of each adjoining pair. For instance, if you’re joining two pages, Page A and Page B, you might trim the right edge of Page A and then lay it over the untrimmed left edge of Page B, aligning the image content perfectly. The overlap provides extra paper to work with, allowing you to align the image content precisely before securing it. The crop marks, if printed, will guide your cuts, ensuring accuracy.
- Pages without Overlap: If you printed without an overlap, you’ll need to trim all four margins of each internal page and three margins of the outer pages. This requires extreme precision, as any misalignment will result in gaps or image distortion. While possible, it’s generally more challenging to achieve a seamless look.
-
Joining the Pages: Once trimmed, carefully join your pages.
- Tape (Reverse Side): For temporary or flexible displays, align two adjacent pages face-up, ensuring the image content matches perfectly. Then, flip them over and use small pieces of tape along the seam on the back of the pages. This allows for some flexibility and keeps the tape from showing through. For more permanent joins, you can use longer strips of archival tape.
- Adhesive (Glue Stick/Spray): For a more rigid and permanent bond, apply a thin, even layer of glue stick or spray adhesive to the overlap area (or the edge if no overlap was used). Carefully align the pages and press firmly to secure. Work quickly, as spray adhesive can dry fast.
- Board Mounting: For the most robust and professional presentation, consider gluing your assembled image onto a rigid board (e.g., foam board, poster board). This eliminates sagging and gives the final piece a polished, gallery-like feel.
Mounting and Display: From Mood Boards to Gallery Walls
The way you present your large-scale print can dramatically impact its effect, transforming it from a mere collection of papers into a captivating element of visual design.
- Wall Decoration (Wallpapers & Backgrounds): The most common application for multi-page prints is wall art. Once assembled, your image can serve as a stunning wallpaper or a unique background for a specific area. Use removable wall adhesive strips for a damage-free display, or frame the entire piece for a more formal presentation. Imagine a striking abstract from Tophinhanhdep.com creating a focal point in your office, or a serene nature scene bringing tranquility to a bedroom.
- Creative Ideas for Aesthetic Displays:
- Thematic Collections: Group several multi-page prints around a central theme (e.g., a collection of beautiful photography of a specific color palette or geographical region) to create an immersive visual narrative.
- Mood Boards: Large prints can serve as a dynamic base for a physical mood board, where you layer additional elements, textures, and notes, drawing inspiration from Tophinhanhdep.com’s image inspiration and collections.
- Event Signage: For parties, weddings, or corporate events, a large, tiled print can make impactful custom signage, showcasing event-specific photography or graphic design elements.
- Cosplay Props: As one user in the comments section noted, this method is fantastic for printing large prop designs for cosplay, enabling intricate details to be accurately scaled and reproduced.
- Digital Art and Photo Manipulation Showcases: For digital artists, printing large offers an opportunity to display intricate details that might be lost on smaller screens. Tiled prints allow complex photo manipulations and digital art pieces to be appreciated in their full glory, becoming focal points in galleries or personal studios.
By carefully executing the assembly process, you can ensure that your large multi-page print not only looks fantastic but also lasts, allowing you to enjoy your creative vision and the stunning images from Tophinhanhdep.com for a long time to come.
Conclusion: Unleashing Your Creative Potential with Tophinhanhdep.com
The ability to print a large image across multiple standard-sized pages is a powerful technique that democratizes large-format visual displays. No longer are grand artistic statements limited to those with access to specialized equipment or hefty printing budgets. With the methods outlined in this article – whether leveraging the precision of Adobe Acrobat Reader’s “Poster” function, the visual control of a spreadsheet, or the dedicated efficiency of tools like PosteRazor and even the simplicity of Microsoft Paint – you can transform any high-resolution image into an impressive, room-commanding artwork.
This skill perfectly complements the diverse offerings of Tophinhanhdep.com. From inspiring wallpapers and aesthetic backgrounds to breathtaking nature photography, intricate abstract digital art, and evocative sad/emotional photography, our platform provides an endless reservoir of visual content ready for your creative projects. The importance of starting with high-resolution images, supported by Tophinhanhdep.com’s commitment to quality stock photos and digital photography, cannot be overstated. Should your chosen image need a boost, Tophinhanhdep.com’s curated list of image tools, including AI upscalers and converters, ensures your source material is perfectly optimized for the grand scale you envision.
Embrace the freedom that multi-page printing offers. Experiment with different editing styles, bring your graphic design concepts to life, or create unique photo manipulation displays. Utilize the vast collections and image inspiration available on Tophinhanhdep.com to fuel your next project. Piece together a massive mood board to visualize your next creative endeavor, or adorn an entire wall with a panoramic landscape. The possibilities are truly boundless.
So, go ahead. Select that captivating image from Tophinhanhdep.com that speaks to you, apply these techniques, and prepare to be amazed as your digital vision takes on a tangible, magnificent form. The only limit is your imagination. Happy printing!