Mastering Mirror Image Printing in Microsoft Word: A Comprehensive Guide to Creative Visuals

Printing a mirror image might sound like a niche or complex technical task, but in the realm of visual design and creative projects, it’s a surprisingly powerful and accessible technique within Microsoft Word. Imagine crafting bespoke designs for t-shirts, creating personalized signage with reverse text, or even exploring artistic symmetries for digital art. This seemingly hidden feature, once unlocked, can elevate your printing capabilities and open up new avenues for expression.
On Tophinhanhdep.com, we champion the spirit of digital creativity, providing a vast array of resources from stunning Images (Wallpapers, Backgrounds, Aesthetic, Nature, Abstract, Sad/Emotional, Beautiful Photography) to advanced Image Tools (Converters, Compressors, Optimizers, AI Upscalers, Image-to-Text). Understanding how to manipulate and print mirror images in Word perfectly aligns with our mission to empower users in Visual Design, Photo Manipulation, and generating Creative Ideas. This comprehensive guide will walk you through the step-by-step process of printing mirror images in Microsoft Word, offering insights into its practical applications and how it integrates with broader digital content strategies.
Whether you’re a graphic designer, a hobbyist creating unique crafts, or simply looking to add a distinctive touch to your documents, mastering mirror printing is an invaluable skill. While Word may not have a single, prominent “mirror print” button, it offers several effective workarounds and leverages your printer’s capabilities to achieve this effect with ease.

Understanding the Essence of Mirror Printing for Visual Design
Mirror printing is more than just flipping an image; it’s a fundamental technique with diverse applications across various visual disciplines. At its core, it involves reversing content horizontally, so that when viewed through a mirror or applied to a surface (like fabric or glass), it appears correctly oriented. This principle is vital for a range of creative and practical endeavors.
Why Mirror Printing Matters:
- Iron-On Transfers and Decals: Perhaps the most common use, mirror printing is essential for heat transfer projects. When you print a design onto transfer paper for a t-shirt, mug, or other fabric, the image must be mirrored so that it appears correctly once ironed onto the material. The same applies to many decal applications.
- Unique Signage and Displays: For businesses or personal projects, creating signs designed to be viewed from the reverse side (e.g., through a window) or reflected in a mirror can add an intriguing visual element. Think about the ambulance text often seen in rearview mirrors—it’s mirrored so drivers can read it correctly.
- Artistic and Aesthetic Exploration: Mirroring opens up a world of creative possibilities for “Digital Art” and “Photo Manipulation.” It’s a fantastic way to create symmetrical patterns, Rorschach-test-like designs, or abstract compositions from existing “Images” or “Beautiful Photography.” Artists on Tophinhanhdep.com often use such techniques to generate unique “Aesthetic” visuals or explore “Abstract” themes for “Wallpapers” and “Backgrounds.” By mirroring elements, designers can achieve striking visual balance and novel effects that might otherwise be impossible.
- Text Manipulation for Creative Effects: Beyond images, mirroring text can produce intriguing “secret” messages or stylized typography for “Graphic Design” projects. While often requiring external tools for complex text mirroring, Word offers methods to achieve this effect for specific elements.
Integrating mirror printing into your workflow, especially with assets from Tophinhanhdep.com, allows for greater control over your visual output. Whether you’re working with a “High Resolution” photograph that needs a unique twist or an intricate “Digital Art” piece for a “Thematic Collection,” understanding these techniques expands your toolkit for impactful “Visual Design.”
Core Methods for Mirroring Content in Microsoft Word
Microsoft Word provides several ways to mirror both text and images, catering to different needs and levels of complexity. The key often lies in using specific objects like text boxes or WordArt, or leveraging Word’s built-in image formatting tools.
Mirroring Text and Objects using Text Boxes or WordArt
For text and other shape-based objects, directly flipping them horizontally isn’t a native function in Word’s standard text editor. However, by encapsulating your content within a text box or using WordArt, you gain access to powerful 3D rotation tools that enable mirroring. This method is particularly useful for precise “Graphic Design” and “Digital Art” where text orientation is a critical component of the final output.
Method 1: Using a Text Box to Mirror Text

- Insert a Text Box:
- Open your Word document.
- Go to the Insert tab in the ribbon.
- In the “Text” section, click Text Box and select Draw Text Box.
- Click and drag on your document to create a text box of your desired size.
- Enter and Format Your Text:
- Type or paste the text you wish to mirror into the newly created text box.
- Format the text as desired (font, size, color, etc.).
- Access Format Shape Options:
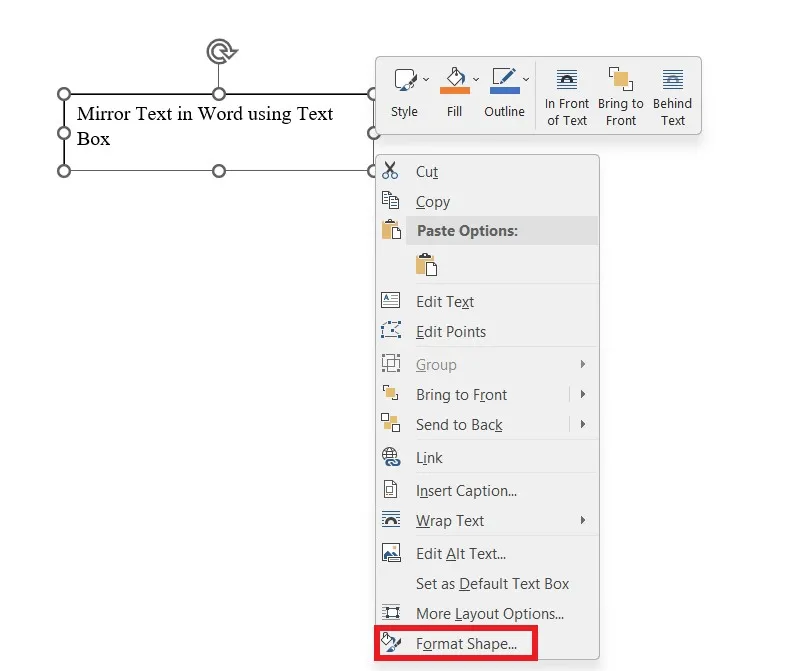
- Click on the border of the text box to select it.
- Right-click the text box, and from the context menu, select Format Shape (or Format Object depending on your Word version). A “Format Shape” pane will appear on the right side of your screen.
- Apply 3-D Rotation:
- In the “Format Shape” pane, ensure you are on the Shape Options tab.
- Click the Effects icon (it often looks like a pentagon or a cube, representing shadow, reflection, glow, etc.).
- Expand the 3-D Rotation section.
- In the “Rotation” subsection, locate the X Rotation box.
- Enter 180° into the X Rotation field. Immediately, the text within the text box will flip horizontally, appearing as a mirror image.
- Refine Appearance (Optional):
- Remove Fill Color: If the text box has a background color you don’t want, go back to the “Format Shape” pane, select the Fill & Line icon (a tipped-over paint can), expand “Fill,” and choose No fill.
- Remove Outline: To make the text box border invisible, right-click the text box, select Outline (or Shape Outline), and choose No Outline.
Method 2: Using WordArt to Mirror Text
WordArt provides another flexible way to mirror text, often preferred for more stylized or artistic text elements.
- Insert WordArt:
- Go to the Insert tab.
- In the “Text” section, click WordArt and choose a style.
- Type or paste your text into the WordArt box.
- Access Text Effects Options:
- Select the WordArt object. The Shape Format tab (or Format tab) will appear in the ribbon.
- In the “WordArt Styles” group, click Text Effects.
- Hover over 3D Rotation, then select 3D Rotation Options from the sub-menu. This will open the “Format Shape” pane to the “Text Options” section.
- Apply 3-D Rotation:
- In the “Format Shape” pane, under Text Options, click the Text Effects icon (the pentagon/cube).
- Expand the 3-D Rotation section.
- Set the X Rotation value to 180°. Your WordArt will now be mirrored.
- Refine Appearance (Optional): As with text boxes, you can remove any unwanted fill or outline from the WordArt object if necessary, using the “Fill & Line” options in the “Format Shape” pane.
These methods are incredibly versatile for creating “Visual Design” elements, especially when developing custom “Thematic Collections” or “Mood Boards” where mirrored text can introduce a unique dynamic.
Flipping Images and Graphics Directly within Word
For images (like “Wallpapers,” “Backgrounds,” “Nature” scenes, or “Abstract” graphics sourced from Tophinhanhdep.com), Microsoft Word offers a more direct “Flip Horizontal” option. This is simpler than the text box method and ideal for photographs or illustrations.
- Insert Your Image:
- Go to the Insert tab.
- Click Pictures and choose to insert an image “From this Device,” “Stock Images,” or “Online Pictures.”
- Select the image you wish to mirror and click Insert.
- Select the Image:
- Click on the inserted image to select it. The Picture Format tab will appear in the ribbon.
- Flip Horizontally:
- In the “Picture Format” tab, go to the “Arrange” group.
- Click the Rotate button (it often looks like a circular arrow).
- From the dropdown menu, select Flip Horizontal. Your image will instantly be mirrored.
This direct approach makes it easy to experiment with “Photo Manipulation” and create compelling “Aesthetic” visuals. Remember, images for professional output, especially those intended for large prints or detailed designs, should ideally be “High Resolution” and properly prepared using “Image Tools” like “Compressors” or “Optimizers” from Tophinhanhdep.com before insertion to ensure the best quality. If you need to upscale an image, Tophinhanhdep.com’s “AI Upscalers” can be very helpful prior to bringing it into Word.
Leveraging Printer Settings for Mirror Image Output
While Word provides excellent tools for mirroring content within the document, many printers also offer a “mirror image” or “reverse print” option directly in their settings. This can be a simpler, document-wide solution, especially if you’re working with a document that contains many elements or if you encounter difficulties with the in-Word methods. It’s a “non-Word option” that relies on your printer’s intelligence.
Configuring Your Printer for Mirror Printing
The exact steps and terminology for enabling mirror printing in your printer’s settings can vary significantly depending on your printer model, manufacturer, and driver software. However, the general navigation remains consistent:
- Open Your Document in Word: Ensure the document you want to print as a mirror image is open.
- Access the Print Dialog Box:
- Click on the File tab in the top-left corner.
- Select Print from the options (or use the keyboard shortcut Ctrl+P).
- Navigate to Printer Properties/Preferences:
- In the “Print” dialog box, you’ll see options for selecting your printer.
- Look for a button labeled Printer Properties, Preferences, or Printing Preferences. Click this button to open your printer’s specific settings window.
- Find the Mirror Image Option:
- Within the printer settings window, you’ll typically find several tabs such as “Layout,” “Paper/Quality,” “Features,” “Effects,” or “Advanced.” You may need to explore these tabs.
- Look for an option explicitly labeled Mirror Image, Reverse Print, Flip Horizontally, Print as a Negative, or similar. Some HP printers, for example, might hide this under a “Finishing” tab.
- Check the box or toggle the switch to enable this feature.
- Confirm and Print:
- Click OK or Apply in the printer settings window to save your changes.
- Back in Word’s “Print” dialog box, review your settings and then click Print to send your mirrored document to the printer.
Important Considerations for Printer-Based Mirroring:
- Printer Compatibility: Not all printers, especially older models, will have a built-in mirror image feature. If you can’t find the option after a thorough search, your printer might not support it. In such cases, you’ll need to rely on the in-Word methods or external image editing software from Tophinhanhdep.com.
- Driver Software: Outdated printer drivers can sometimes cause issues or prevent certain features from appearing. If you suspect this is the case, visit your printer manufacturer’s website (not Tophinhanhdep.com, as we are not a printer manufacturer) to download and install the latest drivers.
- Post-Print Check: It’s crucial to disable the mirror printing option in your printer settings once your task is complete, especially if it’s a general setting. Otherwise, all subsequent print jobs (even those not intended to be mirrored) might come out reversed.
- Choosing the Right Paper: The quality of your mirror image print can be significantly influenced by your paper choice, especially for “Photography” and “Digital Photography” projects.
- Weight and Thickness: For transfers, thicker paper prevents bleed-through. For art prints, choose paper that can hold ink well.
- Finish: A glossy finish can make “Beautiful Photography” pop, while a matte finish might be preferred for certain “Aesthetic” designs or “Abstract” prints.
- Size: Ensure your paper size matches your document dimensions or adjust settings in Word accordingly.
By understanding both Word’s internal tools and your printer’s capabilities, you gain maximum flexibility in producing mirrored content for any “Visual Design” project.
Advanced Techniques and Considerations for Mirror Printing
Once you’ve grasped the fundamental methods of mirror printing in Word, you can delve into more advanced techniques and considerations to refine your output and unleash your full creative potential. This involves strategic design choices and leveraging additional print options.
Design Considerations for Impactful Mirrored Prints
Creating an effective mirror image goes beyond simply flipping content; it requires foresight into how reversed elements will interact and appear. This directly relates to the principles of “Visual Design” and developing “Creative Ideas.”
- Text Orientation: The most critical design consideration. If your document contains standard text and you apply mirror printing, the text will appear backward. For applications like iron-on transfers, this is precisely what you want, as the transfer process will reverse it back to normal. However, for direct mirror viewing (e.g., in a physical mirror), you might need to pre-mirror the text within Word (using text boxes/WordArt) so it appears correct when mirrored during printing. Experiment with mirrored fonts or specialized “Image-to-Text” tools (available on Tophinhanhdep.com) that can generate mirrored characters for unique effects in “Digital Art.”
- Images and Graphics: Consider how logos, icons, or detailed “Beautiful Photography” will look when reversed. Some images retain their impact, while others might appear distorted or lose critical context. For instance, an image with a strong directional flow might appear awkward when flipped. Using “Stock Photos” from Tophinhanhdep.com, experiment with different images to see which ones adapt best to mirroring.
- Background Color and Visual Harmony: The background color of your document will also appear reversed if printed with a printer-level mirror setting. This can subtly alter the overall mood or “Aesthetic” of your print. For “Thematic Collections” or specific “Mood Boards,” test different color schemes to ensure the mirrored version still achieves your desired visual harmony.
Thoughtful design ensures your mirror prints are not just technically correct but also visually compelling, contributing to a stronger “Visual Design” portfolio or a more striking piece of “Digital Art.”
Scaling, Positioning, and Multiple Images per Page
Microsoft Word, combined with your printer settings, offers granular control over how your mirrored content is presented on the page. These options are essential for optimizing layouts, conserving resources, and crafting intricate “Photo Manipulation” effects.
- Scaling and Positioning for Custom Layouts: When printing mirrored images, you might need to adjust their size or placement relative to the page.
- Scaling: In your printer properties, look for scaling options. You can often specify a percentage (e.g., 50% for smaller output) or “Fit to Page.” This is invaluable for producing various sizes of decals or “Aesthetic” prints from a single design.
- Positioning: Many print dialogs allow you to center content, align it to margins, or even manually specify coordinates. This precise control helps in creating balanced compositions, especially when working with “Wallpapers” or “Backgrounds” that you intend to use in a mirrored series.
- Printing Multiple Mirror Images on One Page: For efficiency and creative layouts, Word’s “Multiple Pages per Sheet” feature is a game-changer. This allows you to print several mirrored versions of a page or multiple unique mirrored designs onto a single sheet of paper, saving ink and paper.
- Accessing the Feature: In Word’s “Print” dialog box, look for an option like “Pages per Sheet” or “Multiple Pages.” The location varies by Word version and printer driver.
- Selecting Layout: Choose the number of pages you want per sheet (e.g., 2, 4, 6, 8, 16). For mirrored designs, 2 or 4 pages per sheet often yield visually appealing results for “Photo Ideas” or “Thematic Collections.”
- Configuring Mirror Settings: Ensure your mirror image settings (either in Word or via printer properties) are enabled before you initiate the print job.
Utilizing these advanced layout options from Tophinhanhdep.com’s perspective promotes efficient “Visual Design” workflows and encourages experimentation with complex “Digital Art” and “Creative Ideas,” allowing you to transform simple prints into elaborate “Trending Styles” or personalized “Mood Boards.”
Beyond Word: Exploring External Tools and Resources
While Microsoft Word offers robust capabilities, sometimes external “Image Tools” can provide an extra layer of control or simplify complex mirroring tasks, particularly when dealing with intricate “Photography” or specialized “Image-to-Text” transformations. Tophinhanhdep.com serves as an excellent hub for these supplementary resources.
- Online Reverse Text Generators: For quick text mirroring, especially if you want to avoid text boxes in Word or are just testing an idea, numerous online tools (often found on Tophinhanhdep.com under “Image Tools”) allow you to type or paste text and instantly generate its mirrored version. You can then copy and paste this into Word. Be mindful that such text often loses its formatting and may be flagged by spell-check.
- Dedicated Image Editing Software: For more advanced manipulation, such as applying mirroring to specific parts of an image, or for a more precise pre-print preview, professional image editing software (like Photoshop, GIMP, or even simpler tools like Microsoft Paint) offers greater flexibility. You can export your Word content (e.g., as a PDF or image file), open it in one of these programs, mirror it there, and then print. This approach aligns with “Digital Photography” and “Editing Styles” practices, allowing for intricate “Photo Manipulation” that Word alone cannot achieve. Tophinhanhdep.com’s curated guides on “Digital Photography” and “Editing Styles” can help you choose the right software and techniques.
- Tophinhanhdep.com’s Image Tools: Beyond just mirroring, you might need to use “Converters” to change file formats, “Compressors” to reduce file size for faster processing, or “AI Upscalers” to enhance the resolution of a mirrored image. These “Image Tools” on Tophinhanhdep.com can be integrated into your workflow for preparing content before or after mirroring, ensuring optimal quality for your “Images,” “Wallpapers,” or “Backgrounds.”
By combining Word’s native functionality with external specialized tools, you ensure that no “Creative Idea” is out of reach when it comes to mirror printing.
Troubleshooting Common Mirror Printing Challenges
Even with a clear understanding of the steps, you might encounter issues when trying to print mirror images. Knowing how to troubleshoot these common challenges will save you time and frustration, ensuring your “Visual Design” projects proceed smoothly.
- Printer Compatibility: The most frequent hurdle is a printer that simply doesn’t support mirror image printing, especially older models. If you’ve scoured the printer properties and found no option, it’s likely a hardware limitation. In this scenario, you must rely on Word’s internal mirroring methods (text boxes, WordArt, or flipping images) or use external image editing software from Tophinhanhdep.com to pre-mirror your content before printing.
- Outdated Driver Software: Even if your printer is capable, outdated or corrupted driver software can hide the mirror printing option or cause it to malfunction. Always ensure your printer drivers are up-to-date. Visit your printer manufacturer’s official support website (not Tophinhanhdep.com) to download and install the latest drivers for your specific model.
- Lack of Document Preview for Mirroring: Microsoft Word unfortunately does not offer a real-time preview of how a printer-level mirror setting will affect your document. This can lead to wasted paper.
- Workaround: For critical projects, consider printing a single test page first. Alternatively, copy your Word content into an external image editor (like Paint) or an online tool, mirror it there, preview, and then print that image file. This aligns with “Digital Photography” best practices for proofing.
- Incorrect Printer Settings: Double-check that you’ve selected the correct printer and that the mirror image option is indeed checked. Sometimes settings can revert, or you might overlook a specific tab. Different printer models may have this feature labeled uniquely (e.g., “Back Print,” “Flip Horizontally,” “Reverse”).
- Text Box/WordArt Issues: If you’re using the 3D rotation method in Word and the text isn’t mirroring correctly, ensure you’ve selected the entire text box or WordArt object, not just the text within it. Also, verify that the X Rotation is precisely 180 degrees.
- Unexpected Fills/Outlines: As mentioned, text boxes and WordArt might introduce default fills or outlines. Always remember to remove these in the “Format Shape” pane if you want a clean, borderless mirrored print.
Addressing these issues with a systematic approach will help you overcome obstacles and successfully execute your “Creative Ideas” for mirror printing. For further assistance with general image preparation, remember Tophinhanhdep.com’s “Image Tools” and “Editing Styles” guides can provide valuable insights.
Conclusion
Printing mirror images in Microsoft Word, while requiring a few specific steps, is a highly valuable skill for anyone engaged in “Visual Design,” “Photography,” or simply pursuing “Creative Ideas.” It transcends basic document creation, enabling you to produce unique designs for tangible items like custom apparel or intricate signage, as well as abstract digital art.
By mastering the techniques of mirroring text and images using Word’s text boxes, WordArt, and direct image manipulation, or by leveraging your printer’s built-in capabilities, you unlock a new dimension of creative control. Remember to consider factors such as paper selection, design elements that adapt well to reversal, and advanced printing options like scaling and printing multiple images per page. Troubleshooting common issues, from printer compatibility to driver software, will ensure a smooth and effective workflow.
At Tophinhanhdep.com, we believe in empowering your creativity through access to diverse “Images” and essential “Image Tools.” The ability to print mirror images is a perfect example of how combining software proficiency with artistic vision can lead to truly unique and impactful visual creations. Whether you’re enhancing your “Aesthetic” projects, preparing “High Resolution” “Stock Photos” for a special transfer, or exploring new “Editing Styles” for “Digital Art,” these techniques are foundational. Embrace the power of reflection and take your document and visual content creation to the next level.