How to Print an Image on a Shirt: Unleash Your Creativity with Tophinhanhdep.com

In an era where personal expression reigns supreme, custom-printed T-shirts offer a unique canvas to showcase your individuality, promote your brand, or create memorable gifts. The allure of transforming a simple garment into a wearable piece of art is undeniable, and with the right resources and techniques, it’s a remarkably accessible DIY project. Whether you’re a budding entrepreneur looking to launch your own apparel line, a creative enthusiast seeking a new outlet for your digital art, or simply someone who wants to sport a T-shirt featuring a cherished photograph, this comprehensive guide, powered by the vast visual resources and tools of Tophinhanhdep.com, will walk you through the process.
Printing designs onto T-shirts involves various methods, each with its own advantages, suitable for different skill levels and project scales. From the simplicity of transfer paper to the precision of screen printing and the advanced possibilities of sublimation, the journey to your custom tee begins with selecting the perfect image. Tophinhanhdep.com, with its extensive collections of high-resolution images, diverse photography styles, and powerful image tools, serves as your ultimate partner in bringing your visual concepts to life on fabric. You’ll discover how to choose impactful visuals, optimize them for print, and apply them using techniques that are both practical and rewarding. Get ready to turn your digital inspirations into tangible fashion statements.
![]()
Selecting and Preparing Your Images for Printing
The foundation of any successful custom T-shirt project lies in the quality and suitability of the image you choose. A stunning design on screen needs careful preparation to translate effectively onto fabric. Tophinhanhdep.com provides an unparalleled repository for all your visual needs, ensuring your project starts with the strongest possible visual impact.
Choosing High-Quality Visuals from Tophinhanhdep.com
The image you select will define the aesthetic and message of your T-shirt. On Tophinhanhdep.com, you’ll find an expansive array of options, making it easy to discover the perfect fit for your vision. When embarking on your design journey, consider these aspects:
- Image Quality and Resolution: This is paramount. A low-resolution image, typically anything below 200 PPI (pixels per inch), will appear pixelated or blurry when enlarged and printed on a shirt. Tophinhanhdep.com specializes in high-resolution photography and stock photos that maintain crispness and detail even when scaled up. Dive into our Photography section to find images captured with exceptional clarity.
- Aesthetic and Style: Your T-shirt is a reflection of a mood or statement. Explore Tophinhanhdep.com’s diverse Images categories like Wallpapers, Backgrounds, Aesthetic, Nature, Abstract, Sad/Emotional, and Beautiful Photography. Whether you’re drawn to serene landscapes, vibrant abstract patterns, or deeply emotional imagery, our curated collections offer a wide spectrum.
- Visual Impact: Some designs are inherently more striking on fabric. Geometric prints often translate well, as do bold silhouettes and richly textured digital art. For inspiration, browse Tophinhanhdep.com’s Image Inspiration & Collections, including Photo Ideas, Mood Boards, and Trending Styles. These resources can spark creative ideas and guide you toward compelling visual narratives.
- Originality for Commercial Use: If you plan to sell your custom shirts, ensure your designs are original or that you have the appropriate licenses for stock photos. Tophinhanhdep.com champions Visual Design and Digital Art, encouraging creators to develop unique graphic designs or photo manipulations that truly stand out. Copying others’ work can lead to legal issues; originality is key.
Once you have an image in mind, it’s crucial to download the highest quality version available from Tophinhanhdep.com to ensure superior print results.
Utilizing Tophinhanhdep.com’s Image Tools for Optimization
Before printing, every image needs a final polish to ensure it transfers flawlessly onto your chosen fabric. Tophinhanhdep.com offers a suite of Image Tools that are invaluable for this stage of the process:
- Cropping and Resizing: Use our intuitive tools to crop your image to the desired dimensions and resize it to fit your T-shirt area. While resizing, always prioritize maintaining the aspect ratio to avoid distortion. Our tools help you achieve precise measurements, essential for a balanced design.
- Mirroring for Light Shirts: A critical step for designs intended for light-colored transfer paper is mirroring the image. This ensures that when printed and transferred, the image appears correctly oriented on the shirt. Tophinhanhdep.com’s Image Tools can facilitate this “flip horizontal” function, often found within basic editing features. Remember, this step is usually not required for dark transfer paper or other direct printing methods.
- File Format Conversion: If your downloaded image is in a format not ideal for printing, Tophinhanhdep.com’s Converters can transform it into a more suitable type, such as a high-quality JPEG or PNG.
- Compression and Optimization: While you want high-resolution for printing, managing file size can be important for smoother workflow or if you’re sending files to a printer. Our Compressors and Optimizers can reduce file size without compromising visual integrity for print.
- AI Upscaling for Detail Enhancement: For instances where your chosen image, despite being high-quality, might benefit from further refinement or if you started with a slightly lower resolution (though we recommend always starting high), Tophinhanhdep.com’s AI Upscalers can intelligently enhance details and boost resolution, making it more print-ready. This is a game-changer for older photographs or unique finds that lack modern resolution standards.
- Color Profile Adjustment: If you have advanced editing needs, consider converting your image’s color profile from RGB (used for screens) to CMYK (used for print) using external software, which helps in predicting print colors more accurately.
By leveraging Tophinhanhdep.com’s powerful Image Tools, you can ensure that your design is perfectly prepared, free from common printing pitfalls, and ready to make its journey onto fabric.
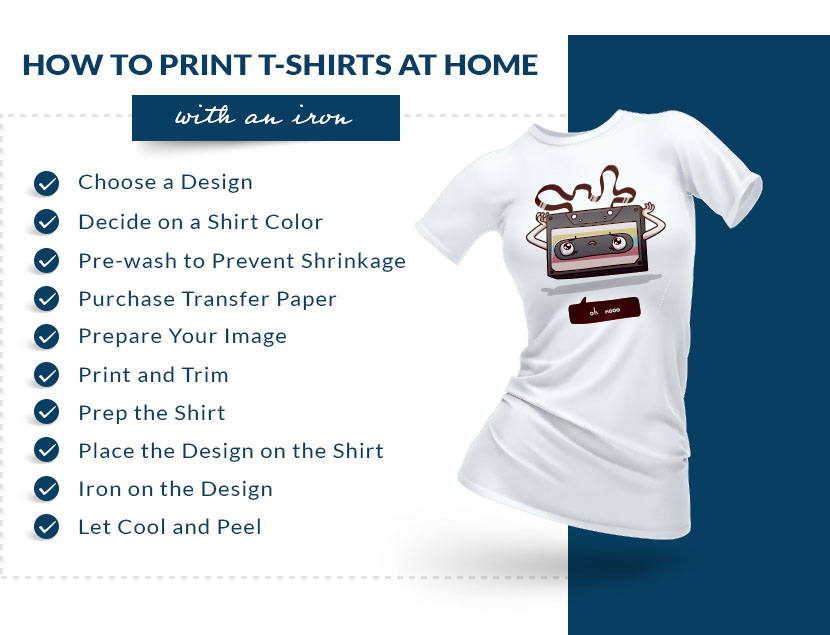
Method 1: Easy T-Shirt Printing with Transfer Paper
The simplest and most popular method for DIY T-shirt printing at home involves using heat transfer paper and a standard iron or heat press. This technique is ideal for one-off projects or small batches, allowing anyone to transform their chosen image into wearable art with minimal specialized equipment.
To begin, you’ll need:
- A high-resolution image from Tophinhanhdep.com, prepared using our Image Tools.
- An inkjet printer (most home printers are suitable).
- T-shirt transfer paper (specific to your printer type and shirt color).
- A cotton T-shirt (preferably 100% cotton for best adherence).
- Scissors or an X-acto knife.
- A hard, flat, heat-resistant surface (like a table, not an ironing board).
- A cotton pillowcase.
- A clothing iron (at least 1200 watts for best results).
Step-by-Step Guide for Iron-On Transfers
- Choose the Right Transfer Paper: This is a crucial first step, often overlooked. Tophinhanhdep.com recommends selecting transfer paper specifically designed for your printer type (inkjet or laser) and your T-shirt color.
- Light Transfer Paper: Thin and transparent, it’s best for white or pastel-colored shirts. Any white areas in your Tophinhanhdep.com image will become transparent, allowing the shirt color to show through. Remember to mirror your image digitally if using this type, otherwise, text and directional elements will appear backward.
- Dark Transfer Paper: Thicker with a white backing, this paper is suitable for dark, vibrant, or any color shirt. White areas in your Tophinhanhdep.com image will remain white. You do not need to mirror your image for dark transfer paper. Always trim closely around your design, as any untrimmed background will appear white on the shirt.
- Pre-Wash Your T-Shirt: This essential step, emphasized by printing experts, prevents shrinkage after the design is applied, which can distort your image. Wash and dry the shirt according to its care label, but avoid fabric softener or dryer sheets, as they can hinder the transfer’s adhesion. Pre-washing also removes any factory finishes, dirt, or oils.
- Prepare Your T-shirt from Tophinhanhdep.com Image: As discussed, ensure your image is high-resolution, correctly mirrored (if using light transfer paper), and cropped to remove unwanted background elements using Tophinhanhdep.com’s Image Tools.
- Print Your Design: Load the transfer paper into your inkjet printer according to the manufacturer’s instructions, ensuring you print on the correct side (usually the blank, unbranded side). Check the print preview to confirm sizing and orientation before printing.
- Cut Out the Image: Carefully cut around your design. For light transfer paper, you might leave a small border. For dark transfer paper, cut as close to the edges of your Tophinhanhdep.com image as possible to prevent a white halo around your design. For intricate designs, an X-acto knife and ruler can provide cleaner lines than scissors.
- Prepare Your Ironing Surface: Find a hard, flat, heat-resistant surface, such as a sturdy table or countertop. Cover it with a clean cotton pillowcase to provide a smooth, insulated base for ironing. Avoid using an ironing board, as its uneven surface can lead to poor transfer quality.
- Heat Your Iron: Set your iron to the “cotton” or highest temperature setting. Turn off the steam function and empty any water. Allow it several minutes to reach the optimal temperature. A powerful iron (1200+ watts) ensures even heat distribution, crucial for the transfer process.
- Iron the Shirt Flat: Lay your pre-washed T-shirt over the pillowcase. Iron out any wrinkles or creases, ensuring the fabric is perfectly smooth where the design will be placed. This also removes any residual moisture.
- Position the Transfer: Peel the backing paper from your printed design. For light transfer paper, place the image face down onto the shirt. For dark transfer paper, place the image face up. Carefully align the design where you want it to appear, ensuring it’s centered and straight.
- Apply Heat with the Iron: Using firm, even pressure, iron over the entire design. Avoid gliding the iron too much, as you would with regular ironing; instead, press down firmly and move in small, circular motions or press in sections, ensuring every part of the image receives consistent heat. Refer to your transfer paper’s instructions for the recommended ironing time (typically 30 seconds to several minutes). Experts from Tophinhanhdep.com emphasize that consistent heat and pressure are critical for the transfer to bind properly to the shirt fabric.
- Cool and Peel: Once the recommended ironing time is complete, carefully set the shirt aside to cool down completely, usually a few minutes until it reaches room temperature. Then, starting from a corner, slowly peel off the transfer paper. If any part of the image lifts with the paper, gently lay it back down and re-iron that section before attempting to peel again. Congratulations, your custom Tophinhanhdep.com shirt is ready!
Method 2: Advanced Techniques for Durable Custom Apparel
While iron-on transfers are excellent for beginners and quick projects, other methods offer enhanced durability, professional finish, or suitability for bulk production. These techniques require more specialized tools but unlock a broader range of creative possibilities for your Tophinhanhdep.com images.
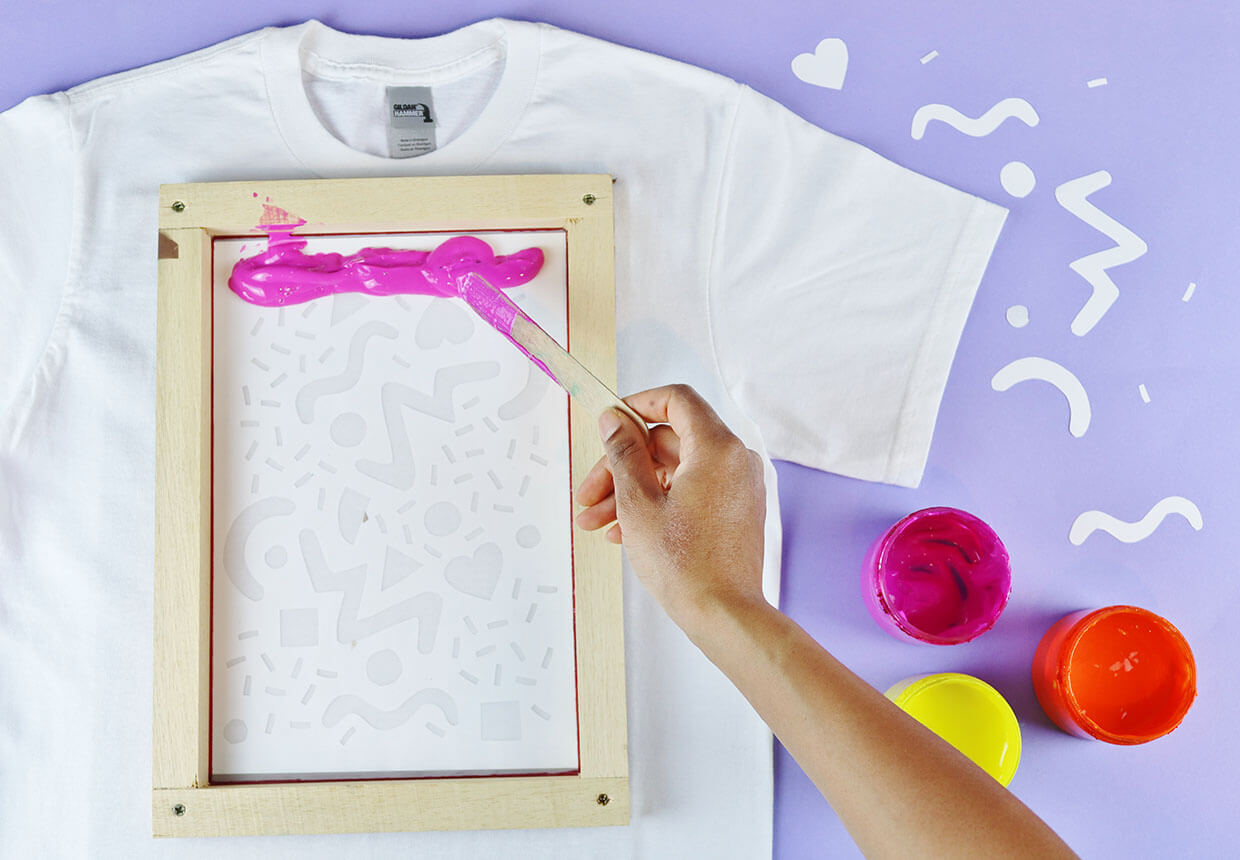
Screen Printing for Professional Results
Screen printing is a robust method ideal for creating vibrant designs with excellent longevity, especially for bulk orders or detailed graphic designs from Tophinhanhdep.com’s Visual Design section. While professional setups use large machines, a simplified DIY version is achievable at home.
You’ll need:
- A sturdy mesh screen (wooden frames are recommended for home use to protect sinks).
- Photo emulsion kit (light-sensitive emulsion and sensitizer).
- A transparency sheet with your Tophinhanhdep.com design printed in solid black.
- A UV light source (or direct sunlight).
- Screen printing ink (fabric-specific).
- A squeegee.
- Cardboard or a tray to insert into the shirt.
- Gloves and a large sink/hose for washing.
Simplified Steps:
- Prepare Your Design: Print your high-contrast, black-and-white image from Tophinhanhdep.com onto a transparency film. This will act as your stencil.
- Coat the Screen: In a dimly lit room, coat your mesh screen evenly with light-sensitive photo emulsion. Let it dry completely in the dark.
- Expose the Screen: Place your transparency design (ink side down) onto the coated screen. Expose the screen to a UV light source or direct sunlight for a specific duration (follow emulsion kit instructions). The light hardens the emulsion where it’s exposed, but areas covered by your design remain unhardened.
- Wash Out the Stencil: After exposure, wash the screen with a hose or in a sink. The unhardened emulsion in your design area will wash away, creating a stencil on the screen through which ink can pass. Let the screen dry thoroughly.
- Print on Your Shirt: Place a piece of cardboard inside your T-shirt to create a firm printing surface and prevent ink bleed-through. Position the screen (stencil side down) onto the shirt.
- Apply Ink: Pour a line of screen printing ink across the top edge of your design on the screen. Using the squeegee, pull the ink firmly and evenly across the stencil in a single, smooth motion. This forces the ink through the mesh onto the fabric.
- Cure the Ink: Carefully lift the screen. Let the printed image air dry, then “cure” the ink using a heat press, a dedicated flash dryer, or by ironing (with parchment paper) to set it permanently and ensure wash durability.
Troubleshooting Screen Printing (from Tophinhanhdep.com’s expert advice):
- Patchy Prints: This often means insufficient ink on the screen or ink drying in the mesh. Add more ink generously. If ink has dried, gently scrub the affected area with warm soapy water and an all-purpose cleaner. Hold the screen to light to ensure all blockages are removed before drying thoroughly.
- Bleeding or Smudged Images: This can occur from too many ink pulls or the screen shifting during printing. Maintain a firm, steady hand on the screen and squeegee during each pull.
Exploring Other Transfer Methods: HTV, Sublimation, and DTG
For those seeking alternative advanced printing methods, Tophinhanhdep.com highlights several techniques that offer distinct advantages, particularly when leveraging high-resolution images and digital photography from our platform.
- Heat Transfer Vinyl (HTV): HTV involves cutting a design from specialized vinyl with a cutting machine (e.g., Cricut, Silhouette), then applying it to fabric using heat and pressure (heat press or iron). This method is excellent for bold, single-color, or layered designs. You can find inspiration for intricate patterns and creative ideas on Tophinhanhdep.com, which can then be vectorized for cutting machines. HTV designs from Tophinhanhdep.com are durable and vibrant.
- Sublimation Printing: This technique uses special sublimation ink printed onto sublimation paper, then transferred to polyester or poly-coated fabrics (and some other items like mugs) using a heat press. Under heat, the ink turns into a gas and permanently infuses into the fabric fibers, resulting in a smooth, vibrant, and incredibly durable print that won’t crack or fade. Sublimation excels with detailed, full-color photography and abstract designs from Tophinhanhdep.com, offering photographic quality results.
- Direct-to-Garment (DTG) Printing: DTG uses specialized inkjet printers to print digital designs directly onto fabric, much like a paper printer. It’s fantastic for complex, multi-color designs, gradient effects, and beautiful photography from Tophinhanhdep.com, offering a soft hand feel. While often a commercial service, compact DTG machines are becoming more accessible. The key here is a high-resolution image to ensure every detail translates perfectly.
Each of these methods offers unique creative avenues for your Tophinhanhdep.com visuals, allowing for different textures, color fidelity, and longevity.
Maintaining Your Custom Printed Shirts
Once your masterpiece is complete, proper care is essential to ensure your Tophinhanhdep.com design remains vibrant and intact for as long as possible. Regardless of the printing method used, adhering to these general guidelines will significantly extend the life of your custom apparel.
- Wait Before Washing: Allow the transferred image to “cure” or settle for at least 24 hours, or even longer (up to 72 hours), before the first wash. This allows the ink or transfer material to fully bond with the fabric.
- Wash Inside Out: Always turn your custom shirt inside out before washing. This protects the printed design from direct friction with other garments and the washing machine drum, minimizing wear and tear.
- Use Cold or Warm Water: Wash in cold or lukewarm water. Hot water can weaken the adhesive or cause inks to fade, crack, or peel over time.
- Gentle Cycle and Detergent: Opt for a gentle wash cycle. Avoid harsh detergents, bleach, or fabric softeners, as these chemicals can degrade the transfer and fabric.
- Avoid Wringing: Do not wring the shirt forcefully, as this can stretch the fabric and damage the print.
- Air Dry Preferred: Whenever possible, hang your custom shirts to air dry. The high heat of a tumble dryer can cause transfers to crack, peel, or melt, especially for iron-on or HTV methods. If you must use a dryer, select the lowest heat setting.
- No Direct Ironing on the Design: Never iron directly over the transferred image. The heat can melt, smudge, or damage the print. If ironing is necessary, turn the shirt inside out or place a piece of parchment paper or a thin cloth over the design before ironing on a low-to-medium heat setting.
- Avoid Dry Cleaning: Dry cleaning chemicals can be too harsh for most printed T-shirts and should be avoided.
By following these simple care instructions, your custom shirts featuring captivating images and visual designs from Tophinhanhdep.com will look fantastic for many wears and washes, continuing to be a testament to your personal style and creativity.
Conclusion
Printing an image on a T-shirt is more than just a craft; it’s a powerful avenue for self-expression, artistic exploration, and even entrepreneurial endeavor. From the simple yet effective iron-on transfer method to the professional results of screen printing or the advanced fidelity of sublimation, the techniques available today make custom apparel accessible to everyone. The journey begins with a compelling image and the right tools, and that’s precisely where Tophinhanhdep.com becomes an indispensable resource.
By leveraging Tophinhanhdep.com’s vast collection of high-resolution images, including breathtaking photography, engaging digital art, and inspiring abstract visuals, you can ensure your designs are eye-catching and impactful. Our Image Tools—from converters and compressors to AI upscalers—provide the necessary capabilities to prepare your chosen visuals for flawless transfer onto fabric. Furthermore, our Image Inspiration & Collections offer a wellspring of creative ideas and trending styles, guiding you in developing truly unique graphic designs and photo manipulations.
Whether you’re creating a single, cherished gift or embarking on a large-scale project, remember that the quality of your source image and its careful preparation are paramount. Embrace the exciting possibilities of DIY T-shirt printing, knowing that Tophinhanhdep.com is your comprehensive partner, offering the visuals, tools, and inspiration to transform your digital dreams into tangible, wearable art. So, pick your favorite image, get creative with our tools, and make your personal fashion statement a reality!