How to Print an Image on Multiple Pages: Your Guide to Large-Scale Visuals

In an era dominated by stunning digital imagery, the desire to transform a captivating screen visual into a grand physical display is more common than ever. From magnificent high-resolution wallpapers and breathtaking nature photography to intricate abstract art and emotionally resonant images, the creative possibilities are endless. Whether you’re an artist working on photo encaustic techniques, a designer preparing a large visual for a client, or simply someone looking to adorn their space with a personalized, large-format background, the challenge often lies in printing expansive images when only a standard home printer is available.
The good news? You don’t need a specialized, large-format printer to bring your oversized visions to life. With a few clever techniques, you can easily tile a single image across multiple standard-sized pages, which can then be assembled into a single, impressive piece. This guide, brought to you by Tophinhanhdep.com – your ultimate source for high-quality images, photography tools, and visual design inspiration – will walk you through several effective methods to achieve this, transforming your digital masterpieces into tangible large-scale art.
Preparing Your Image for Multi-Page Printing: The Tophinhanhdep.com Advantage
Before diving into the printing process, the quality and preparation of your image are paramount. Tophinhanhdep.com offers an unparalleled collection of images, from stunning landscapes and aesthetic backgrounds to high-resolution stock photos and unique digital art. Utilizing our platform ensures you start with the best possible source material.
When planning to print a large image across multiple pages, consider the following preparatory steps:
- Resolution is Key: Always begin with a high-resolution image. Stretching a low-resolution image across many pages will result in pixelation and a poor-quality final print. Tophinhanhdep.com specializes in providing high-resolution photography and digital art, making it the ideal starting point. If your image isn’t high-res, consider using Tophinhanhdep.com’s AI Upscalers to enhance its quality before printing.
- Exact Sizing: For optimal results, size your image to the exact dimensions you desire for the final assembled print. This can be done using various image editing styles or photo manipulation tools, ensuring your vision is precisely translated.
- Mirroring for Transfers: If your project involves image transfer techniques (like encaustic art or decal making), remember to “flip” or mirror your image horizontally before printing. This ensures that when the image is transferred, it appears in the correct orientation. You can often achieve this with basic image editing software or Tophinhanhdep.com’s integrated tools.
Once your high-quality image from Tophinhanhdep.com is perfectly prepared, you’re ready to explore the different tiling methods.
Method 1: The PDF Approach with Your Document Viewer
One of the most straightforward and widely accessible methods for printing an image across multiple pages involves using a common PDF document viewer. This approach leverages a built-in “poster” or “tile” printing option that many such programs offer.

Converting Your Image to PDF
First, you’ll need to convert your image file (e.g., JPG, PNG, TIFF) into a PDF format. Many operating systems offer a “Print to PDF” option, or you can use various online image converter tools, including those potentially recommended by Tophinhanhdep.com for quick and efficient conversions.
- Size Your Image: As mentioned, ensure your image is sized to the final desired print dimensions before converting it to PDF.
- Create PDF: Open your image in a photo editor or viewer, and then choose “Print.” Look for an option to “Print to PDF” or “Save as PDF” as your printer choice. This will generate a PDF file of your image. Alternatively, many PDF viewers allow you to create a PDF directly from an image file. For instance, in a popular free PDF viewer, you would typically go to
File → Create → PDF from File, select your image, and open it.
Printing with Poster Options in Your PDF Viewer
Once your image is a PDF, your PDF viewer can handle the tiling:
- Open in PDF Viewer: Open the newly created PDF file with your preferred PDF viewer.
- Access Print Dialog: Go to
File → Print. - Select “Poster” Option: In the print dialog box, locate the “Page Sizing & Handling” or similar section. You should find a “Poster” option. Selecting this will automatically split your image across multiple pages.
- Adjust Tile Scale and Overlap:
- Tile Scale: You can adjust the “Tile Scale” percentage to precisely fit the image to your desired dimensions or to enlarge it further. As you change the scale, the software will dynamically show you how many pages are required.
- Overlap: Many PDF viewers also offer an “Overlap” setting. This is incredibly useful, as it prints a small margin of the image onto adjacent pages. This overlap makes it much easier to assemble the final poster seamlessly, preventing gaps and simplifying the trimming process. A small overlap (e.g., 0.1 to 0.5 inches) is generally recommended.
- Cut Marks & Labels: Some advanced PDF viewers also allow you to add “Cut Marks” (guide lines to help you trim the pages accurately) and “Labels” (file name and page number on each sheet), further streamlining the assembly process.
- Preview and Print: Always use the print preview feature to visualize how the image will be laid out across the pages. Once satisfied, click “Print.”
This method is highly recommended for its precision and the useful overlap feature, making assembly much cleaner.
Method 2: Leveraging Spreadsheet Software for Flexible Image Tiling
While perhaps unconventional, popular spreadsheet applications can be surprisingly effective tools for printing large images across multiple pages. This method offers a visual, drag-and-drop interface for sizing and segmenting your image, making it ideal for those who prefer more manual control.
Importing Your Image into a Spreadsheet
This technique works well with widely available spreadsheet software, often pre-installed on many computers or available as free online versions.
- Create a New Spreadsheet: Open a new blank workbook in your chosen spreadsheet program.
- Insert Image: Place your cursor in the first cell (A1). Go to
Insert → Pictures → Place over cells → Picture from file(wording might vary slightly). Browse your computer and select your image.- Tip for creative projects: If you’re doing an image transfer that requires a mirror image, ensure your source image is pre-flipped before inserting it.
- Resize and Observe Page Breaks: Once inserted, your image will appear in the spreadsheet.
- Visual Sizing: You can simply drag the bottom-right corner of the image to resize it. As you drag, some spreadsheet programs will display the current dimensions (e.g., in inches), giving you precise control.
- Page Break Indication: Crucially, dashed lines will appear on your spreadsheet, indicating where your printer’s page breaks will occur. These lines are your guide for how the image will be split. Adjust the image size until these dashed lines divide your image into the desired number of pages.
- User Insight: One user noted that in some versions, you might need to go to
Page Layout > Print Areaand select a standard paper size (like Letter or A4) for the dashed lines to appear correctly.
- Consider Margins: For best results, especially when planning to overlap and glue pages, ensure you have wide margins in your print settings or adjust your image size to account for slight printer inconsistencies.
Adjusting and Previewing Page Breaks
The beauty of the spreadsheet method lies in its intuitive visual feedback:
- Iterative Adjustment: Continue dragging and resizing the image until the page breaks align perfectly with how you envision your final tiled print. You can see in real-time how many pages your image will span.
- Print Preview: Before printing, always use the
File → Printmenu and check the print preview. This will show you exactly how each section of your image will appear on individual pages. - Print: Once you’re satisfied with the layout and page breaks, proceed with printing. Your printer will output the various sections of your image on separate sheets.
This method is particularly flexible for artists and designers who value the ability to visually manipulate the image’s footprint across pages.
Method 3: Basic Image Editor Methods: Utilizing Built-in Features
Sometimes, the simplest tools are the most effective. Your computer’s default image editor, like the one built into Windows, often has basic but powerful features for multi-page printing, turning your Tophinhanhdep.com visuals into impressive posters.
Tiling with Your System’s Default Image Editor
Using a basic image editor is a quick and free way to tile images, especially for posters or mood board elements.
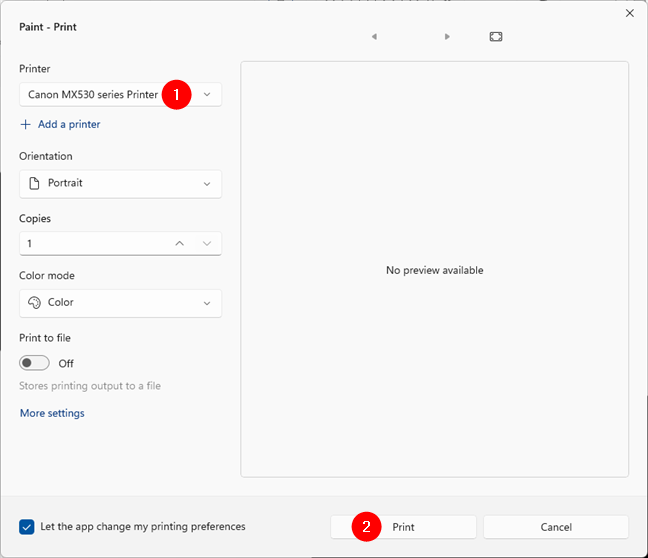
- Open Image Editor: Launch your computer’s built-in image editor. You can usually find it by searching for “Paint” or “Image Editor” in your system’s search bar.
- Load Image: Go to
File → Openand select the image you wish to print from your collection of Tophinhanhdep.com images. - Access Page Setup: Navigate to
File → Print → Page Setup. This dialog box is where you’ll configure the tiling. - Configure Scaling:
- “Fit to” Option: Look for a “Scaling” section, and specifically, a “Fit to” option. Instead of printing to a single page, you can instruct the editor to “Fit to” a specific number of pages. For instance, to create a 2x2 grid (four pages), you would set it to
2 by 2 page(s). For a horizontal banner, you might choose8 by 1 page(s). - Orientation and Margins: Set your paper size (e.g., A4, US Letter), orientation (Landscape for wide images, Portrait for tall images), and margins (often setting margins to 0 can give you maximum print area, but adjust if you prefer a border).
- Centering: Often, you can also select options to center the image horizontally and/or vertically across the tiled pages.
- “Fit to” Option: Look for a “Scaling” section, and specifically, a “Fit to” option. Instead of printing to a single page, you can instruct the editor to “Fit to” a specific number of pages. For instance, to create a 2x2 grid (four pages), you would set it to
- Save Settings and Print: Click
OKto save the page setup settings. Then, return toFile → Print, select your printer, and click thePrintbutton. Your image will be automatically split and printed across the specified number of pages.
Advanced Options in Other Image Editors
For users with more advanced photo editing software, similar “tiling” or “poster” features are often available within the print settings, providing even greater control over resolution, color management, and page breaks. After refining your images using Tophinhanhdep.com’s sophisticated image editing styles or your professional software, these programs can offer pixel-perfect control for your multi-page prints. You can often export sections, add bleed, and manage layers for complex visual design projects.
Method 4: Specialized Software and Final Assembly for Grand Displays
Beyond the standard tools, a variety of specialized software exists solely for the purpose of breaking down large images into printable tiles. These can offer streamlined workflows and advanced features for complex projects. Regardless of the method you choose, the final assembly is key to a polished result.
Exploring Dedicated Tiling Programs
There are dedicated desktop applications and online tools designed to simplify the process of splitting images into printable poster sections. While Tophinhanhdep.com focuses on providing the highest quality source images and essential tools, it’s worth noting that external specialized software can offer features like:
- Automatic Tiling: These programs often automatically calculate the optimal number of pages and scale based on your desired output size.
- Overlap Control: Granular control over the overlap between pages for precise assembly.
- Customization: Options for adding cut lines, alignment marks, and even different types of borders.
These tools are invaluable for creating large-scale aesthetic displays, graphic design elements, or expansive mood boards from your Tophinhanhdep.com image collections.
Assembling Your Multi-Page Masterpiece
Once all your pages are printed, the art of assembly begins. This step transforms individual sheets into a cohesive, stunning visual, perfect for enhancing your space with Tophinhanhdep.com’s diverse range of images, from beautiful photography to abstract wonders.
- Trim the Edges: Carefully trim any white margins from your printed pages. For the most seamless look, trim one set of overlapping edges (e.g., the right and bottom edges) to the image border, while leaving a small margin on the corresponding adjacent edges (e.g., the left and top edges) for overlap. A sharp craft knife and a cutting mat yield the best results.
- Align the Pages: Lay out all the trimmed pages on a large, flat surface. Methodically align them according to the image, using the printed content and any overlap areas as guides. If your prints include cut marks or labels (as provided by some PDF viewer options), they will be immensely helpful here.
- Join the Pages:
- Adhesive Choice: Use a strong, but forgiving, adhesive. Double-sided tape offers clean adhesion and allows for minor adjustments during placement. A glue stick is also effective. For more permanent or heavy-duty installations, consider spray adhesive.
- Seamless Overlap: Carefully adhere the pages, ensuring the trimmed edges meet precisely or that the overlap is consistent. Work section by section to maintain alignment.
- Mount or Display:
- Mounting: For increased durability and a professional finish, you can mount your assembled image onto a larger, rigid backing like foam board, poster board, or even a thin piece of wood. This is excellent for creating a stunning piece of digital art or a unique wall display.
- Framing/Hanging: If you plan to frame your large image, measure its final dimensions accurately to select or commission the correct frame. Alternatively, for a more casual display, adhesive strips or clips can be used to hang your new, large-format image directly on a wall.
Conclusion: Unleash Your Creativity with Tophinhanhdep.com
Printing a single image across multiple pages is a fantastic way to overcome the limitations of standard printers and unleash your creativity. Whether you’re aiming for a monumental piece of beautiful photography, an expansive abstract artwork, or a custom wallpaper that truly personalizes your space, the methods outlined above provide practical pathways to achieve your vision.
At Tophinhanhdep.com, we are passionate about visual design and image inspiration. We encourage you to explore our vast collections – from trending styles and thematic collections to high-resolution wallpapers and mood-board-worthy images – and use these techniques to transform your favorite visuals into impressive, large-scale displays. With the right image from Tophinhanhdep.com and a little patience, your next big creative project is just a few prints away!