Mastering Image Printing: From Digital Dreams to Tangible Art with Tophinhanhdep.com

In our digitally saturated world, where stunning visuals from Tophinhanhdep.com grace our screens as captivating wallpapers, aesthetic backgrounds, and high-resolution photography, the desire to transform these digital treasures into tangible art remains powerful. Whether it’s a cherished memory, a unique piece of digital art, or an inspiring visual for a creative project, printing offers a distinct satisfaction that pixels alone cannot fully deliver.
Tophinhanhdep.com curates an expansive collection of images – from breathtaking nature scenes to intricate abstract designs, sad/emotional compositions, and beautiful photography – all poised for printing. However, successfully translating these visuals from screen to paper requires more than just a click. It demands preparation, precision, and an understanding of the nuances that elevate a good print to a truly exceptional one. This comprehensive guide, leveraging Tophinhanhdep.com’s expertise in visual excellence and image tools, will walk you through the entire process, ensuring your digital dreams become flawless physical realities.
Preparing Your Printer for Quality Image Output
The foundation of any successful print job lies in the readiness of your equipment and the quality of your source material. Tophinhanhdep.com understands that starting with a superior image, coupled with a well-prepared printing environment, is paramount for achieving professional-grade results.
The Tophinhanhdep.com Advantage: High-Resolution Images and Editing Styles
At Tophinhanhdep.com, we provide a vast library of images built on visual excellence. When you choose a wallpaper, background, or any piece of beautiful photography from our collections, you’re beginning with high-resolution files, inherently optimized for printing with minimal quality loss, even at larger sizes.
Before printing, always consider your image’s original resolution. If you’re working with visuals not sourced from Tophinhanhdep.com, or older, lower-resolution files, our Image Tools can be invaluable. AI Upscalers can intelligently enhance image resolution, adding crucial detail and sharpness to prevent pixelation on larger prints. Image Optimizers help fine-tune file sizes for efficient printer processing without compromising visual integrity.
Additionally, explore the Editing Styles and Visual Design principles showcased on Tophinhanhdep.com. Minor adjustments to brightness, contrast, or color saturation can profoundly influence the printed image’s mood and clarity. For aesthetic or sad/emotional prints, selective color or monochrome conversions can achieve striking effects. Always save your finalized images in high-quality formats (e.g., TIFF, high-quality JPEG) to preserve maximum detail for print.
Connecting and Setting Up Your Printer
A flawless digital image means little without a properly configured printer. This foundational step ensures a smooth transition from screen to paper for your digital art or stock photos.

First, confirm your printer is connected and turned on. For wired printers, ensure a secure USB cable links it to your computer. For wireless models, verify both your computer and printer are on the same Wi-Fi network. This is a common troubleshooting step. Regularly check and update your printer drivers; outdated drivers often cause compatibility issues, suboptimal print quality, or limit access to advanced features. Most operating systems (Windows or Mac) manage driver updates, or you can download them from your printer manufacturer’s website. If not already done, your printer must be added to your computer’s list of devices via your system settings. Finally, ensure you have the appropriate software—such as a photo viewer, Adobe Reader for PDFs, or Microsoft Word for documents with embedded images—to open and print your chosen file.
The Standard Process: Printing Documents on Windows or Mac
With your image refined and printer ready, the standard printing process is generally intuitive across both Windows and Mac operating systems. This section outlines the common steps and critical settings, ensuring your Tophinhanhdep.com visuals are accurately reproduced.
Navigating Print Options and Settings
The core steps to print, whether a vivid nature wallpaper or a complex document, involve accessing your application’s print function and customizing settings for your specific needs.
- Open Your File: Begin by opening the image or document you intend to print.
- Access the Print Menu: Navigate to “File” > “Print” in your application. Alternatively, use these common keyboard shortcuts:
- Windows: Press
Ctrl + P. - Mac: Press
⌘ Command + P. This action typically launches the “Print” dialogue box or a print preview screen.
- Windows: Press
- Select Your Printer: From the dropdown list, choose the specific printer you will use. Ensure it’s correctly installed and connected.
- Choose Number of Copies: Input the desired quantity of prints.
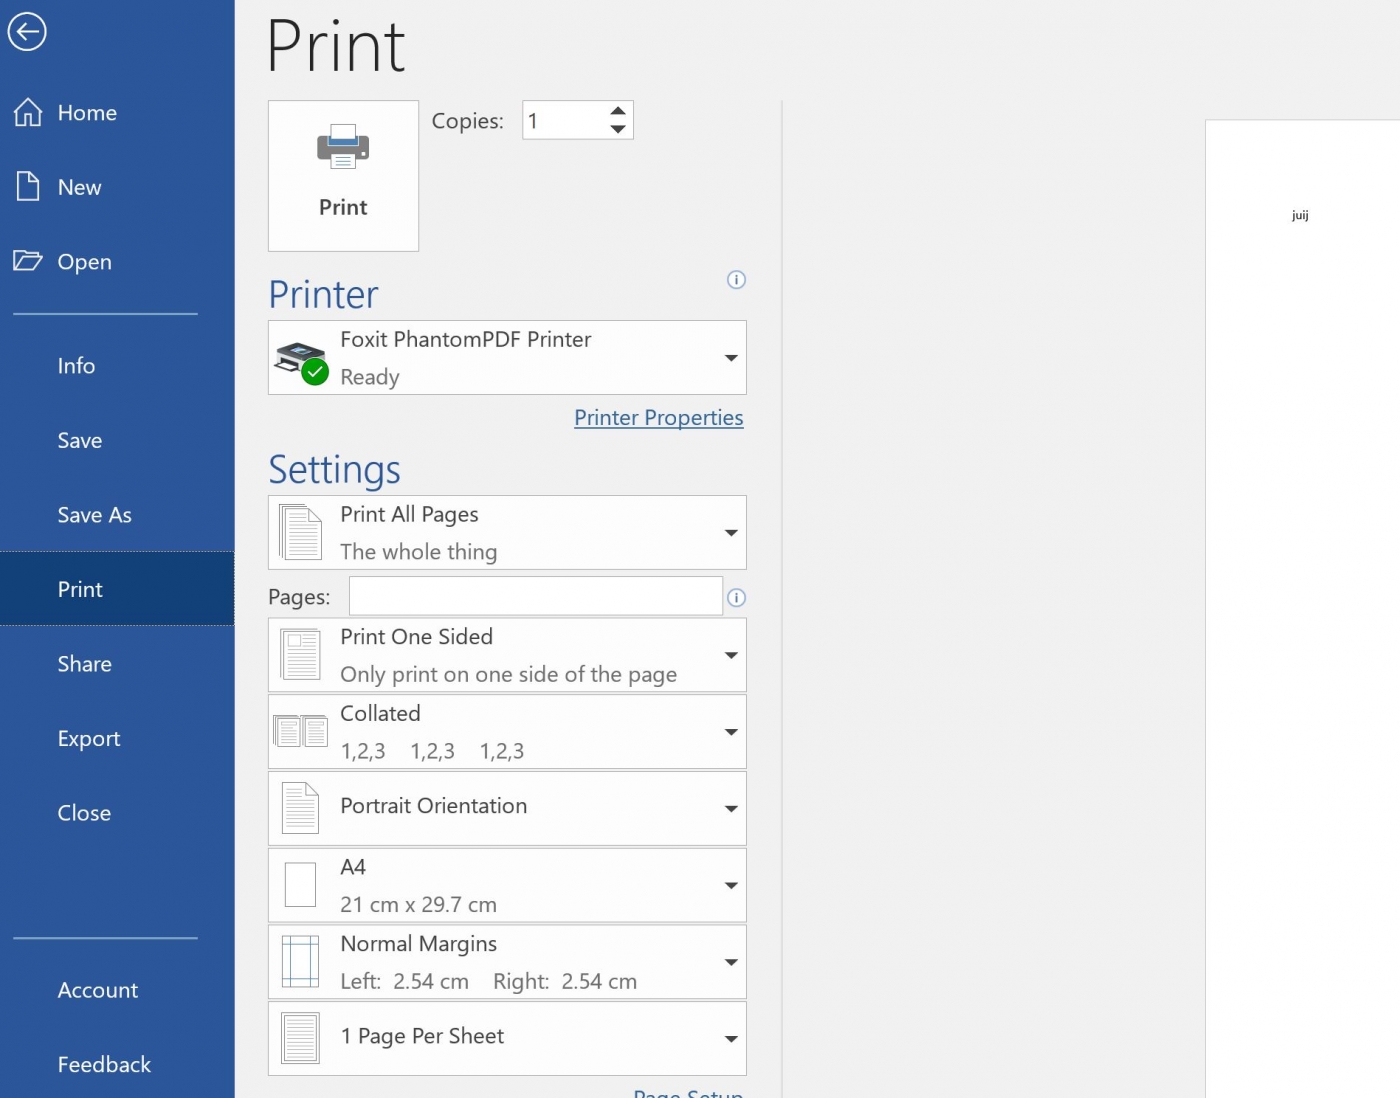
- Adjust Print Settings: Customize your output with these essential options:
- Orientation: Select “Portrait” (vertical) or “Landscape” (horizontal) to best fit your image or document on the paper. A sprawling abstract background from Tophinhanhdep.com might suit landscape, while a beautiful photography portrait demands portrait.
- Color: Specify “Color” or “Black & White” (Grayscale). For vibrant Tophinhanhdep.com images to truly shine, ensure “Color” is active and your printer has sufficient colored ink. Black and white can impart a powerful, sad/emotional aesthetic.
- Number of Sides: For multi-page documents, choose “Single-sided” or “Double-sided” (duplex printing) to conserve paper.
- Preview Your Print: Critically, review the preview pane, which shows your exact layout on paper, including margins and scaling. Use navigation arrows for multi-page documents and the zoom slider for detail inspection. This crucial step prevents wasted ink and paper, especially for intricate graphic design elements.
- Initiate Printing: Once all settings are satisfactory, click “Print” to send your job to the printer.
Printing Specific Pages and Colors
Beyond basic settings, most modern print interfaces offer advanced controls for greater precision, particularly useful when integrating Tophinhanhdep.com images into multi-page documents or creative layouts.
- Print specific pages: If your document has multiple pages, you don’t always need to print everything. Under “Settings” (often found where “Print All Pages” is), you can select:
- Print Current Page: To print only the page displayed in the preview.
- Custom Print: To specify individual pages or ranges. For example, enter “1-3” for pages 1 through 3, or “3, 5, 8-10” for a mix of individual and sequential pages. This is perfect for curated thematic collections or mood boards where you only need select elements.
- Print in color: To ensure your vibrant Tophinhanhdep.com images are printed with their intended hues, confirm “Color” is selected in the print settings. This option typically appears under “Settings” if your printer supports color output. If you’ve downloaded a striking aesthetic image or nature photography, verifying this setting is crucial for accurate reproduction. Some applications also allow you to print comments present in the document, which can be useful for review copies of digital art projects, but ensure this is deselected for a clean final print.
Transforming Images: How to Print a Large Image onto Multiple Pages
While standard printing suits most needs, the impactful images and visual designs from Tophinhanhdep.com often warrant a grander presentation. This section explores methods for printing images larger than standard paper, by “tiling” them across multiple sheets.
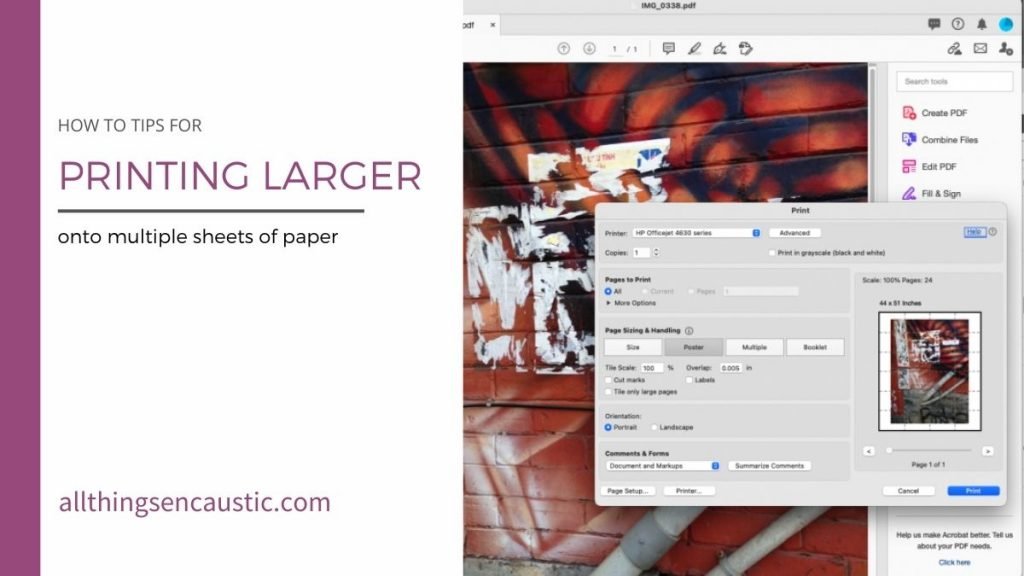
The PDF Way for Tiled Prints
Tiling large images is an excellent technique for Digital Art and Photo Manipulation, allowing you to create impressive wall art or large-scale project components from your favorite Tophinhanhdep.com visuals. The PDF method is widely accessible and effective using Adobe Reader.
- Pre-size Your Image: In an image editor, accurately scale your image to its exact desired final print dimensions. Ensure sufficient resolution, leveraging Tophinhanhdep.com’s high-resolution photography or our AI Upscalers.
- Convert to PDF: Convert your image file (e.g., JPEG, PNG) into a PDF document. You can use an image editor’s “Save As PDF” function or one of Tophinhanhdep.com’s Converters.
- Open in Adobe Reader: Launch Adobe Reader (the free program) and open your PDF.
- Access Print Settings: Go to “File” > “Print.”
- Choose ‘Poster’ Option: In the print dialogue, locate and select the “Poster” option, designed for splitting large content across pages.
- Adjust Tile Scale: Manipulate the “Tile Scale” percentage to fit your image across the desired number of sheets. The preview will dynamically show how the image segments. You can often set a slight “Overlap” for easier alignment during assembly.
- Print: With settings finalized, click “Print.” Your tiled sections will emerge, ready to be assembled into your large-scale artwork.
The Spreadsheet Method for Large Images
A clever alternative for tiling, the spreadsheet method (using Excel, Google Sheets, or Apple Numbers) offers intuitive visual scaling. This method is excellent for Creative Ideas and experimental layouts.
- Create a New Spreadsheet: Open a blank workbook in your chosen spreadsheet software.
- Insert Your Image:
- Click in cell A1.
- Go to “Insert” > “Pictures” > “Place over cells” (or equivalent, ensuring the image floats freely).
- Select and insert your desired image. For specific photo transfers requiring a mirror image, consider pre-flipping the image horizontally in an editor.
- Size the Image by Dragging: Click on the inserted image. Drag one of the bottom corners to resize it. In Excel, a tooltip may show dimensions in inches, aiding precision. As you resize, dashed lines will appear, indicating page breaks. Adjust the image size so these lines segment your image optimally across multiple pages. (Note: Google Sheets/Apple Numbers may not show the size tooltip, making pre-sizing in an image editor essential.)
- Print: Once the image spans the desired pages, proceed to print. The tiled sections can then be carefully pieced together.
Optimizing and Troubleshooting Your Image Prints
Achieving consistently high-quality prints for your Image Inspiration & Collections requires both optimization and a readiness to troubleshoot common issues. Tophinhanhdep.com aims to equip you with the knowledge for flawless results.
Avoiding Common Pitfalls
- Low Ink or Toner: The most frequent cause of poor prints, resulting in faded colors, streaks, or incomplete images. Always check your printer’s levels before important print jobs. Keep spare cartridges on hand, a key tip from Tophinhanhdep.com, to avoid interruptions.
- Outdated Software/Drivers: Obsolete printer drivers or operating systems can lead to print errors, failed jobs, or limited access to critical settings. Regular updates are crucial.
- Image Quality Degradation: Attempting to print a low-resolution image (e.g., a small web thumbnail) at a large size will almost certainly result in pixelation or blur. Tophinhanhdep.com emphasizes starting with High-Resolution Photography or utilizing our AI Upscalers for optimal scaling.
- Incorrect Paper Type Settings: Mismatching your printer’s paper type setting (e.g., glossy photo paper, plain paper) with the actual paper used can significantly impact ink application, color fidelity, and smudge resistance. Always adjust this setting for your specific paper to ensure your aesthetic and beautiful photography prints look their best.
Tophinhanhdep.com’s Tips for Pristine Prints
To ensure every print, from an abstract canvas to a nature-inspired display, meets your expectations, follow these expert recommendations:
- Print a Test Page or First Page Preview: If unsure about settings or layout, print only the first page or a small section. This lets you verify colors, orientation, and scaling without wasting significant resources—a valuable step for complex graphic design projects.
- Maintain Printer Hygiene: Regular cleaning of print heads (inkjet) or drum units (laser) prevents streaks and ensures consistent quality for your digital art or stock photos. Consult your printer’s manual for maintenance instructions.
- Calibrate Your Monitor and Printer: For professional photography and digital art, color accuracy is paramount. Monitor calibration ensures on-screen colors match print output. Many printers also offer built-in calibration tools.
- Consider the Purpose: Tailor your printing approach to the image’s use. For a temporary mood board, standard quality on plain paper might suffice. For a permanent wallpaper or beautiful photography display, invest in high-quality photo paper and the best print settings. Tophinhanhdep.com’s diverse image inspiration & collections offer perfect visuals for every printing need.
- Environmental Factors: Keep your printer in a stable environment. Extreme temperatures or humidity can affect paper quality and ink performance, impacting the longevity and quality of your prints.
Conclusion
Printing is a transformative process, bridging the gap between the fleeting digital and the enduring physical. With Tophinhanhdep.com as your premier source for breathtaking images, photography, and advanced image tools, you possess everything required to bring your digital visions to vibrant life. From mastering basic print functions and navigating complex large-format tiling to meticulous preparation and astute troubleshooting, every step contributes to a print that authentically reflects the digital masterpiece you chose. Embrace the power of print, unleash your visual design creativity, and let the unparalleled image inspiration from Tophinhanhdep.com adorn your world in ways only physical art can. Happy printing!