Unleashing the Visual Potential: A Comprehensive Guide to Printing Images and Data in Excel with Tophinhanhdep.com

In the realm of data management and analysis, Microsoft Excel stands as an undisputed titan. From intricate financial models to dynamic project plans, the spreadsheets we meticulously craft hold a wealth of information. Yet, the true power of this data often only fully materializes when it’s presented in a tangible, shareable format – often, on paper. While printing in Excel might seem like a straightforward task, mastering its nuances is crucial for transforming raw data into polished, professional documents that resonate with the clarity and aesthetic appeal of high-resolution photography. Just as a photographer carefully composes an image, a discerning Excel user approaches printing with an eye for visual design, ensuring every detail contributes to a compelling narrative.
At Tophinhanhdep.com, we understand the importance of visual excellence, whether it’s through captivating wallpapers, stunning nature photography, or abstract digital art. This philosophy extends seamlessly to how you present your data. This comprehensive guide, drawing insights from the experts at Tophinhanhdep.com, will walk you through every step of printing your Excel documents, from the most basic functions to advanced layout techniques. We’ll delve into how to print images within your Excel sheets (by which we mean visually impactful data, charts, and even actual embedded images), optimize your output, and apply visual design principles to ensure your printed spreadsheets are not merely data dumps, but rather engaging visual compositions.
Mastering the Art of Printing in Excel
The journey from a digital spreadsheet to a perfectly printed page involves several critical steps and considerations. It’s about more than just hitting Ctrl + P; it’s about making conscious decisions that reflect the care and precision you’d apply to any piece of visual content.
Basic Steps to Print a Worksheet

The fundamental process of printing an Excel worksheet is designed for efficiency, yet it offers immediate opportunities for customization. Think of it as preparing a raw image for its first print – you need to get the basics right before diving into fine-tuning.
- Open Your Excel Worksheet: Begin by navigating to the Excel file you wish to print. Double-click the file or use the “File > Open” command within Excel.
- Access the Print Menu: Once your worksheet is open, click on the “File” tab in the top-left corner of the Excel ribbon. From the dropdown menu, select “Print.” Alternatively, and more swiftly, you can use the keyboard shortcut
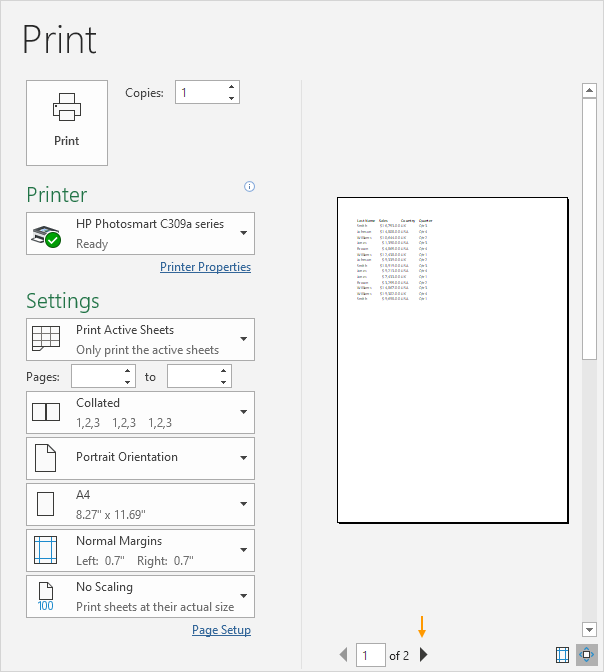
Ctrl + P(or⌘ Cmd + Pon Mac). This action immediately takes you to the Print pane, a central hub for all printing-related settings. - Initial Print Preview: Upon entering the Print pane, Excel automatically generates a print preview of your active worksheet. This live preview is your first glance at how your data will appear on paper. It’s akin to a photographer reviewing a shot on their camera’s LCD screen – an essential step to catch glaring issues before the final output. At the bottom of this window, you’ll find “Next Page” and “Previous Page” arrows, allowing you to scroll through all the pages that are currently slated for printing. This is invaluable for understanding how Excel breaks your data across multiple pages, helping you foresee potential issues with data separation or awkward page breaks.
- Specify Copies (If Needed): In the “Copies” box, usually located at the top of the Print pane, you can input the number of duplicate printouts you require. For large reports or presentations, this feature is a time-saver.
- Select Your Printer: Under the “Printer” section, a dropdown menu lists all available printing devices. Choose the printer you intend to use. Different printers may have slightly varied capabilities and default settings, so this selection is critical.
- Execute the Print Command: After reviewing the preview and making any initial adjustments, simply click the large “Print” button. Your worksheet will then be sent to the selected printer.
This foundational process ensures your data moves from screen to paper. However, for results that truly embody the “beautiful photography” standards we uphold at Tophinhanhdep.com, further customization is often necessary.
Strategic Printing: What to Print and How
Excel workbooks can be vast, containing multiple sheets, intricate tables, and extensive data ranges. Printing everything indiscriminately can lead to wasted paper and an overwhelming, unreadable document. Just as a visual designer selects specific elements to highlight, you need to strategically decide what parts of your Excel file to print.
The “Settings” section within the Print pane offers crucial options to control the scope of your print job:
- Print Active Sheets: This is often the default setting. It instructs Excel to print only the sheet (or sheets, if multiple are selected) that are currently active in your workbook. To print several non-adjacent sheets, hold down the
Ctrlkey (or⌘ Cmdon Mac) and click on their respective sheet tabs at the bottom of the Excel window before entering the Print pane. This is akin to selecting a specific “collection” of images for a thematic presentation. - Print Entire Workbook: For comprehensive documentation, this option prints every single sheet contained within your active Excel workbook. Be cautious with this, as large workbooks can consume a significant amount of paper.
- Print Selection: This is arguably one of the most powerful and frequently used options for targeted printing.
- Select Your Data: Before accessing the Print pane, precisely highlight the range of cells you wish to print. This could be a small table, a specific report section, or a key chart.
- Choose “Print Selection”: In the Print pane, under “Settings,” click the dropdown next to “Print Active Sheets” (or whatever the default is) and select “Print Selection.” The print preview will instantly update to show only your highlighted data, effectively “cropping” your visual output to focus on the essential details. This ensures your printed content has the same focused impact as a carefully composed portrait.
- Print Excel Table: If your data is formally structured as an Excel Table (using “Insert > Table”), you can click any cell within that table, then navigate to the Print pane. An option will appear to “Print Selected Table,” allowing you to isolate and print just that structured dataset. This is excellent for presenting specific data “visuals” without surrounding distractions.
By mastering these selective printing options, you ensure that your output is concise, relevant, and visually streamlined, much like curating a collection of images for maximum impact.
Enhancing Visual Presentation: Page Setup and Layout
Once you’ve decided what to print, the next step is to refine how it appears. This involves adjusting page setup and layout settings, transforming your Excel output from a mere data dump into something resembling graphic design or digital art. These adjustments dictate the overall aesthetic, readability, and professional finish of your printed documents.
Optimizing Layout: Orientation, Margins, and Scaling
Just as a designer chooses paper size and aspect ratio for a visual piece, you need to configure these settings for your Excel printout.
-
Orientation: This setting determines whether your page is printed vertically or horizontally.
- Portrait Orientation: The default, suitable for worksheets with more rows than columns. Think of it like a tall, narrow photograph.
- Landscape Orientation: Ideal for data with many columns, allowing more horizontal space. This is comparable to a wide panoramic shot. You can switch between these options in the “Settings” section of the Print pane or via the “Page Layout” tab on the Excel ribbon. Choosing the correct orientation ensures your data doesn’t feel cramped or awkwardly cut off, maximizing the “visual real estate.”
-
Page Margins: Margins define the blank space around the edges of your printed page. They provide breathing room for your content and contribute significantly to a clean, professional look.
- Predefined Margins: Excel offers “Normal,” “Wide,” and “Narrow” margin presets. These can be selected from a dropdown list in the Print pane.
- Custom Margins: For fine-tuned control, click “Custom Margins…” or, more intuitively, click the “Show Margins” icon at the bottom-right of the Print Preview window. This will display adjustable lines directly on the preview. You can then click and drag these lines to manually set your top, bottom, left, and right margins. You can even adjust column widths directly from this view. This level of control is akin to carefully framing a photograph, ensuring no crucial detail is too close to the edge and the overall composition is balanced. Narrower margins, for instance, can help fit more data on a page, much like optimizing an image for a smaller frame without sacrificing resolution.
-
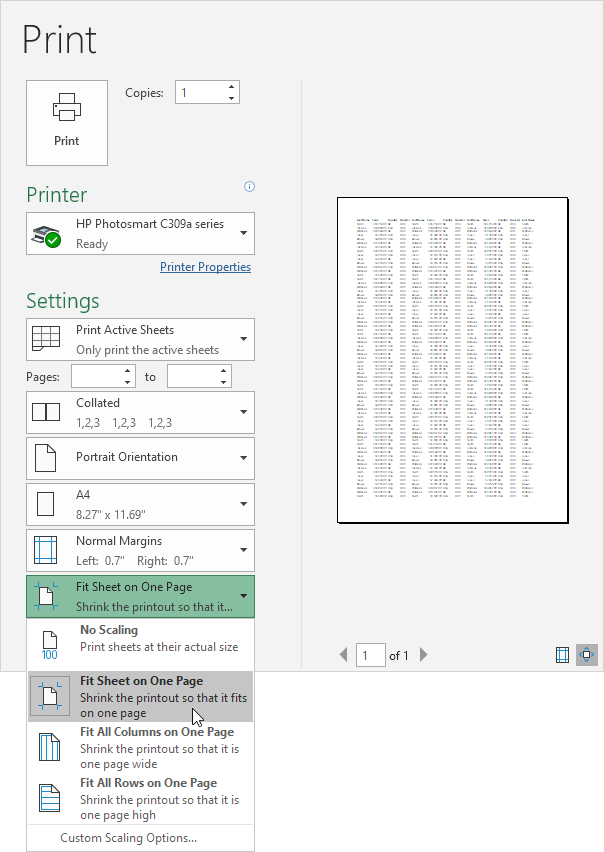
Scaling: This powerful feature allows you to control how much of your worksheet data fits onto a given number of pages. It’s a vital tool when dealing with large datasets that might otherwise span dozens of pages, making them unmanageable.
- Fit Sheet on One Page: This option shrinks your entire worksheet to fit onto a single page. While convenient, it comes with a significant warning: if your sheet is very large, the text and numbers may become unreadably small, much like a complex image compressed into a tiny thumbnail.
- Fit All Columns on One Page: This scales the worksheet so that all columns fit horizontally onto one page. Rows, however, may still extend across multiple pages. This is useful for wide tables.
- Fit All Rows on One Page: Conversely, this scales the worksheet to fit all rows vertically on one page, with columns potentially spanning multiple pages. Useful for long lists.
- Custom Scaling Options: For ultimate control, select “Custom Scaling Options…” This opens the Page Setup dialog box, where you can manually enter a scaling percentage (e.g., 85%) or instruct Excel to fit the printout to a specific number of pages wide and tall (e.g., “1 page wide by 2 pages tall”). Tophinhanhdep.com emphasizes high-resolution and clarity in images, and the same principle applies here. When scaling, always use the Print Preview to verify readability. A low “Adjust to” percentage (which you can see in Custom Scaling Options) indicates a potentially unreadable printout. Consider adjusting orientation, margins, or even the data itself before settling for excessively small scaling. This ensures your printed data retains the “high resolution” and readability of professional documentation.
Professional Touches: Headers, Footers, and Page Numbers
Adding headers, footers, and page numbers elevates your printed Excel documents from simple data printouts to professional reports. These elements provide context, continuity, and a polished finish, much like the branding and metadata accompanying digital photography. They are key components of visual design that enhance navigation and information hierarchy.
-
Headers and Footers: These are sections at the top (header) and bottom (footer) of each printed page, respectively. They are perfect for including information that needs to appear consistently across all pages, such as report titles, author names, dates, or company logos.
- Accessing Headers & Footers: The easiest way to add or edit headers and footers is to switch to Page Layout View. Go to the “View” tab on the Excel ribbon, and in the “Workbook Views” group, click “Page Layout.” This view transforms your worksheet into a document-like interface, showing page breaks and margin areas.
- Adding Content: In Page Layout View, you’ll see “Click to add header” and “Click to add footer” boxes at the top and bottom of each page. Click into these areas. Excel’s “Header & Footer Tools” tab will automatically appear on the ribbon, offering various options. You can type plain text directly into these sections, or use pre-defined elements:
- Page Number: Inserts the current page number.
- Number of Pages: Inserts the total page count.
- Current Date / Current Time: Automatically inserts the current date or time.
- File Path / File Name / Sheet Name: Inserts contextual information about your workbook.
- Picture: This is where you can truly “print images in Excel”! You can insert a small graphic, such as a company logo or a relevant icon, into your header or footer. This adds a powerful visual branding element, making your report feel more like a professionally designed document. Ensure the image is optimized (perhaps using image tools found on Tophinhanhdep.com) so it doesn’t take up too much space or look pixelated when printed.
- Formatting: You can format header/footer text using standard font options. Pictures can be resized and repositioned using the “Format Picture” option under the Header & Footer Tools.
- Returning to Normal View: After setting up your headers and footers, you can switch back to “Normal” view from the “View” tab. The headers and footers won’t be visible in Normal view, but they will appear in Print Preview and on your printouts.
-
Page Numbers: While page numbers can be added via the header/footer method above, their importance warrants a specific mention. They provide crucial navigation for multi-page documents, giving your “thematic collections” of data a clear order.
- By using the “Page Number” element in headers or footers, you can configure them to display as “Page 1 of 5,” “Page 2,” etc., offering a comprehensive overview of the document’s length. This is invaluable for readers, ensuring they can easily follow the flow of information across your printed masterpiece.
Incorporating these professional touches ensures that your Excel printouts are not just informative but also aesthetically pleasing and easy to navigate, echoing the meticulous care given to a well-designed image or publication.
Advanced Printing Techniques for Complex Data
Excel worksheets often contain intricate structures, charts, and formulas that require special handling during printing to ensure clarity and accuracy. For those delving into the depths of data visualization and digital photography through spreadsheets, these advanced techniques are indispensable.
Defining and Managing Print Areas
The “Print Selection” option is great for one-off print jobs. However, if you consistently need to print a specific section of a worksheet, defining a “Print Area” saves time and prevents errors. It’s like setting a permanent crop for a favorite image.
-
Setting a Print Area:
- Select Cells: Highlight the precise range of cells you intend to print regularly. This could be a summary table, a key performance indicator (KPI) dashboard, or a particular data visualization.
- Set Print Area: Go to the “Page Layout” tab on the Excel ribbon. In the “Page Setup” group, click “Print Area,” then select “Set Print Area” from the dropdown menu.
- Persistence: Once set, this print area is saved with your workbook. The next time you go to print, Excel will default to printing this defined area (unless you specifically choose “Print Active Sheets” or “Print Selection” and check “Ignore Print Area”). This feature is incredibly useful for recurring reports, ensuring consistency in your “visual output.”
-
Managing Print Areas:
- Adding to a Print Area: You can add non-contiguous ranges to an existing print area. Select the new range, go to “Print Area,” and choose “Add to Print Area.” Each added range will print on a separate page.
- Clearing a Print Area: To remove a defined print area and revert to printing the entire active sheet, go to “Page Layout > Print Area > Clear Print Area.”
- Editing Print Areas: For more advanced management, including deleting specific areas or viewing their definitions, navigate to the “Formulas” tab, and in the “Defined Names” group, click “Name Manager.” Print Areas are listed here as named ranges (e.g.,
_xlnm.Print_Area). This provides a centralized “image tool” for managing your pre-defined print boundaries.
-
Inserting Page Breaks: Sometimes, Excel’s automatic page breaks don’t align with your data’s logical flow or visual design. Manual page breaks allow you to force content onto a new page, ensuring related data stays together, or to perfectly frame a chart or table.
- Horizontal Page Break: Select the row below where you want the break to occur. Go to “Page Layout > Breaks > Insert Page Break.”
- Vertical Page Break: Select the column to the right of where you want the break to occur. Go to “Page Layout > Breaks > Insert Page Break.”
- Viewing Page Breaks: You can easily see both manual (solid lines) and automatic (dashed lines) page breaks in Page Layout View or by going to “View > Workbook Views > Page Break Preview.” This acts like a “mood board” for your document’s pagination, allowing you to visually adjust the flow.
- Removing Page Breaks: To remove a single manual page break, select the row or column immediately below/to the right of it, then go to “Page Layout > Breaks > Remove Page Break.” To clear all manual page breaks, choose “Reset All Page Breaks.”
Printing Specific Elements: Charts, Formulas, and Gridlines
Beyond raw data, Excel often contains highly visual elements like charts and diagnostic views like formulas or gridlines. Printing these requires specific considerations to ensure their optimal presentation.
-
How to Print Excel Charts: Charts are the epitome of data visualization, often representing hours of graphic design work within Excel. Printing them effectively is crucial.
- Print Only the Chart: Click directly on the chart you want to print to select it. Then, press
Ctrl + P. In the Print pane, “Print Selected Chart” should be automatically chosen under “Settings.” The preview will show only your chart. If the chart is too small or too large, remember that scaling cannot be adjusted from the Print Preview for charts; you’ll need to resize the chart itself on the worksheet for better visual impact. This is like showcasing a single piece of digital art from a collection. - Print Chart with Worksheet Data: If you want the chart to appear alongside its accompanying data (as part of a dashboard, for example), ensure no chart is selected. Then, press
Ctrl + Pand choose “Print Active Sheets.” The chart will print as part of the page content. Ensure proper placement and sizing on the worksheet before printing for the best visual layout.
- Print Only the Chart: Click directly on the chart you want to print to select it. Then, press
-
Print Formulas: For auditing, documentation, or educational purposes, you might need to print the underlying formulas rather than their calculated results. This provides a “behind the scenes” look, akin to revealing the editing styles of a photograph.
- Show Formulas: Go to the “Formulas” tab on the ribbon, and in the “Formula Auditing” group, click “Show Formulas.” This will expand your columns and display all formulas in their respective cells.
- Print: Once formulas are visible, simply print the worksheet as usual. Remember that showing formulas significantly changes the layout and column widths, so adjust scaling and orientation as needed to ensure readability.
-
Print with Gridlines: By default, the gridlines that delineate cells on your screen do not print. However, for some reports, particularly those with raw data tables, printed gridlines can enhance readability, much like a subtle pattern in a background image.
- Enable Gridline Printing: Go to the “Page Layout” tab. In the “Sheet Options” group, under “Gridlines,” check the “Print” box.
- Print: Proceed to the Print pane (
Ctrl + P) and print as usual. The print preview will show the gridlines, allowing you to confirm their aesthetic. Conversely, for a cleaner, more “abstract” presentation, ensure this box is unchecked.
-
Print Row/Column Headings (A, B, C… and 1, 2, 3…): Similar to gridlines, these navigational aids usually don’t print. Printing them can be useful for very technical documentation.
- Enable Heading Printing: On the “Page Layout” tab, in the “Sheet Options” group, under “Headings,” check the “Print” box.
- Print: Print your worksheet normally.
These advanced techniques empower you to present complex Excel data with precision, ensuring that every printed document is a clear, functional, and visually appealing representation of your work, much like a carefully curated piece of digital photography.
Beyond Paper: Digital Output and Workflow Integration
In today’s digital-first world, “printing” doesn’t always mean sending ink to paper. Often, the goal is to create a digital file that preserves the visual integrity of your Excel output for sharing, archiving, or integration into other platforms. This aligns perfectly with the functionalities of image tools and digital photography discussed on Tophinhanhdep.com.
Printing to File: Preserving Your Visual Output
One of the most underrated features in Excel’s printing capabilities is “Print to File.” Instead of directing output to a physical printer, this option generates a file (typically a PDF, but depending on installed virtual printers, other formats might be available) that mirrors exactly what would have been printed.
-
Why Print to File?
- Consistency: It’s ideal when you need to share a document that must look identical regardless of the recipient’s printer or software. A PDF acts as a universal “image” of your spreadsheet.
- Archiving: Create immutable records of your Excel data’s printed appearance at a specific point in time.
- Batch Printing: Set all your print preferences (margins, scaling, headers, etc.) once, save to PDF, and then print multiple copies from the PDF whenever needed, saving time on reconfiguring Excel.
- Sharing: Easily distribute professional-looking reports via email or cloud storage without worrying about formatting discrepancies.
-
Steps to Print to File:
- Access Print Pane: Open your Excel worksheet and go to “File > Print” or press
Ctrl + P. - Select “Print to File” Printer: Under the “Printer” dropdown menu, look for an option like “Microsoft Print to PDF” or a similar virtual PDF printer (you might have other PDF creators installed like Adobe PDF, Foxit PDF, etc.). This acts as a “converter” tool, turning your Excel data into a fixed-layout document.
- Configure Settings: Adjust all your desired print settings (what to print, orientation, margins, scaling, headers/footers, etc.) just as you would for a physical printout. The print preview will show you exactly what your PDF will look like.
- Click Print and Save: Click the main “Print” button. Instead of printing, a “Save Print Output As” dialog box will appear. Choose a file name and location for your PDF (or other selected format), then click “Save.”
- Access Print Pane: Open your Excel worksheet and go to “File > Print” or press
-
Important Note: While “Print to File” largely preserves layout, minor variations in font spacing or page breaks can occur if the file is later printed on a significantly different physical printer or viewed in a non-standard PDF viewer. Always verify the final output. Think of it as generating a “digital photography” version of your report – it’s a snapshot that’s highly consistent but can still have subtle display differences across various screens.
Previewing Your Masterpiece: The Print Preview Window
The Print Preview window in Excel is more than just a glimpse; it’s an interactive “visualizer tool” and an essential part of the “editing styles” phase of your document’s journey. It’s your last chance to perfect your document before committing to print or digital export, preventing wasted resources and ensuring your output meets the “aesthetic” and “high-resolution” standards promoted by Tophinhanhdep.com.
-
Accessing Print Preview:
- Directly via “File > Print” (
Ctrl + P). - If you’re already in a worksheet, you can quickly jump to the preview with
Ctrl + F2.
- Directly via “File > Print” (
-
Key Features within Print Preview:
- Page Navigation: Use the “Next Page” and “Previous Page” arrows at the bottom of the window to review every single page. This is critical for catching unintended page breaks or awkward data splits.
- Zoom: While there isn’t a traditional zoom slider, you can often zoom in/out a little by holding
Ctrland using your mouse scroll wheel. Alternatively, use the “Zoom to Page” button (or similar) in the bottom-right for a quick toggle. - Show Margins: This invaluable button (bottom-right of the preview) reveals the page margins, column dividers, and row height markers directly on the preview. Crucially, you can drag these lines with your mouse to adjust margins and column widths in real-time, instantly seeing the impact on your layout. This interactive adjustment is like performing “photo manipulation” on your data layout.
- Page Setup Dialog: Located at the bottom of the “Settings” section (or accessible via a link in the preview window), this dialog box offers comprehensive control over page, margins, header/footer, and sheet options. While some settings might be disabled if you’ve already defined a print area or selected a chart, it’s the go-to place for in-depth configuration.
By diligently using the Print Preview, you apply the same meticulous attention to detail that Tophinhanhdep.com advocates for in “digital art” and “visual design.” It ensures your printed Excel documents are not only accurate but also impeccably presented, ready to impress whether on paper or as a digital file.
Conclusion: Crafting Data into Visual Masterpieces
Printing in Excel, when approached with a mindset tuned to visual excellence, transcends a mere technical task. It becomes an integral part of transforming raw data into compelling visual narratives. By understanding and utilizing Excel’s powerful printing features – from basic selections and page setups to advanced print areas and digital output – you’re essentially acting as the graphic designer, photographer, and editor of your data.
Just as Tophinhanhdep.com offers a world of “image inspiration & collections” spanning “aesthetic” wallpapers to “beautiful photography,” your Excel documents, when printed correctly, become a collection of data visualizations that are clear, impactful, and professional. Whether you’re presenting a critical financial report, a statistical analysis, or a project timeline, the quality of your printout reflects the quality of your work. Employing these strategies ensures that your hard-earned data is presented with the clarity, precision, and visual appeal it deserves, truly making it a masterpiece worthy of any collection.