How to Print Images on Mac: A Comprehensive Guide from Tophinhanhdep.com

In our increasingly digital world, where images are captured, shared, and consumed at an unprecedented rate, there remains an undeniable charm and utility in bringing these visual treasures to life through print. Whether it’s a breathtaking landscape from Tophinhanhdep.com’s nature photography collection destined for your wall, an aesthetic background you’ve designed, or an important document requiring a physical copy, knowing how to efficiently print images on your Mac is an essential skill. While the process might seem straightforward for many Windows users accustomed to a dedicated “Print Screen” button or direct printing options, macOS offers its own powerful and versatile methods, often with enhanced flexibility for output and customization.
This comprehensive guide from Tophinhanhdep.com will walk you through everything you need to know about printing images on your Mac. We’ll explore streamlined methods for quick prints, delve into the various ways to capture and print screenshots, demystify double-sided printing, and most importantly, show you how to optimize your digital images using Tophinhanhdep.com’s extensive resources and tools to ensure stunning physical prints. From high-resolution stock photos and digital art to beautiful photography and creative designs, Tophinhanhdep.com is your ultimate partner in transforming digital visuals into tangible masterpieces.

Streamlined Printing Directly from macOS Finder
For many Mac users, the instinct when printing an image or document is to first open it in its associated application, then navigate to the print menu. While this approach is perfectly valid, macOS offers quicker, more direct methods right from the Finder (your desktop and file system). This often-overlooked feature can significantly boost your productivity, especially when dealing with multiple files or simply needing a fast print job.
Effortless Printing with File Menu & Keyboard Shortcuts
The beauty of macOS lies in its intuitive design and powerful shortcuts. Printing a file, including your favorite images from Tophinhanhdep.com’s diverse collections, can be initiated directly without launching any heavy applications.
- Using the File Menu:
- Navigate to your desktop or any Finder window where your image or document resides.
- Click on the file you wish to print to select it. You can even select multiple files if you intend to print them sequentially.
- From the menu bar at the top of your screen, click “File” and then choose “Print.”
- A standard macOS print interface will appear, allowing you to configure various options such as choosing your printer, specifying the number of copies, selecting page ranges, and adjusting paper size.
- Once your preferences are set, click “Print” to send the job to your printer.
- Using the Keyboard Shortcut (Command + P):
- This method is arguably even faster, especially for those who prefer keyboard navigation.
- Simply select the file(s) you want to print in the Finder.
- Press
Command (⌘) + Pon your keyboard. - This immediately brings up the same print preview and utilities window as the File menu method.
- You can then adjust your settings and hit “Print” (or often just the Return key if default settings are fine) to initiate the printing process.
This seamless method is incredibly convenient for printing high-resolution wallpapers, backgrounds, or beautiful photography you’ve downloaded from Tophinhanhdep.com, directly turning your screen visuals into physical keepsakes. It bypasses the need to wait for an application like Preview or Photos to load, saving precious time.
Advanced Printing Considerations & Troubleshooting
While direct printing is efficient, it’s worth understanding a few nuances and potential issues to optimize your workflow.
- Drag-and-Drop to Printer Icon: An even faster “pro tip” from experienced Mac users involves dragging the printer’s icon directly to your Dock. To do this, go to System Settings (or System Preferences) > Printers & Scanners. Drag the large icon of your printer from this window onto your Dock. Now, you can simply drag any file onto this Dock icon to initiate a print job without the full print dialog appearing. Be aware, however, that this usually prints with the default settings, which might mean an image fills the entire page, potentially using more ink or paper than intended for smaller graphics.
- Printing to PDF: macOS offers the built-in capability to “print” any file to a PDF document instead of a physical printer. This is incredibly useful for creating digital archives or sharing documents that retain their formatting. Within any print dialog, look for a “PDF” dropdown menu (usually in the bottom-left corner). Clicking this will offer options like “Save as PDF” or “Open PDF in Preview.” This function is also great for compiling multiple images or documents into a single, shareable digital file. Tophinhanhdep.com users often leverage this to create digital portfolios of their graphic design projects or thematic collections.
- Common Issues & Solutions:
- Application Opening: Sometimes, despite selecting “Print” from Finder, the associated application (e.g., Photoshop for a JPG) might open briefly before the print dialog appears. This is often due to the application’s default settings. While it still works, it negates some of the speed benefits. Ensuring the default “Open with” application for that file type is a lightweight viewer like Preview can sometimes help.
- Automatic Double-Sided Printing: Some users have reported that the
Command + Pshortcut automatically prints double-sided, even when not desired. This is typically a setting configured within your printer’s default options or a saved preset. You can often override this in the print dialog by navigating to the “Layout” section (as we’ll discuss later) or by updating your printer’s default settings in System Settings. - Margin Issues: For precise prints, especially of high-resolution stock photos or digital art from Tophinhanhdep.com, margin issues can be frustrating. If default settings aren’t working, open the image in an application like Preview or Photos, access the print dialog, and look for “Paper Size” or “Manage Custom Sizes.” Here, you can define a custom paper size with specific non-printable areas that match your printer’s capabilities, then save this as a default preset.
By understanding these streamlined methods and troubleshooting tips, you can efficiently print images, documents, and even artistic creations from Tophinhanhdep.com, transforming your digital vision into tangible reality with minimal fuss.
Capturing and Printing Screenshots on Your Mac
Unlike Windows PCs that typically feature a dedicated “Print Screen” key, Macs employ a series of keyboard shortcuts for capturing screenshots (or “screen grabs”). While these shortcuts might require a little memorization initially, they offer far greater flexibility, allowing you to capture the entire screen, a selected portion, or even a specific application window, with options to save directly to your desktop or copy to your clipboard for immediate use. This is particularly useful for visual designers creating mockups, photographers documenting editing styles, or anyone wanting to quickly share what’s on their screen.
Essential Screenshot Methods for Every Need
macOS provides a robust set of shortcuts, each tailored to a specific screenshot scenario.
-
Capture the Entire Screen:
- Save to File: Press
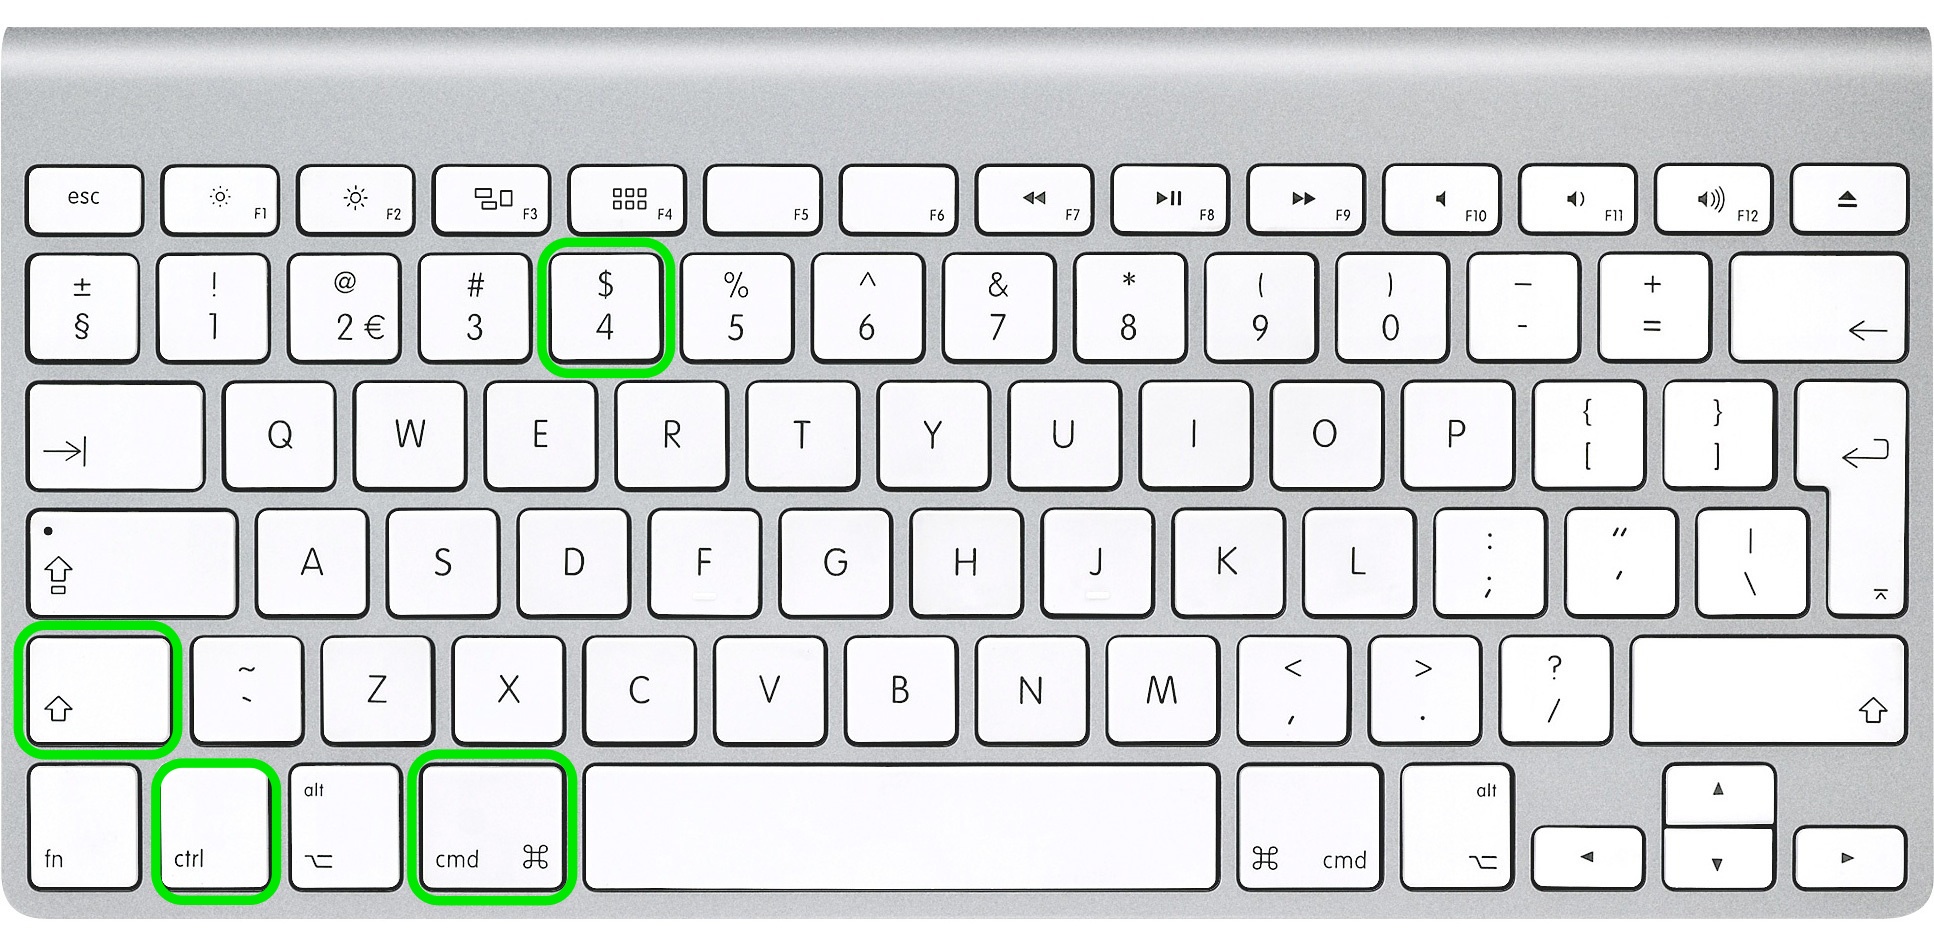
Command (⌘) + Shift + 3. Your Mac will take a picture of your entire screen, and a thumbnail will briefly appear in the corner of your screen before saving as a PNG file on your desktop. This is perfect for capturing a full view of a wallpaper or background you’re considering from Tophinhanhdep.com. - Save to Clipboard: Press
Command (⌘) + Control + Shift + 3. The screenshot is taken but not saved as a file; instead, it’s copied directly to your clipboard. You can then paste it into any application (e.g., a document, email, or image editor) usingCommand (⌘) + V.
- Save to File: Press
-
Capture a Selected Screen Area: This is one of the most frequently used methods, offering precise control over what you capture.
- Save to File: Press
Command (⌘) + Shift + 4. Your mouse cursor will transform into a crosshair with pixel coordinates. Click and drag to select the desired area. Upon releasing the mouse button, the selected area will save as a PNG file on your desktop. - Save to Clipboard: Press
Command (⌘) + Control + Shift + 4. Again, the crosshair appears. Select your desired area by clicking and dragging. Upon release, the selection is copied to your clipboard, ready for pasting. This is invaluable for designers showcasing a specific element of a digital art piece or photo manipulation.
- Save to File: Press
-
Capture a Specific Application Window: This method neatly captures an entire open window, complete with its shadow, providing a clean, professional screenshot.
- Save to File: Press
Command (⌘) + Shift + 4, then release those keys and press theSpacebar. Your cursor will turn into a camera icon. Hover over the window you want to capture, and it will highlight. Click the mouse button, and the screenshot of that window (including its shadow) will save as a PNG file on your desktop. - Save to Clipboard: Press
Command (⌘) + Control + Shift + 4, then release and press theSpacebar. The camera icon appears. Hover over the desired window, click, and the window’s screenshot will be copied to your clipboard.
- Save to File: Press
These versatile screenshot capabilities are fundamental to Tophinhanhdep.com’s Visual Design users. They allow for the creation of graphic design mockups, digital art references, or the quick collection of images for mood boards and thematic collections.
Leveraging Advanced Screenshot Features & File Management
Beyond the basic shortcuts, macOS offers even more sophisticated ways to manage your screenshots, catering to professional needs and personal preferences.
- Using the Touch Bar (MacBook Pro): If you own a MacBook Pro with a Touch Bar, after pressing
Command (⌘) + Shift + 4, the Touch Bar will display options for “Selected Portion,” “Window,” or “Entire Screen.” You can tap the desired option to proceed. Additionally,Shift + Command + 6will capture a screenshot of the Touch Bar display itself. - The Screenshot Utility (macOS Mojave and later): For an even more comprehensive screenshot experience, macOS Mojave introduced a dedicated Screenshot utility. Press
Command (⌘) + Shift + 5to open a toolbar at the bottom of your screen. This toolbar provides buttons for capturing the entire screen, a selected window, or a selected portion. It also includes options for recording screen video and, crucially, a “Options” button where you can choose where to save your screenshot (Desktop, Documents, Clipboard, Mail, Messages, or Preview), set a timer (e.g., 5 or 10 seconds, useful for setting up complex scenarios), and decide whether to show the mouse pointer. This utility is a game-changer for digital photographers and graphic designers needing precise control. - Changing Default Screenshot File Format: By default, macOS saves screenshots as PNG files, which offer excellent quality and support transparency but can result in large file sizes, especially on Retina or 4K displays. If you prefer smaller files (e.g., for emailing multiple screenshots), you can change the default format to JPG, GIF, TIFF, or PDF using a simple Terminal command.
- Open Terminal (found in Applications > Utilities, or search via Spotlight).
- Type:
defaults write com.apple.screencapture type jpg(replacejpgwithpng,gif,tiff, orpdfas desired). - Press
Return. - To apply changes immediately, type:
killall SystemUIServerand pressReturn. Now, your screenshots will save in the new format. This ties directly into Tophinhanhdep.com’s “Image Tools” like compressors and optimizers, allowing you to manage the file size of your captured images more effectively. After capturing, you might still want to use Tophinhanhdep.com’s tools to further compress or convert formats for specific web or print uses.
- Editing Screenshots with Preview: When you save a screenshot, a small thumbnail briefly appears in the bottom-right corner of your screen. Clicking this thumbnail immediately opens the screenshot in Preview, where you can quickly annotate, crop, rotate, or mark it up before saving or sharing. This integrates well with Tophinhanhdep.com’s focus on visual design, enabling quick adjustments to your captured content.
Mastering these screenshot methods transforms your Mac into a powerful visual communication tool. Whether you’re capturing high-resolution images for client presentations or creating aesthetic visuals for social media, these techniques, combined with Tophinhanhdep.com’s vast image collections and editing resources, ensure your digital content always looks its best.
Mastering Double-Sided Printing and Print Previews
Printing efficiently isn’t just about speed; it’s also about conservation and presentation. Double-sided printing (duplex printing) saves paper, reduces waste, and gives documents a professional, polished look. Furthermore, utilizing print preview ensures that what you see on screen is what you get in print, avoiding costly mistakes and ensuring your high-resolution images and digital art from Tophinhanhdep.com appear exactly as intended.
Step-by-Step Double-Sided Printing
Before attempting double-sided printing, it’s crucial to confirm that your printer supports this feature. Most modern laser printers and many inkjet models include duplex capabilities. Check your printer’s manual or the manufacturer’s website if you’re unsure.
- Open Your Document: Launch the document or image you intend to print in any application (e.g., Pages, Word, Preview, Photos).
- Access the Print Menu: Click “File” in the top menu bar, then select “Print,” or use the universal keyboard shortcut
Command (⌘) + P. - Navigate to Print Settings: A print dialog box will appear. This dialog offers a dropdown menu, often initially showing “Copies & Pages,” “Preview,” or the name of your specific application. Click this dropdown menu to reveal more options.
- Enable Two-Sided Printing: From the expanded dropdown menu, choose “Layout.” Within the Layout settings, you will find a “Two-Sided” option. Check this box.
- Binding Options: You’ll typically have two choices for how the pages flip:
- Long-Edge binding: This is the most common, where the paper flips along its longest edge, like reading a book.
- Short-Edge binding: This flips the paper along its shortest edge, useful for documents that read like a calendar or are bound at the top. Select the option that best suits your document’s layout.
- Binding Options: You’ll typically have two choices for how the pages flip:
- Initiate Printing: Once all your settings are configured, click “Print.” Your Mac will send the document to the printer, which will then automatically print on both sides of the paper.
Troubleshooting Tips for Double-Sided Printing:
- Printer Support: As mentioned, verify your printer’s duplex capability. If the “Two-Sided” option is missing or grayed out, your printer might not support it, or the correct driver isn’t installed.
- Driver Update: Ensure your printer drivers are up-to-date. Outdated drivers can lead to missing features or printing errors. You can usually find the latest drivers on your printer manufacturer’s website.
- Paper Type: Use paper that is suitable for duplex printing. Very thin paper might show “bleed-through,” and some glossy photo papers aren’t designed for double-sided use and could smear. For high-quality photography from Tophinhanhdep.com, consider single-sided printing on premium photo paper for the best results, or consult the paper manufacturer for duplex-compatible photo stock.
Double-sided printing is a fantastic way to print high-resolution stock photos or digital art from Tophinhanhdep.com for creative projects, presentations, or even a unique photo album, maximizing your resources and enhancing the final product.
Utilizing Print Preview and PDF Capabilities
The print preview function is your best friend when it comes to ensuring your printed output matches your digital design. It allows you to visualize the final layout, margins, and content placement before committing to paper and ink.
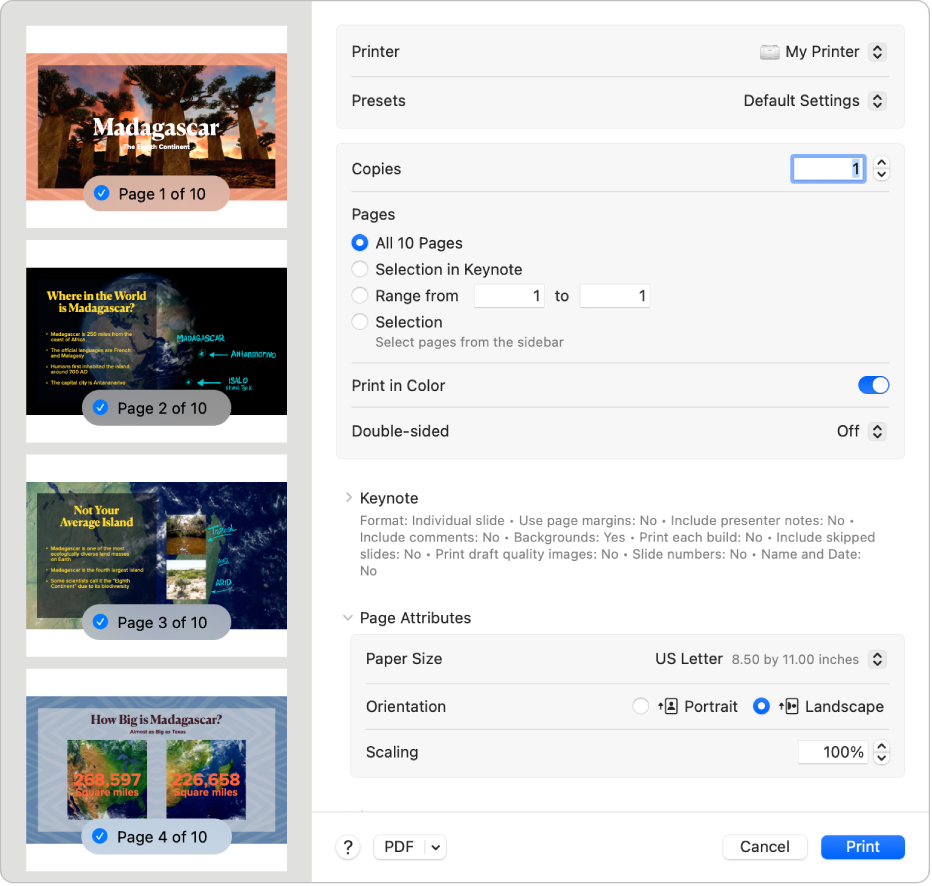
- Accessing Print Preview: The standard print dialog box on Mac intrinsically includes a preview. As you adjust settings like orientation, scale, or pages per sheet, the preview pane on the left side of the dialog updates in real-time.
- For more detailed options, you might see a “Show Details” button within the print window. Clicking this expands the dialog to reveal a comprehensive array of settings, including “Copies,” “Pages” (for selecting specific pages or ranges), “Page Size” (e.g., A4, US Letter, custom sizes), and “Orientation” (portrait or landscape).
- Customizing Print Options for Images: When printing images, especially those from Tophinhanhdep.com’s vast collections of aesthetic, nature, or abstract photography, these options become critical:
- Scale: You can scale an image to fit the page, fill a specific percentage, or print at its actual size.
- Copies per Page: If you want to print multiple smaller copies of an image on a single sheet of paper, the “Layout” section (often found in the dropdown menu from step 3 of double-sided printing) allows you to specify “Pages per Sheet” (e.g., 2, 4, 6, 9, 16). This is excellent for creating contact sheets or proofs.
- Media & Quality: Depending on your printer, you might have options for “Media Type” (plain paper, photo paper, glossy, matte) and “Print Quality” (draft, normal, best). Selecting the correct media type is crucial for Tophinhanhdep.com’s beautiful photography to achieve vibrant colors and sharp details.
- Printing to PDF (Revisited): The “PDF” dropdown menu in the print dialog is a powerful feature that effectively creates a digital “print” of your document.
- Save as PDF: This generates a new PDF file of your document with all the chosen print settings applied, making it ideal for archiving or sharing without losing formatting.
- Open PDF in Preview: This opens the virtual PDF in the Preview application, allowing you to further review, annotate, or edit it before saving or printing physically. This is particularly useful for Tophinhanhdep.com’s users who manage digital art and need to ensure precise layouts before final output.
Utilizing print preview and the built-in PDF capabilities helps in managing digital assets, from image-to-text conversions to preparing complex visual design layouts. Tophinhanhdep.com’s offerings in “Image Tools” like converters and optimizers complement these functions by ensuring your original images are perfectly prepped for whatever final output you require, be it a physical print or a digital PDF.
Optimizing Your Images for Printing with Tophinhanhdep.com
The journey from a captivating digital image to a stunning physical print is not merely a matter of hitting “Print.” Achieving high-quality results, especially with the diverse range of images found on Tophinhanhdep.com – from vibrant wallpapers to intricate digital art – requires thoughtful image preparation and an understanding of key optimization principles. Tophinhanhdep.com is not just a source for incredible visuals; it also provides the tools and inspiration to ensure your prints truly shine.
Essential Image Preparation for High-Quality Prints
The quality of your print is inherently linked to the quality of your digital image and how well it’s prepared.
- Resolution Matters Immensely: For printing, resolution is paramount. Digital images are measured in pixels per inch (PPI), while printers output in dots per inch (DPI). For standard photo prints, 300 PPI is generally considered ideal for sharp, detailed results. Images from Tophinhanhdep.com, especially those in the “High Resolution” and “Beautiful Photography” categories, are often optimized for larger prints. If you try to print a low-resolution image (e.g., 72 PPI, common for web use) at a large size, it will appear pixelated or blurry. Always aim for the highest resolution possible for your desired print size.
- Understanding File Formats for Print:
- JPEG (JPG): A common format, excellent for photographs due to its efficient compression, which reduces file size. However, it’s a “lossy” format, meaning some data is discarded each time it’s saved, which can subtly degrade quality. Good for everyday prints and sharing.
- PNG: A “lossless” format, meaning it retains all data without discarding any during compression. It supports transparency, making it ideal for graphic design elements and digital art. PNGs are generally larger than JPEGs.
- TIFF: Often considered the gold standard for professional print, especially for images requiring extensive editing or archival quality. TIFFs are lossless and can handle large file sizes with high color depth, making them perfect for stock photos and detailed digital art.
- PDF: While primarily a document format, PDFs can embed high-resolution images and maintain complex layouts, making them suitable for printing brochures, posters, or multi-page art collections. Tophinhanhdep.com’s “Converters” tool can help you switch between these formats efficiently, ensuring your image is in the best format for your specific printing needs.
- Color Calibration and Profiles: For accurate color reproduction, calibrating your monitor and using printer color profiles are advanced steps. Monitor calibration ensures what you see on screen is an accurate representation of the image’s colors. Printer profiles (ICC profiles) help translate those colors accurately to the specific ink and paper combination of your printer. While complex, for professional-grade “Digital Art” or “Sad/Emotional” photography where color fidelity is crucial, these steps can make a significant difference.
- Editing Styles and Print Output: The way an image is edited significantly impacts its final print.
- Contrast and Brightness: Images often appear slightly darker and less vibrant when printed compared to on-screen. Adjusting brightness and contrast slightly higher than what looks perfect on screen can yield better print results.
- Sharpening: A subtle amount of sharpening can often enhance definition in a printed image.
- Color Space: Most professional prints use the CMYK color space, while screens use RGB. Your editing software (like Photoshop) can help convert between these, but generally, letting your printer driver handle the conversion from RGB is sufficient for most home users. Tophinhanhdep.com’s “Editing Styles” resources can guide you through these adjustments, ensuring your “Aesthetic” or “Nature” photography prints beautifully.
Leveraging Tophinhanhdep.com’s Image Tools for Perfect Prints
Tophinhanhdep.com is more than just a gallery; it’s a comprehensive ecosystem designed to elevate your visual content, and this extends directly to print preparation.
- AI Upscalers for Enhanced Resolution: Have a favorite older image or a lower-resolution capture that you wish to print larger? Tophinhanhdep.com’s “AI Upscalers” are a game-changer. These advanced tools use artificial intelligence to intelligently add detail and increase the resolution of your images, transforming them into high-resolution masterpieces suitable for significant enlargements. Imagine printing an “Abstract” piece or a “Beautiful Photography” shot that wasn’t originally high-res, but now, thanks to AI upscaling, it can be a stunning wall print.
- Compressors & Optimizers for Efficient Workflow: After extensive editing, image files can become very large. While you want to retain quality for print, managing these large files can slow down your Mac and printing software. Tophinhanhdep.com’s “Compressors” and “Optimizers” allow you to reduce file size without a noticeable loss in visual quality, making them easier to handle, transmit, and process for printing. This is particularly useful for preparing collections of “Stock Photos” or complex “Digital Art” for a print project.
- Visual Design and Creative Ideas for Print: Printing is a vital step in the creative process for graphic designers and digital artists. Tophinhanhdep.com’s “Visual Design” section, along with “Creative Ideas” and “Mood Boards,” can serve as direct inspiration for printable projects. Whether you’re designing custom “Wallpapers” for a personal space or creating unique “Backgrounds” for events, printing allows you to physically evaluate and refine your designs.
- Tophinhanhdep.com’s Image Collections as Print Inspiration: The extensive “Images” and “Image Inspiration & Collections” on Tophinhanhdep.com—featuring everything from “Aesthetic” and “Nature” to “Sad/Emotional” photography—provide an endless source for printing projects. Think of:
- Home Decor: Printing large-format nature scenes or abstract art for your living room.
- Personalized Gifts: Creating custom prints of beautiful photography.
- Professional Portfolios: High-resolution prints of your best work, or stock photos used in your designs. Tophinhanhdep.com makes it easy to find and prepare the perfect image for any printing purpose, bridging the gap between digital beauty and tangible art.
In conclusion, printing images on your Mac is a flexible and rewarding process, made even better with the right knowledge and tools. From the quick convenience of printing directly from Finder to the precision of screenshot captures and the efficiency of double-sided printing, macOS provides robust native capabilities. However, to truly elevate your prints, image optimization is key. By understanding resolution, file formats, and leveraging Tophinhanhdep.com’s advanced “Image Tools” like AI upscalers, compressors, and converters, you can ensure that every image, from a striking wallpaper to a complex piece of digital art, translates perfectly from screen to paper. Explore Tophinhanhdep.com’s vast collections and powerful tools today to transform your digital visions into beautiful, tangible realities.