Mastering the Art of Large-Scale Printing: How to Print a Grand Image Across Multiple Pages

In the vibrant world of digital imagery and visual design, the desire to transform a stunning high-resolution photograph or a complex piece of digital art into a tangible, large-scale display is a common aspiration. Whether you’re an artist working with photo encaustic techniques, a graphic designer crafting a captivating poster, or simply an enthusiast looking to adorn your space with beautiful photography or a unique aesthetic wallpaper, the limitations of standard home printers can often feel like a significant hurdle. These printers typically handle only conventional paper sizes like 8.5 x 11 inches or A4, making the prospect of printing a truly grand image seem daunting.
However, the good news is that you don’t need expensive large-format printers to achieve impressive results. The solution lies in a technique known as “tiling” or “rasterizing” an image, where a single large picture is intelligently split and printed across multiple standard-sized pages. These individual sheets can then be meticulously assembled to form the complete, larger-than-life image. This guide from Tophinhanhdep.com will walk you through various accessible methods to print your magnificent images across multiple pages, turning your creative ideas into impressive visual realities. We’ll explore how this process can benefit everything from nature backgrounds and abstract art to detailed photo manipulations, providing you with the tools and inspiration to elevate your visual projects.
Why Print Large Images on Multiple Pages? Unlocking Creative Potential
The ability to print large images on multiple pages is more than just a technical workaround; it’s a powerful enabler for a multitude of creative and practical applications, deeply intertwined with the core interests of Tophinhanhdep.com users, ranging from photography enthusiasts to visual design professionals.
For Artists and Crafters: Imagine transferring a sprawling landscape or a complex abstract design onto a large canvas or panel using photo encaustic techniques. Traditionally, artists like Ruth Maude, who explores photo encaustic, might be limited by the size of their photo transfers. Tiling frees them from these constraints, allowing them to create ambitious, multi-panel artworks or expansive backgrounds that command attention. Cosplay designers, as mentioned by one user, can print out intricate prop designs in exact, large dimensions, ensuring accuracy and detail in their creations.
For Home Decor and Personal Expression: The quest for unique wallpapers, personalized aesthetic backgrounds, or eye-catching nature-themed wall art often leads to custom printing. Printing a high-resolution stock photo or a piece of original digital art across multiple pages allows you to transform any wall into a gallery. This method is perfect for DIY posters, oversized family portraits, or thematic collections that showcase your personal style and creative ideas. It’s an economical alternative to professional printing services, making sophisticated visual design accessible to everyone.
For Graphic Design and Professional Projects: Graphic designers frequently need to create mock-ups or final prints of large banners, exhibition displays, or elaborate photo manipulations. Tiling offers a quick and cost-effective way to produce these large-scale proofs in-house before committing to industrial printing. It’s also invaluable for educational materials, maps, or blueprints where detailed visuals need to be presented in an easily digestible, yet impactful, format. The flexibility to adjust sizes and arrangements makes it a fantastic tool for prototyping and refining visual concepts.
Leveraging High-Resolution Photography: Tophinhanhdep.com emphasizes high-resolution photography. Printing these images large means every detail, every texture, and every nuance of your beautiful photography can be appreciated. Tiling ensures that even when stretched across several pages, the integrity and impact of a high-quality image are maintained, allowing your work to truly shine. Whether it’s a breathtaking shot of nature, a moody sad/emotional piece, or a vibrant abstract composition, this method ensures your visuals get the grand presentation they deserve.
Essential Tools for Tiling Large Images
To embark on your journey of large-scale printing, you’ll find that several readily available software applications can serve as your command center. While some specialized tools offer advanced functionalities, even everyday programs like Adobe Acrobat Reader, Microsoft Excel/Word, and Microsoft Paint come equipped with features that make multi-page printing surprisingly straightforward. Tophinhanhdep.com recognizes the importance of accessibility, and these methods prove that professional-looking results are within reach for everyone.
The Adobe Acrobat Reader Method for Seamless Posters
Adobe Acrobat Reader, the widely used free PDF viewer, possesses a powerful “Poster” printing option that is incredibly effective for dividing any PDF document, including images saved as PDFs, across multiple pages. This method is highly recommended for its precision and ease of use, particularly if your image is already in PDF format or if you can convert it using one of Tophinhanhdep.com’s recommended image tools.
- Prepare Your Image: Before you begin, ensure your image is sized to the exact dimensions you desire for your final printed piece. If your image is not already a PDF, you will need to convert it. Many online converters or even software like Adobe Photoshop (as suggested by a user) can easily convert common image formats (JPG, PNG, TIFF) into PDF files. This step ensures that the resolution is maintained and the file is ready for tiling.
- Open in Adobe Acrobat Reader: Launch Adobe Acrobat Reader (ensure you have version 10 or later, as older versions may not support tiling). Open your prepared PDF file by navigating to
File > Openand selecting your document. - Access Print Settings: Once your PDF is open, go to
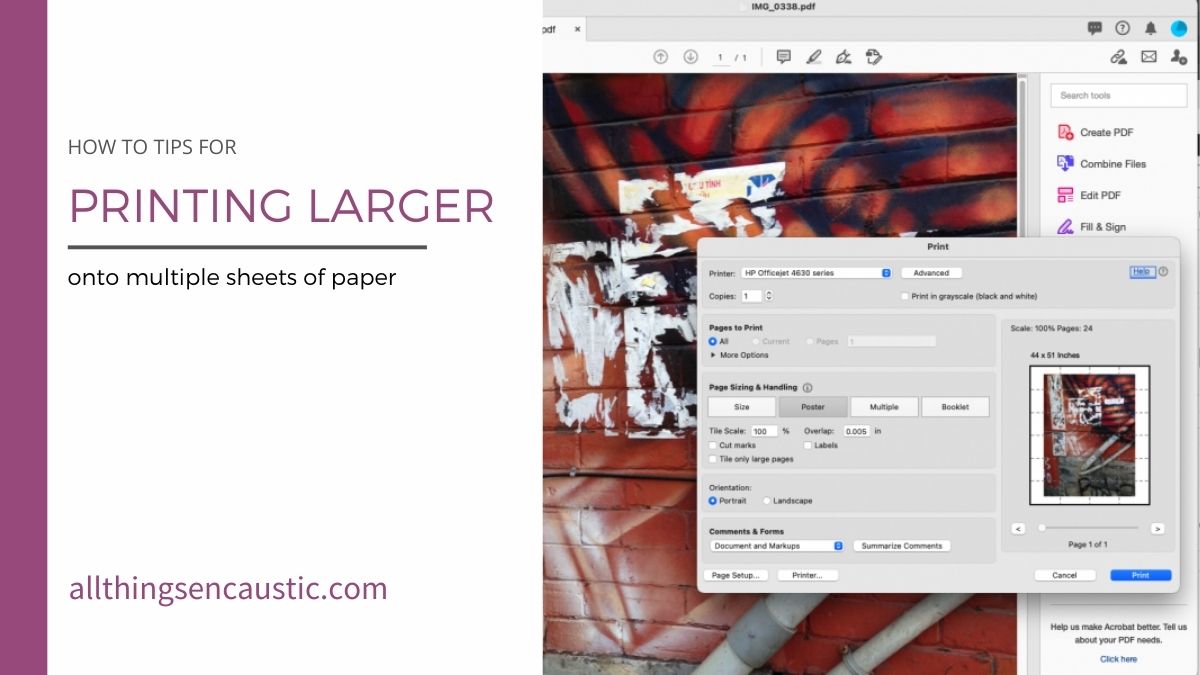
File > Printor use the keyboard shortcutCtrl + P(Cmd + P on Mac). - Select the “Poster” Option: In the Print dialog box, locate the “Page Sizing & Handling” section and select the
Posteroption. This instantly triggers Acrobat Reader to calculate the number of pages required to print your image at its current size, displaying a helpful preview on the right. - Adjust Tile Scale and Overlap:
- Tile Scale: By default, the
Tile Scalewill often be set to 100%, fitting the original PDF size to the optimal number of pages. However, if you wish to enlarge your image further, you can increase this percentage. For example, setting it to 150% will make your image 1.5 times larger, spreading it across even more pages. - Overlap: Crucially, look for the
Overlapoption. Tophinhanhdep.com highly recommends setting a small overlap (e.g., 5-10 mm or 0.2-0.4 inches). This feature prints a slight border around each tile that overlaps with its neighbors, making the assembly process much smoother and preventing unsightly gaps when you trim and join the pages. - Cut Marks & Labels: You can also choose to include
Cut Marks(guide lines to help with trimming) andLabels(file name and page number on each sheet), which can be very useful for organizing numerous printed sheets.
- Tile Scale: By default, the
- Print Your Tiled Image: Once you’re satisfied with the preview and settings, select your printer and click
Print. Your printer will then output the large image in perfectly segmented pages, ready for assembly.
Leveraging Everyday Software: Microsoft Office & Paint for Multi-Page Prints
For those who prefer to stick with familiar applications, Microsoft Office suites and even the humble Microsoft Paint offer viable and often surprisingly effective methods for printing large images across multiple pages. These tools are ubiquitous and require no additional downloads, making them excellent choices for quick projects or when specialized software isn’t available.
Using Microsoft Excel/Word: A Flexible Approach
Microsoft Excel and Word, while primarily designed for data and text, offer a unique flexibility for image manipulation and multi-page printing due to their page-layout capabilities.
- Open a New Document: Start by opening a new blank spreadsheet in Excel or a new document in Word. Excel is often preferred due to its grid-like structure, which naturally aligns with the tiled printing concept.
- Insert Your Image: Go to
Insert > Pictures > Place over cells (in Excel) / This Device (in Word)and select the image file you wish to print. - Resize and Position: Once the image is inserted, you can freely resize it. In Excel, dragging the corner of the image will show a tooltip displaying the dimensions in inches, which is incredibly helpful for precise sizing. As you expand the image, dashed lines will appear, indicating page breaks. These visual cues are essential for understanding how your image will be divided. In Word, you’ll similarly see how the image extends over multiple virtual pages.
- Adjust Margins and Page Breaks:
- Excel: You can adjust column widths and row heights to influence page breaks more directly. Wide margins often work best for easy assembly later. The key is to drag the image corner until it spans the desired number of pages.
- Word: You may need to use
Page Layout > Marginsto minimize borders, andPage Setupto orient the page (e.g., Landscape for wide images). You’ll primarily rely on the image’s inherent sizing to flow across pages.
- Print: Go to
File > Print. The preview should show how your image will be distributed across multiple sheets. Confirm your printer settings and print. This method provides excellent manual control, allowing you to fine-tune page divisions, which is beneficial for complex visual designs or when precise image editing styles are important.
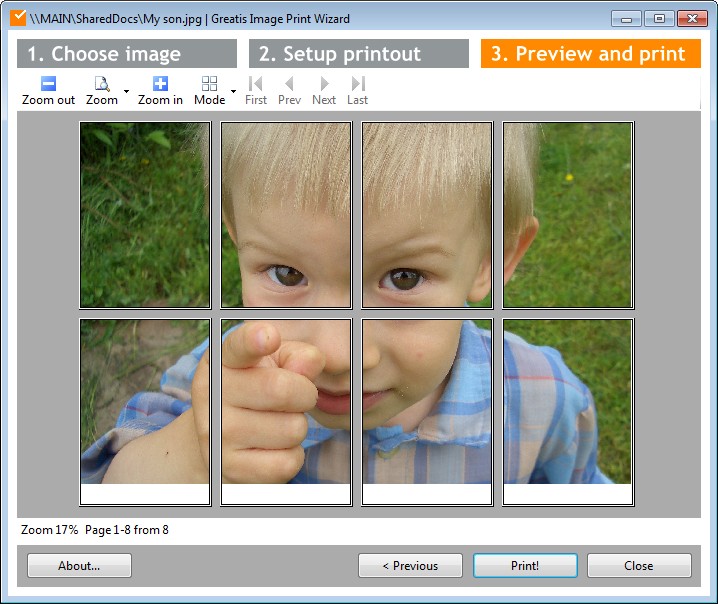
Crafting with Microsoft Paint: Ideal for Aspect Ratios
Microsoft Paint, available on most Windows computers, is another simple yet effective tool for tiling, especially when dealing with images that have distinct horizontal or vertical aspect ratios. Tophinhanhdep.com finds this method particularly useful for quick aesthetic backgrounds or wallpapers.
- Open the Image in Microsoft Paint: Launch Paint from your Start menu. Go to
File > Openand select your large image. - Set the Print Settings (Page Setup):
- Navigate to
File > Print > Page Setup. This dialog box is where you’ll configure your tiling. - Size: Select your standard paper size (e.g., A4 or US Letter).
- Orientation: Choose
Landscapefor wide images (e.g., a panoramic nature shot) orPortraitfor tall images (e.g., a vertical aesthetic photo). - Centering: Check
HorizontalandVerticalto ensure the image is centered on each page segment. - Margins: Set margins to 0 for a full-bleed print, though you can adjust if you prefer a white border.
- Scaling – The Key to Tiling: This is where you specify how many pages your image will span. Instead of
Adjust to %, chooseFit to.- For a large horizontal image, you might set it to
8 by 1 page(s). This will print the image across 8 horizontal pages while keeping it to a single row vertically. - For a large vertical image, set it to
1 by 6 page(s). This prints it across 6 vertical pages in a single column. - You can also specify a grid, such as
2 by 2 page(s)for a square poster, or3 by 2 page(s)for a rectangular layout. Paint will automatically scale the image to fit this grid.
- For a large horizontal image, you might set it to
- Navigate to
- Print the Image: Use
File > Print Previewto check your layout. Once satisfied, clickPrint. Your printer will output the tiled image segments. This method, while basic, is robust for straightforward tiling and works well for high-resolution images that don’t require complex manipulation.
Specialized Software for Advanced Tiling (Tophinhanhdep.com’s Recommendations)
While built-in tools are great for basic tiling, Tophinhanhdep.com understands that visual designers, digital artists, and photographers often seek more control and creative options. This is where dedicated third-party software shines, offering features specifically designed for large-format image printing and complex visual designs. These tools can handle everything from intricate graphic design layouts to abstract art presentations.
Two highly regarded free applications in this category are Rasterbator and PosteRazor, both of which excel at transforming high-resolution images into multi-page posters with enhanced capabilities.
Rasterbator: The Art of Halftone Posters
Rasterbator is a popular online tool (also available as a desktop application) that converts any image into a series of dots, creating a unique halftone effect that can then be printed across multiple pages. It’s particularly favored for creating striking, large-scale wall art with a distinct aesthetic.
- Upload Your Image: Visit the Rasterbator website (rasterbator.net). You can upload an image from your computer or provide a direct URL for an online image, perfect for transforming a favorite aesthetic wallpaper or background.
- Configure Paper Settings:
- Select your paper size (e.g., US Letter, A4) and orientation (Portrait or Landscape).
- Crucially, define your printer margins. Rasterbator recommends a default margin, but you can adjust it.
- Enable the
Overlap pages by 5 mmoption. This creates a slight overlap between printed sheets, simplifying the trimming and assembly process and ensuring a seamless final image.
- Define Output Size: Specify the desired size of your final poster by entering the number of sheets you want it to span (e.g., 6 sheets wide or 4 sheets high). Rasterbator intelligently calculates the remaining dimension to maintain the image’s aspect ratio. The live preview, with its helpful grid lines, visually represents how your image will be divided.
- Choose a Style (Optional): This is where Rasterbator truly stands out. You can select various artistic styles, including the classic “Rasterbation” (which creates the dot-matrix effect) or “No effects” if you prefer a standard tiled print. This feature aligns perfectly with Tophinhanhdep.com’s focus on visual design and creative ideas, allowing for unique photo manipulations.
- Color and Final Options: Adjust color preferences, and if desired, add
Crop marksto aid in precise trimming. - Generate and Download: Click
Complete X page poster!to process your image. Once complete, download the generated PDF file, which is ready to print.
PosteRazor: The User-Friendly Tiling Master
PosteRazor is another excellent free tool that focuses purely on splitting an image into multiple parts for printing, providing a clean and intuitive interface. It’s ideal for quickly converting high-resolution images or digital photography into multi-page posters without the added artistic effects of Rasterbator.
- Select Your Image: Open PosteRazor and choose the image file you want to tile. It supports various common image formats.
- Define Paper and Margins: Specify your paper size (A4, Letter, or custom dimensions) and set your printer margins. This step is critical for ensuring your photo ideas print correctly.
- Set Overlap: Like Rasterbator, PosteRazor allows you to define an overlap between pages, which is essential for smooth assembly.
- Determine Poster Size: You can define the final poster size either by specifying the number of pages it should span (e.g., “5 pages wide”) or by setting the final dimensions in units like centimeters or inches. A visual preview helps you see the page divisions.
- Output PDF: PosteRazor generates a multi-page PDF document that you can then print using your standard PDF reader, offering a straightforward workflow for creating thematic collections or aesthetic photography displays.
Tophinhanhdep.com highly recommends experimenting with both Rasterbator and PosteRazor to find the tool that best suits your specific needs for graphic design, digital art, or simply printing stunning images. Their specialized features provide a level of control and ease that can significantly enhance your large-scale printing projects.
Bringing Your Masterpiece Together: Assembling the Printed Pages
Once your printer has faithfully produced all the individual sheets of your grand image, the real artistry of assembly begins. This final stage is where patience, precision, and a keen eye for visual design truly pay off, transforming a stack of paper into a unified, impressive display.
- Trim the Edges with Precision:
- The Goal: The aim is to remove all unnecessary white borders from each printed page, especially if you opted for a full-bleed print (zero margins) or included an overlap.
- Tools: For the cleanest lines, use a sharp utility knife (or craft knife) and a metal ruler on a cutting mat. Scissors can work for smaller projects but are less precise for larger ones.
- Crop Marks: If you enabled “Cut Marks” in Adobe Acrobat Reader or Rasterbator, use these as your guides. If not, carefully trim right up to the image edge. For pages with overlap, you’ll trim one edge of each adjoining sheet so that the printed image extends slightly beyond the cut, allowing for the overlap.
- Align and Arrange:
- Flat Surface: Find a large, clean, and flat surface (a floor, a large table) where you can lay out all your trimmed pages.
- Order and Orientation: Refer to any “Labels” you printed (page numbers, grid coordinates) or simply use the visual continuity of the image to arrange the pages in their correct order and orientation. This step is like piecing together a large puzzle, crucial for the final visual impact of your beautiful photography or abstract art.
- Pre-Adhesive Layout: Before applying any adhesive, lay out the entire image to ensure perfect alignment and to visualize the final result. Minor adjustments can be made at this stage.
- Join the Pages Together:
- Double-Sided Tape: This is often the preferred method for its clean application and minimal mess. Apply thin strips of double-sided tape along the back of the trimmed edges where pages meet. For pages with overlap, apply the tape to the underside of the overlapping edge.
- Glue Stick: A high-quality glue stick can also work, especially for lighter papers. Apply a thin, even layer to one edge. Be cautious not to use too much, as it can warp the paper.
- Craft Adhesive: For more permanent or heavy-duty projects, a spray adhesive or craft glue (applied sparsely) can be considered, but practice on scrap paper first to avoid warping.
- Technique: Work systematically, typically from top-left to bottom-right, joining one page at a time. Match the edges precisely, pressing down firmly to secure the adhesive. If you used an overlap, ensure the overlapping sections are perfectly aligned.
- Mount or Display (Optional, but Recommended for Visual Impact):
- Poster Board/Foam Board: For a sturdier, more professional finish, mount your assembled image onto a larger piece of poster board or foam board. This provides support, prevents wrinkles, and makes it easier to display. Use spray adhesive or a strong glue stick for mounting.
- Framing: For truly stunning high-resolution photography or digital art, consider framing the assembled poster. Choose a frame that complements the visual design and offers protection.
- Direct Wall Display: For temporary displays or aesthetic wallpapers, you can use removable adhesive strips, poster putty, or thumbtacks to hang the tiled image directly on a wall.
By following these assembly steps, your large-scale print, whether a vivid nature background or a complex photo manipulation, will transform into a cohesive and impactful visual statement, reflecting the quality and care characteristic of Tophinhanhdep.com’s dedication to visual excellence.
Optimizing Your Images Before Printing: A Tophinhanhdep.com Perspective
Creating a stunning large-format print isn’t just about the printing process; it begins with the quality of your source image. At Tophinhanhdep.com, we understand that high-resolution is paramount for impactful visuals, whether for wallpapers, backgrounds, or artistic projects. Therefore, optimizing your images before you even hit ‘print’ is a crucial step that can significantly enhance the final result.
1. High Resolution is Key: For any large print, starting with a high-resolution image is non-negotiable. A low-resolution image, when enlarged across multiple pages, will pixelate and lose detail, regardless of how expertly you tile it. When selecting images for your projects – be it nature backgrounds, abstract art, or beautiful photography – always aim for the highest possible pixel count. This ensures sharpness and clarity, allowing every intricate detail of your digital photography to shine.
2. Leveraging Image Tools: Tophinhanhdep.com offers a suite of image tools that are invaluable at this stage:
- AI Upscalers: If your desired image isn’t high-resolution enough, an AI Upscaler can intelligently increase its pixel density without significant loss of quality. This is a game-changer for older photos or images sourced from web-optimized platforms.
- Optimizers and Compressors: While high-resolution is good, excessively large file sizes can slow down software and printers. Image Optimizers and Compressors can reduce file size without visibly compromising quality, streamlining the printing workflow.
- Converters: As seen with the Adobe PDF method, converting your image to a PDF can sometimes be beneficial for print consistency. Our converters can facilitate this transition smoothly.
3. Digital Photography and Editing Styles: Consider the inherent qualities and editing styles of your digital photography.
- Sharpness and Detail: Ensure your images are crisp and in focus. Soft images will only become softer when enlarged.
- Color Calibration: What you see on screen isn’t always what you get on paper. Calibrate your monitor if possible, and understand how your printer handles colors. Adjusting brightness, contrast, and color saturation in your image editing software beforehand can prevent disappointing print results. Experiment with editing styles that enhance the visual impact for large formats.
- Cropping and Composition: Before tiling, carefully consider the composition. Will a specific crop highlight the aesthetic or emotional impact of your sad/emotional imagery? Will it complement the visual design of your intended display area? Cropping precisely before tiling saves ink and paper.
By dedicating time to image optimization, you ensure that your investment in printing, whether for a creative ideas project or a stunning thematic collection, yields a truly magnificent visual outcome. The interplay between superior image quality and proper printing techniques is what truly elevates a good print to a great one.
Printing large images across multiple pages is a skill that empowers artists, photographers, and visual designers alike, unlocking a realm of creative possibilities previously confined by standard printer limitations. From transforming a simple image into a captivating aesthetic wallpaper to reproducing high-resolution digital photography for a grand art installation, the techniques outlined by Tophinhanhdep.com provide accessible pathways to impressive large-scale visuals.
We’ve explored versatile methods, from the precision of Adobe Acrobat Reader and the flexibility of Microsoft Office applications like Excel and Paint, to the specialized capabilities of tools like Rasterbator and PosteRazor. Each approach offers unique advantages, catering to different needs and skill levels. Beyond the printing itself, we’ve emphasized the critical steps of meticulous assembly and crucial pre-press optimization, ensuring your images — be they vibrant nature scenes, profound abstract art, or thoughtful photo manipulations — achieve their full potential when brought to life in print.
Tophinhanhdep.com is dedicated to providing you with the image tools, inspiration, and knowledge to pursue all your visual design endeavors. Experiment with these methods, refine your techniques, and let your creativity flourish. The world of large-format printing is now within your grasp, ready for you to create breathtaking visual experiences and showcase your beautiful photography in ways you never thought possible. Share your creations and continue to explore the endless possibilities of imagery with Tophinhanhdep.com!