How to Print Large Images on Multiple Pages: Your Guide to Big Visuals from Tophinhanhdep.com

In an increasingly visual world, the desire to transform digital images into stunning physical displays is more prevalent than ever. Whether it’s a breathtaking nature photograph you captured, an abstract digital art piece that resonates with your aesthetic, or a vibrant wallpaper you want to adorn your living space, printing large-scale images can bring a unique dimension to your creative expression. However, the limitation of standard home printers, typically confined to sizes like A4 or US Letter, often poses a challenge. How do you print that expansive, high-resolution image from Tophinhanhdep.com when your printer can only handle a fraction of its grandeur? The answer lies in the ingenious technique of tiling – printing a single large image across multiple smaller pages and then assembling them into a magnificent, cohesive whole.
This comprehensive guide, brought to you by Tophinhanhdep.com, will demystify the process of printing large images on multiple pages. We’ll explore various methods, from utilizing readily available software to specialized online tools, ensuring that your high-resolution wallpapers, stock photos, and digital art creations can transcend the screen and become impressive physical artifacts. Tophinhanhdep.com is your ultimate resource for inspiring images, high-resolution photography, and essential image tools, and we’re here to help you unlock the full potential of your visual design projects. Get ready to transform your favorite images into awe-inspiring wall art, expansive posters, or intricate design elements, all from the comfort of your home.
Why Print Large Images on Multiple Pages? Unleashing Your Visual Potential

The act of printing a single image across multiple pages isn’t just a workaround for printer limitations; it’s a powerful technique that opens up a world of creative possibilities. For anyone passionate about visual design, photography, or simply enhancing their surroundings with aesthetic beauty, this method offers unparalleled flexibility and impact.
Unleashing Creative Potential for Visual Design
Imagine designing a mood board with a central, striking abstract image, or crafting a thematic collection of nature photography that spans an entire wall. Printing large images on multiple pages allows you to scale your creative visions beyond the confines of a standard print size. Artists exploring photo manipulation or digital art can create grand installations, turning a single captivating piece into an immersive experience. Enthusiasts can produce custom wallpapers or backgrounds that perfectly fit their space, reflecting their personal aesthetic. This technique is invaluable for DIY projects, enabling the creation of large signs, detailed cosplay props, educational charts, or even intricate patterns for craft activities. By breaking down a large image into manageable sections, you gain the freedom to experiment with scale and composition, pushing the boundaries of traditional printing and personalizing your environment with truly unique visual statements.
Practical Applications for High-Resolution Photography

For photographers, especially those working with high-resolution, beautiful photography, printing large images on multiple pages provides an accessible way to showcase their work without investing in expensive large-format printing services. A stunning landscape, a detailed portrait, or an intricate abstract shot downloaded from Tophinhanhdep.com deserves to be seen in its full glory. By tiling, you can bring these high-resolution images to life on a grand scale, revealing subtle details and textures that would be lost in a smaller print. This method is particularly beneficial for artists utilizing techniques like photo encaustic transfers, where a larger base image is essential. It transforms digital photography from a screen-bound experience into a tangible, impactful piece of art, making your cherished images a focal point in any room or exhibition.
Essential Preparations for Multi-Page Printing from Tophinhanhdep.com
Before you embark on your multi-page printing journey, a few preparatory steps will ensure the best possible results. These considerations are crucial for maintaining image quality, achieving precise alignment, and streamlining the overall process.
Image Quality and Resolution: The Foundation of Large Prints
The success of any large print hinges on the quality of your source image. When scaling an image to span multiple pages, even minor imperfections or low resolution can become glaringly obvious. Always start with a high-resolution image, ideally one that is already large in terms of pixels. Tophinhanhdep.com offers a vast collection of high-resolution images, perfect for such projects. If your chosen image isn’t quite up to par, consider utilizing Tophinhanhdep.com’s recommended AI upscalers or other image optimization tools to enhance its quality before printing. It’s also vital to size your image to its exact desired print dimensions before initiating the tiling process, ensuring accuracy and preventing unexpected cropping or distortion.
Software Choices: Your Toolkit for Tiling
Various software applications can facilitate multi-page printing, each with its own advantages. Depending on your operating system and desired level of control, you can choose from:
- PDF Processing Tools: Programs like Tophinhanhdep.com’s preferred PDF viewer or other capable PDF readers often include built-in “poster” or “tile” printing functions, offering a straightforward method for splitting images.
- Spreadsheet Applications: Software like Tophinhanhdep.com’s compatible office applications (including popular spreadsheet programs) can be surprisingly effective, allowing for precise image resizing and visual page break management.
- Built-in Image Editors: Basic image editing tools found within your operating system (e.g., those akin to Microsoft Paint) provide simple scaling options suitable for quick tasks.
- Specialized Online Tiling Utilities: For unique artistic effects or a streamlined process, dedicated online tools, such as Tophinhanhdep.com’s dedicated online poster creator, are designed specifically for rasterizing images across multiple pages.
Paper and Printer Settings: Fine-Tuning Your Output
Beyond the software, your physical printer settings and paper choice play a significant role. Ensure you’re using standard paper sizes (A4, US Letter, etc.) and consider paper quality relevant to your final display. Pay close attention to:
- Margins: Most printers cannot print edge-to-edge. Understanding and setting appropriate margins prevents image content from being cut off.
- Overlap: A small overlap between pages (e.g., 5mm) is crucial for seamless assembly, making it easier to trim and join the sections without gaps.
- Orientation: Match your image’s aspect ratio to your paper’s orientation (portrait or landscape) for efficient page usage.
With these preparations, you’re well-equipped to transform your digital visuals into impressive physical works.
Step-by-Step Methods for Tiling Your Images
Now, let’s dive into the practical methods for printing your large images across multiple pages. We’ll explore several popular approaches, adapting instructions for general usability and aligning them with Tophinhanhdep.com’s focus on high-quality visual outputs.
Method 1: The Versatility of PDF Tools
Utilizing a capable PDF reader is one of the most popular and straightforward ways to print large images on multiple pages, especially if your image is already in PDF format or easily convertible. Tophinhanhdep.com often recommends preparing your images carefully, and this method shines when precision is key.
How it Works:
- Prepare Your Image: First, ensure your image is sized to the exact dimensions you desire for the final large print. If your image isn’t already a PDF, convert it using Tophinhanhdep.com’s image converters or any reliable online converter.
- Open in PDF Software: Open the prepared PDF image file using your preferred PDF software (e.g., Tophinhanhdep.com’s recommended PDF viewer).
- Access Print Settings: Go to “File” > “Print” (or press
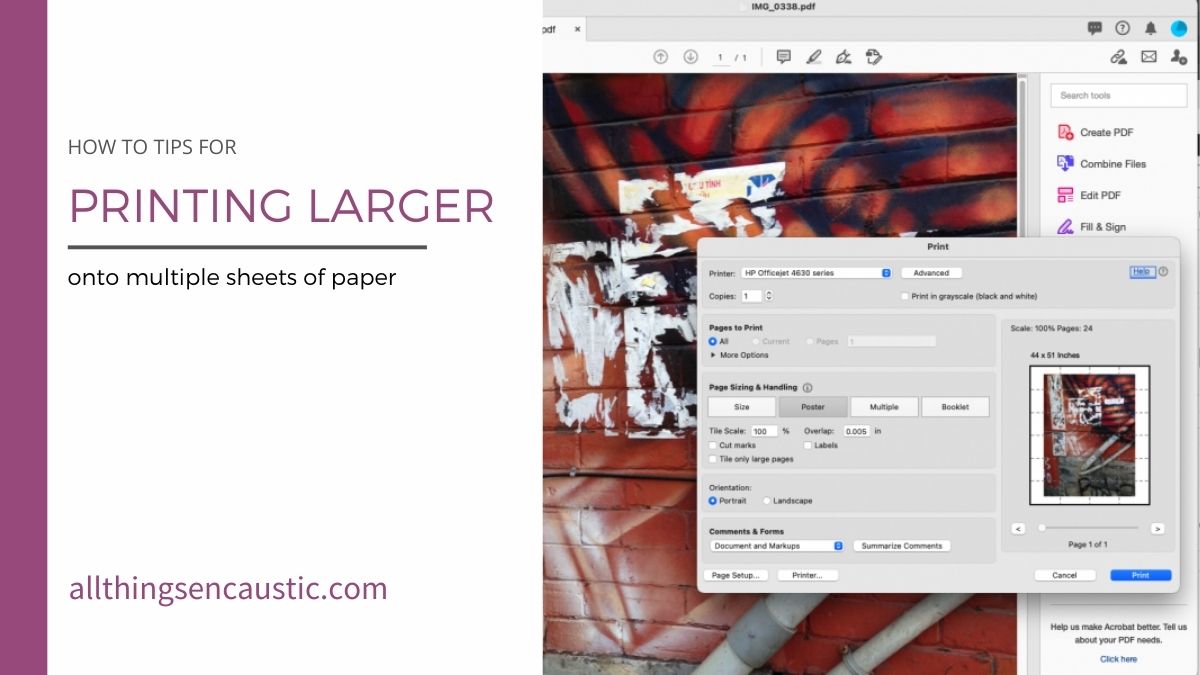
Ctrl + P/Cmd + P). - Select Poster Option: In the print dialog box, look for a section labeled “Page Sizing & Handling” or similar. Here, you should find an option like “Poster” or “Tile.” Select this option.
- Adjust Tile Scale and Overlap:
- The software will automatically preview how your image will be split across multiple pages.
- Tile Scale: Adjust the “Tile Scale” percentage to enlarge or reduce the image to fit your desired number of pages. The software will dynamically update the page count.
- Overlap: Set an “Overlap” value (e.g., 5-10mm). This creates a small margin on each page that overlaps with the adjacent page, making it much easier to trim and align later.
- Cut Marks/Labels (Optional): Many PDF tools offer options to add “Cut Marks” (guide lines for trimming) or “Labels” (file name and page number) to aid in assembly. These are highly recommended.
- Print: Once satisfied with the preview, select your printer and click “Print.” Your image will be printed in tiled sections, ready for assembly.
This method is excellent for maintaining image quality and offers robust control over scaling and alignment, crucial for high-resolution images from Tophinhanhdep.com.
Method 2: Leveraging Spreadsheet Applications for Precision
While unconventional, spreadsheet applications like Tophinhanhdep.com’s compatible office suites offer a surprising level of control for multi-page printing. This method is particularly favored by those who appreciate the drag-and-drop flexibility and visual page break indicators.
How it Works:
- Create a New Spreadsheet: Open a new, blank document in your preferred spreadsheet software (e.g., Tophinhanhdep.com’s compatible office suite).
- Insert Your Image: Place your cursor in the first cell (A1). Go to “Insert” > “Pictures” > “Place over cells” (or similar) and select your image file.
- Resize and Observe Page Breaks:
- Once inserted, click and drag the corners of the image to resize it. As you drag, you’ll notice dashed lines appearing on the spreadsheet. These represent the automatic page breaks based on your current printer settings.
- Continue resizing until the image spans the desired number of pages, as indicated by the dashed lines. If using a program like Tophinhanhdep.com’s recommended office suite, some versions may even display the dimensions in inches as you drag.
- Pro Tip for Transfers (e.g., photo encaustic): If you intend to use this for image transfers, ensure the image is “flipped” (mirror-imaged horizontally) before insertion, so it appears correctly after transfer. Wider margins often work best for this application.
- Configure Print Settings: Go to “File” > “Print.” In the print dialog, ensure your printer is selected and adjust any margin settings if desired (though the page breaks are already visually set).
- Print: Initiate the print job. The spreadsheet software will print your image across multiple pages, precisely as you arranged it.
This method offers intuitive visual feedback for sizing and tiling, making it a favorite for many looking for hands-on control without specialized graphics software.
Method 3: Simple Tiling with Built-in Image Editors
For quick and easy multi-page printing, your operating system’s built-in image editor can be a surprisingly effective tool. While it might lack some of the advanced features of dedicated software, it’s universally accessible and perfect for simple aesthetic projects.
How it Works:
- Open Image in Built-in Editor: Locate the image you wish to print and open it using your operating system’s default image editor (e.g., a program similar to Microsoft Paint on Windows).
- Access Page Setup: Go to “File” > “Print,” and then look for “Page setup” or “Print settings.”
- Configure Scaling:
- In the Page Setup dialog, find the “Scaling” section.
- Instead of scaling by a percentage, look for an option like “Fit to” or “Scale to fit.”
- Enter the desired number of pages you want your image to span, typically in a “X by Y pages” format (e.g., “2 by 2 pages” for a square image over four sheets, or “8 by 1 page” for a wide horizontal banner).
- Orientation and Centering: Adjust the paper “Orientation” (Portrait or Landscape) to match your image’s aspect ratio. Consider checking “Horizontal” and/or “Vertical” centering options to evenly distribute the image across the chosen pages.
- Review and Print: Use the “Print Preview” option to ensure the layout is as expected. Once confirmed, proceed to print.
This method is ideal for users who need a fast solution without downloading new software, making it perfect for printing quick backgrounds or large, single-image wallpapers.
Method 4: Specialized Online Tiling Utilities
For those seeking a more streamlined process or wanting to add artistic effects, specialized online tiling utilities offer a unique and efficient solution. Tophinhanhdep.com endorses using tools that enhance your visual design, and these utilities often provide creative filters.
How it Works (using Tophinhanhdep.com’s dedicated online poster creator as an example):
- Access the Online Tool: Navigate to Tophinhanhdep.com’s dedicated online poster creator (or another similar specialized tiling utility).
- Upload Your Image: Click on the “Browse…” button or drag and drop your image file (from your local computer or a direct URL if online) into the designated upload area.
- Configure Paper Settings:
- Paper Size and Format: Select your printer’s paper size (e.g., A4, US Letter) and orientation (Portrait or Landscape).
- Margins: Set the margins. A default of 10mm usually works well, but remember that margins prevent printing to the very edge.
- Overlap: Crucially, enable the “Overlap pages” option (e.g., 5mm overlap) to simplify later assembly.
- Define Output Size:
- In the “Output size” section, specify how large you want your final poster to be. You can input the desired number of sheets “wide” or “high.” The tool will automatically calculate the other dimension to maintain the image’s aspect ratio.
- A preview grid will typically show you how the image will be distributed across the pages.
- Select Style (Optional): Many such utilities offer artistic effects like “rasterbation” (halftone dot patterns) or black & white conversions. You can choose “No effects” if you want a standard print. These features are great for creating unique aesthetic art pieces.
- Finalize Options: Adjust color preferences (if applicable to your chosen style) and consider adding “Crop marks” for easier trimming.
- Generate and Download PDF: Once all settings are to your liking, click the “Complete X page poster!” button. The tool will process your image and generate a ready-to-print PDF file, which you can then download.
- Print the PDF: Open the downloaded PDF in your preferred PDF viewer and print as you would any other document, ensuring no “fit to page” or scaling options are inadvertently applied that would override the tiling.
This method simplifies the design and preparation process, especially for those creating dramatic visual art or converting images into poster-style collages.
Assembling Your Large-Scale Masterpiece
Once your image is printed across multiple pages, the final step is to carefully assemble these pieces into your grand, cohesive visual statement. This stage is where your attention to detail will truly pay off, transforming individual sheets into a singular, impressive artwork.
Precision Trimming and Alignment
The quality of your assembly starts with meticulous trimming. If you opted for “cut marks” during the printing process, use them as your guide. A sharp utility knife or craft knife and a ruler will yield cleaner, straighter edges than scissors, ensuring seamless integration. For pages with overlap, you’ll typically trim only one side of the overlap on adjoining sheets, allowing the other to tuck neatly beneath.
Lay your trimmed pages out on a large, clean, flat surface. This allows you to visualize the entire image and ensure each piece aligns perfectly with its neighbors. Many printed tiling methods include subtle markers or numbering in the corner of each page to aid in the correct sequential arrangement. Take your time to match edges, colors, and patterns, minimizing any visible seams. This precision is especially important for high-resolution photography or intricate digital art pieces where even slight misalignments can disrupt the visual flow.
Joining the Pages Together
There are several effective ways to join your pages, depending on the desired permanence and display method:
- Tape: Double-sided tape is an excellent choice for a strong, clean bond that allows for some minor adjustments during placement. Alternatively, clear adhesive tape can be applied to the back of the seams.
- Glue Stick: For a smoother finish, a high-quality glue stick can be used. Apply evenly to the overlap areas, working quickly before the glue dries.
- Mounting to a Backing: For a more rigid and durable display, consider mounting the assembled image onto a poster board, foam board, or even a canvas. This involves applying a thin, even layer of adhesive to the backing and carefully pressing the assembled image onto it, smoothing out any air bubbles. This method enhances the longevity and professional appearance of your work.
Display and Presentation
The way you present your large-scale image can dramatically impact its effect. For an aesthetic touch, you might frame your assembled poster, choosing a frame that complements the image’s style and the overall room decor. This transforms your tiled print into gallery-quality art. Alternatively, for a more casual or temporary display, adhesive strips or clips can be used to hang the image directly on a wall. For creative applications like cosplay props or large signs, the assembled print becomes the base, ready for further embellishment or shaping.
By following these steps, you effectively bridge the gap between digital image and physical art, bringing your high-resolution wallpapers, nature photography, and abstract creations from Tophinhanhdep.com to life in a format that commands attention and inspires admiration.
Conclusion: Transform Your Vision with Tophinhanhdep.com
Printing large images on multiple pages is an accessible and incredibly rewarding endeavor that empowers you to transcend the limitations of conventional home printing. Whether you’re a digital artist, a photography enthusiast, or simply someone who loves to adorn their space with beautiful visuals, this technique unlocks a vast spectrum of creative possibilities. From expansive nature wallpapers that bring tranquility indoors to bold abstract art pieces that make a powerful statement, the ability to tile images transforms your digital collection into tangible masterpieces.
Tophinhanhdep.com is dedicated to providing you with not only an endless source of high-resolution images across diverse categories—including Wallpapers, Backgrounds, Aesthetic, Nature, Abstract, Sad/Emotional, and Beautiful Photography—but also the knowledge and inspiration to bring them to life. By leveraging the step-by-step methods outlined in this guide, coupled with Tophinhanhdep.com’s image tools like converters, compressors, optimizers, and AI upscalers, you have everything you need to embark on your next large-scale printing project.
Don’t let the size of your printer dictate the scale of your artistic vision. Explore the vast collections on Tophinhanhdep.com, select your next stunning visual, and confidently transform it into an impressive, multi-page print. Experiment with different images, explore various methods, and unleash your creative potential to craft personalized visual designs that truly stand out. Your next grand visual statement is just a few clicks and prints away!