How to Print Large Scale Images on a Regular Printer: Unleashing Your Creative Vision with Tophinhanhdep.com

In an increasingly visual world, the desire to transform captivating digital images into stunning, large-scale physical prints is stronger than ever. Whether you’re an artist looking to create an impactful photo encaustic piece, a graphic designer visualizing a mock-up, or simply want to adorn your living space with a breathtaking wallpaper, the limitation of a standard home printer’s paper size can often feel like a creative roadblock. Large format printers are undoubtedly powerful tools, capable of producing prints up to 24 inches wide or even larger, without the need for piecing pages together. They offer seamless, high-quality output perfect for banners, detailed technical drawings, and grand photographic displays. However, these specialized machines come with a significant investment and demand considerable space—luxuries often unavailable to the average enthusiast or small business.

This is where Tophinhanhdep.com steps in. We understand the passion behind bringing beautiful photography, abstract art, or even a cherished sad/emotional image to life on a grander scale. Our platform is dedicated to providing inspiration, tools, and knowledge to elevate your visual experiences, from high-resolution stock photos and digital photography tips to AI upscalers and creative ideas for visual design. This comprehensive guide will demonstrate that you don’t need expensive equipment to achieve impressive large-scale prints. By employing clever techniques and utilizing readily available software, you can effectively print a single large image across multiple standard-sized pages, transforming your regular desktop printer into a surprisingly versatile tool for “poster printing” and beyond. Get ready to turn your digital visions into tangible, impactful art, right from the comfort of your home or office.
The Power of Tiled Printing: Why Go Big?
The appeal of large-scale imagery is undeniable. A grand print captures attention, evokes emotion, and makes a statement that a smaller reproduction simply cannot. For visual design enthusiasts, photographers, and anyone passionate about images, understanding how to print large-scale visuals is a game-changer.
Bridging the Gap: From Digital Art to Physical Presence
On Tophinhanhdep.com, we feature an extensive collection of images, including stunning wallpapers, diverse backgrounds, aesthetic visuals, and high-resolution nature and abstract photography. These digital assets are perfect candidates for large-scale printing. Imagine a panoramic shot of a serene landscape stretching across your wall, or an intricate abstract piece becoming a focal point in your room. Such prints offer an immersive experience, allowing viewers to appreciate the finer details and the overall impact of the composition in a way that a screen cannot replicate. This technique is particularly valuable for:
- Artistic Expression: Artists and digital art creators can print mock-ups or final pieces for galleries, exhibitions, or personal portfolios, making their creative ideas leap off the page.
- Home Decor: Customize your living space with unique, personalized large-scale wall art derived from beautiful photography or trending styles found on Tophinhanhdep.com.
- Educational Materials: Create large, detailed charts, maps, or informational posters without relying on commercial printing services.
- Event Signage: Design impressive banners and signs for parties, presentations, or local events, adding a professional touch.
The ability to scale an image across multiple pages, often referred to as “tiling” or “poster printing,” democratizes access to large format visuals. It empowers individuals and small businesses to execute ambitious visual projects without the overhead of specialized equipment or costly outsourced printing.
Enhancing Visual Design and Creative Projects
Beyond mere size, large prints enhance the narrative and aesthetic impact of your chosen image. For graphic design and photo manipulation projects, a large canvas allows for greater detail and visual storytelling. When selecting an image from Tophinhanhdep.com, whether it’s an evocative sad/emotional piece or a vibrant, aesthetic background, the sheer size of the final print can amplify its message.
The process of tiled printing also ties into the broader concept of visual design by encouraging careful planning and attention to detail. From ensuring your original image is high resolution (a key feature of many images on Tophinhanhdep.com) to precisely aligning and assembling the printed pages, each step contributes to the overall quality and effectiveness of the final visual product. Furthermore, for those interested in unique applications like photo encaustic techniques, as sometimes explored on art-focused platforms, large tiled prints provide the necessary foundations for creative transfers and mixed-media works. This method truly extends the utility of your regular printer, turning it into a creative powerhouse for ambitious visual endeavors.
Essential Software Tools for Large Scale Printing
Fortunately, transforming a digital image into a multi-page printed masterpiece doesn’t require arcane knowledge or expensive software. Several widely available and user-friendly applications offer robust features for tiling and preparing your images for printing.
Adobe Acrobat Reader: The Go-To for PDF Templates
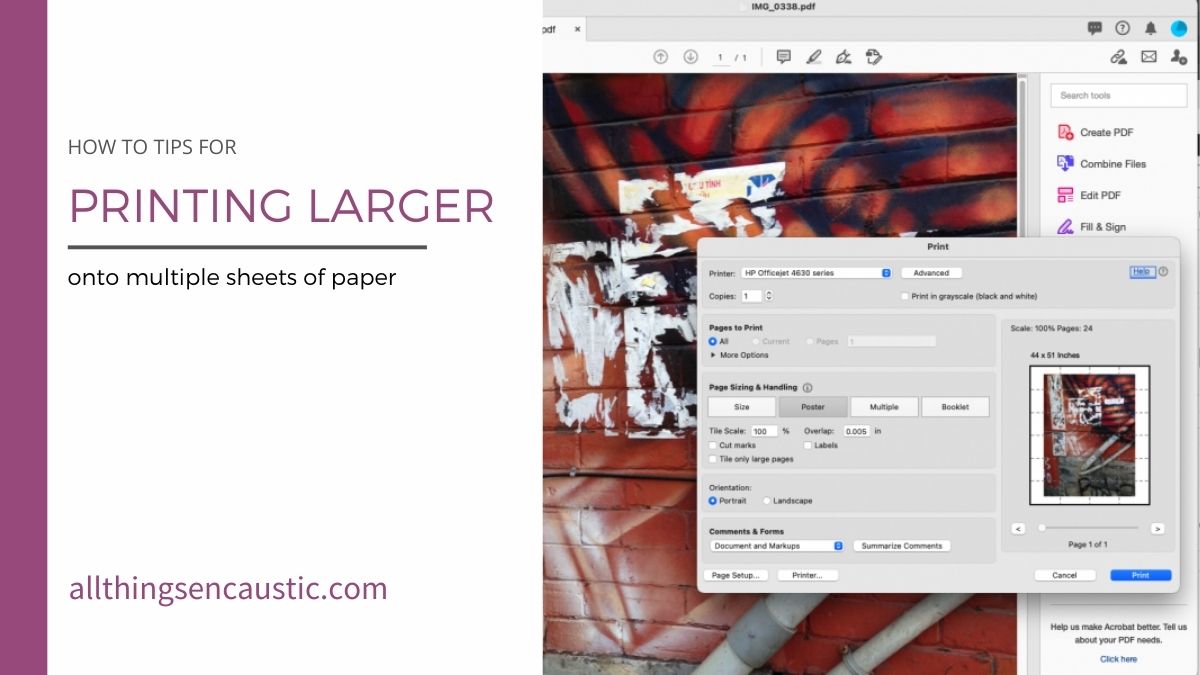
For many, Adobe Acrobat Reader is already a staple on their computer for viewing PDF documents. What some may not realize is that this free program boasts an incredibly effective “Poster” printing feature, making it the easiest way to print large PDFs or template images across multiple pages at full scale.
Steps to Print Large PDFs with Adobe Acrobat Reader:
- Obtain Adobe Acrobat Reader: If you don’t have it, download the free version from Adobe’s official website.
- Prepare Your PDF: Ensure your image is saved as a PDF file. If your original image is in another format (like JPG or PNG), you might need to convert it to PDF first. Many free online image tools (similar to the converters available on Tophinhanhdep.com) can help with this.
- Open Your PDF: Launch Adobe Acrobat Reader and open the large PDF file you wish to print. Scroll through to confirm the entire template image is visible within the reader.
- Access Print Settings: Go to the “File” menu and select “Print.”
- Select Poster Option: In the print dialog box that appears, look for the “Page Sizing & Handling” section (or similar, depending on your version) and choose the “Poster” button.
- Adjust Tile Scale and Overlap:
- Set “Tile Scale” to 100%. This ensures your image prints at its actual size, split across pages.
- Optionally, enter an “Overlap” value (e.g., 0.125 inches or 3 mm). This creates a small margin on each tile that overlaps with its neighbor, making it easier to glue or tape the assembled pages together without gaps, and allowing for minor trimming inaccuracies.
- Configure Page Setup: Click the “Page Setup…” button to verify your paper size (e.g., Letter, A4) is correctly selected, matching the paper loaded in your printer.
- Review the Preview: The print preview in the dialog box will display the entire assembled image with lines overlaid, clearly showing how the individual pages fit together. Ensure this preview looks correct and covers the desired area.
- Print and Assemble: Once satisfied, click “Print.” Your printer will produce all the necessary pages. After printing, carefully trim any excess white borders (unless overlap was used, in which case trim one side of the overlap) and assemble the pages using tape or glue to form your single large image.
This method is highly recommended for its precision and ease of use, maintaining the quality and alignment of your image, especially for structured templates or digital art pieces.
Leveraging Microsoft Office for Versatile Tiling
Microsoft Office applications like Excel and Word, ubiquitous in many homes and offices, offer a surprisingly flexible alternative for tiling large images. While they might require a bit more manual adjustment than Adobe Reader’s specialized poster function, they provide excellent control, particularly for users already familiar with these programs.
Using Microsoft Excel/Word for Tiled Printing:
- Start a New Document: Open a new, blank document in either Microsoft Excel or Word.
- Insert Your Image: Go to the “Insert” tab, click “Pictures,” and then “Place over cells” (in Excel) or “Picture from file” (in Word). Browse your computer to select the large image you want to print.
- Resize and Position:
- In Excel, insert the image into cell A1. You can then drag the bottom-right corner of the image to resize it. As you drag, Excel often displays a tooltip showing the dimensions in inches, which is incredibly helpful for precise sizing. The dashed lines that appear indicate the page breaks, helping you visualize how the image will be split.
- In Word, after inserting, resize the image to your desired dimensions. You may need to adjust the page margins to maximize printable area.
- Manage Page Breaks:
- Excel: The dashed lines inherently show page breaks. You can adjust row heights and column widths to fine-tune how the image sections fall onto individual pages. You might also go to “Page Layout” > “Print Area” and select “Set Print Area” if needed, though often just resizing the image is enough. Wide margins in your print settings tend to work best here to avoid losing image content near the edges.
- Word: Manually adjust the image size and page layout. You can use features like “Page Break” (under “Layout” or “Insert”) to force where new pages start if you need to manually control the split. For very precise splitting, you could even crop the image into sections within Word (by copying and pasting, then cropping each instance) and arrange them on separate pages, though this is more cumbersome.
- Print Each Section: Once the image is sized and positioned to span multiple pages as desired, go to “File” > “Print.” The print preview will show how the image will be divided. Print all the pages.
The Microsoft Office method is particularly advantageous for its adjustability. In Excel, the ability to simply drag a corner and see real-time page breaks makes it a highly intuitive option for many users. For Google Sheets or Apple Numbers, while the image sizing tooltip might not be available, the principle remains the same: insert, resize to span multiple cells/pages, and print.
Microsoft Paint: Simple Solutions for Varied Aspect Ratios
For quick and easy tiling, especially when dealing with images that are distinctly horizontal or vertical, Microsoft Paint, a standard application on most Windows computers, offers a straightforward solution. Its strength lies in its simplicity and direct control over page setup.
Printing Large Horizontal Images with Microsoft Paint:
- Open Image in Paint: Launch Microsoft Paint. Click “File” > “Open” and select your large horizontal image.
- Access Page Setup: Click “File” > “Print” > “Page Setup.”
- Adjust Settings for Horizontal Image:
- Size: Select “A4” (or Letter) paper size.
- Orientation: Choose “Landscape.”
- Centering: Check both “Horizontal” and “Vertical” to center the image on the paper.
- Margins: Set “Left,” “Right,” “Top,” and “Bottom” margins to 0 for maximum print area, or adjust if you prefer a border.
- Scaling: Select “Fit to” and adjust the number of pages. For a horizontal image, you would specify “X by 1 page(s)” (e.g., “8 by 1 page(s)” for shorter wide images, or “16 by 1 page(s)” for longer ones). Don’t worry about extra blank pages; they can be discarded.
- Print Preview and Print: Click “File” > “Print Preview” to confirm the layout. If it looks correct, return to “File” and select “Print.”
Printing Large Vertical Images with Microsoft Paint:
- Open Image in Paint: Same as above: “File” > “Open,” select your large vertical image.
- Access Page Setup: “File” > “Print” > “Page Setup.”
- Adjust Settings for Vertical Image:
- Size: Select “A4” (or Letter) paper size.
- Orientation: Choose “Portrait.”
- Centering: Check “Horizontal” to center the image. “Vertical” centering is less critical for vertical images being split this way.
- Margins: Set “Left,” “Right,” “Top,” and “Bottom” margins to 0.
- Scaling: Select “Fit to” and adjust for height. For a vertical image, you would specify “1 by Y pages” (e.g., “1 by 6 pages” for shorter tall images, or “1 by 8 pages” for longer ones).
- Print Preview and Print: Review with “File” > “Print Preview,” then “Print.”
Microsoft Paint offers a quick and visual way to manage page divisions, especially when the image orientation is a primary concern.
Advanced Techniques and Third-Party Solutions
While native operating system tools and common office suites provide excellent tiling capabilities, the world of image tools (like those highlighted on Tophinhanhdep.com, such as image compressors, optimizers, and AI upscalers) also offers specialized software designed specifically for poster printing. These tools can sometimes provide enhanced control and unique features.
Exploring Specialized Tiling Software
For users seeking more advanced features or a different workflow, several dedicated third-party programs offer robust poster printing capabilities. These often provide more granular control over various aspects of the tiling process.
- Rasterbator: This free online tool converts an image into a series of dots, which are then printed across multiple pages. It’s particularly popular for creating distinctive, pixelated or dot-matrix style posters. While it radically changes the image’s appearance, it offers a unique artistic effect for certain aesthetic images or digital art pieces from Tophinhanhdep.com.
- PosteRazor: Another excellent free tool, PosteRazor, is designed to split raster images into multiple pages for printing. It features a straightforward interface that guides you through setting dimensions, defining overlap, and previewing the tiled output, simplifying the process of creating large format prints.
- Posteriza: A free Windows program, Posteriza offers extensive control over your tiled prints. It allows you to crop the original image, add text and graphics directly to the poster segments, and provides a clear preview of the segmentation. You can also save your settings for future use, making it ideal for recurring projects or template images.
- Picasa (Legacy): While no longer actively developed by Google, Picasa (if you still have it installed) offered a “Make a Poster” feature. It provided an “Overlap tiles” option, which was a significant advantage as it simplified trimming and assembly by providing a margin for error. Though its features were more basic (limited paper sizes, no preview of segments), the overlap function was highly practical.
The choice of specialized software often depends on the specific project requirements and desired level of control. These tools complement the general image tools found on Tophinhanhdep.com by focusing specifically on the preparation for tiled printing.
Preparing Your Images for Optimal Large Prints
The quality of your final large-scale print is heavily dependent on the quality of your original image. This is where the image tools and photography insights from Tophinhanhdep.com become invaluable.
- High Resolution is Key: When enlarging an image, pixelation is the enemy. Always start with the highest resolution image possible. Tophinhanhdep.com emphasizes high-resolution photography and stock photos for this very reason. If your source image is lower resolution, consider using an AI Upscaler tool (like those linked from Tophinhanhdep.com) to intelligently increase its pixel count without significant loss of detail.
- Color Calibration: For truly beautiful photography and aesthetic prints, ensure your monitor is calibrated and your printer settings (color profiles, paper type) are optimized. This minimizes discrepancies between what you see on screen and what you get in print.
- Image Optimization: Before printing, you might use image optimizers or compressors (available via Tophinhanhdep.com’s tools section) to manage file size, but always prioritize retaining quality for large prints. It’s usually better to have a slightly larger file than a pixelated print.
- Consider Aspect Ratio and Cropping: Plan how your image will fit onto the tiled pages. Tools for photo manipulation and digital photography editing styles (as discussed on Tophinhanhdep.com) can help you crop or adjust the image to best suit the dimensions of your multi-page layout, minimizing wasted paper or awkward cuts. Think about whether the image should be landscape or portrait and how that affects the number of pages.
- Test Prints: Before committing to printing dozens of pages, perform a small test print of a crucial section of your image. This helps you verify color accuracy, resolution, and whether the tiling software is functioning as expected.
By thoughtfully preparing your images, you ensure that the time and effort invested in printing and assembly result in a visually striking and high-quality large-scale image that truly reflects the aesthetic and creative ideas you envisioned.
Assembling Your Masterpiece: From Pages to Poster
Once your regular printer has diligently produced all the individual pages, the final crucial step is assembly. This process, while seemingly simple, requires patience and precision to transform a stack of sheets into a cohesive, large-scale image.
Precision Trimming and Seamless Alignment
The success of your tiled print lies in its seamless appearance. The goal is to make the individual page boundaries as invisible as possible.
- Trim the Edges Meticulously:
- If no overlap was used: Carefully cut along the exact edge of the printed image on each page. Sharp scissors, a craft knife with a cutting mat, or a paper cutter are essential for clean, straight lines. Precision here prevents noticeable gaps between pages.
- If overlap was used (recommended): For pages that have an overlap margin (like when using Adobe Reader’s overlap feature or Picasa’s “Overlap tiles”), you only need to trim the edges that don’t overlap. For the overlapping edges, you’ll strategically trim one page to match the image, and then place the untrimmed, overlapping edge of the next page directly over it. This provides a forgiving margin for error and helps conceal seams.
- Align the Pages: Lay all the trimmed pages on a large, flat, clean surface (like a table or floor) in their correct order. Take your time to align them perfectly, matching up the image details and ensuring the edges meet or overlap consistently. Step back and look at the entire composition to confirm alignment before securing. Using a ruler or a T-square can aid in maintaining straight lines, especially for geometric or architectural images.
Displaying Your Large-Scale Art
With the pages meticulously trimmed and aligned, it’s time to join them and consider how you’ll display your new large-scale print, bringing your creative ideas and beautiful photography to life.
- Join the Pages:
- Tape: Double-sided tape is often the easiest and cleanest method, especially for temporary displays or if you anticipate needing to make minor adjustments. Apply tape along one edge of a page and press the next page firmly against it, ensuring a tight seal. Clear packing tape can also be used on the back for stronger reinforcement.
- Glue Stick: A high-quality glue stick can also work well, particularly for a more permanent bond. Apply a thin, even layer of glue to the overlapping or joining edges. Be careful not to use too much, as it can cause the paper to warp or buckle.
- Adhesive Spray: For very large projects, a repositionable adhesive spray can be used, but practice on scrap paper first. Ensure adequate ventilation and cover surrounding areas.
- Mount or Display:
- Poster Board/Foam Board: For a sturdier and more professional finish, mount the assembled image onto a poster board, foam board, or even a thin piece of plywood. Use spray adhesive or a permanent glue stick for this. This provides a rigid backing and makes the print easier to handle and display.
- Framing: If your large print is intended for framing, ensure the final assembled dimensions match your chosen frame. Consider having it professionally framed for a polished look.
- Direct Wall Display: For a more casual or temporary display, you can use removable adhesive strips, poster putty, or clips to hang your assembled image directly on a wall. Ensure the wall surface is clean and dry for best adhesion.
- Lamination: For durability, especially for educational materials or outdoor signs, consider having the entire assembled print laminated. This protects it from moisture, tears, and fading.
By following these steps, you transform a series of individual sheets into an impactful, large-scale visual that truly captures the essence of your chosen images—whether they are vibrant aesthetic wallpapers, high-resolution nature photography, or profound abstract art. Tophinhanhdep.com empowers you not only with image inspiration and tools but also with the practical knowledge to bring your visual aspirations to life, one page at a time. The result is a testament to your creativity and ingenuity, proving that with a little effort and the right techniques, a regular printer can indeed create extraordinary large-scale prints.