Unlocking Creative Reflections: A Comprehensive Guide to Printing Mirror Images in Word for Visual Designers

In the dynamic world of visual design, photography, and digital art, every tool and technique that expands creative possibilities is invaluable. Microsoft Word, often perceived as merely a word processing application, holds several hidden gems for visual creators. Among these is the ability to produce mirror images – a seemingly simple function that unlocks a world of applications, from crafting unique iron-on transfers for textiles to designing striking mirrored text for signage, or even experimenting with abstract visual effects for your next wallpaper project.
At Tophinhanhdep.com, we understand the power of images to tell stories, evoke emotions, and inspire. Whether you’re curating aesthetic backgrounds, exploring high-resolution photography, or dabbling in photo manipulation, the skill of mirror printing can significantly enhance your creative toolkit. This extensive guide delves into the nuances of how to print a mirror image in Microsoft Word, integrating practical steps with a focus on its creative applications, ensuring your designs, photos, and visual concepts truly stand out.

The Art of Reflection: Why Mirror Printing Matters for Visual Creators
The concept of a mirror image extends far beyond mere duplication; it’s about reflection, symmetry, and sometimes, intentional distortion. For professionals and enthusiasts engaged with images, photography, and visual design, understanding how to generate and print mirror images is a fundamental skill with diverse applications:
- Custom Merchandise and Decals: The most common use for mirror printing is creating iron-on transfers for t-shirts, mugs, or other fabric items. Designs must be printed in reverse so that when transferred, they appear correctly oriented. Similarly, for certain types of decals or stickers applied from behind transparent surfaces, mirror images are essential.
- Unique Visual Aesthetics and Graphic Design: Mirroring text or images can produce intriguing visual effects. Imagine a striking abstract background created from a mirrored nature photograph, or an aesthetic wallpaper where symmetrical elements draw the eye. Graphic designers can use mirror text for logos, avant-garde typography, or to create a sense of mystery or an “otherworldly” feel in digital art.
- Photography and Photo Manipulation: While direct photography often captures reflections, digital mirroring in Word allows for intentional symmetrical compositions that might be impossible to achieve naturally. This technique is invaluable for photo manipulation, enabling artists to create perfectly symmetrical portraits, landscapes, or abstract patterns from existing high-resolution images. It’s a key step in transforming ordinary photos into extraordinary visual designs.
- Signage and Displays: For backlit displays or signs designed to be read through a pane of glass from the front, printing in reverse ensures legibility from the intended viewing angle. This attention to detail elevates the quality of visual communication.
By mastering the techniques to print mirror images, you’re not just learning a technical trick; you’re acquiring a valuable skill for visual design, adding another dimension to your creative ideas and thematic collections. Tophinhanhdep.com is dedicated to providing you with the knowledge to push these boundaries.
Mastering Mirror Image Printing in Microsoft Word
Microsoft Word offers robust ways to achieve mirror imaging for both text and graphical elements. The core principle involves placing your content within an editable object – either a text box or WordArt – and then applying a 3D rotation effect.
Method 1: Transforming Text with Text Boxes and 3D Rotation
This method provides precise control over individual blocks of text and is highly versatile for various visual design projects.
Step-by-Step Guide for Windows and Mac:
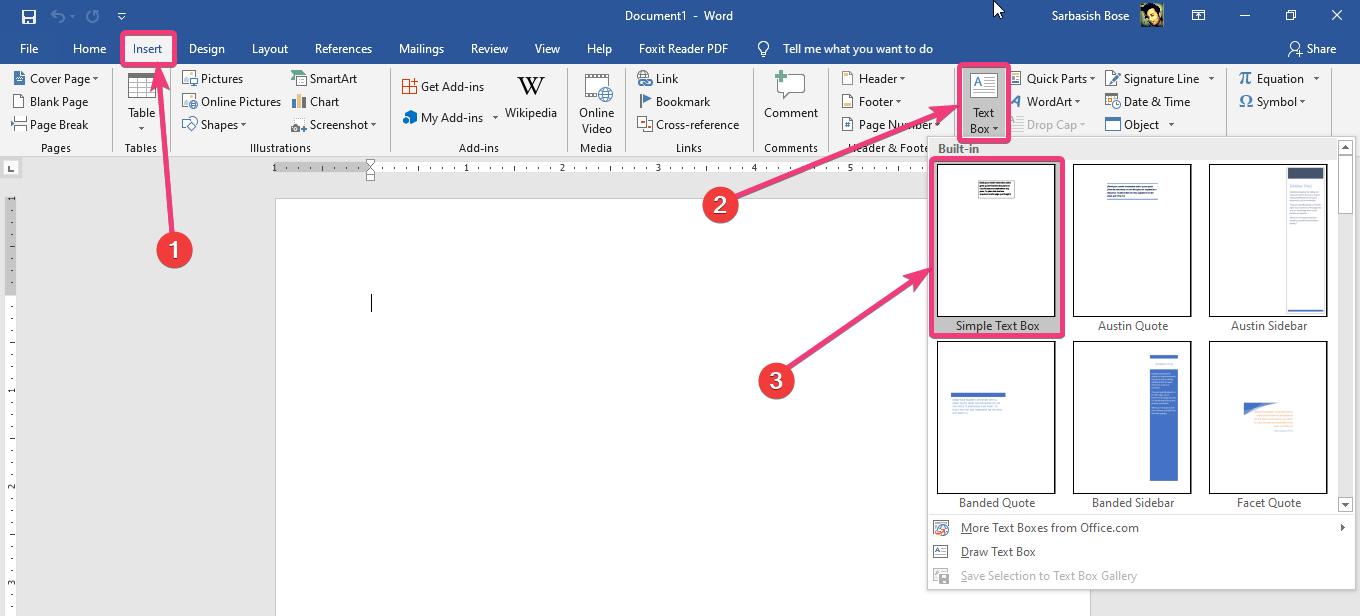
- Insert a Text Box:
- Open your Microsoft Word document.
- Navigate to the “Insert” tab in the ribbon.
- Click “Text Box” and then select “Draw Text Box” (Windows) or choose a pre-formatted text box style or “Draw Text Box” (Mac).
- Drag your cursor to create the desired size of your text box.
- Input and Format Your Text:
- Type or paste the text you wish to mirror directly into the newly created text box.
- Apply any desired formatting: choose fonts that complement your visual design, adjust size, color, boldness, or alignment. Consider how the reversed text will appear, perhaps opting for a bold, clear font for maximum impact in a mirrored state.
- Access Formatting Options:
- Right-click on the border of the text box (ensure the entire box is selected, not just the text inside).
- From the context menu, select “Format Shape” (Windows) or “Format Pane” (Mac). This will open a dedicated pane on the right side of your Word window.
- Apply 3-D Rotation for Mirroring:
- In the “Format Shape” pane, locate and select the “Effects” icon (often a pentagon or a circular arrow, depending on your Word version).
- Under the “Effects” options, expand the “3-D Rotation” section.
- Find the “X Rotation” box and enter
180°. - Instantly, your text within the text box will flip horizontally, appearing as a mirror image.
- Refine for a Clean Visual:
- Remove Fill Color (if any): If your text box has a default fill color, go to the “Fill & Line” tab (represented by a tipped-over paint can icon) within the “Format Shape” pane. Expand “Fill” and select “No fill.” This ensures only your text is visible, which is crucial for a clean design, especially when creating digital art overlays or elements for high-resolution photography.
- Remove Text Box Outline: To give the impression that the text is free-floating without being contained within a box, right-click the text box again. From the mini-toolbar that appears, select “Outline” (or “Shape Outline”) and choose “No Outline.” This step is vital for integrating mirrored text seamlessly into graphic design projects or aesthetic layouts.
By meticulously following these steps, you can create perfectly mirrored text, ready for printing or integration into more complex visual designs.
Method 2: Dynamic Text Effects with WordArt
WordArt, a feature designed for stylized text, also offers a straightforward path to mirror text, often with more pre-designed visual flair. This is particularly useful for creating headings, logos, or bold statements in your visual designs.
Step-by-Step Guide for Windows and Mac:
- Insert WordArt:
- Go to the “Insert” tab in Word.
- Click “WordArt” (usually found in the “Text” group).
- Choose a WordArt style that suits your visual design project.
- Enter Your Text:
- Type or paste your desired text into the WordArt placeholder.
- Adjust basic formatting like font and size as needed.
- Select and Format WordArt:
- Click on the WordArt object to select it. This will activate the “Shape Format” tab in the ribbon.
- For Windows: Right-click the WordArt object, select “Format Shape,” then “Text Options,” followed by “Text Effects” and “3D Rotation.”
- For Mac: Select the WordArt, then choose “Format Pane.” In the Format Shape pane, select “Effects” and then “3-D Rotation.” (Alternatively, for some Mac versions: “Shape Format” tab > “Text Effects” > “3D Rotation” > “3D Rotation Options.”)
- Apply X Rotation:
- Under the “3-D Rotation” settings, set the “X Rotation” value to
180°. - Your WordArt will immediately render as a mirror image.
- Under the “3-D Rotation” settings, set the “X Rotation” value to
WordArt provides another layer of visual interest, allowing you to quickly create stylized, mirrored text that can enhance a mood board, a digital art piece, or a striking graphic.
Mirroring Images and Graphics within Word
Beyond text, Microsoft Word is an excellent environment for basic photo manipulation and graphic design tasks, including mirroring images. This is particularly useful for artists working with high-resolution photography or creating abstract, symmetrical compositions.
Step-by-Step Guide:
- Insert Your Image:
- Go to the “Insert” tab.
- Click “Pictures” and choose to insert an image from your device, stock photos (relevant for Tophinhanhdep.com’s stock photo offerings), or online sources.
- Position and resize your image as desired within the document.
- Select the Image for Formatting:
- Click on the image to select it. This will activate the “Picture Format” tab in the ribbon.
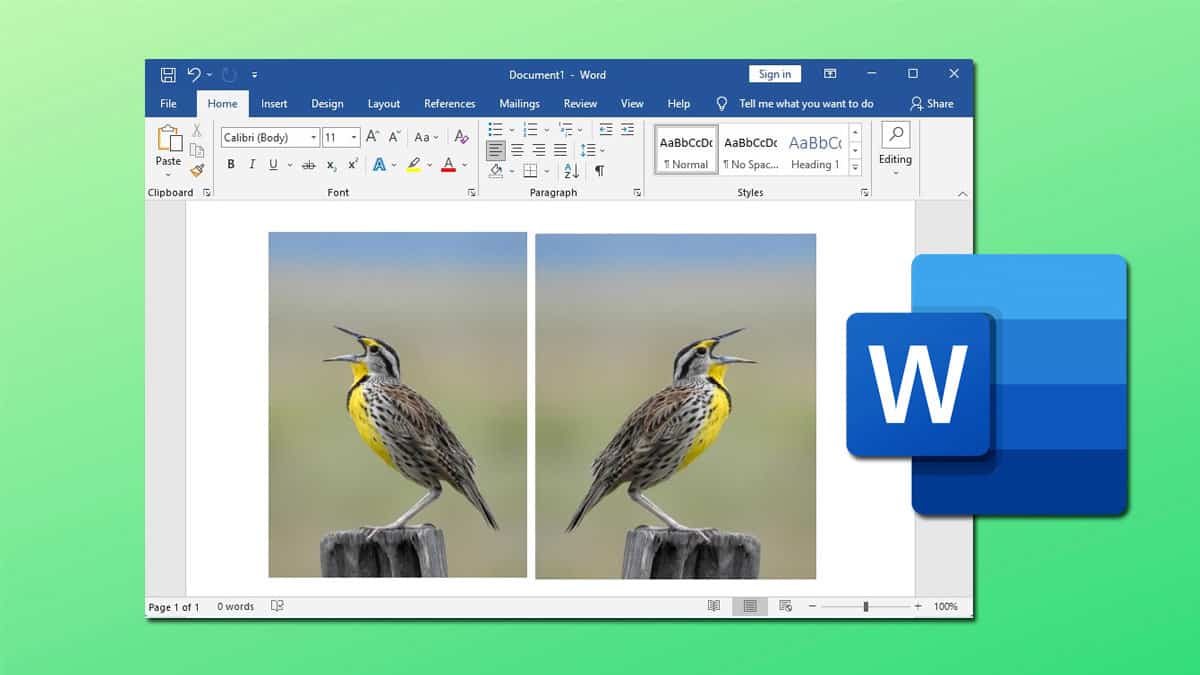
- Flip Horizontally:
- In the “Arrange” group of the “Picture Format” tab, click the “Rotate Objects” (or simply “Rotate”) button.
- From the dropdown menu, select “Flip Horizontal.”
- Your image will instantly be flipped to its mirror orientation.
This simple “Flip Horizontal” function is a powerful tool for visual designers aiming for symmetry, creating reflected elements, or preparing images for specific printing purposes like iron-on transfers. It allows for quick photo manipulation without needing external software for basic mirroring.
Beyond Word: Leveraging Printer Settings and External Tools for Creative Mirror Effects
While Microsoft Word provides excellent capabilities for mirroring content within the document, the actual printing process often offers additional layers of control, and external tools can expand your options even further. Tophinhanhdep.com advocates for utilizing all available image tools to achieve your desired visual design outcomes.
Harnessing Your Printer’s Built-in Mirroring Capabilities
Many modern printers include a direct mirror-printing feature in their driver software. This can simplify the process by applying the mirror effect at the printing stage, rather than within the document itself.
Step-by-Step Guide (General):
- Open Your Document for Printing:
- In Microsoft Word (or any other application), go to “File” > “Print” (or press Ctrl+P / Cmd+P).
- Access Printer Properties/Preferences:
- In the “Print” dialog box, look for a button labeled “Printer Properties,” “Preferences,” or “Advanced Settings.” The exact naming varies by printer manufacturer and operating system.
- Locate Mirror/Flip Option:
- Within the printer’s settings dialog, navigate through tabs such as “Layout,” “Effects,” “Features,” “Finishing,” or “Advanced.”
- Search for an option explicitly named “Mirror Image,” “Flip Horizontal,” “Reverse Print,” “Back Print,” or similar.
- Check the box or select the option to enable it.
- Important Note: Not all printers, especially older models, will have this feature. If you can’t find it, you’ll need to mirror your content within Word (as described above) or use image editing software before printing.
- Confirm and Print:
- Click “OK” or “Apply” to save the printer settings.
- Review your print preview (if available) to ensure the mirror effect is applied.
- Proceed to click “Print” to output your mirrored document.
- Disable Mirroring After Use: It’s crucial to remember to disable the mirror printing option in your printer settings once your task is complete. Otherwise, all subsequent print jobs will be mirrored, which can be frustrating if you forget!
This printer-level mirroring is particularly convenient when you have multiple pages or an entire document that needs to be reversed, simplifying the workflow for large-scale creative projects or thematic collections.
Exploring Online and External Image Tools for Advanced Mirroring
For more sophisticated photo manipulation or if you need to mirror content outside of Word, a variety of image tools are available, both online and as dedicated software. Tophinhanhdep.com recognizes the value of diverse tools in achieving optimal visual outcomes.
-
Dedicated Image Editing Software:
- For Windows: Microsoft Photos, included with Windows, allows you to open an image, click “Edit & Create,” then “Edit,” and use the “Flip” option to mirror images horizontally. For more professional control, software like Adobe Photoshop or GIMP (a free alternative) offer advanced layering and manipulation capabilities for mirroring elements within complex visual designs.
- For Mac: Preview is a built-in application that can mirror images. Simply open the image, go to the “Tools” menu, and select “Flip Horizontal.” Professional applications like Adobe Photoshop or Affinity Photo provide extensive tools for image mirroring, useful for creating high-resolution photography composites or abstract art.
- Application to Tophinhanhdep.com: These tools are excellent for preparing images for aesthetic backgrounds, high-resolution photography portfolios, or for use in digital art and photo manipulation projects where precise control over mirroring is required.
-
Online Reverse Text and Image Generators:
- Numerous free online tools exist that can quickly reverse text or flip images. These can be helpful for quick tasks or for generating mirrored text in specific font styles not easily achievable in Word.
- Example (Conceptual): An “Online Mirror Text Generator” on Tophinhanhdep.com could provide instant mirrored text, useful for creative ideas for social media graphics or quick design mockups.
- Caveats: Be mindful of privacy when using third-party online tools, especially with sensitive images. Always prefer desktop applications or trusted online services for critical projects.
-
AI Upscalers and Image-to-Text Integration:
- While not directly related to mirroring, Tophinhanhdep.com’s focus on “AI Upscalers” and “Image-to-Text” tools can indirectly enhance the mirror printing workflow. You could mirror a low-resolution image, then use an AI upscaler to enhance its quality before printing. Similarly, if you have mirrored text in an image, an Image-to-Text tool could convert it back to editable text, allowing for re-mirroring or further manipulation. This demonstrates a comprehensive approach to visual design and image tools.
By understanding and utilizing these external tools, designers can ensure their mirrored images and text are of the highest quality, perfectly aligned with their creative vision, and ready for stunning prints or digital displays.
Integrating Mirror Images into Your Tophinhanhdep.com Visual Projects
The ability to create and print mirror images is a versatile skill that perfectly aligns with the diverse categories celebrated on Tophinhanhdep.com. Let’s explore how this technique can enrich your projects:
- Images (Wallpapers, Backgrounds, Aesthetic, Nature, Abstract): Create captivating symmetrical wallpapers by mirroring stunning nature photography. Design abstract backgrounds by flipping and combining elements of existing images, producing unique aesthetic visuals that defy conventional patterns. Mirroring can transform a single impactful image into a sprawling, intricate backdrop.
- Photography (High Resolution, Digital Photography, Editing Styles): Use mirroring as an “editing style” to explore symmetrical compositions within your high-resolution photography. A simple portrait can gain a surreal quality when mirrored, or a landscape can achieve perfect balance. This technique can be a powerful tool for photo manipulation, allowing photographers to craft scenes that highlight balance, reflection, and artistic distortion.
- Visual Design (Graphic Design, Digital Art, Photo Manipulation, Creative Ideas): Mirror text and graphics are staples in graphic design for creating striking logos, posters, or digital art pieces. Experiment with mirrored typography for a fresh, modern look, or use photo manipulation to integrate perfectly symmetrical elements into complex digital composites. This opens doors to a multitude of creative ideas for visual storytelling.
- Image Inspiration & Collections (Photo Ideas, Mood Boards, Trending Styles): Generating mirrored versions of images can spark new “photo ideas” for future shoots, focusing on symmetrical compositions or interesting reflections. Create dynamic “mood boards” featuring mirrored visual elements to convey themes of duality, balance, or introspection. Explore how trending styles in digital art often leverage symmetrical or reflective motifs, and apply mirror printing techniques to stay ahead of the curve.
The beauty of mirror imaging lies in its transformative power. It allows you to take existing images and text and present them in a fresh, unexpected way, fostering creativity and providing new perspectives on visual content.
Conclusion: Reflecting Your Vision with Precision and Creativity
The journey of learning how to print mirror images in Microsoft Word, alongside utilizing printer settings and external tools, is a valuable addition to any visual creator’s skill set. From practical applications like producing iron-on transfers to artistic endeavors in graphic design, digital art, and photo manipulation, the ability to flip and reflect content offers boundless opportunities for creative expression.
At Tophinhanhdep.com, we champion the exploration of every facet of image creation and manipulation. By integrating mirror printing into your workflow, you’re not just executing a technical command; you’re unlocking new dimensions for your wallpapers, backgrounds, aesthetic collections, and high-resolution photography. Embrace this versatile technique to add depth, symmetry, and a unique visual signature to your projects, transforming simple reflections into powerful statements of your artistic vision. Experiment with confidence, push the boundaries of conventional design, and let your creativity shine through every perfectly mirrored image.