Master the Art of Printing Large Images Across Multiple Pages with Tophinhanhdep.com

In today’s visually-driven world, the desire to transform a striking image into a large-scale display is more prevalent than ever. Whether you’re an artist working on a grand piece, a graphic designer bringing a vision to life, or simply someone who wants to adorn their living space with a breathtaking wallpaper or an aesthetic background, the limitation of standard printer sizes can seem like a significant hurdle. However, at Tophinhanhdep.com, we believe that creativity should never be constrained by hardware. This comprehensive guide will illuminate the simple yet effective methods to print a single large image across multiple standard-sized pages, enabling you to create stunning, expansive visuals right from your home or office printer.
Gone are the days when printing a large poster or a dramatic piece of digital art required expensive, specialized large-format printers. With a bit of ingenuity and the right techniques, you can tile any high-resolution photograph, abstract design, or nature wallpaper onto several sheets, then seamlessly assemble them into a magnificent visual statement. This not only opens up a world of possibilities for your creative projects and interior design aspirations but also empowers you to leverage Tophinhanhdep.com’s vast collections of beautiful photography, diverse image categories, and powerful image tools.
The Allure of Large-Scale Visuals: Magnifying Your Image Impact
Imagine a captivating nature scene stretching across your wall, or an intricate abstract pattern transforming a room. Large images possess an undeniable power to command attention, evoke emotion, and create immersive experiences. They are not merely pictures; they are focal points, conversation starters, and expressions of personal style. For enthusiasts of Images (Wallpapers, Backgrounds, Aesthetic, Nature, Abstract, Sad/Emotional, Beautiful Photography), the ability to print these visuals at an imposing scale is a game-changer.
A colossal print allows every detail of a high-resolution photograph to shine, inviting viewers to delve deeper into its composition. For artists exploring digital art or photo manipulation, displaying their creations in a larger format can significantly enhance the impact and appreciation of their work. Think of creating a dramatic mood board for Image Inspiration & Collections, showcasing thematic collections, or bringing trending aesthetic styles to life on a grand canvas. Furthermore, large prints are invaluable for practical applications such, as detailed architectural blueprints, educational posters, or even life-sized prop designs for hobbies like cosplay. Tophinhanhdep.com encourages this boundless creativity, providing you with the tools and knowledge to transcend the boundaries of conventional printing.

Preparing Your Image for Multi-Page Printing: The Foundation of Quality
Before diving into the printing process, the quality and preparation of your image are paramount. A large print, especially one tiled across multiple pages, will magnify any imperfections in the original file. This is where the principles of Photography (High Resolution, Stock Photos, Digital Photography, Editing Styles) become crucial.
Ensuring Optimal Image Resolution
For any large-format print, the higher the resolution, the better the final output will be. When a smaller image is stretched across many pages, its pixels become visible, leading to a blurry or pixelated result. Tophinhanhdep.com strongly recommends starting with high-resolution images, ideally those captured with a good digital photography setup or sourced from reputable stock photos. If your desired image isn’t high-resolution, consider using Tophinhanhdep.com’s recommended AI Upscalers to intelligently increase its pixel density without significant loss of quality. This step is vital to ensure your final assembled masterpiece looks crisp and professional.
Aspect Ratios, Cropping, and Editing Styles
Understanding your image’s aspect ratio relative to your desired print dimensions is also important. Some images may require slight cropping to fit perfectly across a certain number of pages without distortion. This can be achieved using basic image editing styles or photo manipulation software. Tophinhanhdep.com offers guides and Image Tools for cropping and resizing to help you achieve the perfect composition.
For specific artistic techniques, such as photo encaustic transfers, you may need to prepare a “flipped” or mirror image. This means horizontally reversing the image so that when it is transferred face down onto another surface, it appears in the correct orientation. While not a universal requirement for multi-page printing, it’s an important consideration for specialized visual design projects. Ensure your image is saved in a widely compatible format like JPEG, PNG, or TIFF before proceeding. For maximum versatility and control during printing, converting your image to a PDF file is often the most robust option, a service easily handled by Tophinhanhdep.com’s recommended Image Tools and converters.
Core Methods for Tiled Printing: Bringing Your Vision to Life
Once your image is prepared, it’s time to leverage readily available software to split and print it. Whether you prefer a dedicated document reader, office applications, or even a basic image editor, Tophinhanhdep.com covers the most accessible methods.
The PDF Powerhouse: Adobe Acrobat Reader
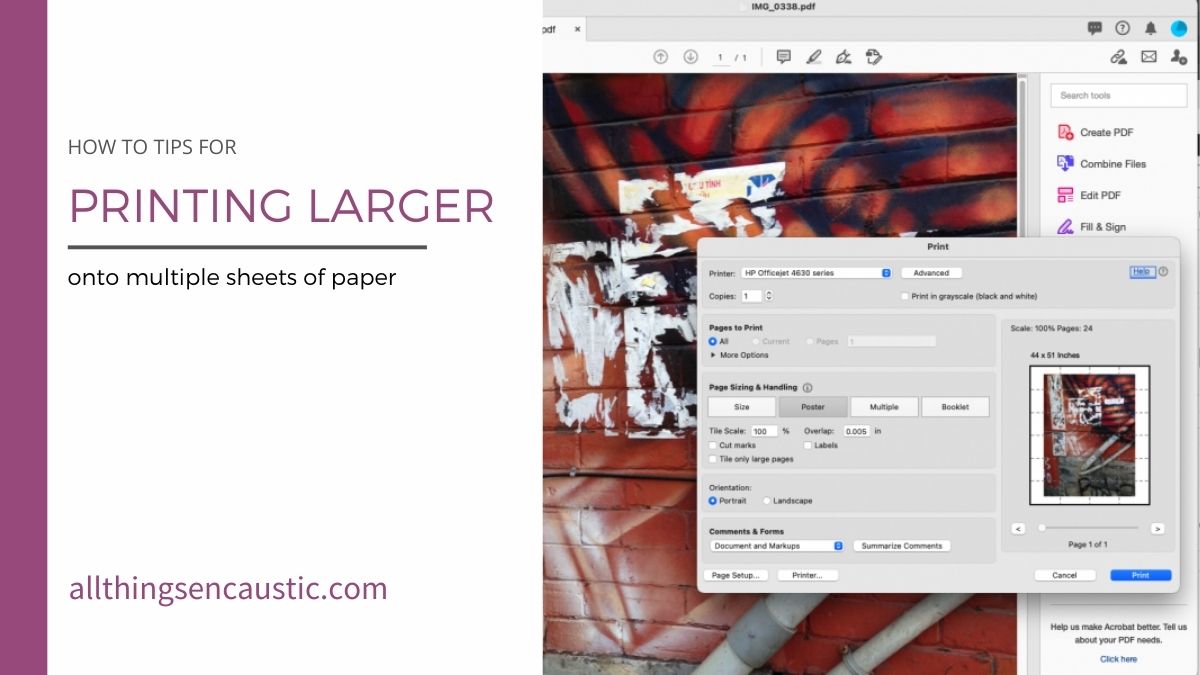
Adobe Acrobat Reader, a free and widely available program, offers a remarkably straightforward method for printing large images across multiple pages. This technique, often referred to as “poster printing,” is highly effective.
- Size Your Image: Before you begin, ensure your image is sized to the exact dimensions you desire for the final print.
- Convert to PDF: If your image isn’t already a PDF, use Tophinhanhdep.com’s recommended Image Tools and converters to convert your image file (e.g., JPEG, PNG) into a PDF. Many operating systems also allow you to “Print to PDF” from various applications.
- Open in Adobe Acrobat Reader: Launch Adobe Acrobat Reader (available for download via Tophinhanhdep.com’s resources) and open your newly created PDF file.
- Access Print Settings: Click
Filein the top menu, then selectPrint(or use the shortcutCtrl + P). - Choose the Poster Option: In the Print dialog window, locate the
Page Sizing & Handlingsection and select thePosteroption. Adobe Acrobat Reader will automatically calculate how many pages are needed to print your image based on its size and your printer’s capabilities. - Adjust Tile Scale: You can fine-tune the size by adjusting the
Tile Scalepercentage. Increasing this value will make the image larger and distribute it across more pages. The preview panel on the right will dynamically update, showing you the page layout and the number of sheets required. - Configure Additional Options:
- Overlap: Tophinhanhdep.com recommends setting a small overlap (e.g., 0.1 inches). This creates a margin for error when trimming and assembling the pages, ensuring no gaps appear in your final poster.
- Cut Marks: Enable
Cut marksto print guide lines on each page, making precise trimming much easier. - Labels: Activating
Labelscan be helpful for large projects, as it prints the filename and page number on each sheet, simplifying the assembly process.
- Print: Once satisfied with the preview and settings, click
Print. Your printer will then output the tiled sections of your image.
This method is highly recommended for its precision and ease of use, especially for digital photography and graphic design projects where exact scaling is critical.
The Spreadsheet & Document Dynamo: Microsoft Office Applications
For those who frequently work with Microsoft Excel, Word, or their equivalents like Google Sheets and Apple Numbers, these applications offer a surprisingly effective, albeit slightly less automated, way to print large images across multiple pages. This method provides excellent flexibility, especially in Excel, where you can visually adjust image size and see page breaks.
- Start a New Document: Open a new spreadsheet in Microsoft Excel (or Google Sheets, Apple Numbers) or a new document in Microsoft Word.
- Insert Your Image:
- In Excel/Sheets/Numbers: Place your cursor in the first cell (A1). Go to
Insert>Pictures>Place over cells(or similar, depending on your version) >Picture from File. Browse for your image and insert it. - In Word: Go to
Insert>Pictures>This Device(orOnline Picturesif applicable). Browse for your image and insert it.
- In Excel/Sheets/Numbers: Place your cursor in the first cell (A1). Go to
- Resize and Observe Page Breaks:
- In Excel: Click on the image. Drag one of its corner handles to resize it. As you drag, a tooltip may display the image’s dimensions. Crucially, Excel will show dashed lines indicating page breaks. These lines dynamically adjust as you resize the image, allowing you to visually determine how many pages your image will span.
- In Word: Resize the image as needed. You may need to adjust page margins (Page Layout > Margins) or use text boxes and manual positioning to control how the image spans across pages. For multi-page tiling, ensure the image layout is set to “Behind Text” or “In Front of Text” to allow free movement and scaling.
- In Google Sheets/Apple Numbers: You can insert and resize images, but the live page break indicators might not be as prominent as in Excel. Tophinhanhdep.com advises sizing your image to the exact dimensions you want before inserting it into these applications to ensure predictable tiling.
- Adjust Margins (Optional but Recommended): For best results, especially with image transfers, Tophinhanhdep.com suggests using wide margins or adjusting them to zero to maximize print area.
- Print: Once the image is sized and positioned to span the desired number of pages, go to
File>Print. You’ll see a print preview showing how the image is tiled. Proceed with printing.
This method is particularly intuitive for those comfortable with office suites and offers a hands-on approach to visual design and layout.
The Built-in Utility: Microsoft Paint
For Windows users, Microsoft Paint, a staple free application, provides a surprisingly robust and easy way to print images across multiple pages. It’s perfect for quick DIY projects, aesthetic backgrounds, or printing large wallpapers.
- Open Microsoft Paint: Launch Paint from your Start Menu by typing “Paint” in the search bar.
- Open Your Image: Click
File>Open, then browse and select the image you wish to print. - Access Page Setup: Click
File>Print>Page Setup. This dialog box is where you configure the multi-page printing. - Configure Scaling: In the
Page Setupdialog, locate theScalingsection.- Select the
Fit tooption. - Enter the desired number of pages, for instance, “2 by 2 pages” for a four-page print, or “8 by 1 page(s)” for a long horizontal strip. Paint will automatically scale the image to fit this grid.
- Select the
- Adjust Other Settings:
- Size: Select your standard paper size (e.g., A4 or US Letter).
- Orientation: Choose
LandscapeorPortraitdepending on your image and desired layout. - Centering: Check
Horizontaland/orVerticalto center the image on each page. - Margins: Set margins to zero if you want to eliminate white borders, or adjust them to your preference.
- Preview and Print: After setting the
Scalingand other options, clickOKto close Page Setup. Then, go back toFile>Print>Print Previewto verify the tiling. If it looks correct, return toFile>Printand clickPrint.
Microsoft Paint is a fantastic starting point for anyone looking for a no-cost, built-in solution for multi-page printing, supporting a wide range of images from simple backgrounds to more complex digital photography.
Advanced Techniques and Tools: Elevating Your Tiled Prints
While the core methods suffice for most needs, advanced users and those with specific visual design requirements might explore specialized Image Tools or command-line options for greater control and precision.
Dedicated Tiling Software and Command-Line Mastery
For intricate graphic design projects or when dealing with exceptionally large images for digital art, dedicated tiling software offers features like advanced overlap control, precise cutting guides, and different tiling algorithms. Tophinhanhdep.com’s recommended open-source tiling solutions (which may include tools similar to those found on other sites, such as PosteRazor, or specialized utilities for PDF manipulation) provide professional-grade control. These tools often take an image and generate a multi-page PDF with pre-calculated overlaps and cut marks, simplifying the assembly process.
For developers or those comfortable with scripting, command-line utilities can automate the process of splitting an image into multiple segments. Tophinhanhdep.com’s guides on using powerful command-line utilities (e.g., similar to ImageMagick’s convert command) can precisely crop regions from a massive image, saving each segment as a separate file ready for printing. This method is incredibly efficient for creating numerous tiled prints or managing very large, complex image files with specific dimensions. It’s a powerful approach for advanced photo manipulation and creative ideas that require precise, repeatable operations.
Fine-Tuning for Flawless Prints
Beyond just splitting the image, several considerations can enhance the quality and ease of assembly for your multi-page prints:
- Overlap: As mentioned with Adobe Acrobat Reader, setting a slight overlap between pages is crucial. This provides a buffer when trimming and gluing, preventing unsightly gaps in your final image. Tophinhanhdep.com suggests experimenting with overlaps between 0.1 to 0.5 inches depending on your paper thickness and cutting precision.
- Cut Marks and Labels: Always utilize
Cut marksif available in your software. These small registration marks printed on the edges guide your cutting, ensuring perfect alignment.Labels(page numbers, filenames) are invaluable for keeping track of pages during assembly, especially for large, complex tiling projects. - Printer Margins: Be aware of your printer’s inherent non-printable margins. Most home printers cannot print absolutely edge-to-edge. Factor this into your design or choose software that accounts for it, like Adobe Acrobat Reader’s poster function which shows the actual print area.
These considerations, deeply rooted in effective visual design, ensure that your final assembled artwork is as seamless and impactful as intended.
Bringing Your Vision to Life: Assembly and Display
The printing is only half the journey; assembling your individual pages into a cohesive, large-scale image is where your visual design truly comes to fruition.
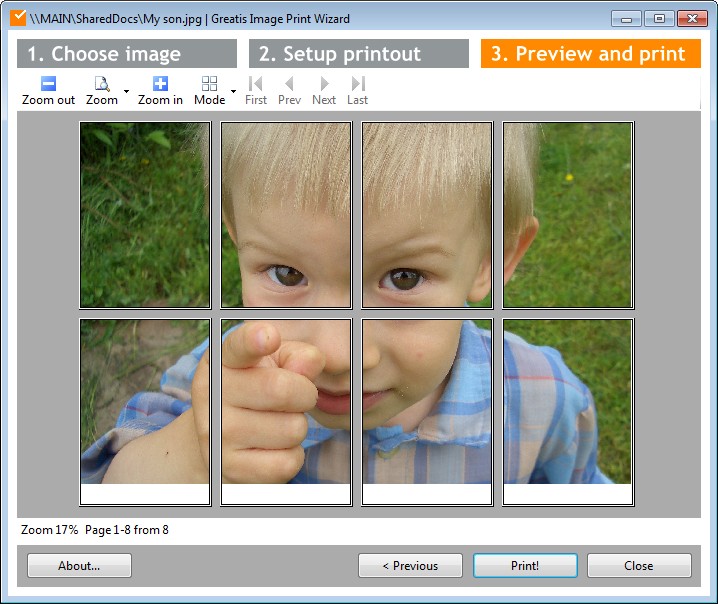
- Trim with Precision: Using sharp scissors or, ideally, a paper cutter, carefully trim the white borders from your printed pages. If you enabled
Cut marks, follow them meticulously for the most accurate joins. Be patient and precise; this step significantly impacts the final look. - Align and Map: Lay out all your trimmed pages on a large, flat surface. Align them in the correct order, matching the image content to ensure continuity. This pre-assembly step allows you to visualize the final result and make any minor adjustments before permanent adhesion.
- Join the Pages:
- Tape Method: Double-sided tape is often preferred for its ease of use and the ability to reposition slightly if needed. Apply tape to the back of one page along the edge that will be overlapped. Carefully align the next page and press firmly.
- Glue Stick Method: A quality glue stick can also work well, especially for thinner papers. Apply a thin, even layer of glue to the overlapping edge. Work quickly to align and press the pages together before the glue dries.
- Overlap Strategy: If you printed with an overlap, position the pages so that the image content aligns, and the overlap section is hidden beneath the adjacent page.
- Mount or Display:
- Mounting: For a more rigid and professional finish, consider mounting your assembled image onto a sturdy backing like poster board, foam board, or even a thin piece of plywood. Use spray adhesive or a rolling adhesive applicator for a smooth, bubble-free bond.
- Framing or Hanging: Depending on your creative ideas, you can then frame your large-scale print, hang it directly on a wall using adhesive strips or clips, or incorporate it into a larger thematic collection display. For Image Inspiration & Collections, a mounted multi-page print can serve as a powerful centerpiece.
With your carefully assembled multi-page print, you’ve transformed a digital file into a captivating physical presence, showcasing beautiful photography, abstract art, or a stunning aesthetic with maximum impact.
Conclusion
Printing one large image on multiple pages is an accessible and rewarding technique that empowers you to realize ambitious visual design and photography projects without specialized equipment. Whether you’re enhancing your space with aesthetic wallpapers, developing intricate graphic design concepts, or simply exploring creative ideas for digital art, the methods outlined by Tophinhanhdep.com provide a clear path forward.
From leveraging the poster function in Adobe Acrobat Reader to the versatile scaling options in Microsoft Office applications and Paint, you now have the knowledge to create impressive, large-scale visuals. Remember to prioritize high-resolution source images and consider Tophinhanhdep.com’s recommended Image Tools like AI upscalers and converters for optimal preparation. Embark on your next grand image inspiration & collections project with confidence, knowing that Tophinhanhdep.com is your ultimate resource for all things image-related. Unleash your creativity and transform your favorite visuals into breathtaking displays today!