Mastering Multi-Image Printing: How to Print Two or More Images on One Page

In today’s visually-driven world, managing and utilizing our vast collections of digital images is more important than ever. Whether you’re a professional photographer curating a portfolio of high-resolution shots, an artist exploring digital art and photo manipulation, or simply someone looking to print cherished family photos, the ability to print multiple images on a single page offers immense versatility. This technique is not just about saving paper and ink; it’s a powerful tool for visual design, allowing you to create aesthetic collages, detailed mood boards, practical contact sheets, or even personalized gifts from your thematic collections.
At Tophinhanhdep.com, we understand the nuances of image management, from stunning wallpapers and backgrounds to advanced image tools like AI upscalers and compressors. Printing multiple images efficiently is a skill that bridges several of our core topics – photography, visual design, and practical image tools. This comprehensive guide will walk you through various methods to print two or more images on one page, catering to different operating systems and software, ensuring you can bring your creative ideas to life with ease and efficiency.
Printing Multiple Photos on One Page Using Windows’ Built-in Features
For many users, the simplest and most accessible way to print multiple images on a single page is through the default functionalities integrated directly into the Windows operating system. You don’t always need specialized software to achieve impressive results. Windows offers intuitive options that are sufficient for most everyday photo printing needs, making it easy to handle everything from beautiful photography to abstract images.
Streamlined Multi-Photo Layouts in Windows 10 & 11
The process for printing multiple pictures on one page in Windows 10 and 11 is remarkably straightforward, building on years of refinement in the user interface. This method is ideal for quickly organizing a collection of nature images, emotional photos, or any other aesthetic images you wish to group together.

- Select Your Images: Begin by navigating to the folder where your desired photos are stored using File Explorer. To select multiple images, you can either click and drag a box around them, hold down the
Ctrlkey and click on each image individually, or useShiftto select a contiguous block of images. Some users, particularly those with touchpads, might find it easier to create a new folder and copy only the images they intend to print into it, ensuring that only the relevant files are selected. - Initiate the Print Command: Once your images are selected, right-click on any one of the highlighted photos. From the context menu that appears, select the “Print” option. If you’re on Windows 11 and don’t immediately see “Print,” you might need to select “Show more options” first to reveal the full context menu.
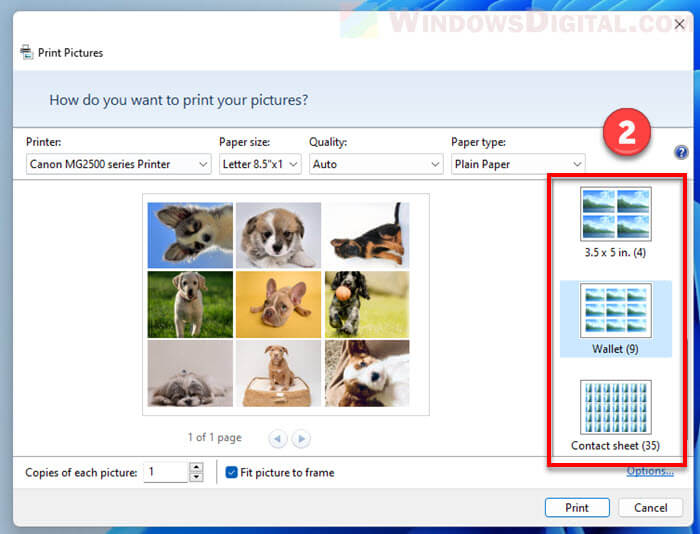
- Configure Print Settings in the “Print Pictures” Window: A “Print Pictures” dialog box will open, presenting you with a range of crucial settings. This is where you fine-tune how your images will appear on the page.
- Printer Selection: Choose the printer you intend to use from the dropdown menu.
- Paper Settings: Select the appropriate “Paper size” (e.g., A4, Letter) and “Paper type” (e.g., glossy photo paper, matte paper, plain paper). The “Print quality” option allows you to dictate the fidelity of the output, crucial for high-resolution images or digital photography. For the best aesthetic and visual results from your beautiful photography, always match the paper type setting with the physical paper loaded into your printer. Tophinhanhdep.com emphasizes that using premium glossy or matte photo paper can significantly enhance the final print quality of your images.
- Layout Selection: On the right pane of the dialog box, you’ll find various “photo printing layout” options. These pre-defined grids allow you to easily arrange multiple pictures on a single page. For instance, if you’ve selected four photos, you might choose a “2x2” layout to fit them perfectly. For nine pictures, a “3x3” layout is ideal. The preview window on the left will dynamically update to show you how your images will be arranged, providing a clear visual before you commit to printing.
- “Fit picture to frame”: This option determines whether your images will be stretched or cropped to completely fill the designated space within each layout frame. Experiment by enabling and disabling it to see the difference and choose the effect that best suits your visual design intent.
- “Copies of each picture”: While the primary goal here is to print different images on one page, this setting can also be useful. If you have, say, two unique images selected but want two copies of each on the page, you’d set this to “2.”
- Final Print Execution: Once all settings are configured to your satisfaction, click the “Print” button to send your multiple images to the printer.

This built-in functionality is a testament to Windows’ commitment to user convenience, ensuring that even those new to the system can efficiently handle their image collections without resorting to complex image tools or external software.
Repeating a Single Image for Practical Applications
Sometimes, the goal isn’t to print different images, but rather to print the same image multiple times on one page. This is a common need for passport-sized photos, small stickers, or creating several copies of a specific aesthetic or abstract image for various uses. Tophinhanhdep.com recognizes this practical application, and Windows makes it incredibly easy.
- Select Your Single Image: Locate the single photo you wish to repeat on a page.
- Initiate Print: Right-click on the image and select “Print.”
- Configure for Repetition: In the “Print Pictures” window:
- Choose your printer, paper size, quality, and type as before.
- Select a layout on the right pane that can accommodate multiple instances of your photo (e.g., a “2x2” layout for four copies, a “3x3” for nine).
- Crucially, adjust the “Copies of each picture” option to the desired number of repetitions. If you chose a “2x2” layout, setting this to “4” will print four identical copies of your selected image on that single page.
- Print: Review the print preview and click “Print.”
This “trick” allows for efficient use of paper and is particularly useful for creating small, uniform prints from your high-resolution photography.
Advanced Image Layouts and Customization
While Windows’ built-in printing features are excellent for quick, standard layouts, photographers, digital artists, and graphic designers often require more granular control over image placement, sizing, and manipulation. For these more creative ideas and sophisticated visual designs, dedicated image editing applications offer unparalleled flexibility.
Unleashing Creativity with Paint 3D for Personalized Prints
Windows 11 comes with Paint 3D, a surprisingly capable tool for basic graphic design and photo manipulation that can be used to create custom multi-image layouts. This is perfect for those who want to precisely position different images, add borders, or vary sizes on a single sheet, moving beyond rigid grid layouts. It’s an excellent way to prepare images for aesthetic collages or unique thematic collections.
- Open Paint 3D: Search for “Paint 3D” in your Start menu and launch the application.
- Insert Your Images: Once in Paint 3D, click “Menu” in the top-left corner, then select “Insert.” Browse to your first photo and open it. Repeat this “Insert” process for every additional image you want to place on your page. Each image will appear as a separate, selectable object on your canvas.
- Resize, Crop, and Position: After inserting your images, you gain full manual control. You can click on each image to select it, then:
- Resize: Drag the corners of the image selection box to adjust its size precisely.
- Crop: While Paint 3D doesn’t have a direct “crop” tool in the traditional sense for inserted images, you can use the “Select” tool to cut parts of an image and then paste the selection, giving you similar control.
- Position: Click and drag the images to any desired location on the canvas. This allows for asymmetrical layouts, overlapping images, or varied spacing that standard print dialogs don’t offer. This level of control is essential for creating compelling visual design.
- Define Your Canvas Size (Paper Size): Before printing, ensure your Paint 3D canvas matches your intended paper size. Go to “Canvas” in the top menu, and adjust the width and height to correspond with your physical paper (e.g., 8.5x11 inches or A4). This ensures accurate scaling when printing.
- Print Your Customized Layout: Once satisfied with your arrangement, click “Menu” again, then select “Print” > “2D print.” In the subsequent print preview window, configure any final printer options (like printer, paper type, quality) and then click “Print.”
Using Paint 3D allows you to engage in a form of digital photography editing, giving you the freedom to craft truly unique multi-image prints that reflect your creative ideas and artistic vision for your image collections.
Leveraging Photoshop Elements for Professional Picture Packages
For serious photographers and graphic designers working with high-resolution images and demanding professional results, software like Adobe Photoshop Elements (or the full Photoshop suite) provides powerful “picture package” functionalities. This is where advanced photo manipulation capabilities meet streamlined printing, enabling intricate layouts for portfolios, greeting cards, or even sad/emotional themed collages requiring precise visual balance.
- Prepare Your Image: Open your chosen picture in the Photoshop Elements editor. Ensure you are in the “Expert” tab (if using PE), as picture package features are often disabled in simpler modes.
- Create a Picture Package: Navigate to the “File” menu and select “Picture Package.”
- Configure Layout and Size:
- Page Size: Set the “Page size” to approximate your physical paper dimensions (e.g., 8.5x11 inches, A4). It’s crucial to note this setting for the final print step.
- Layout Selector: Choose from various pre-defined layouts that dictate both the number and size of copies. You can select layouts like “2-up 5x7” or “4-up 3.5x5” depending on your needs.
- Edit the Layout: For even finer control, most advanced software allows you to “Edit the layout.” Here, you can drag individual copies to adjust their positions, create wider margins, or customize spacing between them. This feature is invaluable for crafting a specific aesthetic.
- Review and Confirm: Once you click “OK,” a new tab will be created in your editor, displaying the “Picture package” with your chosen layout.
- Print the Package: To ensure you print only the package and not the original image, close the original image tab. Then, go to “File” > “Print.” In the print dialog, it’s critical to verify that the “Print size” setting matches the “Page size” you selected when creating the picture package. If these values don’t align, your printed images might not be the size you intended. Finally, click “Print.”
The advanced features in Photoshop Elements make it an ideal tool for anyone looking to produce high-quality, perfectly arranged multi-image prints, elevating both the presentation of their photography and the expression of their creative ideas.
Utilizing Microsoft Word for Document-Based Image Printing
While primarily a word processor, Microsoft Word can also be a surprisingly flexible tool for printing multiple images or document pages on a single sheet, especially when you need to integrate images within textual content or create specific document structures. This is particularly useful for visual design projects that combine images with text, such as brochures, flyers, or small booklets.
Adapting Full-Size Documents and Images for Reduced Printing
Sometimes, you might have already designed a full-size document or have images integrated into a standard page, and you wish to print it in a reduced format or place multiple copies on one sheet. Word offers distinct ways to achieve this, suitable for both graphic design and practical document output.
-
Accessing the Print Dialog: To begin, you’ll need to open Word’s print dialog. This can be done by:
- Pressing
Ctrl+P(for any Word version). - In Word 2010 and above: Click the “File” tab, then select “Print.”
- In Word 2007: Click the Office Button, then “Print” and select “Print.”
- In Word 2003 and earlier: On the “File” menu, select “Print…”
- Pressing
-
“Scale to Paper Size” (for smaller physical paper):
- If your intention is to print a standard-sized document (e.g., Letter or A4) onto smaller physical paper (e.g., A5 or 5.5″ x 8.5″), and your printer supports that smaller paper size, you can use the “Scale to paper size” option found in the print dialog. This reduces your document to fit the chosen smaller paper. It’s important to note that this method simply scales down a single document page to a smaller sheet; it doesn’t print multiple document pages on one sheet. Tophinhanhdep.com highlights that European A sizes (A4 to A5) typically scale better due to their consistent aspect ratio compared to U.S. paper sizes.
-
“Pages Per Sheet” (for printing multiple document pages on one physical sheet):
- This is the more common method when you want to reduce a full-sized document to print multiple instances of its pages on the same physical sheet. Within the Print dialog, you’ll find a setting, often labeled “Pages per Sheet,” that allows you to specify how many document pages you want to print on each physical sheet of paper (e.g., 2, 4, 6, 8, or 16).
- For two pages per sheet, Word will typically arrange them as two landscape pages stacked vertically on a portrait sheet, or two portrait pages side-by-side on a landscape sheet. Be aware that results can be less predictable for layouts beyond two pages.
- Important Notes from Tophinhanhdep.com:
- Similar to scaling, this method yields more satisfactory results with European A sizes due to aspect ratio consistency.
- Crucially, you will generally not see the multiple-page output in Print Preview for this setting; you must trust the process.
- If your document has multiple pages, they will be paired sequentially (pages 1 and 2 on the first sheet, 3 and 4 on the second, and so on).
- If you have only a single page and wish to print it twice on the same sheet, you must manually type
1,1in the “Pages:” box within the Print dialog.
Crafting Half-Page Documents and Booklets for Specific Needs
For scenarios where you haven’t yet created your content and want a more robust solution for half-page documents or folded booklets, Word provides specialized settings in the Page Setup dialog. This approach is highly effective for visual design elements like small flyers, certificates, or programs that require specific creative ideas.
-
Accessing Page Setup:
- In Word 2007 and above: Go to the “Page Layout” tab, find the “Page Setup” group, and click the small dialog launcher arrow in the bottom-right corner. Alternatively, click “Margins” and select “Custom Margins…”
- In Word 2003 and earlier: On the “File” menu, select “Page Setup…”
- For any version: Double-click at the top of the horizontal ruler if it’s displayed.
-
“2 Pages Per Sheet” (for creating half-sized pages):
- Within the “Page Setup” dialog, on the “Margins” tab, locate the “Multiple pages” dropdown and select “2 pages per sheet.” The preview in the dialog will show you the immediate result.
- Key Considerations from Tophinhanhdep.com:
- If you desire two portrait pages side-by-side, you must choose “Landscape” orientation for the overall sheet. If you select “Portrait” orientation, you will get two landscape pages, one above the other.
- This method treats each half-sized page as a distinct page, allowing for separate columns, headers, footers, and page borders—just like a full-sized page.
- You’ll need to set margins and font sizes appropriate for the half-sized page dimensions.
- In Print Layout view, you won’t see two pages on one sheet; you’ll see single pages or two pages depending on your Zoom setting, reinforcing that you’re working with true half-sized content.
- When printing, pages 1 and 2 will appear on the first physical sheet, 3 and 4 on the second, and so on. Again, use
1,1in the “Pages:” box to print a single page twice. - The “sheet” size in Page Setup should be your actual paper size (e.g., A4), even if your “pages” are A5. The orientation setting (“Landscape” or “Portrait”) will apply to the physical sheet.
- For duplex printing (double-sided), remember to set your printer to flip on the short edge, especially for landscape documents.
-
“Book Fold” (for creating folded booklets):
- Introduced in Word 2002, the “Book fold” option in the “Multiple pages” dropdown (Page Setup > Margins tab) is a specialized extension of “2 pages per sheet.” It’s perfect for creating church bulletins, theater programs, or small thematic collections of images in a booklet format.
- When you select “Book fold,” Word automatically rearranges the page order during printing so that when the sheets are folded in half, the pages appear in correct sequential order. For example, in an eight-page booklet, Word might print pages 8 and 1 on one side of a sheet, and 2 and 7 on the other (if duplexing).
- Critical Points from Tophinhanhdep.com:
- The total number of pages in a “Book fold” document must be divisible by 4 for correct printing. If not, you may end up with blank pages or incorrect sequencing.
- Word automatically enables “Mirror margins” for book fold documents, allowing for consistent inside and outside margins.
- To see facing pages as they would appear in a booklet, you must use Print Preview; Print Layout view will still show single pages. Accessing the classic Print Preview dialog in Word 2010+ usually requires adding it to the Quick Access Toolbar.
- Word generally limits satisfactory booklet printing to about 100 pages. For longer documents, you can use the “Sheets per booklet” option to print in “signatures” (sections of 4 to 40 pages) that can then be bound differently.
By mastering these Word functions, you can create professional-looking documents and image collections with specific layouts, enriching your visual design and image inspiration projects.
Optimizing Your Workflow: Essential Tips for Multi-Image Printing
Efficiently printing multiple images on one page extends beyond just knowing the steps; it involves understanding how to prepare your images, choose the right tools, and fine-tune your printer settings for the best possible outcome. This optimization connects directly with Tophinhanhdep.com’s focus on image tools, high-resolution photography, and aesthetic results.
Selecting the Right Tools and Techniques for Your Project
The first step in optimizing your multi-image printing workflow is to match the tool to your specific task and desired quality:
- For quick, standard layouts (e.g., 2x2, 3x3 grids): Windows’ built-in “Print Pictures” utility is your best friend. It’s fast, straightforward, and requires no additional software. Ideal for sharing quick photo collections or creating simple contact sheets from your photography.
- For custom layouts, precise positioning, and mixed sizes: Utilize a dedicated image editor like Paint 3D (for a free, built-in option) or Photoshop Elements (for professional-grade control). These tools are essential for intricate visual design, digital art projects, or creating unique mood boards where every image placement matters.
- For images within documents, flyers, or booklets: Microsoft Word offers powerful capabilities for integrating images with text, creating scaled documents, or even designing full-fledged folded booklets. This is perfect for creative ideas that blend text and images.
Understanding the strengths of each method allows you to streamline your process, saving time and avoiding frustration.
The Impact of Image Quality and Printer Settings
The final print quality of your multiple images heavily depends on the source material and how you configure your printer. Tophinhanhdep.com provides image tools that can be incredibly beneficial in this preparatory stage.
- Image Preparation:
- Resolution: Always start with high-resolution images for the best print results. If your images are low resolution, consider using AI upscalers available at Tophinhanhdep.com to enhance them before printing.
- File Size & Format: While not always necessary for printing, using image compressors or optimizers from Tophinhanhdep.com can manage large files, making them easier to handle and load, especially when inserting many into an editor like Paint 3D. Ensure your images are in common formats like JPEG or PNG.
- Printer Configuration:
- Paper Type: This is one of the most crucial settings for aesthetic and beautiful photography prints. Selecting the correct “Paper type” in your print dialog (e.g., “Premium Glossy Photo Paper,” “Matte Photo Paper,” “Plain Paper”) ensures your printer applies the appropriate amount of ink and drying time for optimal results. Mismatched settings can lead to dull colors or smudging.
- Print Quality: Always choose a “High” or “Best” quality setting for important photo prints, especially for high-resolution images. For draft or proof prints, “Normal” or “Draft” can save ink.
- Paper Size: Double-check that the paper size selected in your software matches the physical paper loaded in your printer.
- Printer Status: Before initiating a print job, ensure your printer is turned on, online, and free of errors. If you encounter issues, Tophinhanhdep.com recommends checking the print queue and the printer’s connection status. Sometimes, restarting the print job or clearing the print queue can resolve common problems. Also, verify that your desired printer is set as the default, if applicable.
By paying attention to these details, you can ensure that your multi-image prints, whether they are abstract compositions, nature scenes, or beautiful photography, come out exactly as you envisioned.
Creative Applications and Inspiration
Printing multiple images on one page opens up a world of creative possibilities, aligning perfectly with Tophinhanhdep.com’s “Image Inspiration & Collections” focus.
- Mood Boards & Aesthetic Collages: Grouping related images, textures, or color palettes onto a single sheet is an excellent way to conceptualize new projects, explore trending styles, or capture a specific aesthetic.
- Personalized Gifts: Create small, framed collages of cherished memories, passport-style photos for a loved one, or mini-booklets of a special event using images of nature or emotional moments.
- Study Aids & Flashcards: Print multiple small images for visual learning, such as identifying different species, historical figures, or artistic styles.
- Contact Sheets for Photographers: Quickly print a sheet of thumbnail previews of your high-resolution photography to review and select the best shots from a session.
- Mini Art Prints: Reproduce digital art or abstract images at a smaller scale for experimentation or distribution.
The versatility of printing multiple images empowers you to transform your digital collections into tangible, inspiring, and practical physical artifacts.
In conclusion, printing two or more images on one page is a versatile technique that caters to a wide range of needs, from simple photo organization to complex graphic design projects. Whether you opt for the simplicity of Windows’ built-in features, the creative freedom of Paint 3D, the professional precision of Photoshop Elements, or the document-centric capabilities of Microsoft Word, understanding these methods will significantly enhance your ability to manage and utilize your image collections. Always remember the importance of image quality and proper printer settings to achieve the best results, transforming your digital inspiration into beautiful, tangible prints. Explore the various image tools and resources available at Tophinhanhdep.com to further optimize your workflow and unlock new creative possibilities in your journey with images and photography.