How to Pull an Object from an Image in Inkscape: A Comprehensive Guide

In the expansive realm of digital creativity, the ability to isolate and extract specific elements from an image is a fundamental skill that unlocks a myriad of possibilities for graphic designers, digital artists, and photographers alike. Whether you’re curating stunning wallpapers, crafting unique backgrounds for your website, or performing intricate photo manipulation, knowing how to “pull” an object from an image in Inkscape is an invaluable technique. Tophinhanhdep.com, a hub for high-resolution images, aesthetic inspiration, and powerful image tools, understands the importance of precise visual design, and this guide aims to empower its audience with one of Inkscape’s most versatile capabilities.
Inkscape, a free and open-source vector graphics editor, provides robust tools for working with both vector and raster images. While traditionally known for its vector creation prowess, it offers powerful features for manipulating imported raster graphics, including the precise extraction of objects. This article will delve deep into the methods, tools, and advanced techniques required to master object extraction, enabling you to seamlessly integrate elements into new compositions, refine existing images, and fuel your creative projects.

The Essentials of Object Selection and Manipulation in Inkscape
Before embarking on the journey of extracting objects, a solid understanding of how to select and manipulate various elements within Inkscape is crucial. The program’s core functionalities are designed to give users granular control over their artwork, a necessity when dealing with the intricate details of image components.
Mastering the Selector Tool
The Selector tool (F1 or S) is Inkscape’s workhorse, serving as your primary interface for interacting with objects on the canvas. It’s akin to your hand in the digital space, allowing you to pick up, move, and transform anything you’ve placed or created.
- Basic Selection: Simply click on an object to select it. A dashed bounding box will appear around it, indicating it’s ready for manipulation.
- Moving Objects: Click and drag a selected object to reposition it. Holding
Ctrlwhile dragging restricts movement to horizontal or vertical axes, invaluable for maintaining alignment in graphic design projects. - Scaling (Resizing): Once selected, eight two-way arrows appear around the bounding box. Dragging these arrows allows you to resize the object. Holding
Ctrlwhile dragging a corner arrow maintains the object’s aspect ratio, preventing unwanted distortion – a critical detail when working with high-resolution photography. - Skewing: Click the selected object a second time. The corner arrows will change to curved rotation arrows, and the side arrows will become skewing arrows. Drag a horizontal or vertical two-way arrow to skew the object. Holding
Ctrllocks the skew to 15-degree increments. - Rotating: After the second click, drag a curved corner arrow to rotate the object. Again, holding
Ctrlconstrains rotation to 15-degree steps. The cross in the middle of the bounding box is the rotation center, which you can drag to a different position for precise rotational effects.
Selecting Multiple Objects
Many visual design scenarios require working with more than one element simultaneously. Inkscape offers several intuitive methods for multi-object selection:
- Shift-Clicking: Click the first object, then hold
Shiftand click each additional object you wish to select. This allows you to hand-pick specific elements. - Drag Selection Box: Click and drag your mouse to create a rectangular selection box. Any object completely enclosed by this box will be selected. By default, this is how it works, but you can change this behavior via the tool controls bar to select objects even if only partially touched.
- Combining Methods: You can combine these techniques. For instance, select a group of objects with a drag box, then hold
Shiftto add or remove individual objects from that selection. TheShiftkey effectively acts as a toggle for selection. - Selection by Touch (Alt-Drag): For intricate designs or numerous small objects,
Alt+ drag will turn your selection box into a red path. Any object that this path touches, even partially, will be selected. This is particularly useful when objects are tightly packed or overlapping, making it difficult to enclose them entirely or click them individually. Remember to ensure nothing is already selected before usingAlt-drag, as it can otherwise cause objects to unintentionally move.
Managing Object Stacking Order
In Inkscape, just like in any robust visual design software, objects are arranged in a stack. The order in which they are created or imported dictates their initial position in this stack – the first object added sits at the bottom, and the last object is at the top. This layering is crucial for composite images, allowing elements to overlap realistically or creatively.
To manipulate this stacking order:
- Select the Object: Use the Selector tool (S) to click on the object you wish to reorder.
- Lower to Bottom: To send an object all the way to the very back of the current layer’s stack, use
Object > Lower to Bottomor press theEndkey. You can also click the “Lower selection to bottom” icon in the top settings bar. This is useful for placing backgrounds or foundational elements beneath everything else. - Lower One Step: If you only need to move an object down one position in the stack, use
Object > Loweror pressPage Down. This is ideal for fine-tuning overlaps, ensuring specific details appear just above or below another element. - Raise to Top / Raise One Step: Conversely, Inkscape also provides
Object > Raise to Top(Home key) andObject > Raise(Page Up key) to bring objects forward.
Understanding and effectively utilizing these selection and stacking controls lays the groundwork for seamless object extraction and photo manipulation, allowing for cleaner compositions and more intuitive design workflows within Tophinhanhdep.com’s creative framework.
Step-by-Step Guide to Object Extraction Using Clipping Paths
One of the most efficient and versatile methods for “pulling an object” from an image in Inkscape is through the use of clipping paths. This non-destructive technique allows you to define a specific area of an image that remains visible, effectively masking out the rest. It’s perfect for fitting images into unique shapes or isolating elements for use in digital art projects or thematic collections on Tophinhanhdep.com.
Preparing Your Image and Shape
The clipping path process involves two primary elements: your raster image and a vector shape (the clipping mask) that dictates the visible area.
Step 1: Import Your Image into Inkscape First, you need the image you intend to modify.
- Drag and drop your image file directly onto the Inkscape canvas.
- Alternatively, go to
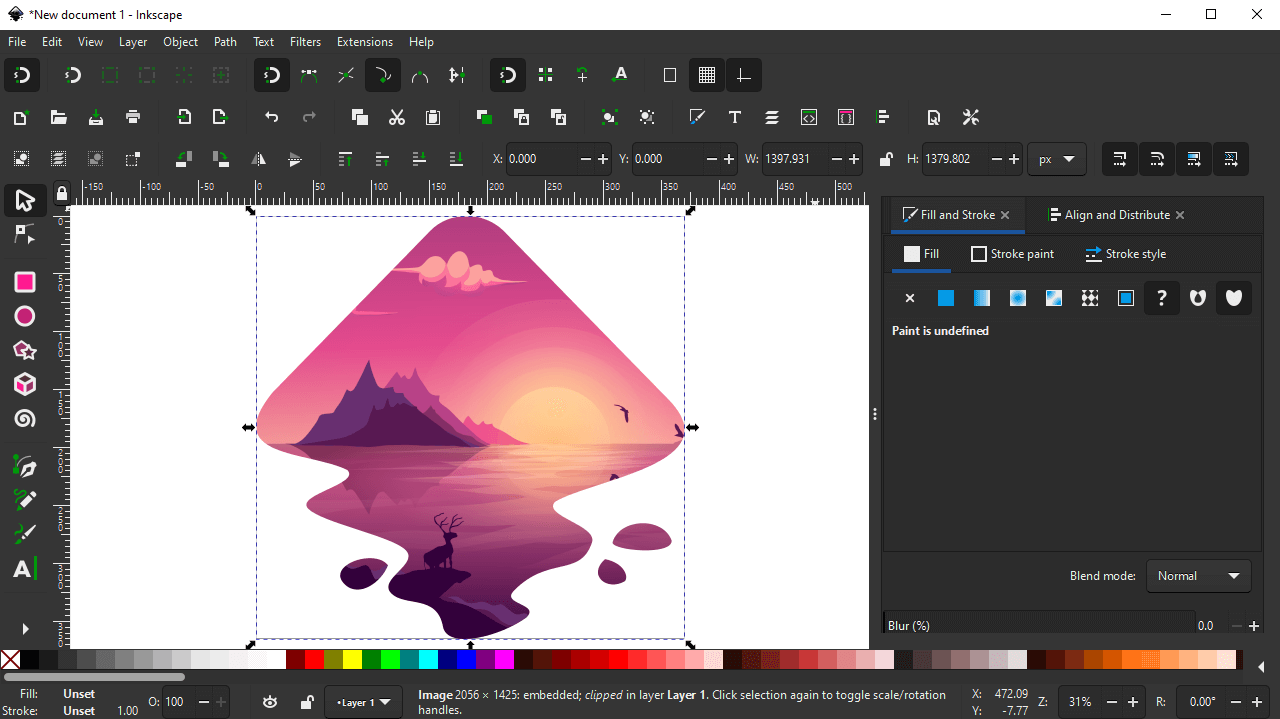
File > Import(orCtrl + I), navigate to your image, and select it. - When prompted, choose to “Embed” the image rather than link it. Embedding ensures the image is saved within your Inkscape file, preventing broken links if you move the original image file later. For this demonstration, we’ll assume you’re working with a rasterized image (e.g., JPG, PNG), even if the original content might conceptually be vector, the process applies to pixel-based sources.
Step 2: Create or Place Your Vector Shape This shape will act as your “cookie cutter.” It needs to be a vector object – a rectangle, circle, star, a custom path you’ve drawn, or even text converted to a path.
- Use Inkscape’s drawing tools (e.g., Rectangle tool
R, Ellipse toolE, Pen toolBfor custom paths, or Text toolTfollowed byPath > Object to Path) to create your desired shape. - Important Tip for Visibility:
- Contrast: Give your vector shape a distinct fill color that contrasts sharply with your imported image. This makes it easier to see and position.
- Opacity: Reduce the opacity of your shape (or the image, if preferred) temporarily. You can find the opacity setting in the bottom-left corner of the Inkscape window (labeled
O:). Adjusting it allows you to see the underlying image through your shape, helping you accurately align it to the part of the image you want to extract. A value around 50-70% often works well, depending on your image’s composition.
Step 3: Adjust the Size and Position of the Shape Now, use the Selector tool (S) to precisely scale and position your vector shape over the specific area of the image you wish to “pull.” Imagine the shape as the window through which you’ll view a portion of your image. Ensure it covers exactly what you want to keep. This step is crucial for achieving the desired aesthetic and visual impact, especially when preparing images for mood boards or thematic collections on Tophinhanhdep.com.
Applying and Releasing the Clipping Path
With your image and perfectly positioned vector shape, you’re ready to perform the magic.
Step 4: Select Both Objects and Create the Clipping Path
- Select Both: Using the Selector tool, either hold
Shiftand click both the image and the vector shape, or drag a selection box around both of them. Ensure both are selected simultaneously. - Order Matters: Crucially, the vector shape must be on top of the raster image in the stacking order for the clipping path to work correctly. If it’s not, select the shape and use
Object > Raise to Top(Home key). - Set the Clip: With both objects selected and the shape on top, navigate to
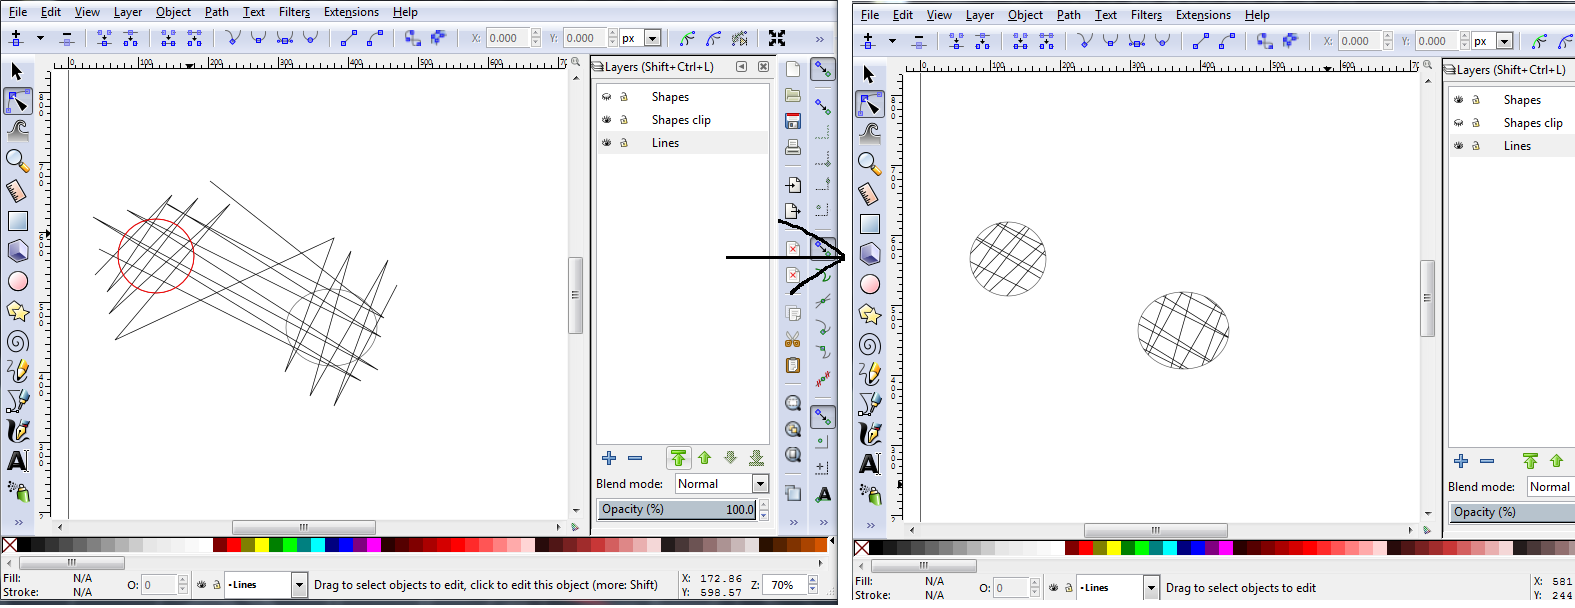
Object > Clip > Set.
Instantly, your image will be “clipped” to the boundaries of your vector shape. Everything outside the shape will become invisible, effectively extracting the object or region you desired. This powerful technique allows for dynamic photo manipulation and creative ideas, whether you’re designing aesthetic backgrounds or isolating elements for digital art.
Destructive vs. Non-Destructive Extraction
One of the significant advantages of clipping paths is their non-destructive nature.
- Releasing the Clip: If you’re not satisfied with the result or need to adjust the clipping area, simply select the clipped object and go to
Object > Clip > Release. This will revert the image and shape to their pre-clipped states, allowing you to reposition the shape or choose a different one. This flexibility is a hallmark of good graphic design practice, encouraging experimentation.
While non-destructive editing is highly beneficial, there are times you might want a “permanent” or “destructive” extraction, perhaps for optimizing file size or when moving the extracted object to a program that doesn’t fully support Inkscape’s clipping paths.
- Making a Bitmap Copy (Destructive): To make the clipping permanent and convert the clipped vector object into a new raster image, select the clipped object and go to
Edit > Make a Bitmap Copy. This creates a new, rasterized image that is cropped to the clipping path, effectively “burning in” the extraction. This new bitmap copy is now a pixel-based image, and its edges cannot be beveled in Inkscape (you’d need a pixel editor like GIMP for that).
Alternative: Path Operations for Destructive Cuts
For scenarios where you want to cut a hole in an image or perform a truly destructive extraction between vector objects, Inkscape’s Path operations are the way to go. While clipping paths are ideal for images, path operations primarily work on vector objects.
- Path > Difference: If you have two overlapping vector shapes, selecting both and going to
Path > Differencewill subtract the top shape from the bottom shape, essentially cutting a hole. This is useful for creating complex vector masks that you might then use for clipping a raster image. For instance, to cut out the Inkscape logo from an image, you’d create a rectangle the size of the image, place the vector Inkscape logo on top, select both, and usePath > Difference. The resulting “holed” rectangle can then be used as a clipping mask.
The choice between clipping paths and destructive path operations depends on your specific goal and whether you’re working with raster images or pure vector shapes. Both empower you to pull objects and transform your visual designs.
Advanced Techniques for Precision and Complex Extractions
Beyond basic clipping, Inkscape offers a suite of advanced features that can elevate your object extraction skills, allowing for even more complex photo manipulation and digital art creations. These techniques are particularly valuable for intricate backgrounds, aesthetic compositions, and high-resolution imagery featured on Tophinhanhdep.com.
Leveraging Path Operations and Node Editing
While clipping paths are excellent for simple shapes, sometimes you need more sophisticated control or to combine/subtract shapes before clipping.
- Ungrouping (Ctrl + Shift + G): Often, imported SVG files or complex vector elements are grouped. Before you can manipulate individual components for a clipping mask or path operation, you may need to
Object > Ungroupthem. This allows you to isolate specific parts of a complex object. - Object to Path (Shift + Ctrl + C): For text or basic shapes that need more granular control, convert them to paths (
Path > Object to Path). This transforms the object into a series of nodes and segments, which can then be edited with extreme precision. - Node Tool (F2): Once an object is a path, the Node Tool becomes your best friend. This tool allows you to:
- Edit Nodes: Click and drag individual nodes to reshape curves and lines with meticulous accuracy.
- Add/Delete Nodes: Add new nodes for more control points, or delete redundant ones to simplify paths.
- Change Node Types: Convert sharp corners to smooth curves, and vice-versa, for organic or geometric precision.
- Break Paths: Break paths at selected nodes, creating open segments that can be manipulated independently. This is particularly useful when you’ve combined paths and need to modify a specific section.
These path and node editing capabilities are fundamental for refining your clipping masks, ensuring the extracted object has perfectly smooth or sharply defined edges, enhancing the overall quality of your visual design.
Special Considerations for Laser Cutting and Digital Fabrication
The discussion around “pulling an object” sometimes extends beyond purely digital visual design to practical applications like laser cutting. As noted in the Inkscape forums, how Inkscape handles “clips” versus “real Boolean cuts” can have significant implications for physical fabrication.
- Clipping vs. Boolean for Laser Cutters: A standard clipping path in Inkscape hides parts of a path; it doesn’t delete them. If you send a file with a clipping path to a laser engraver, the engraver’s software needs to interpret this clip as a Boolean operation (a hard cut) to avoid cutting or engraving the hidden parts. Some laser software can do this, but it’s not guaranteed.
- Vector vs. Raster Output: For etching or engraving, laser cutters often operate in two modes:
- Vector Mode: Follows paths (lines) for cutting or scoring. For this, true Boolean operations (
Path > Difference,Path > Union,Path > Intersection) are generally safer than clips, as they create definitive, unhidden paths. - Raster Mode: Used for engraving filled areas or grayscale images. In this mode, the laser zips back and forth, firing at varying intensities. If you’re etching a clipped image, you might need to convert it to a raster image (
Edit > Make a Bitmap Copy) within Inkscape first, ensuring the laser software receives a pixel-based representation that it can then interpret for grayscale power levels.
- Vector Mode: Follows paths (lines) for cutting or scoring. For this, true Boolean operations (
- “Cut Paths” and Inverting Selections: The original forum post hinted at using a “cut paths” tool (often achieved with
Path > DivisionorPath > Cut Path) to break paths where they intersect shapes. After such an operation, you might need to select and delete unwanted segments. Inkscape’sEdit > Invert Selection(orAlt + !) can be a time-saver here, allowing you to select everything except your desired object and then delete the rest en masse.
When preparing files for laser cutting or other digital fabrication, it’s always recommended to consult your machine’s software documentation and perform test cuts. Ensuring your Inkscape work translates correctly to a physical output is a critical part of the visual design process, merging digital art with tangible creation.
Optimizing Your Workflow with Smart Selections
For highly complex images or repetitive tasks, Inkscape offers intelligent selection tools that can significantly streamline your object extraction.
- Select by Similarity: The
Edit > Select Samemenu offers various options like “Fill Color,” “Stroke Color,” “Object Type,” and more. This tool is a true “Pro Tip” when working with elaborate designs. If you need to extract all red circles from an image, simply select one red circle, then go toEdit > Select Same > Fill Color. This will select all objects with that exact fill color, saving you immense time compared to manual selection. This is invaluable when assembling mood boards or large thematic collections. - Paste on Top of Selection: When placing a copied object precisely onto another, Inkscape allows you to
Edit > Paste on Top of Selection. This ensures your pasted item aligns perfectly with the selected object, even if it’s hidden beneath other elements.
By integrating these advanced techniques, you move beyond basic object extraction to a level of mastery that empowers you to tackle virtually any photo manipulation or graphic design challenge, making your contributions to Tophinhanhdep.com’s collections truly stand out.
Elevating Your Visual Design with Extracted Objects
The ability to proficiently pull objects from images in Inkscape is more than just a technical skill; it’s a gateway to boundless creative expression in visual design. For users of Tophinhanhdep.com, this capability directly translates into enhancing various aspects of image creation and curation:
- Creating Unique Wallpapers and Backgrounds: Imagine isolating a stunning element from a nature photograph – perhaps a lone tree, a striking mountain peak, or a delicate flower – and placing it onto a minimalist abstract background. This technique allows you to blend elements from high-resolution stock photos to create personalized wallpapers and captivating backgrounds that resonate with your aesthetic preferences.
- Enhancing Aesthetic Photography: Extracted objects can be used for sophisticated photo manipulation, adding surreal elements, refining compositions, or performing digital photography edits that transcend simple filters. You can composite multiple elements to tell a new visual story or highlight specific features within a beautiful photograph.
- Fueling Graphic Design and Digital Art Projects: From designing intricate logos that incorporate photographic elements to crafting complex digital art pieces, object extraction is foundational. It enables you to integrate diverse visual assets, whether you’re building a creative idea from scratch or modifying existing images.
- Developing Image Inspiration and Collections: For those curating thematic collections or creating mood boards, extracting key visual elements allows for precise composition. You can pull specific textures, shapes, or subjects to articulate a particular style or trending aesthetic, making your collections on Tophinhanhdep.com more cohesive and impactful.
- Complementing Image Tools: While Tophinhanhdep.com offers converters, compressors, optimizers, and AI upscalers for image processing, Inkscape serves as the primary tool for creative editing and manipulation. By extracting objects, you effectively prepare your imagery for these subsequent optimization steps, ensuring that only the desired elements are processed, leading to more efficient workflows.
Mastering object extraction in Inkscape empowers you to transform ordinary images into extraordinary visual narratives, aligning perfectly with the mission of Tophinhanhdep.com to inspire and facilitate creative imagery.
Conclusion
The journey of learning how to pull an object from an image in Inkscape is a rewarding one, unlocking a vast spectrum of creative possibilities for anyone involved in visual design and digital photography. From the foundational steps of using the Selector tool and understanding object stacking to the sophisticated application of clipping paths and advanced node editing, Inkscape provides a comprehensive toolkit for precise image manipulation.
Whether your goal is to craft stunning wallpapers, refine high-resolution photographs, or build complex graphic designs for your next creative project, the techniques outlined in this guide will serve as a robust foundation. Remember the flexibility of non-destructive clipping paths, the precision offered by path operations and node editing, and the practical considerations for diverse outputs like laser cutting.
As you integrate these skills into your workflow, you’ll find yourself not just editing images, but truly reinventing them, transforming raw visual data into compelling digital art. Embrace experimentation, utilize the array of tools Inkscape offers, and let your creativity flourish. With Inkscape and the rich resources available on Tophinhanhdep.com, the power to create breathtaking and unique visual content is truly at your fingertips.
Frequently Asked Questions about Object Extraction in Inkscape
Can I extract multiple objects from an image at once?
Yes, you can! Simply select all the objects you wish to use as clipping masks (if they are vector shapes) or all the sections you want to extract from a single image (if you’re using a single complex vector mask). Use the Selector Tool (F1) and the Shift key to select multiple objects, or drag a selection box around them. Then, proceed with the clipping or path operation as outlined. For a single image, you would generally unify or group multiple vector shapes into one complex mask before clipping.
How do I extract an object with a transparent background?
If you are trying to extract an object from an image (raster format like JPG/PNG) and have a transparent background behind it, the clipping path method will automatically create a transparent background around the extracted object. If your original image already has transparency, Inkscape respects that. If your clipping shape has transparency, the clipped image will inherit that transparency. When you save your work, ensure you save it in a format that supports transparency, such as .svg (Inkscape’s native vector format) or .png (a raster format that supports alpha channels).
Can I extract text from an image in Inkscape?
Inkscape is primarily a vector editor, and while it can import raster images (which text from an image would be), it does not have built-in Optical Character Recognition (OCR) to convert pixel-based text directly into editable vector text.
However, you can extract the visual representation of text from an image by:
- Creating a vector shape (e.g., a rectangle or a custom path using the Pen tool) that precisely outlines the text you want to extract.
- Using this vector shape as a clipping mask over the raster image to isolate the text visually.
If you want to edit the text content itself, you would need to use an external OCR tool to convert the image text into editable digital text, and then re-type or paste that text into Inkscape using the Text Tool (F8), where you can then manipulate it as a vector object.