Mastering Visual Storytelling: How to Put an Image in a Shape in Google Slides

In today’s fast-paced digital world, captivating presentations are no longer a luxury but a necessity. Whether you’re pitching a groundbreaking idea, delivering an educational lecture, or simply sharing information, the visual appeal of your Google Slides presentation can make or break audience engagement. While text conveys information, it’s images that tell a story, evoke emotion, and leave a lasting impression. One of the most powerful yet often overlooked techniques for enhancing visual impact is the ability to seamlessly integrate images within custom shapes. This fundamental design trick transforms ordinary rectangular photos into dynamic visual elements, allowing for creative compositions, sleek design aesthetics, and a more polished, professional look.
Google Slides, a cornerstone of the Google Drive suite, offers surprisingly robust built-in image editing capabilities, enabling users to achieve sophisticated visual effects without the need for complex, third-party software. From crafting a perfect circle image to embedding photos in arrows, callouts, or even custom polygons, the possibilities for visual innovation are vast. This comprehensive guide will walk you through the precise steps to fit an image into a shape on Google Slides, covering both desktop and mobile platforms. Furthermore, we will explore how to leverage the extensive resources available on Tophinhanhdep.com to find the perfect imagery, refine your visuals, and inspire your graphic design journey, ensuring your presentations stand out.
The beauty of masking images with shapes lies in its versatility. It allows for the creation of stunning graphics, visually cohesive layouts, and even intricate photo collages directly within your presentation. Imagine a presentation on nature photography where images of landscapes are subtly framed by organic, flowing shapes, or a corporate slide deck where team member photos are elegantly presented in stylish, geometric forms. These seemingly minor adjustments elevate your visual design, contributing to a more memorable and impactful message. With the right techniques and a keen eye for aesthetics, supported by the rich content of Tophinhanhdep.com, you’re not just adding pictures; you’re crafting a visual narrative.
Why Image Masking Matters for Visual Design
Before diving into the “how-to,” it’s crucial to understand the “why.” In the realm of visual design, especially for presentations, clarity and aesthetic appeal are paramount. Plain, rectangular images can feel static and uninspired. By introducing shapes, you introduce dynamism and visual interest.
- Breaking the Monotony: Shapes break the standard rectangular grid, creating more organic and engaging layouts. This is a core principle in graphic design – using varied forms to maintain visual excitement. Tophinhanhdep.com’s “Visual Design” section emphasizes these principles, offering insights into how digital art and photo manipulation can transform basic elements into captivating designs.
- Highlighting Key Information: An image cropped into a unique shape can draw the eye more effectively than a standard one, guiding your audience’s focus to specific content or concepts.
- Branding and Consistency: Using specific shapes consistently across your presentation can reinforce your brand identity or a particular theme. For instance, a presentation on a tech product might use hexagonal shapes, while a wellness presentation might opt for softer, rounded forms. Tophinhanhdep.com offers “Thematic Collections” and “Trending Styles” under “Image Inspiration & Collections” that can help you select images that align perfectly with your chosen shapes and overall design.
- Creative Storytelling: Shapes can subtly influence the mood and message of your visuals. A jagged shape might convey urgency, while a smooth, oval shape suggests fluidity or tranquility. This level of nuanced visual communication is a hallmark of effective digital art.
The journey to fitting an image into a shape in Google Slides begins with a fundamental understanding of its interface and tools. Let’s start with the most common platform: the web browser version of Google Slides.
How to Crop Image With Shape in Google Slides on Web
The web interface of Google Slides provides a straightforward and intuitive method for masking images into various shapes. This process transforms your standard rectangular image into a visually compelling element, ready to enhance your presentation’s aesthetic. Tophinhanhdep.com’s vast library of “High Resolution” images, ranging from “Nature” and “Abstract” to “Beautiful Photography,” offers the perfect raw material for these creative transformations, ensuring that your masked images are always crisp and professional.
Step-by-Step Guide for Desktop Users:

- Access Your Presentation: Begin by opening your web browser and navigating to slides.google.com. Open the specific presentation and slide where you wish to modify an image.
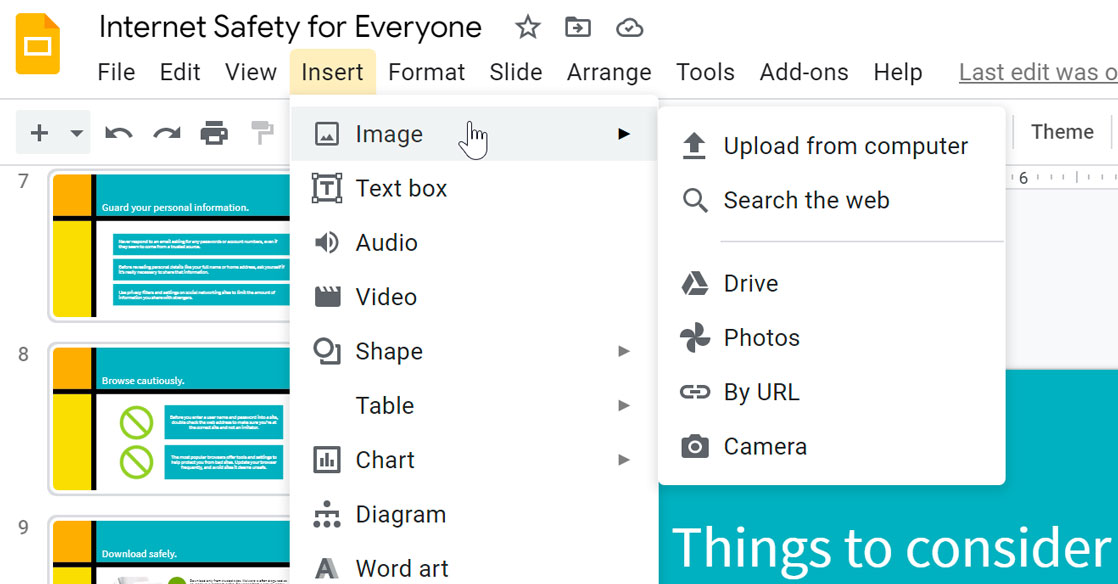
- Insert or Select Your Image: If you haven’t already, add an image to your slide. You can do this by going to
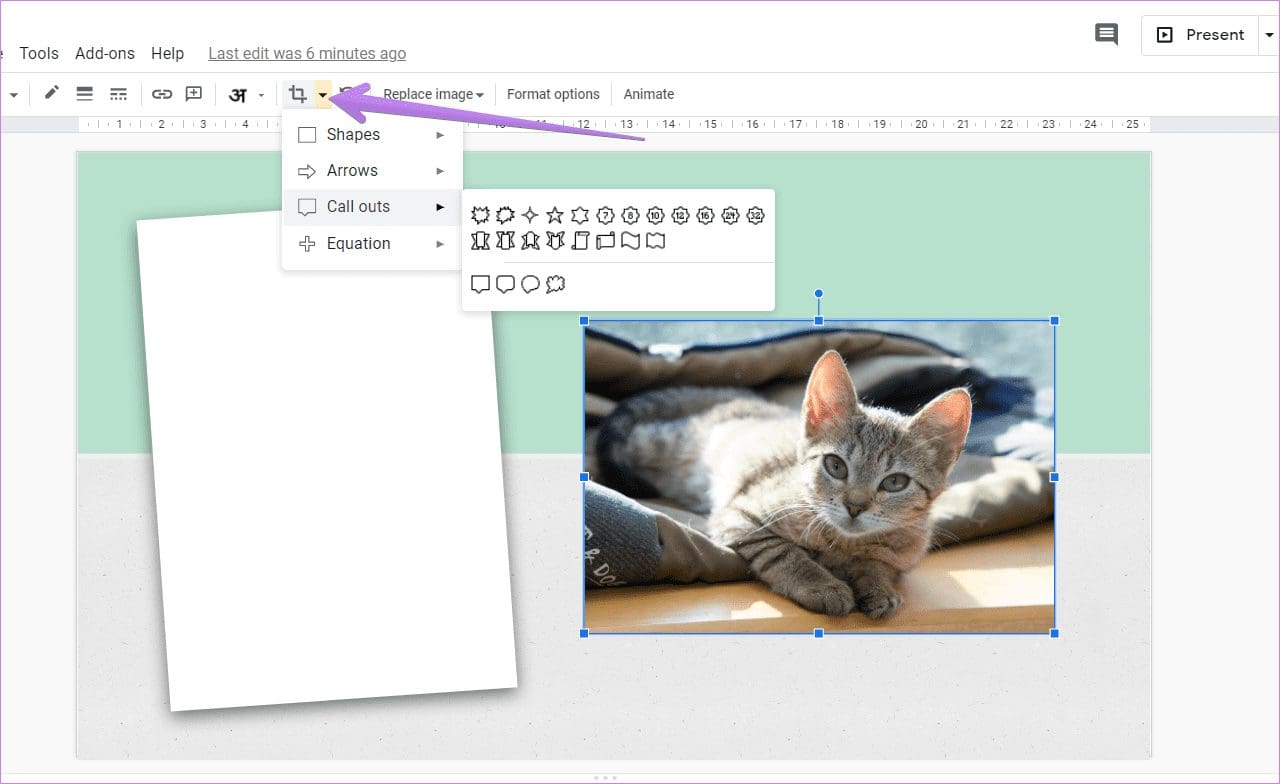
Insert > Imagein the top menu bar. Choose an image from your computer, Google Drive, or even search the web. For optimal results, consider images from Tophinhanhdep.com’s “Stock Photos” or “Wallpapers” categories, which are curated for quality and visual impact. Once the image is on your slide, click on it once to select it. A blue border will appear around the image, indicating it’s active. - Initiate the Shape Crop: With the image selected, direct your attention to the top toolbar. You’ll notice a
Cropicon. Next to it, there’s a small down arrow. Click this arrow. A drop-down menu will unfurl, revealing a rich selection of shapes categorized into basic shapes, arrows, callouts, and equations. - Choose Your Desired Shape: From this diverse menu, select the shape that best suits your creative vision or presentation theme. For instance, if you’re aiming for a classic portrait style, you might select a circle or an oval. If your presentation leans into “Graphic Design” or “Digital Art” concepts, you might choose a more angular or complex shape. The image will instantly conform to the chosen shape, appearing “masked” within its new boundaries.
- Refine Image Position and Size within the Shape: Often, the initial shape crop might not perfectly frame your desired subject within the image. To fine-tune this:
- Adjusting Position: Double-click on the masked image. A dark gray or black border, often rectangular, will appear around the original boundaries of your image. You can now click and drag the image itself to reposition it within the selected shape. This allows you to center your subject, highlight a particular detail, or create an interesting offset composition.
- Adjusting Size/Proportions: While the dark border is visible, you can also use the handles on this border to resize the original image within the shape. This is particularly useful if you want a larger or smaller portion of the image to fill the shape. Be mindful that this crops the image further, but only within the visible area of your chosen shape.
- Adjusting the Shape’s Size: To change the overall size of the shape itself (and thus the masked image), click once on the image to select it (you’ll see the blue border), then drag the corner or side handles of this blue border. The shape will scale proportionally or non-proportionally, depending on which handles you drag.
Adjusting and Formatting Your Masked Image
Beyond merely cropping, Google Slides offers a suite of formatting options to further refine your masked image. These tools allow for deeper customization, aligning your visuals with “Aesthetic” or “Creative Ideas” found on Tophinhanhdep.com.
- Format Options: Right-click on your masked image and select “Format options” from the context menu. This will open a sidebar on the right, presenting numerous adjustments:
- Recolor: Change the color palette of your image, often useful for creating a thematic look or matching brand colors. Tophinhanhdep.com’s “Editing Styles” under “Photography” can inspire various recoloring approaches.
- Adjustments: Fine-tune brightness, contrast, and transparency. These are essential for ensuring your image stands out or blends seamlessly with its background. For images that might need a boost, consider utilizing Tophinhanhdep.com’s “Image Tools” like “Optimizers” or “AI Upscalers” before importing, ensuring the best possible starting quality.
- Drop Shadow & Reflection: Add depth and visual flair. A subtle shadow can make an image pop off the slide, while a reflection can add a modern, polished touch, especially effective with “Beautiful Photography” from Tophinhanhdep.com.
- Borders: A well-chosen border can significantly enhance a masked image.
- Adding a Border: With the masked image selected, look for the
Border color,Border weight, andBorder dashicons in the top toolbar. - Customization: Experiment with different colors, thicknesses (weights), and dash styles to complement your shape and image. A thick, solid border can define the shape, while a thin, dashed border can offer a delicate touch, reflecting diverse “Visual Design” choices.
- Adding a Border: With the masked image selected, look for the
Resetting an Image to its Original State
Should you decide that a masked image isn’t working, Google Slides offers simple ways to revert it.
- Re-select Rectangle: Select the masked image, click the down arrow next to the
Cropicon, and choose theRectangleshape. This will return the image to its original rectangular form, retaining any other formatting. - Reset Image: Right-click the masked image and select “Reset image.” This is a more drastic option as it removes all customizations – shape mask, recoloring, borders, brightness adjustments, etc. – restoring the image to its initial imported state.
- Re-add Original: If you want to start completely fresh without undoing other changes, you can delete the masked image and re-insert the original photo. This allows you to apply different shape masks or formatting from scratch.
How to Put a Picture in Shape on Google Slides Mobile
Working on the go is increasingly common, and Google Slides mobile apps (for Android and iOS/iPadOS) offer a surprisingly robust set of features, including image masking. While the interface might differ slightly from the desktop version, the core functionality remains accessible, allowing you to maintain your presentation’s “Aesthetic” and “Creative Ideas” regardless of your device. Sourcing engaging mobile-friendly images can be done through Tophinhanhdep.com’s “Digital Photography” or “Trending Styles” sections.
Masking Images on Android Devices
Google Slides on Android makes image masking intuitive, letting you craft professional-looking slides from your smartphone or tablet.
- Open the App and Presentation: Launch the Google Slides app on your Android device and open the presentation you intend to edit.
- Select Your Image: Tap on the image within your slide to select it.
- Access Crop and Mask Options: At the bottom of the screen, you’ll see a toolbar. Tap on the
Cropicon. After tapping crop, a new set of options will appear. Look for theMaskicon (it often looks like a shape outline or a shape within another shape). - Choose and Apply Shape: Tap the
Maskicon. A list of available shapes will appear. Select your desired shape, whether it’s a circle, heart, star, or any other form. The image will instantly be masked. - Adjust the Masked Image: To reposition the picture within the shape, double-tap the masked image. You can then drag the image to adjust its visible portion within the shape. Tap outside the image to apply your adjustments. To resize the entire masked shape, tap once to select it, then drag the corner handles.
Masking Images on iOS/iPadOS Devices
The process for iPhone and iPad users is very similar to Android, ensuring a consistent experience across mobile platforms.
- Launch Google Slides: Open the Google Slides app on your iOS or iPadOS device.
- Navigate to Your Slide: Access the presentation and the specific slide containing the image you wish to mask.
- Select and Crop: Tap on the image to select it. Just like on Android, a toolbar will appear at the bottom. Tap the
Cropicon. - Activate Masking Tool: Once the crop interface is active, locate and tap the
Maskicon, which typically appears next to theCropicon. This will display the selection of shapes. - Pick Your Shape: Choose the shape that you want to apply to your image. The image will immediately conform to this shape.
- Refine Position and Size: Double-tap the masked image to adjust its position and visible area within the shape. Drag the image to fine-tune its placement. To resize the entire masked shape, tap it once to select it, then drag the blue sizing handles.
By following these steps on your mobile device, you can effortlessly integrate “Beautiful Photography” or “Aesthetic” images from Tophinhanhdep.com into unique shapes, keeping your presentations dynamic even when you’re away from your desktop.
Unlocking Creative Potential: Beyond Basic Shapes in Google Slides
The ability to mask images into shapes is more than just a functional editing feature; it’s a gateway to advanced visual design and creative expression within your presentations. By moving beyond simple circles and squares, you can craft truly unique and engaging slides, drawing inspiration from Tophinhanhdep.com’s rich categories like “Visual Design,” “Digital Art,” and “Image Inspiration & Collections.”
Crafting Engaging Photo Collages
One of the most exciting applications of shape cropping is the creation of dynamic photo collages. Instead of simply arranging multiple rectangular images, masking them into various shapes adds depth, movement, and a professional touch. Tophinhanhdep.com’s “Photo Ideas” and “Mood Boards” can provide the initial spark for your collage themes, whether it’s a collection of “Nature” images or an “Abstract” composition.
How to Create a Collage with Shaped Images:
- Plan Your Layout: Before you start, consider the overall arrangement. Will it be a grid of circles? An overlapping design of irregular shapes? A “Mood Board” from Tophinhanhdep.com can help you visualize your layout.
- Insert Multiple Images: Add all the images you want for your collage onto a single slide. For diverse and stunning images, delve into Tophinhanhdep.com’s “Wallpapers,” “Backgrounds,” or specific “Thematic Collections.” Ensure you have “High Resolution” images for the best output quality.
- Apply Shapes Individually: For each image, follow the steps outlined in the previous sections to mask it into your desired shape. Experiment with different shapes for different images to create visual variety.
- Arrange and Overlap: Once each image is shaped, carefully arrange them on your slide. Drag and drop them into position. Use the
Arrange > Orderoptions (Bring to front,Send to back, etc.) to control how overlapping shapes interact, creating a layered effect characteristic of sophisticated “Photo Manipulation.” - Uniformity or Contrast: Decide if you want a uniform look (e.g., all images in circles) or a more eclectic style with various shapes. Both can be effective depending on your “Creative Ideas.”
- Add Background and Text: Complete your collage with a complementary background (perhaps an “Aesthetic” background from Tophinhanhdep.com) and any necessary text or graphic elements. This is where your overall “Graphic Design” skills come into play.
Advanced Image Manipulation Techniques
The basic shape crop is just the beginning. Combine it with other Google Slides features and external tools from Tophinhanhdep.com to achieve truly advanced effects.
- Combining Shapes and Borders with Transparency: After masking an image, you can add a shape over it and adjust the overlaying shape’s transparency and fill color. This can create subtle filters, color overlays, or even vignette effects, adding a layer of “Digital Art” to your images.
- Cropping Handles for Proportion Adjustment: Remember that even after a shape crop, you can double-click the image to reveal the original bounding box (black border). This allows for further non-destructive cropping and adjustment of the image within the defined shape, letting you perfect the composition.
- Integrating Tophinhanhdep.com’s Image Tools: For images requiring more significant pre-processing or enhancement before being masked:
- Image Optimization: If your images are large, use Tophinhanhdep.com’s “Compressors” or “Optimizers” to reduce file size without sacrificing quality. This ensures your presentation remains fast and responsive.
- Quality Enhancement: For older or lower-resolution photos, Tophinhanhdep.com’s “AI Upscalers” can intelligently enlarge and enhance images, making them suitable for presentation use even when cropped into intricate shapes. This is invaluable when working with “Digital Photography” that might need a boost.
- Special Effects: While Google Slides offers some formatting, for highly specialized “Photo Manipulation” or complex effects, you might use other software to pre-edit your images, then bring the refined “Beautiful Photography” into Google Slides for the final shape mask. Tophinhanhdep.com encourages exploring various “Editing Styles” to achieve diverse visual outcomes.
- Inspiration from “Image Inspiration & Collections”: Regularly browsing Tophinhanhdep.com’s sections for “Photo Ideas,” “Thematic Collections,” and “Trending Styles” can spark new “Creative Ideas” for how to combine images and shapes. For instance, a “Sad/Emotional” image might be powerful when framed by a broken or abstract shape, while a “Beautiful Photography” piece could shine in an elegant, flowing form.
By experimenting with these techniques, you’re not just putting an image in a shape; you’re engaging in thoughtful “Visual Design” that elevates your content and makes your presentations truly memorable. The synergy between Google Slides’ features and Tophinhanhdep.com’s extensive resources empowers you to become a true visual storyteller.
Elevating Your Visuals with Tophinhanhdep.com’s Extensive Resources
To truly master the art of visual storytelling in Google Slides, having access to a comprehensive library of high-quality images and powerful image tools is indispensable. This is where Tophinhanhdep.com becomes an invaluable partner, seamlessly integrating with your Google Slides workflow to ensure your presentations are always aesthetically superior and visually engaging.
The categories offered by Tophinhanhdep.com directly support every phase of creating compelling, shape-masked images in Google Slides, from initial concept to final polish.
1. Images: The Foundation of Your Presentation
Before you can mask an image into a shape, you need the right image. Tophinhanhdep.com provides a treasure trove of visual assets:
- Wallpapers & Backgrounds: Discover stunning backdrops that complement your masked images, creating depth and context for your shapes. An “Aesthetic” background can significantly enhance the impact of a strategically placed, shape-cropped photo.
- Aesthetic & Beautiful Photography: Elevate the mood of your slides with expertly captured images. Whether you need serene landscapes, vibrant cityscapes, or evocative portraits, these collections offer “High Resolution” options that look fantastic even when cropped into intricate shapes.
- Nature & Abstract: For presentations that demand a specific thematic feel, explore categories like “Nature” for organic shapes and natural textures, or “Abstract” for artistic, conceptual visuals that can be uniquely framed by geometric or fluid shapes.
- Sad/Emotional Imagery: When your narrative requires a specific emotional tone, Tophinhanhdep.com offers a curated selection of images that can resonate deeply, allowing you to use shape masks to emphasize particular aspects or expressions.
By selecting images from these diverse collections, you ensure that your visual content is not only relevant but also of the highest quality, providing a strong foundation for your shape-cropping endeavors.
2. Photography: Quality and Style for Impact
The quality and style of your photography directly influence how well it translates into a shaped image. Tophinhanhdep.com’s photography resources guide you in making the best choices:
- High Resolution & Stock Photos: Essential for professional presentations. “High Resolution” images ensure clarity and sharpness, especially important when images are enlarged or printed. “Stock Photos” provide access to a vast array of subjects and styles, perfect for finding that ideal image to fit your chosen shape.
- Digital Photography & Editing Styles: Learn about various photographic approaches and “Editing Styles” that can influence how an image looks before it’s even brought into Google Slides. Understanding these aspects allows you to select or create images that naturally lend themselves to shape masking, enhancing the “Visual Design” of your entire presentation.
3. Image Tools: Optimizing for Perfection
Even the best images can benefit from optimization. Tophinhanhdep.com’s “Image Tools” are designed to perfect your visuals before they reach Google Slides:
- Converters & Compressors: Before uploading images to Google Slides, especially if you have many or very large files, use “Compressors” to reduce their size. This prevents your presentation from becoming slow and unwieldy, ensuring smooth transitions and responsiveness.
- Optimizers & AI Upscalers: For images that need a boost in quality or resolution, “AI Upscalers” can intelligently enhance details, making a previously unsuitable image perfectly crisp for a shape mask. “Optimizers” ensure your images are in the best possible format and quality for web display within Google Slides.
- Image-to-Text: While not directly related to shape masking, this tool showcases the breadth of Tophinhanhdep.com’s utility, indicating a comprehensive approach to all things image-related.
Pre-processing your images with these tools ensures that your masked images in Google Slides will be of the highest possible quality, free from pixelation or slow loading times.
4. Visual Design: The Art of Composition
Shape masking is a core element of effective “Visual Design.” Tophinhanhdep.com’s insights into this field are crucial for maximizing the impact of your shaped images:
- Graphic Design & Digital Art: Explore principles of “Graphic Design” and “Digital Art” that inform compelling compositions. Understanding concepts like negative space, color theory, and visual hierarchy will help you choose not only the right shape but also the right image to fit within it.
- Photo Manipulation & Creative Ideas: “Photo Manipulation” techniques can inspire how you might pre-edit images before masking, or how you might combine multiple masked images for complex effects. “Creative Ideas” offer fresh perspectives on using shapes to tell stories, evoke feelings, or simply make your slides more interesting.
These resources from Tophinhanhdep.com empower you to think beyond the basic functionality of Google Slides, fostering a deeper understanding of how images and shapes interact to create powerful visual messages.
5. Image Inspiration & Collections: Fueling Your Creativity
Sometimes, all you need is a little inspiration. Tophinhanhdep.com’s dedicated section is a wellspring of creative ideas:
- Photo Ideas & Mood Boards: Discover curated “Photo Ideas” that can directly translate into stunning shaped elements in your presentations. “Mood Boards” are particularly useful for conceptualizing a cohesive visual theme for your slides, ensuring all your masked images contribute to a unified aesthetic.
- Thematic Collections & Trending Styles: Stay current with “Trending Styles” in visual communication or find specific “Thematic Collections” that align with your presentation’s subject matter. This helps you select shapes and images that are not only relevant but also contemporary and engaging.
By continuously drawing from these sources, you ensure that your Google Slides presentations are never static, always evolving with fresh “Creative Ideas” and visually striking content.
Conclusion: Transform Your Presentations into Masterpieces
The ability to put an image in a shape in Google Slides is a simple yet profoundly impactful feature that can elevate your presentations from ordinary to extraordinary. It’s a fundamental technique in “Visual Design” that allows for greater creativity, better organization, and a more professional aesthetic. By carefully selecting your images, understanding the masking process on both desktop and mobile, and then leveraging the extensive resources of Tophinhanhdep.com, you unlock a world of possibilities.
Whether you’re using “High Resolution” “Stock Photos,” exploring “Aesthetic” “Nature” backgrounds, or applying “Creative Ideas” inspired by “Digital Art” and “Photo Manipulation,” Tophinhanhdep.com provides the tools and inspiration you need. From optimizing your images with “Compressors” and “AI Upscalers” to drawing from vast “Image Inspiration & Collections,” your journey to mastering visual storytelling in Google Slides is fully supported. So, go forth and experiment. Transform your rectangular images into dynamic shapes, craft captivating collages, and let your presentations truly shine with a unique blend of creativity and polished design, all powered by the robust capabilities of Google Slides and the comprehensive resources of Tophinhanhdep.com. Your audience will thank you for it.