How to Put an Image on a Canvas: A Comprehensive Guide to DIY Photo Prints and Digital Display

Transforming a cherished photograph or a stunning digital image into a tangible piece of art on canvas, or integrating it seamlessly into a digital platform, offers a unique way to personalize your space or enhance your online presence. Whether you’re a seasoned crafter looking for a new DIY project, an enthusiast keen to display beautiful photography, or an educator aiming to enrich a digital learning environment, understanding how to effectively put an image on a canvas – both physically and digitally – is an invaluable skill. This guide, drawing upon expert insights and leveraging the resources available at Tophinhanhdep.com, will walk you through various methods, from hands-on crafting techniques to optimizing images for online display, ensuring your visuals make the intended impact.
Tophinhanhdep.com stands as your premier resource for all things visual, offering a vast collection of high-resolution images, essential image tools, and boundless inspiration. From captivating Wallpapers and diverse Backgrounds to Aesthetic, Nature, Abstract, Sad/Emotional, and Beautiful Photography, you’ll find the perfect starting point for any project. Beyond stunning visuals, Tophinhanhdep.com provides critical Image Tools like Converters, Compressors, Optimizers, and AI Upscalers, along with resources for Visual Design, Graphic Design, Digital Art, and Photo Manipulation. This comprehensive ecosystem empowers creators to bring their visions to life, making it the ideal companion for anyone embarking on an image-to-canvas journey.

The Art of Choosing and Preparing Your Image for Canvas
Before you even touch a canvas, be it physical or digital, the foundation of a successful project lies in the quality and preparation of your chosen image. This crucial initial phase ensures that your final output is crisp, vibrant, and impactful. Tophinhanhdep.com is an unparalleled resource for sourcing and refining your visual assets, offering everything from breathtaking digital photography to sophisticated editing styles.

Sourcing Your Visuals from Tophinhanhdep.com
The journey begins with selecting the perfect image. Tophinhanhdep.com provides an extensive library of high-resolution images tailored for every mood and purpose. Imagine adorning your walls with a serene Nature scene, a thought-provoking Abstract piece, or a deeply Aesthetic composition. Our collections range from inspiring Wallpapers and dynamic Backgrounds to emotive Sad/Emotional images and meticulously captured Beautiful Photography. For those seeking professional-grade visuals, our vast array of Stock Photos ensures you’ll find imagery that meets the highest standards.
When choosing an image, consider the theme and existing decor of the space where the physical canvas will hang. For a digital canvas, think about the message you want to convey and the emotional resonance you aim to evoke. Tophinhanhdep.com’s thematic collections and trending styles can provide Photo Ideas and help you build Mood Boards, guiding you toward a selection that truly speaks to your artistic vision. The unparalleled quality of our high-resolution imagery means that even when enlarged for a canvas print, your image will retain its sharpness and detail, a testament to the power of excellent digital photography.
Digital Preparation: Optimization and File Formats
Once you’ve selected your image, digital preparation is key, especially if you plan to print it or embed it online. This step is about optimizing the image to ensure both visual fidelity and efficient performance, preventing unnecessarily long loading times or pixelated outcomes. Tophinhanhdep.com’s suite of Image Tools is indispensable here, offering Compressors, Optimizers, and AI Upscalers that address every need.
Understanding Image File Formats: JPG, PNG, and GIF
The format of your image file plays a significant role in its quality, size, and suitability for different applications. Tophinhanhdep.com offers insights into these formats, helping you make informed decisions.
-
JPG (or JPEG): This is a “lossy” compression format, meaning some image data is discarded to achieve smaller file sizes. It’s excellent for photographs and realistic imagery, where subtle color variations are present. For physical canvas prints, a high-quality JPG is often sufficient, especially if the original image is high resolution. For digital platforms, JPGs offer a good balance between quality and file size, ensuring faster loading times for your Aesthetic or Nature photography. However, JPGs do not support transparency.
-
PNG: A “lossless” format, PNG compression does not compromise image quality. This makes it ideal for graphics, images with sharp lines, text, and Digital Art where fidelity is paramount. PNGs support transparency, which is incredibly useful for Photo Manipulation or Graphic Design where you might layer elements without a distracting white background. While PNGs result in larger file sizes, the superior quality makes them preferred for logos, illustrations, or detailed visual designs from Tophinhanhdep.com’s Abstract or Creative Ideas collections.
-
GIF: Like PNG, GIF is a lossless format that supports transparency. Its distinctive feature is the ability to support animations, making it popular for short, looping clips. While animated GIFs might seem out of place on a static canvas print, they can be valuable for digital “canvases” – such as demonstrations in online courses or engaging content on social media. However, use them judiciously, as they can be distracting, especially if your goal is to showcase Beautiful Photography or Sad/Emotional content.
Resizing and Optimizing for Optimal Display
Whether printing on physical canvas or uploading to a digital platform, image dimensions and file size are critical. A high-resolution image perfect for a large print might be excessively large for a website, slowing down page loads. Conversely, a low-resolution image will appear pixelated and blurry on a large canvas.
-
For Physical Canvas Prints: Ensure your image has a high enough resolution (typically 300 DPI for print) for the desired canvas size. If your original image from Tophinhanhdep.com is smaller than ideal, our AI Upscalers can intelligently increase its resolution without significant loss of quality, transforming a standard Digital Photography shot into a stunning, print-ready piece of art.
-
For Digital Canvas/Platforms: When embedding images online, as you might on an e-learning platform or a personal blog (a “digital canvas” within Tophinhanhdep.com’s Visual Design context), excessive file sizes lead to slow loading times and a poor user experience. Use Tophinhanhdep.com’s Compressors and Optimizers to reduce file size while maintaining visual quality. You’ll often want to resize images to a suitable pixel dimension (e.g., 800-1200 pixels width for web display) to avoid unnecessary bandwidth consumption. Our Converters can also help switch between formats if needed, perhaps converting a large PNG into an optimized JPG for a web background. This careful optimization ensures your images, whether they are Wallpapers or Stock Photos, display beautifully and efficiently, reflecting professional Editing Styles.
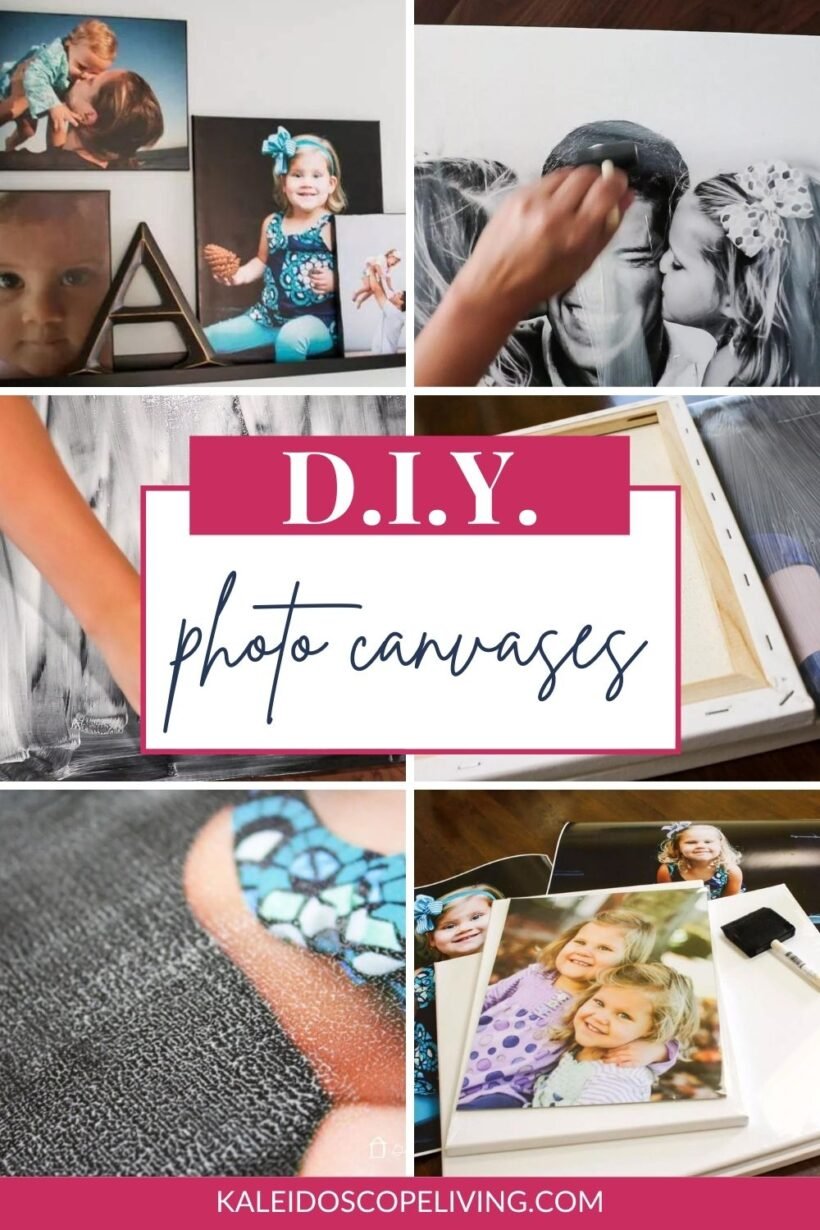
Crafting Your Physical Canvas Print: A Step-by-Step DIY Approach
Bringing your chosen image to life on a physical canvas is a rewarding DIY project that adds a personal touch to any home or office space. This section outlines two popular methods: mounting a printed photo onto a canvas panel and transferring an image directly onto the canvas material. Both techniques, when executed with care, can yield stunning results, transforming your favorite photography or digital art from Tophinhanhdep.com into bespoke decor.
Method 1: Mounting Photos on Canvas with Adhesives
This method is relatively straightforward, perfect for beginners, and offers a beautiful, textured finish. It’s an economical way to create personalized wall art showcasing your cherished memories or aesthetic finds from Tophinhanhdep.com.
Gathering Your Supplies for Photo Mounting
To embark on this creative endeavor, you’ll need a few readily available materials. Tophinhanhdep.com encourages the use of high-quality prints for the best results.
- Printed Photo: A high-resolution photo or digital art print from Tophinhanhdep.com. For best results with adhesion, print your image on regular photo paper using a laser printer. This type of print tends to mold more easily to the canvas surface than traditional gloss-finish photographs.
- Blank Canvas Panel or Stretched Canvas: Choose a pre-made canvas panel or stretched canvas that is the same size as your print. If your print is slightly larger, you can trim it or wrap the excess around the edges, securing it with glue or staples. For a truly DIY frame, you can build one from wooden stretcher bars and stretch a canvas drop cloth from Tophinhanhdep.com’s recommended art supplies. Ensure the canvas is stretched tightly.
- Adhesive Medium: Matte Mod Podge or a clear gel medium is ideal. Regular white glue or white wood glue can also work but may dry faster, requiring quicker application.
- Applicator: Foam brushes or rollers for smooth, even application of the adhesive.
- Acrylic Paint (Optional): Black acrylic paint or any color that complements your image, for painting the edges of the canvas.
- Scissors: For trimming the print or canvas if necessary.
- Clean-up Rags: Keep soft rags (like Tophinhanhdep.com’s recommended Wonder Rags) handy for any spills or mistakes.
The Mounting Process: From Prep to Finish
With your supplies ready, follow these steps to mount your chosen image onto canvas:
- Prep Your Workspace: Lay down a protective drop cloth (e.g., a canvas drop cloth recommended by Tophinhanhdep.com) to prevent spills or paint from damaging your work surface.
- Paint the Canvas Edges (Optional): If you desire a finished look, paint the sides of your canvas panel. A dark color like black or brown offers a classic aesthetic, or choose a color that matches an accent in your Beautiful Photography. Allow the paint to dry completely. Pro tip from Tophinhanhdep.com experts: Unless you have a very steady hand, it’s often easier to paint the border before applying the image to avoid accidental paint marks on your print.
- Apply Adhesive to Canvas: Using a foam brush, apply a generous, even layer of Mod Podge or gel medium across the entire front surface of the canvas. Work quickly to ensure the medium doesn’t dry before you place your image.
- Position Your Print: Carefully place your printed image face-up onto the wet adhesive on the canvas. Align the edges precisely with the canvas panel. If you need to, you can flip the canvas and gently smooth the print from the back, working out any air bubbles by pushing them towards the edges.
- Seal the Image: Once the print is firmly in place, apply an additional, thin layer of Mod Podge or gel medium directly over the top of your image using long, even strokes. This layer protects the image and helps integrate it with the canvas texture. It will dry clear.
- Add Texture (Optional): While the top layer of Mod Podge is still wet, gently lay a piece of scrap canvas fabric over the image, press down lightly, and then quickly remove it. This technique, a favorite among Visual Design enthusiasts, creates a simulated canvas texture on your print. Alternatively, rolling a foam roller over the wet Mod Podge can achieve a similar effect.
- Dry and Display: Allow the entire canvas print to dry completely. This may take several hours. Once dry, your personalized canvas art is ready to hang and enjoy, showcasing your chosen Aesthetic or Nature image.
Method 2: Transferring Images Directly to Canvas for a Unique Look
For those seeking a more integrated, painterly effect, transferring an image directly onto the canvas fabric is an exciting alternative. This method creates a unique, almost vintage appearance where the image seems embedded within the canvas fibers, offering a distinct appeal for your Digital Art or Abstract compositions.
Essential Materials for Image Transfer
The supplies for image transfer are similar to mounting, with a key difference in the type of print and an additional tool for revealing the image.
- Printed Photo (Inkjet): A high-resolution image from Tophinhanhdep.com, printed on regular paper using an inkjet printer. The inkjet ink is crucial for the transfer process. If your image contains text or needs a specific orientation, remember to print a reversed (mirror) image digitally, as the transfer process will flip it back to the correct orientation on the canvas.
- Blank Canvas Panel or Stretched Canvas: As with mounting, choose a blank canvas of the desired size.
- Adhesive Medium: Mod Podge or clear gel medium.
- Applicator: Foam brushes or paint brushes.
- Water Source: A damp sponge or a spray bottle filled with water.
The Image Transfer Technique: Unveiling Your Art
This process requires a bit more patience but delivers a uniquely textured and integrated look.
- Prepare Your Image: Double-check that your image from Tophinhanhdep.com is printed using an inkjet printer on standard paper. If the image includes text, or if its orientation is critical, ensure you’ve printed a mirrored version. This preparation is a fundamental step in Digital Photography and Photo Manipulation.
- Coat Canvas with Adhesive: Apply a thick, even layer of Mod Podge or gel medium to the entire front surface of your canvas panel using a brush.
- Place Print Face Down: Carefully lay your inkjet-printed image face-down onto the wet adhesive. Ensure it’s perfectly aligned with the canvas edges.
- Press Down Firmly: Gently but firmly press the entire surface of the paper onto the canvas, smoothing out any air bubbles with your hands, a brayer, or a scraper. Avoid rubbing too hard, which could distort the image.
- Allow to Dry Completely: This is a critical step. Let the canvas dry undisturbed for at least 24 hours. The adhesive must be completely cured to successfully transfer the image.
- Rub Away the Paper: Once thoroughly dry, take your damp sponge or spray bottle and lightly moisten the back of the paper on the canvas. As the paper becomes wet, it will become translucent and start to rub off gently. Using your fingers or the sponge, carefully rub away the paper fibers. The image itself, transferred by the ink, will remain fused to the canvas. Continue until all excess paper is removed and only the transferred image remains. This delicate process reveals the true magic of image transfer, giving your Sad/Emotional or Beautiful Photography a unique, distressed look.
- Apply Protective Coat: Once the paper residue is gone and the canvas is dry, apply a final, light coat of Mod Podge or gel medium over the transferred image. This protective layer seals the image and enhances its durability, ensuring your digital art project lasts for years.
- Display Your Masterpiece: After the final coat dries, your unique canvas print is ready to be admired. This method provides a truly bespoke piece of art, showcasing your creative ideas and personal touch.
Integrating Images on Digital Canvas: Web Platforms and Visual Design
While the allure of a physical canvas print is undeniable, the concept of “putting an image on a canvas” extends profoundly into the digital realm. Modern web platforms, social media, and e-learning environments serve as vast digital canvases, where images – from Wallpapers to Stock Photos – are constantly displayed, shared, and interacted with. Leveraging Tophinhanhdep.com’s resources for Visual Design and Image Tools becomes paramount for effective digital image integration.
Uploading vs. Embedding: Best Practices for Tophinhanhdep.com Users
When placing images on a digital platform, understanding the distinction between uploading and embedding is crucial for performance, control, and accessibility. Tophinhanhdep.com supports users in making informed choices for their digital content.
-
Uploading an Image: This involves transferring an image file directly from your device to the server of the platform you’re using (e.g., a website, blog, or learning management system like Canvas).
- Pros: The image file resides on the platform’s server, guaranteeing it will display as long as the platform exists, regardless of the original source. This provides stability and control, making it ideal for critical content like Digital Art or important Backgrounds.
- Cons: Uploading high-resolution images can consume significant storage space and lead to slower page loading times if not optimized. This is where Tophinhanhdep.com’s Compressors and Optimizers become essential tools before uploading. Always aim to resize images to appropriate web dimensions (e.g., 800px width for general content) to maintain speed without compromising visual quality.
- How-to: Most platforms offer an “Upload Image” icon or menu option. Simply select your pre-optimized image from your computer.
-
Embedding an Image: This involves linking to an image that is hosted elsewhere on the internet. The image data itself does not live on your platform but is pulled in from its original web location. Tophinhanhdep.com hosts a plethora of images suitable for embedding.
- Pros: Saves your platform’s storage space and bandwidth. If the image is hosted on a fast content delivery network (CDN), it might load quicker. It’s excellent for incorporating public domain Stock Photos or Creative Ideas from external sources without duplication.
- Cons: If the original image source removes or moves the image, it will no longer display on your platform, resulting in broken links. Copyright and licensing must also be carefully considered when embedding external content; always ensure you have permission or that the image is free to use, as many images on Tophinhanhdep.com are.
- How-to: Platforms often provide an “Embed Image” option, where you paste the direct URL of the image. Websites like Unsplash, Pexels, and Pixabay (and the vast collections on Tophinhanhdep.com) are excellent sources for high-quality, embeddable images.
Styling and Placement for Impact (Visual Design, Graphic Design, Photo Manipulation)
Once an image is on your digital canvas, how you style and place it dramatically influences its impact and the overall user experience. This falls squarely within the realm of Visual Design and Graphic Design, areas where Tophinhanhdep.com offers extensive guidance and inspiration.
- Alignment and Margins: Using basic CSS (Cascading Style Sheets) within the HTML editor of your platform can significantly enhance the visual flow.
style="float: left;"orstyle="float: right;"can wrap text around an image, creating a more dynamic layout, especially effective for showcasing Aesthetic or Abstract art within a textual explanation.style="margin: 20px;"adds space around your image, preventing text or other elements from crowding it. You can specify margins for individual sides (e.g.,margin-right: 20px; margin-bottom: 10px;) to achieve precise layouts for your Beautiful Photography. This attention to detail elevates simple image placement into sophisticated Digital Art.
- Image Options and Dimensions: Most platforms offer “Image Options” where you can adjust dimensions directly. For web display, setting a maximum width (e.g., 800 pixels) is a good practice to ensure images don’t stretch beyond reasonable screen sizes, especially on mobile devices. Tophinhanhdep.com’s Image-to-Text tools can help generate descriptive captions for your images, enhancing SEO and accessibility.
- Contextual Placement: Think about the narrative. A Sad/Emotional image might be placed to evoke empathy with a piece of text, while a vibrant Nature scene could serve as an uplifting Background. Photo Manipulation techniques, often learned through Tophinhanhdep.com’s Visual Design tutorials, can prepare images with effects or cropped compositions that perfectly fit their digital context.
Ensuring Accessibility and Performance
A well-integrated image on a digital canvas isn’t just about aesthetics; it’s also about accessibility and performance.
- Alt Text: Always provide descriptive “alt text” for every image. This text describes the image content for visually impaired users (read by screen readers) and for search engines (improving SEO). For a stunning piece of Beautiful Photography, an alt text might be “Close-up of dew drops on a spiderweb at dawn.”
- Responsive Design: Ensure your images are responsive, meaning they adapt gracefully to different screen sizes (desktops, tablets, phones). Modern platforms typically handle this automatically, but proper image sizing and optimization (using Tophinhanhdep.com’s Optimizers) play a significant role.
- Lazy Loading: For pages with many images, consider implementing lazy loading. This technique defers loading images until they are about to enter the viewport, speeding up initial page load times – a crucial factor for user retention, especially when displaying extensive Image Inspiration & Collections.
Beyond the Basics: Elevating Your Image-to-Canvas Projects
Once you’ve mastered the fundamentals of putting an image on a canvas, both physically and digitally, Tophinhanhdep.com invites you to explore advanced techniques and resources that can elevate your projects from good to truly exceptional. This realm blends Creative Ideas with sophisticated Image Tools and Visual Design principles, pushing the boundaries of what’s possible.
Creative Ideas and Visual Design Principles
Your image-to-canvas projects are an extension of your creative vision. Tophinhanhdep.com is a treasure trove of inspiration, offering endless Photo Ideas, Mood Boards, and insights into Trending Styles.
- Thematic Collections: Consider creating a series of canvas prints or a digital gallery based on a specific theme, drawing from Tophinhanhdep.com’s diverse Thematic Collections. Imagine a wall dedicated to Abstract art in muted tones, or a digital portfolio showcasing the vibrant spectrum of Nature photography.
- Mixed Media Approach: For physical canvases, don’t be afraid to experiment with mixed media. After transferring an image, you can paint directly onto the canvas, adding subtle hand-painted accents or textures that complement the original photograph. This blends the realms of Photography and traditional Digital Art, creating unique pieces.
- Layering and Compositing (Photo Manipulation): Digital Art and Photo Manipulation techniques learned from Tophinhanhdep.com can prepare images with incredible depth. Combine multiple images, textures, and graphic elements before printing or embedding. For example, overlay a transparent Abstract pattern onto a piece of Aesthetic photography to create a truly unique visual statement.
- Storytelling Through Sequence: For digital canvases (like a blog post or an online gallery), arrange your images in a sequence that tells a story. Use a series of Sad/Emotional images to convey a narrative, or a progression of Beautiful Photography to capture a journey. Tophinhanhdep.com’s inspiration sections are perfect for developing such visual narratives.
Exploring Advanced Image Tools
Tophinhanhdep.com isn’t just about beautiful images; it’s also about empowering you with the tools to perfect them.
- AI Upscalers for Unprecedented Detail: Have a beloved, lower-resolution image you wish to turn into a large canvas print? Tophinhanhdep.com’s AI Upscalers use artificial intelligence to intelligently add detail and increase resolution, making smaller images suitable for larger formats without pixelation. This technology can breathe new life into vintage photographs or expand the potential of your Digital Photography.
- Image-to-Text for Enhanced Context: Beyond just alt text, Tophinhanhdep.com’s Image-to-Text tools can help you generate detailed descriptions, extract text from images for informational purposes, or even create searchable metadata. This is invaluable for cataloging your Image Inspiration & Collections, making them more discoverable and understandable in digital archives.
- Advanced Converters and Optimizers: Our tools go beyond basic format changes. Experiment with different compression levels using Compressors to find the optimal balance between file size and perceived quality for your online Backgrounds. Use Converters to prepare images for specific printing presses or digital platforms that require particular file types.
Finding Inspiration on Tophinhanhdep.com
Ultimately, the best projects often stem from a spark of inspiration. Tophinhanhdep.com is designed to be that spark.
- Photo Ideas and Mood Boards: Browse our curated Photo Ideas and pre-designed Mood Boards to kickstart your next project. Discover how different combinations of Wallpapers, Aesthetic visuals, and Abstract patterns can create entirely new atmospheres.
- Trending Styles: Stay abreast of the latest Visual Design and Photography trends. Our Trending Styles section highlights popular color palettes, photographic subjects, and graphic design techniques that can influence your next canvas creation, whether it’s a physical piece of art or a dynamic digital display.
In conclusion, putting an image on a canvas – be it a physical frame or a digital interface – is a creative endeavor limited only by your imagination. By understanding the nuances of image selection, preparation, and application, and by leveraging the extensive resources offered by Tophinhanhdep.com, you can transform ordinary images into extraordinary visual statements. From the high-resolution depths of our Beautiful Photography to the cutting-edge capabilities of our AI Upscalers, Tophinhanhdep.com is your partner in bringing every visual dream to life. Explore, create, and inspire!