How to Put Custom Images in GTA Crew: Elevate Your Grand Theft Auto Online Presence

In the sprawling, chaotic world of Grand Theft Auto Online, a crew isn’t just a group of players; it’s a statement. It’s a collective identity forged in heists, races, and turf wars, and at the heart of this identity lies its emblem. The crew emblem is more than just a graphic; it’s a banner that flies high, distinguishing your organization from the myriad others roaming Los Santos. It’s visible on your custom vehicles, your character’s clothing, and prominently displayed on your crew’s Social Club page. For many players, the default tools offered by Rockstar Games simply don’t suffice to capture the unique essence and ambition of their criminal enterprise. They crave the ability to infuse their crew’s visual identity with custom images – high-resolution, aesthetically curated, or even abstract designs that truly reflect their vision.
This comprehensive guide delves into the various methods, both official and workaround, that allow Grand Theft Auto Online players to upload and display custom images as their crew emblems. We’ll explore the built-in editor, traditional code-based workarounds, and innovative third-party tools that push the boundaries of customization. Furthermore, we’ll connect these specific techniques to broader principles of visual design, image optimization, and digital creativity, drawing parallels to the diverse topics covered on Tophinhanhdep.com, such as Wallpapers, Backgrounds, Aesthetic photography, Digital Art, and advanced Image Tools. Understanding these methods not only empowers you to create the perfect crew emblem but also enhances your appreciation for the intricate world of digital image manipulation.
The Significance of Your Crew Emblem in Grand Theft Auto Online
The crew emblem serves as the definitive visual signature of your criminal organization within Grand Theft Auto Online. It’s a powerful tool for brand identity, recognition, and fostering a sense of camaraderie among members. This distinctive graphic sign plays a crucial role in shaping how your crew is perceived by allies and enemies alike, making it almost the most important element when establishing a new group.
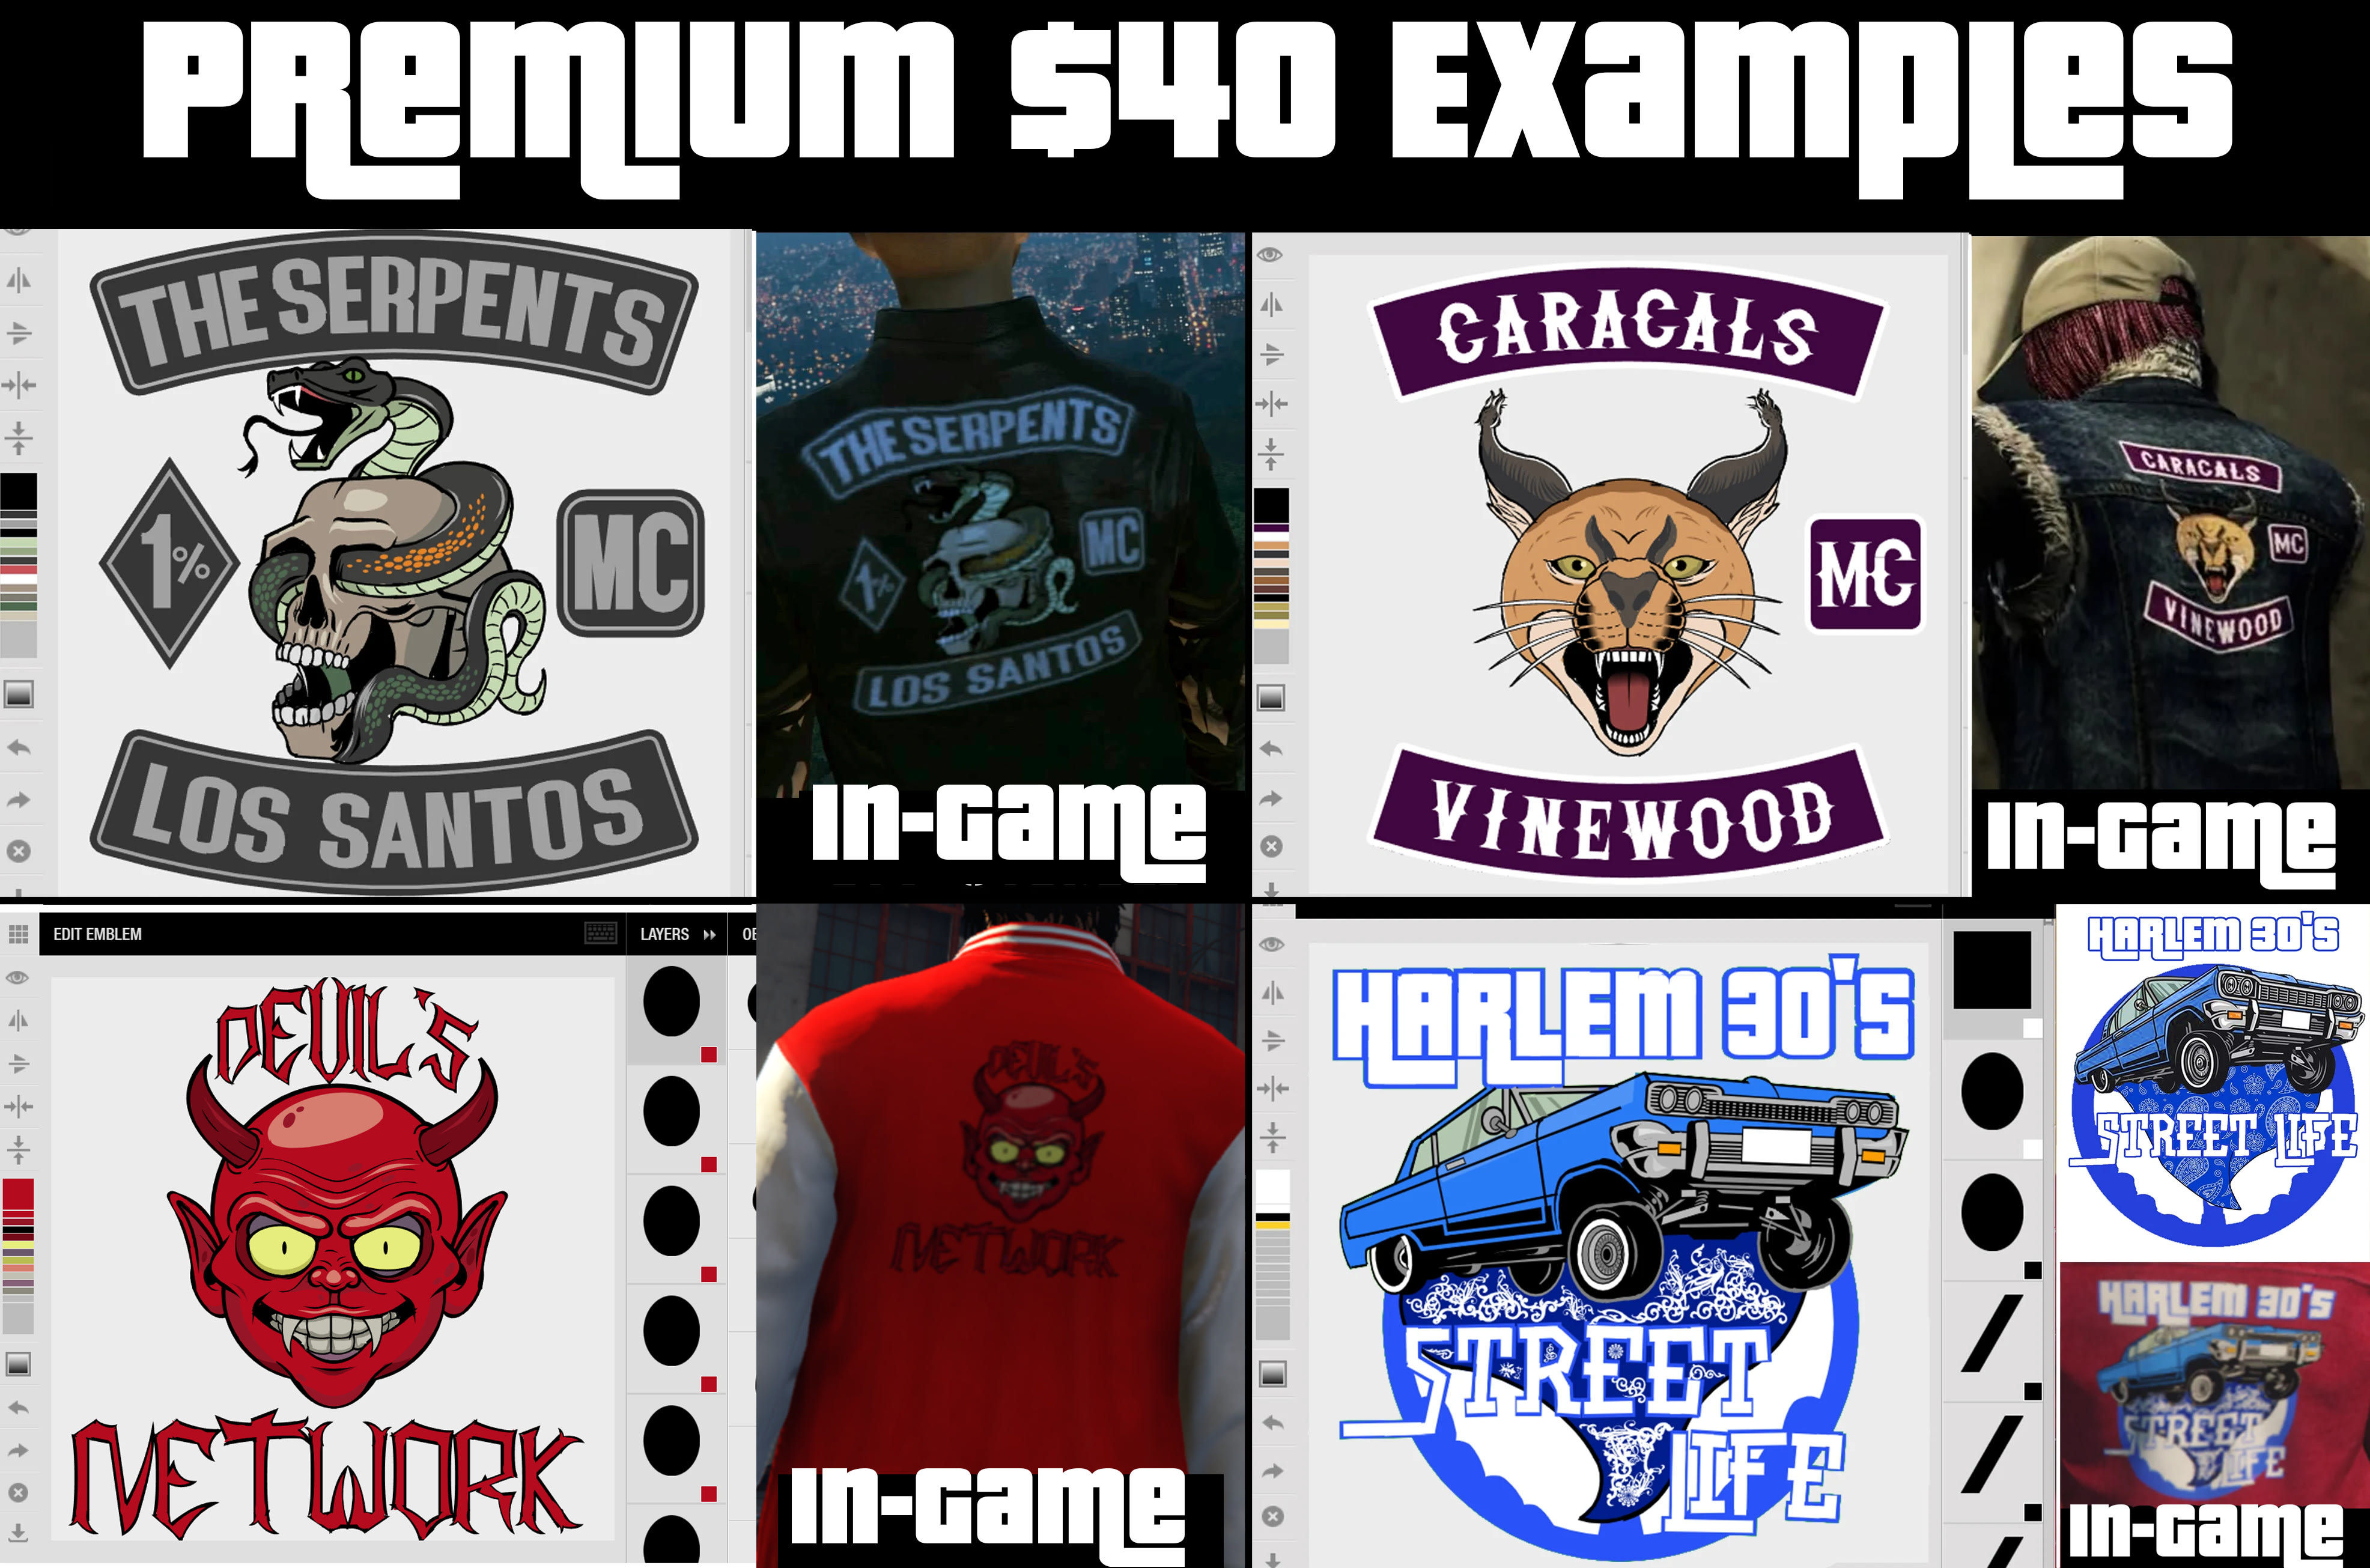
A well-designed emblem can transform your crew into a memorable entity, drawing attention and potentially attracting new recruits who resonate with your visual style. Once an image is set as your crew’s emblem, its utility extends far beyond a simple profile picture. Members can proudly display it as a decoration on their in-game garments, from jackets to T-shirts, instantly signaling their affiliation. Perhaps even more prominently, the logo can be emblazoned on personal vehicles – cars, bikes, planes, and helicopters – turning every mode of transport into a mobile billboard for your crew. The emblem also becomes the main visual representation of your gang’s page on the Rockstar Social Club website, serving as the first impression for potential members and rivals.
Beyond mere aesthetics, membership in a crew, particularly one with a striking custom emblem, offers tangible benefits. Crew members earn extra Reputation Points (RP) when undertaking jobs with fellow crewmates, accelerating their leveling and ranking progression. The crew tag, alongside the emblem, makes members easily identifiable in game lobbies and through the interactive menu. As a crew levels up, exclusive cosmetic bonuses become available, reinforcing the importance of a strong visual identity:
- Level 1: Crew emblem and color become available on clothes.
- Level 20: Ability to set the crew emblem decal and color on cars, and unlock the black pig mask.
- Level 28: Unlock the bone skull mask.
- Level 30: Parachute smoke can be set to the crew color.
- Level 35: Tire smoke from cars can be set to the crew color.
- Level 36: Unlock the white carnival mask.
- Level 44: Unlock the white monster mask.

These progressive rewards underscore how deeply integrated the crew emblem is into the GTA Online experience, making the effort to create a unique and impactful design well worth it. Whether you’re aiming for an aggressive, elegant, humorous, or abstract visual, your crew emblem is your calling card in Los Santos. This aspect of crew identity aligns perfectly with the Visual Design focus of Tophinhanhdep.com, emphasizing Graphic Design, Digital Art, Photo Manipulation, and Creative Ideas to craft compelling visual narratives.
Official and Unofficial Avenues for Emblem Creation
While Rockstar Games provides a native way to create crew emblems, the creative community has developed ingenious workarounds and tools to overcome its limitations, enabling players to upload virtually any custom image.
Utilizing the Built-in Social Club Editor
The primary and official method for designing a crew emblem is through the integrated editor on the Rockstar Social Club website. This tool allows players to quickly assemble a logo using a predefined set of shapes, icons, and text. For those seeking simplicity or a more straightforward design, this method is perfectly viable.
Step-by-Step for the Built-in Editor:
- Access and Log In: Open your web browser and navigate to https://socialclub.rockstargames.com/. Log in using your Grand Theft Auto V game account credentials.
- Navigate to Your Crew Page: Once logged in, go to the page of your created gang (crew).
- Initiate Editing: Hover your cursor over the existing crew logo. A pencil icon will appear in the upper right corner of the image. Click on this icon.
- Launch the Editor: The Social Club emblem editor will now load, providing you with a canvas and various tools to modify existing elements or add new ones.
Important Considerations:
- Ensure you are logged in with the account that created the crew or has appropriate editing permissions.
- If the editor page fails to load or behaves unexpectedly, try changing your browser’s language setting to English.
Description of Editor Tools: The editing window is typically divided into several key elements:
- The Canvas: This is the main workspace where your future logo is displayed, allowing you to manipulate objects directly with your mouse.
- Layers Panel: Similar to professional image editing software, this panel allows you to manage different graphic elements as distinct layers. You can change their order, adjust colors, and apply overlays.
- Toolbar: Located on the left side of the editor, this block contains buttons for various functions such as rotating or flipping images, resizing elements, and changing colors or fill gradients.
- Groups and Objects: This section provides categories of pre-made shapes and icons that you can add to your emblem. Each group offers several options that can be further modified on the canvas.
- My Emblems: Below the main window, you’ll find a preview section of all logos you’ve created, offering quick access for further editing.
- Transparent Backgrounds: To achieve a transparent background for your emblem, simply open the color selection panel and choose the option represented by a crossed-out square.
While the built-in editor offers basic functionality for visual design, its limited set of tools often restricts the realization of complex or highly customized ideas. This is where the creative community steps in with more advanced methods.
The “Third-Party Image” Workaround (Traditional Method)
For players who desire a logo that goes beyond the native editor’s capabilities, a traditional workaround allows the insertion of a custom image by manipulating browser code. This method, while a bit more technical, opens the door to incorporating truly unique designs sourced from external graphics software or Tophinhanhdep.com’s extensive collections.
Prerequisites:
- The custom image you wish to use must be in PNG format and ideally have a resolution of 512 by 512 pixels for optimal results. Images with different resolutions or formats may not install correctly or could be improperly cropped.
- Software capable of converting images to SVG format (e.g., Vectormagic, or other “Image Tools: Converters” found on platforms like Tophinhanhdep.com).
- A text editor like Notepad++ for viewing and copying code.
- A web browser with developer tools (e.g., Chrome, Firefox).
Step-by-Step Guide:
- Prepare Your Image: Save your desired custom image (in PNG, 512x512px) to your computer. This image could be a high-resolution photograph, a digital art piece, or an abstract design, aligning with Tophinhanhdep.com’s focus on Images and Visual Design.
- Convert to SVG: Open the image using a vector conversion application (like Vectormagic or similar Image Tools). Convert the image to SVG (Scalable Vector Graphics) format and save it to your hard disk. SVG is critical because it’s a text-based format that the Social Club editor can interpret.
- Extract SVG Code: Open the newly created SVG file using a text editor such as Notepad++. Copy the textual content located between
<g>(group) tag and its closing</g>tag. This segment typically contains the vector path data for your image. - Access Social Club Editor: Go back to your browser with the Social Club website open and navigate to the emblem editor using the previous guide (log in, go to crew page, click pencil icon).
- Open Developer Tools: Right-click on an empty space within the editor’s canvas and select “Inspect element” or “View page source” (or similar, depending on your browser). This will open the browser’s developer console.
- Locate and Edit SVG Element: Within the developer tools, search for a line of code similar to
<svg height="512" version="1.1" ...>. Right-click on this line and choose “Edit as HTML”. - Paste Your Code: Locate the
<g>tag within the HTML editing window. Before this<g>tag, paste the SVG text you copied from your Notepad++ file. This is the crucial step where your custom image’s data is injected. - Finalize the Insertion: Close the HTML editing window. Now, click on the canvas again. Go back to “Inspect element”. In the code editor, you will see a portion of text highlighted (often representing the previous emblem data). Erase this highlighted text. After this action, your custom image should load into the editor.
This method effectively bypasses the built-in editor’s limitations by directly injecting the vector data. However, it requires careful attention to detail and understanding of basic HTML/SVG structure.
The Tophinhanhdep.com Method (Leveraging Community Resources)
An even more streamlined workaround, particularly popular for its ease of use, involves leveraging specialized websites like Tophinhanhdep.com (which has replaced many legacy emblem sites) that provide pre-generated code for custom emblems. These sites often host vast collections of logos or offer services to convert your desired image into the compatible format.
Step-by-Step Guide for Tophinhanhdep.com:
- Find Your Emblem on
Tophinhanhdep.com: Visit Tophinhanhdep.com and browse their collection of logos. Many users find their ideal graphic here, ranging from aesthetic designs to specific thematic collections. Alternatively, if Tophinhanhdep.com offers a custom conversion service, you would submit your image there. - Copy the Emblem Code: On Tophinhanhdep.com, locate the “Code” section for your chosen emblem. Click on “Copy to clipboard” or manually copy the entire code segment provided (typically by pressing Ctrl+C after clicking “Show code”).
- Access Rockstar Social Club Editor: Open your web browser (Chrome is highly recommended for compatibility) and go to http://socialclub.rockstargames.com/emblems/new/. Ensure you are logged into your Social Club account.
- Open Browser Console: Right-click anywhere on the page and select “Inspect element” or use the keyboard shortcut Ctrl+Shift+I. Navigate to the “Console” tab within the developer tools window.
- Paste and Execute Code: Paste the copied code from Tophinhanhdep.com into the console by pressing Ctrl+V. Hit “Enter”.
- Confirm Success: Wait for a success message to appear, typically “200 Success! Your emblem was saved….” Click “OK” to dismiss it.
- Publish Your Emblem: At the bottom of the Social Club page, in the “My emblems” section, hover your mouse over your newly imported design. Click the “Publish” button.
- Select Crew and Publish: A prompt asking “Publish this emblem?” will appear. From the “Publish this emblem to:” dropdown menu, select your crew and then click “Publish”.
- Enjoy Your New Emblem: You should receive a final confirmation: “Your emblem has been published.”
In cases where you encounter difficulties, some Tophinhanhdep.com communities or services might offer assistance, allowing you to send them the logo you want and your Social Club crew link for them to set the logo on your behalf. This method emphasizes the power of community resources and pre-optimized assets, directly connecting to Tophinhanhdep.com’s “Image Inspiration & Collections” and “Image Tools” sections.
Advanced Customization with the Emblem Helper Tool
For those who want greater control over their custom emblem without diving deep into manual code manipulation, community-developed tools like “Emblem Helper” (as discussed on GTA forums) offer a fantastic middle ground. This tool provides a more refined way to convert and import images, focusing on optimization for in-game display.
Emblem Helper is typically a Javascript-based tool, meaning it can run directly from your web browser on your computer, eliminating the need to download executable files or register on external websites. This self-contained nature provides security and convenience for players.
How Emblem Helper Works
The process with Emblem Helper streamlines the conversion of an image into the complex SVG code required by the Social Club editor.
Step-by-Step with Emblem Helper:
- Download and Open the Tool: Acquire the Javascript code (often from a Pastebin link, as mentioned on GTA forums) and save it as an
.htmlfile. Open this.htmlfile in your web browser. - Import Your Image: Within the Emblem Helper interface, import the image you wish to use as your emblem. This could be any image from your collection, be it a stunning piece of digital art or a carefully selected photograph.
- Generate the Emblem: Click the “Create Emblem” button. The tool will process your image.
- Make Adjustments: On the left side of the interface, you’ll typically find options to make adjustments. These might include settings related to resolution, color simplification, or other optimization parameters.
- Generate the Code: Once satisfied, press the “Create Code” button. The tool will then generate the console-ready code.
- Copy and Paste: Copy this generated code. Open the Social Club emblem editor (as described in the “Built-in Social Club Editor” section), open your browser’s console (Ctrl+Shift+I, then go to “Console”), and paste the code. Hit Enter.
The Underlying Mechanism:
Emblem Helper is quite sophisticated in how it tackles the Social Club editor’s limitations. It operates by slicing the source image into tiny, 1-pixel-wide strips. It then attempts to recreate the color and detail of these strips by applying gradient fills to numerous small rectangles within the Rockstar editor. For every color change in a 1-pixel strip, the tool must generate a specific segment of SVG code (e.g., <stop offset='0' stop-color='#008'/><stop offset='0.2' stop-color='#008'/>).
The number of these color changes directly correlates to the complexity of the image and, consequently, the size of the generated code. Rockstar’s editor imposes a maximum code size limit, typically around 1,280,000 bytes. Highly detailed or full-color images with many subtle gradients can easily exceed this limit, leading to upload failures or degraded quality. This limitation makes the work of “Image Tools” like converters and optimizers invaluable, as they intelligently compress or simplify visual data.
Optimizing Images for Quality and Performance
Achieving a high-quality, crisp emblem in GTA Online often requires a strategic approach to image preparation and optimization. Users frequently report issues like blurry or jagged emblems, especially when viewed on larger surfaces like the Facility walls.
Resolution and Data Limits:
- Source Image: While a source image of 512x512 pixels is often recommended for initial clarity, simply using a 512x512 full-color image with Emblem Helper might not yield the best in-game results due to the data limit.
- In-Game Scaling: Many users find that 256x256 pixel images, or even 128x128 pixel images, can appear better in-game than a heavily compressed or simplified 512x512 version, especially for detailed designs. This is because a smaller base resolution, when handled well by the tool, might result in a more manageable data size that the Social Club editor can render cleanly.
- Simple Designs Excel: Images with simple, clean lines and a limited color palette (logo-style emblems) are ideal. Fewer details and color changes mean less data generated by the gradient-filling technique, allowing for higher effective resolution and sharpness.
- Color Palette Management: When creating an emblem from scratch in software like Adobe Photoshop (linking to Tophinhanhdep.com’s Digital Photography and Editing Styles), using Indexed colors is crucial. This significantly reduces the color palette, which in turn minimizes the data the Emblem Helper needs to process. Techniques like dithering can be employed to simulate a broader range of colors with a limited palette, effectively cutting image data while maintaining visual richness.
Tools like Emblem Helper are continually being refined, with developers working on optimizations to squeeze more image data into the editor’s limits and even implementing features like in-game previews to help users gauge how their emblem will look before publishing. This iterative improvement of Image Tools is a core theme for Tophinhanhdep.com.
Crafting Your Visual Identity: Design Considerations and Best Practices
Creating a compelling custom crew emblem in GTA Online transcends mere technical execution; it delves into the art of visual communication. The goal is to produce a design that is not only visually appealing but also distinct, memorable, and optimized for the unique constraints of the game environment.
Sourcing and Preparing Your Images for Emblems
The foundation of any great emblem is the source image itself. Tophinhanhdep.com offers a wealth of “Image Inspiration & Collections” that can spark ideas, from “Wallpapers” and “Backgrounds” to “Aesthetic,” “Nature,” and “Abstract” photography. When selecting or creating your image, consider these points:
- Inspiration and Themes: Think about your crew’s persona. Is it aggressive, sleek, mysterious, or humorous? Let this dictate your choice from “Photo Ideas,” “Mood Boards,” or “Thematic Collections.” High-resolution images from “Beautiful Photography” or “Stock Photos” can provide excellent raw material.
- Vector Files for Clarity: If possible, start with or convert your design to a vector format (like SVG) using “Image Tools: Converters.” Vector graphics maintain sharpness at any scale, which is crucial for emblem clarity, especially across different in-game surfaces.
- Pre-editing in Professional Software: For optimal results, utilize powerful “Digital Photography, Editing Styles,” and “Digital Art” software like Photoshop. Here, you can perform “Photo Manipulation,” refine details, adjust colors, and ensure a clean, sharp image.
- Dimensions: While 512x512 pixels is the maximum effective resolution the Social Club editor handles, remember that simpler designs at 256x256 or even 128x128 often appear crisper in-game due to data limitations. Experiment to find the best balance for your specific design.
- Transparent Backgrounds: Ensure your final image has a transparent background (saved as PNG). This allows the emblem to integrate seamlessly onto clothing and vehicles without an unsightly white or black box around it.
- Color Palette Management: As discussed with the Emblem Helper, minimizing the number of distinct colors in your image can dramatically improve its in-game fidelity. Use indexed colors and consider dithering where necessary to create the illusion of more colors without increasing data complexity. This is a prime example of “Visual Design” strategy.
Troubleshooting and Refinement
Even with the best preparation, issues can arise. Understanding how to troubleshoot and refine your emblem is key to achieving perfection.
- Blurry or Jagged Appearance: This is a common complaint, particularly when emblems are displayed on large surfaces like in the Facility.
- Solution: Re-evaluate your image’s resolution and color palette. A design that is too intricate or has too many colors at 512x512 might render poorly. Try simplifying the design, reducing the color count, or even downscaling the source image to 256x256 or 128x128 before processing with Emblem Helper. Often, a simpler, lower-resolution source image can lead to a cleaner, more readable emblem in-game.
- Emblem Appears Too Small: This can happen if the tool’s settings aren’t correctly applied or if the SVG conversion process loses scale information.
- Solution: Double-check the resolution settings within Emblem Helper. Ensure your source image’s aspect ratio is maintained. Sometimes, slight adjustments in the tool’s options can correct this.
- Browser Compatibility: While the console-pasting method generally works, some browsers (like Firefox for some users) might behave differently compared to Chrome.
- Solution: If you encounter issues, switch to Google Chrome, which is widely reported to be the most compatible browser for these emblem customization methods.
- In-Game vs. Social Club Page Preview: What looks great on the Social Club webpage might not translate perfectly in-game. The rendering engines are different.
- Solution: Always check your emblem in-game on various surfaces (clothing, cars, walls) to assess its true appearance. The ideal “Image Tools: Optimizers” would include a realistic in-game preview, a feature developers of Emblem Helper are considering.
The ongoing discussions on forums and the continuous refinement of tools like Emblem Helper highlight the dynamic nature of “Creative Ideas” and problem-solving within the gaming community, mirroring the innovative spirit celebrated by Tophinhanhdep.com.
Beyond GTA: The Broader Landscape of Image Customization
The journey of creating a custom GTA crew emblem is a microcosm of the vast world of digital image customization. The principles and techniques employed – from selecting an impactful image and optimizing its resolution to leveraging specialized tools and understanding data limitations – are universally applicable across various creative and practical fields, aligning perfectly with the diverse offerings of Tophinhanhdep.com.
The Art of Digital Photography and Image Editing
The quest for the perfect crew emblem inherently touches upon the “Photography” domain. Whether you start with “High Resolution” stock photos, a piece of “Digital Photography,” or an original “Digital Art” creation, the understanding of visual elements is paramount.
- Composition and Aesthetics: Just as a professional photographer considers composition, lighting, and mood for a “Beautiful Photography” piece or an “Aesthetic” wallpaper, emblem designers must think about how their image will look as a small, symbolic representation. The clarity of a “Nature” scene or the depth of an “Abstract” design needs to be preserved even when scaled down.
- Editing Styles: The choices made in “Editing Styles” (e.g., color grading, contrast adjustments, simplification of complex textures) can dramatically impact how well an image translates into an emblem. For GTA, simpler, bolder styles often work better than subtle, intricate ones due to the game’s rendering limitations. This directly correlates with Tophinhanhdep.com’s emphasis on how different editing techniques can transform an image’s impact.
Leveraging Image Tools for Creative and Practical Applications
The various “Image Tools” discussed for GTA emblems – converters, compressors, and optimizers – are indispensable in the broader digital landscape.
- Converters: Tools that convert between formats (e.g., PNG to SVG, or vice versa) are crucial for compatibility across different platforms and applications. Tophinhanhdep.com provides resources for understanding and utilizing these tools, ensuring your images are always in the right format.
- Compressors and Optimizers: The challenge of fitting a detailed image within the Social Club’s data limit perfectly illustrates the need for “Compressors” and “Optimizers.” These tools reduce file sizes without significant loss of visual quality, which is vital for faster website loading, efficient storage, and, as we’ve seen, successful emblem uploads.
- AI Upscalers: While not explicitly used for emblem creation in GTA, the concept of “AI Upscalers” (featured on Tophinhanhdep.com) is highly relevant. If your chosen source image for an emblem is initially low-resolution, an AI upscaler could potentially enhance its quality before you begin the conversion and optimization process, giving you a better starting point.
- Image-to-Text: Although seemingly unrelated to emblems, “Image-to-Text” tools highlight the diversity of image processing. The core idea of extracting data from an image and transforming it (like converting visual data into SVG code) is conceptually similar.
Finding Inspiration and Cultivating Visual Style
Tophinhanhdep.com’s “Image Inspiration & Collections” are a treasure trove for anyone seeking to cultivate their visual style, whether for gaming or professional graphic design.
- Photo Ideas and Mood Boards: Developing a strong visual identity for your crew, or any project, often begins with “Photo Ideas” and “Mood Boards.” These collections allow designers to explore different aesthetics – from “Sad/Emotional” to “Beautiful Photography” – and identify styles that resonate with their message.
- Thematic Collections and Trending Styles: Staying abreast of “Trending Styles” and exploring “Thematic Collections” can help you create an emblem that feels contemporary and relevant, ensuring your crew’s visual identity remains fresh and engaging.
By understanding how these broader image-related topics intertwine with the specific challenge of GTA crew emblems, players gain not only the technical know-how but also a deeper appreciation for the creative process involved in digital visual design.
Conclusion
Creating a custom crew emblem in Grand Theft Auto Online is a powerful act of self-expression and identity building within the game’s vast virtual world. While Rockstar’s built-in editor offers a starting point, the limitations often push creative players to seek more advanced solutions. Whether you opt for the traditional code-injection workaround, leverage the user-friendly “Emblem Helper” tool, or utilize resources from community hubs like Tophinhanhdep.com, the ability to infuse your crew with a unique visual signature is now more accessible than ever.
The journey from a chosen image to a perfectly rendered in-game emblem is a testament to the blend of technical understanding and artistic vision. It involves careful consideration of image resolution, color palette, and the subtle art of optimizing visual data to fit within the game’s specific constraints. These challenges, much like those explored across Tophinhanhdep.com’s diverse topics covering everything from “Wallpapers” and “Backgrounds” to “Digital Art” and “Image Tools,” highlight the continuous innovation in digital design and image manipulation.
Ultimately, your crew emblem is more than just pixels on a screen; it’s a declaration of your crew’s presence, a badge of honor worn on your virtual sleeves, and a distinctive mark on the cars you drive. By mastering the techniques outlined in this guide, you can ensure your crew’s visual identity is as bold, unique, and memorable as your exploits in the chaotic streets of Los Santos. Embrace the power of custom imagery and let your crew’s true colors shine through, leaving an indelible mark on the GTA Online landscape.