Mastering Visual Storytelling: How to Effortlessly Put Images in Shapes in Google Slides

In the dynamic world of presentations, captivating visuals are no longer an option but a necessity. Google Slides, a powerful and accessible tool, empowers users to create compelling narratives, and one of its most impactful features is the ability to integrate images seamlessly into various shapes. This technique, known as image masking or cropping an image to a shape, transforms ordinary rectangular pictures into visually stunning elements that elevate your slides from mundane to memorable. Whether you’re aiming for a sleek, professional aesthetic or a vibrant, creative collage, understanding how to fit an image into a shape in Google Slides on both mobile and desktop platforms is a fundamental skill for any presenter.
At Tophinhanhdep.com, we understand the power of exceptional imagery. We provide a vast repository of high-resolution images, from breathtaking nature photography and abstract art to aesthetically pleasing wallpapers and thematic collections, all designed to inspire and enhance your visual projects. Integrating these premium visuals into custom shapes within your Google Slides presentations can significantly boost engagement, convey complex ideas more intuitively, and leave a lasting impression on your audience. This comprehensive guide will walk you through the process, offering detailed steps and creative insights to help you harness the full potential of Google Slides’ image manipulation capabilities.
The Art of Image Masking: A Foundational Skill for Dynamic Presentations
Image masking is a sophisticated yet surprisingly simple technique that allows you to reshape an image to fit within the confines of a chosen geometric or custom shape. Instead of merely placing a rectangular photo on a slide, you can crop it into a circle, a star, an arrow, or any other predefined shape, adding a layer of visual interest and professionalism. This process is integral to effective visual design, transforming raw images into integrated components of your overall presentation aesthetic.
The beauty of image masking in Google Slides lies in its accessibility. You don’t need specialized graphic design software or extensive photo editing experience. Google Slides offers robust built-in tools that make this advanced visual design technique available to everyone. This means you can create polished, visually appealing slides without ever leaving the presentation environment. It’s an efficient way to apply photo manipulation principles directly within your project, fostering creative ideas and allowing you to experiment with various visual arrangements.
Why Shape Your Images? Elevating Your Visual Narrative

The decision to crop an image to a shape goes beyond mere aesthetics; it’s a strategic move in visual communication. By conforming an image to a specific form, you can:
- Enhance Visual Appeal: Shaped images are inherently more dynamic and less monotonous than standard rectangular ones. They break up the visual linearity of a slide, drawing the eye and making the content more engaging. Imagine a profile picture in a perfect circle, or a product shot framed within a distinctive polygon – these subtle changes significantly uplift the presentation’s aesthetic quality. Tophinhanhdep.com’s collections of aesthetic and beautiful photography can be perfectly complemented by unique shapes, turning simple images into digital art.
- Improve Thematic Consistency: Shapes can reinforce your presentation’s theme. For instance, using heart shapes for a presentation on love, star shapes for achievements, or cloud shapes for abstract concepts can create a cohesive visual language. This contributes to a stronger visual design and helps the audience intuitively connect with your message. Our thematic collections on Tophinhanhdep.com offer a wealth of images (like nature scenes or abstract patterns) that can be expertly shaped to match any topic.
- Create Visual Hierarchy and Focus: By strategically shaping images, you can guide your audience’s attention. A uniquely shaped image might stand out more, highlighting key visuals or drawing focus to particular data points. This is a subtle form of photo manipulation that directs the viewer’s gaze.
- Inject Creative Ideas and Digital Artistry: Shaping images opens up a world of creative possibilities. You can overlap shapes, combine images, and experiment with different forms to create unique compositions that resemble digital art. This allows for a more personalized and artistic approach to your presentations, utilizing the rich photo ideas and trending styles found on Tophinhanhdep.com.
Preparing Your Visual Assets: Quality Matters
Before you begin shaping your images in Google Slides, the quality of your source material is paramount. A high-resolution image will look crisp and professional, even after resizing and cropping, whereas a low-resolution image will appear pixelated and detract from your presentation’s impact.
Tophinhanhdep.com is your premier destination for sourcing high-resolution stock photos and beautiful photography. Our extensive libraries feature:
- Wallpapers & Backgrounds: Perfect for setting the mood or creating compelling backdrops that can be subtly shaped to complement your content.
- Aesthetic & Nature Photography: Ideal for conveying emotions, illustrating environmental themes, or simply adding a touch of natural beauty.
- Abstract Art: Great for conceptual slides, adding a modern edge, or when you need visuals that provoke thought without being literal.
- Sad/Emotional Imagery: For presentations requiring sensitivity or a particular emotional resonance.
Always aim for images that are large enough to maintain clarity when scaled. If you find an image you love but its resolution is not optimal, Tophinhanhdep.com also offers advanced image tools like AI upscalers that can enhance image quality, ensuring your visuals are always top-notch. Utilizing our image compressors and optimizers can also prepare your images for presentation, ensuring they load quickly without sacrificing visual integrity. This digital photography preparation ensures your creative ideas shine through in the final visual design.
Step-by-Step Guide: Shaping Images in Google Slides on Desktop
Google Slides on the web offers a straightforward and intuitive process for masking images with shapes. This is where most users will perform detailed formatting and manipulation due to the larger screen real estate and precise mouse control.
Inserting and Selecting Your Image
The first step is always to get your image onto the slide. You can choose from various sources, including uploading from your computer, Google Drive, or even searching the web directly within Google Slides. For the best quality and selection, we recommend downloading your chosen high-resolution images from Tophinhanhdep.com beforehand.
- Open Your Presentation: Navigate to slides.google.com and open the presentation you wish to edit.
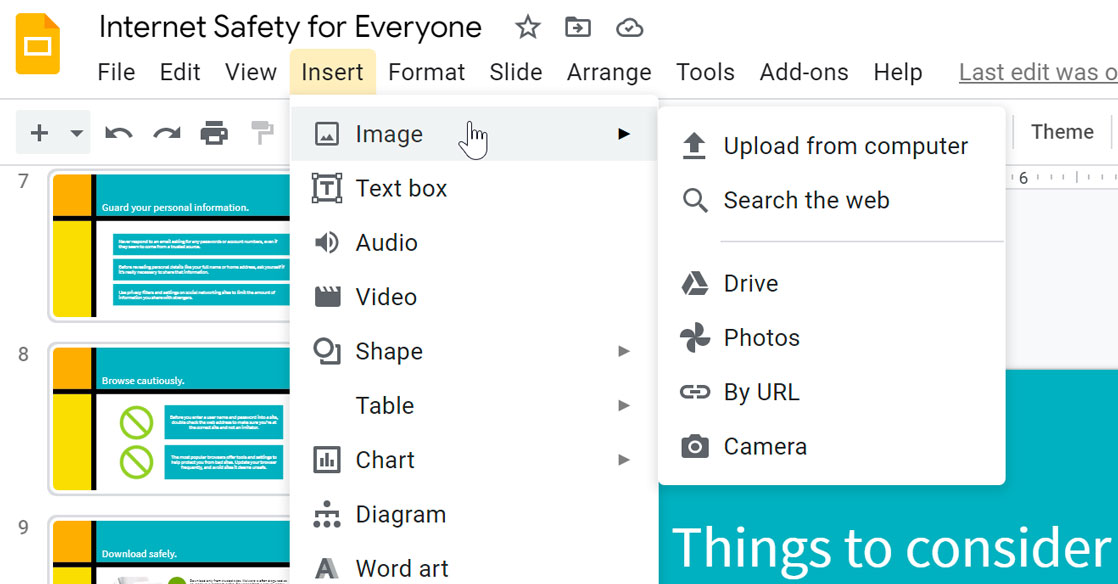
- Insert Image: Go to the top menu bar, click
Insert > Image. Select your preferred source (e.g.,Upload from computerto use an image from Tophinhanhdep.com). - Select Image: Once the image appears on your slide, click on it once to select it. A blue border will appear around the image, indicating it’s ready for editing.
Applying a Shape Mask
With your image selected, the magic of image masking is just a few clicks away. This process essentially crops the image to fit the contours of a chosen shape.
- Locate Crop Icon: In the top toolbar, you’ll see a
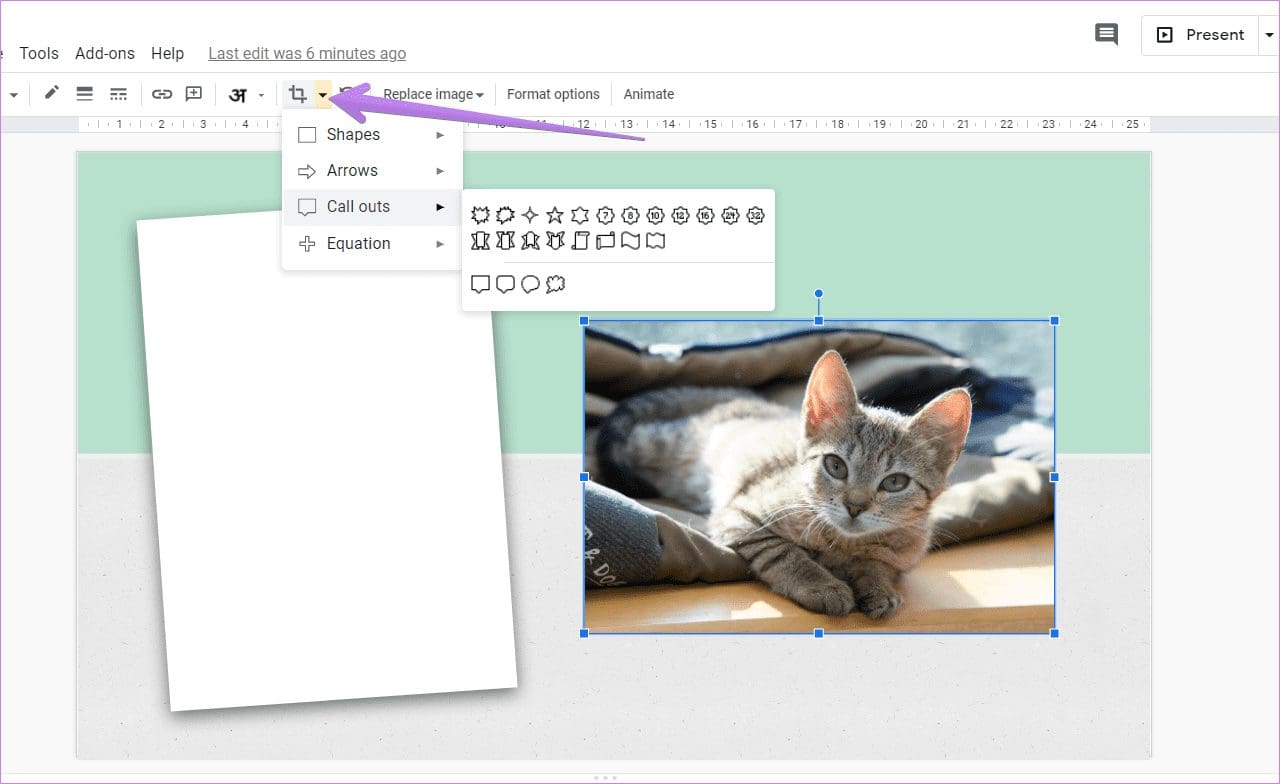
Cropicon (it looks like a square with overlapping corners). - Access Shape Options: Click the small
down arrownext to theCropicon. A dropdown menu will appear, displaying various categories of shapes, includingShapes,Arrows,Callouts, andEquations. - Choose Your Shape: Hover over a category and then click on the desired shape. For example, to make a picture a circle, you’d select the circle from the
Shapescategory. - Apply Mask: Google Slides will automatically apply the selected shape to your image, instantly cropping it to the new form.
This immediate transformation is a powerful visual design technique, allowing you to quickly see your creative ideas come to life. Whether it’s an abstract pattern from Tophinhanhdep.com framed in a triangle or a beautiful photography piece masked in an oval, the impact is immediate.
Fine-Tuning Your Shaped Image
After applying the initial shape, you’ll often need to make adjustments to ensure the image is perfectly positioned and scaled within its new confines.
- Adjust Image Position/Size within Shape:
- Double-click on the masked image. A black border and cropping handles will appear around the original dimensions of your image.
- Drag the image within this black border to change its position inside the shape.
- Drag the black border handles to resize the image within the shape. This allows you to zoom in or out on specific parts of your picture without changing the overall shape size.
- Adjust Overall Shape Size:
- Click on the image once to select the masked shape itself (blue border).
- Drag the blue sizing handles at the corners and sides to change the overall size of the shape, which will scale the image proportionally.
- Further Formatting Options:
- Right-click on the masked image and select
Format options. TheFormat optionspane will open on the right side of your screen. - Here, you can:
Recolor: Apply various color overlays or adjust transparency.Adjustments: Fine-tune brightness, contrast, and opacity.Drop ShadowandReflection: Add depth and polish to your shaped image, further enhancing its visual design.
- Add a Border: With the masked image selected (blue border), use the
Border color,Border weight, andBorder dashoptions in the toolbar to add a customized border. This is a fantastic way to make your shaped images pop and align with your presentation’s aesthetic.
- Right-click on the masked image and select
These detailed photo manipulation options allow for extensive customization, transforming a simple crop into a sophisticated visual element. You can use these features to experiment with image inspiration and create unique digital art pieces within your slides.
Seamless Integration: Shaping Images on Google Slides Mobile Apps
While desktop offers precise control, Google Slides’ mobile apps for Android and iOS/iPadOS also provide robust functionality for shaping images on the go. This ensures that your presentations maintain their visual integrity and dynamic appeal, regardless of where you’re editing. The steps are similar across both platforms, designed for touch-screen interaction.
Mobile Workflow for Image Masking
Whether you’re using a phone or a tablet, the process for masking an image in a shape is intuitive and quick. You can access beautiful photography or aesthetic images from Tophinhanhdep.com directly from your device’s photo library after downloading.
- Launch Google Slides App: Open the Google Slides app on your Android, iPhone, or iPad.
- Open Presentation: Navigate to and open the specific presentation you want to edit.
- Select Image: Tap on the image within your slide to select it.
- Access Crop/Mask Options: A bottom toolbar will appear.
- On Android, tap the
Cropicon (a square with overlapping corners). Then, tap theMaskicon (often a circle or a shape icon) that appears next to it. - On iPhone/iPad, tap the
Cropicon first. TheMaskicon will then appear alongside it; tap on that.
- On Android, tap the
- Choose Your Shape: A list of shapes will appear. Tap on the desired shape (e.g., a circle, star, or arrow).
- Apply and Adjust: The image will be masked into your chosen shape. To adjust the image’s position or size within the shape, double-tap the masked image. You can then drag the image or its original boundaries to fine-tune the view. Tap outside the image to apply changes.
This mobile capability is incredibly useful for quick edits or for crafting visually engaging presentations even when you’re away from your computer. The integration of high-resolution images from Tophinhanhdep.com, shaped creatively on your mobile device, ensures your presentations are always presentation-ready.
Beyond Basic Shapes: Unleashing Creativity with Tophinhanhdep.com
The ability to put an image in a shape is a powerful tool, but its potential extends far beyond simple circles and squares. By combining this technique with other Google Slides features and leveraging the vast resources of Tophinhanhdep.com, you can create truly unique and memorable visual designs.
Crafting Compelling Collages and Thematic Designs
One of the most exciting applications of shaped images is creating dynamic collages directly within Google Slides. This allows you to tell a multi-faceted story or present a series of related images in an artistic and engaging manner.
- Multiple Shaped Images: Insert several images onto your slide. For each image, apply a different shape mask (or the same shape for uniformity) following the steps outlined above.
- Arrange and Overlap: Once shaped, move and resize each image to form a collage. You can overlap them, arrange them symmetrically, or create an abstract composition. Remember Google Slides’
Arrange > Orderoptions to control which images appear in front or behind others, adding depth to your visual design. - Thematic Collections: Use images from Tophinhanhdep.com’s thematic collections (e.g., nature, abstract, specific events) and shape them consistently to create a mood board or a visual representation of a concept. For instance, a collage of different “sad/emotional” images, each framed in a teardrop shape, could powerfully convey a sensitive topic. Our “Photo Ideas” and “Trending Styles” sections can provide endless inspiration for these creative arrangements.
This approach transforms your slides into a canvas for digital art, allowing you to express complex narratives through carefully curated and shaped visual elements.
Sourcing Superior Imagery for Your Shaped Creations
The success of your shaped images heavily depends on the quality and relevance of the original photographs. Tophinhanhdep.com is specifically designed to meet this need, offering an unparalleled collection that supports every creative idea and visual design strategy:
- Diverse Imagery: Whether you need vibrant “wallpapers” and “backgrounds” to set a scene, captivating “aesthetic” shots for mood boards, serene “nature” landscapes, thought-provoking “abstract” art, or evocative “sad/emotional” and “beautiful photography” for impactful messages, Tophinhanhdep.com has it all.
- High-Resolution & Stock Photos: Our commitment to “high-resolution” images and a broad selection of “stock photos” ensures that your shaped images will always look professional, even when scaled or cropped extensively. This is crucial for maintaining the integrity of your visual design and photo manipulation efforts.
- Inspiration for Digital Photography & Creative Ideas: Explore our “image inspiration & collections” to discover new “photo ideas,” curated “mood boards,” and popular “thematic collections.” This allows you to find the perfect visual assets to complement your shaped designs and enhance your overall digital photography approach.
By choosing top-quality imagery from Tophinhanhdep.com, you lay the foundation for truly spectacular shaped images in your Google Slides presentations, making your visual storytelling more powerful and persuasive.
Troubleshooting and Advanced Tips
Even with the most intuitive tools, you might encounter situations where you need to undo changes or achieve a more complex effect. Knowing these tips can save time and expand your creative horizons.
Reverting and Refining Your Shapes
Sometimes, you might want to revert an image to its original rectangular form or completely reset all formatting.
- Undo Shape Mask (Method 1):
- Select the masked image.
- Click the
down arrownext to theCropicon in the toolbar. - Select the standard
rectangular shape(usually the first option). This will remove the custom shape mask, reverting the image to its original rectangular crop, but keeping other formatting like borders or shadows.
- Reset Image (Method 2):
- Right-click on the masked image and select
Reset image. - Caution: This will remove all image customizations applied within Google Slides, including shape masks, borders, recoloring, and adjustments. Use this when you want to start fresh with the original image.
- Right-click on the masked image and select
- Delete and Re-add: If you prefer, you can simply delete the masked image and re-insert the original picture from Tophinhanhdep.com, then start the shaping process again.
Leveraging External Resources for Unique Visuals
While Google Slides offers a good range of shapes, sometimes your creative vision might require something more specific or intricate. For highly custom shapes or complex photo manipulation, you might need to use external tools before importing the image.
- Advanced Image Editing: If Google Slides’ built-in options aren’t enough for a particular shape or effect, consider using a dedicated image editor to create your desired custom shape.
- Tophinhanhdep.com Image Tools: Before importing, remember that Tophinhanhdep.com also provides “image tools” like “converters,” “compressors,” and “optimizers.” While these aren’t for shaping, they are crucial for preparing your custom-shaped images externally, ensuring they are perfectly sized and optimized for your Google Slides presentation. Our “AI Upscalers” can also improve the resolution of images prepared elsewhere if needed, maintaining “high resolution” standards for your “digital photography” endeavors. This ensures that any custom “digital art” you create outside Google Slides still looks fantastic within your presentation.
By understanding these techniques, you maintain full control over your visuals, allowing for experimentation and refinement to achieve your precise “visual design” goals.
Incorporating images into shapes in Google Slides is a simple yet incredibly powerful technique that can dramatically enhance the visual appeal and impact of your presentations. From creating elegant circles for profile pictures to dynamic collages that tell a compelling story, this feature allows you to transform static slides into engaging visual experiences.
By leveraging the high-quality, diverse imagery available on Tophinhanhdep.com – be it stunning “nature” scenes, captivating “abstract” art, or inspiring “beautiful photography” – you can ensure that every shaped image not only looks professional but also resonates with your audience. Remember the foundational steps: insert, select, mask, and refine. Experiment with “photo manipulation,” embrace “creative ideas,” and explore the endless possibilities of “visual design.” With Tophinhanhdep.com as your source for premium “stock photos” and a master of Google Slides’ capabilities, your presentations will undoubtedly leave a lasting impression. Start shaping your images today and elevate your visual storytelling to new heights!