How to Put Images on Google Docs: A Comprehensive Guide to Visual Enhancement with Tophinhanhdep.com

In today’s visually-driven world, adding images to your Google Docs documents is more than just an aesthetic choice; it’s a powerful way to convey information, break up text, and create engaging content. Whether you’re crafting a professional report, a school project, a creative story, or a presentation, well-placed and well-edited images can significantly enhance your document’s impact and readability. Google Docs, as a leading online word processor, offers robust tools for inserting and managing images, making it accessible for users of all skill levels. When paired with a comprehensive resource like Tophinhanhdep.com, which provides a vast array of high-quality visuals and image utilities, your document creation workflow can become seamless and highly effective.
This guide will walk you through every aspect of putting images on Google Docs, from the various insertion methods to advanced editing techniques, and illustrate how Tophinhanhdep.com can be your go-to platform for sourcing, preparing, and optimizing the perfect visuals for your projects.
Inserting Images on Google Docs: Your Gateway to Visual Storytelling
Adding an image to your Google Docs document is a straightforward process, but Google provides multiple avenues to do so, catering to different sources and preferences. Understanding these options will help you efficiently integrate visuals into your work, drawing from your local files, online libraries, or even directly from the web.
Uploading from Your Computer or Device

The most common method for inserting an image is to upload it directly from your computer or mobile device. This is ideal when you have specific photos, graphics, or custom designs ready to go. For those seeking unique and high-quality visuals, Tophinhanhdep.com is an exceptional resource. You can explore their extensive collections of Wallpapers, Backgrounds, Aesthetic, Nature, Abstract, Sad/Emotional, and Beautiful Photography to find the perfect image, download it, and then easily upload it to your Google Doc.
Steps for PC:
- Place your cursor in the document where you want the image to appear.
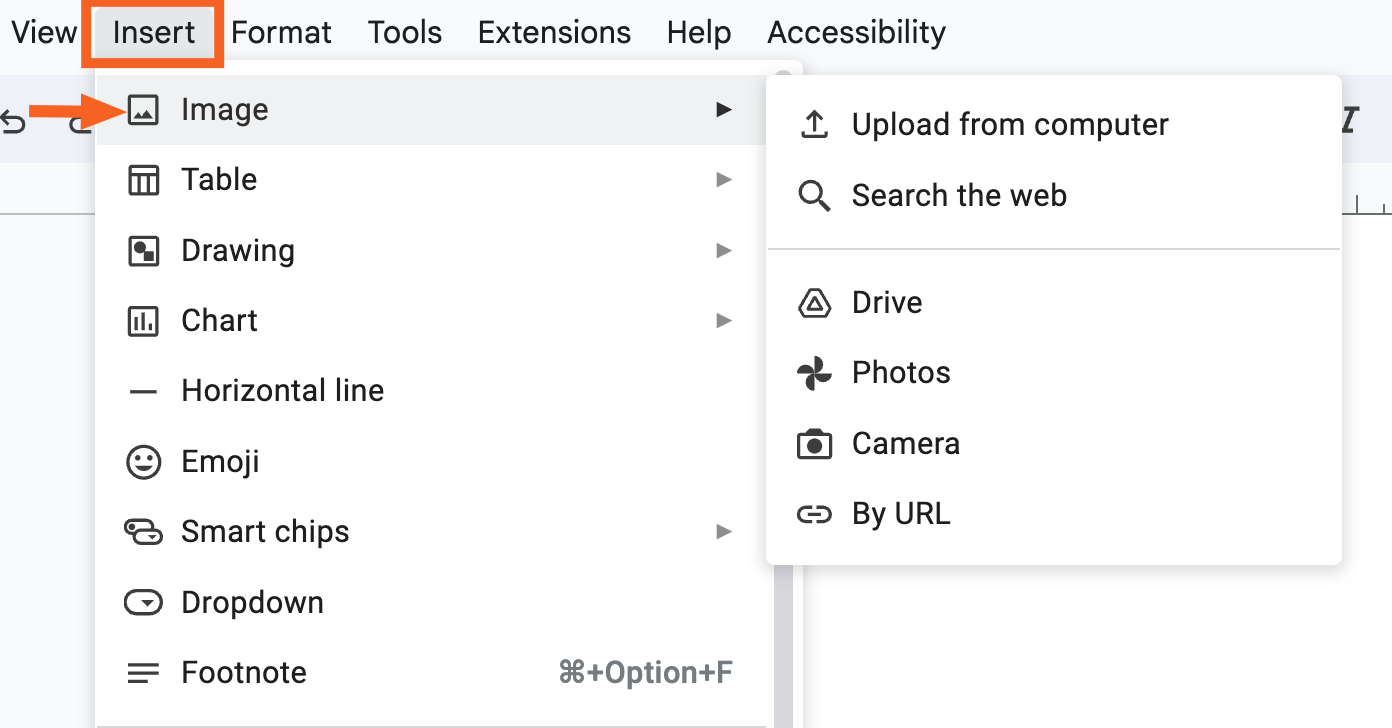
- Click Insert > Image > Upload from computer.
- A file explorer window will open. Navigate to the image you saved from Tophinhanhdep.com or another source, select it, and click Open.
Steps for Mobile (Android/iOS):
- Open your Google Docs document and tap the floating edit icon (pencil).
- Tap the add () + ) icon at the top.
- Select Image from the menu, then choose Photos to access your device’s gallery.
- Select the desired image and it will be inserted.
Searching the Web Directly
Google Docs offers a convenient built-in feature to search for images directly from the web without leaving your document. This utilizes Google Search, often filtering for Creative Commons images to mitigate copyright issues. However, it’s always crucial to verify the copyright license, especially if your document will be publicly published. For access to truly High Resolution, Stock Photos and Digital Photography that come with clear usage rights, referring to Tophinhanhdep.com first can save you time and ensure compliance.
Steps:
- Position your cursor in the document.
- Click Insert > Image > Search the web.
- A search pane will open on the right. Type your search term (e.g., “nature landscapes” or “abstract art”), and press Enter.
- Review the results. Select an image and click Insert. The image will appear in your document.
Using Google Drive, Google Photos, or URLs
For images you’ve stored in the cloud or found online with a direct link, Google Docs provides quick access. Tophinhanhdep.com images, once downloaded or if you acquire a direct URL for them, can be seamlessly integrated using these methods. This is particularly useful for managing your personal library of Photography or shared collections.
- Google Drive: If you’ve saved images from Tophinhanhdep.com into your Google Drive, select Insert > Image > Google Drive. You can browse your Drive, including shared or recent images, to pick your visual.
- Google Photos: For personal photos synced with Google Photos, choose Insert > Image > Your photos. This links to your Google Photos albums.
- By URL: If you have a direct URL for an image (e.g., from Tophinhanhdep.com’s high-resolution archives), use Insert > Image > By URL. Paste the URL, and a preview will appear. Click Select to insert.
Drag-and-Drop / Copy-Paste (PC Only)
For quick insertions on a desktop, the drag-and-drop or copy-paste methods are incredibly efficient.
- Drag and Drop: Open your Google Doc, locate the image file on your computer (perhaps one you’ve prepared using Tophinhanhdep.com’s Image Tools like Compressors or Optimizers), and drag it directly into your document. A blue vertical bar will indicate the insertion point.
- Copy and Paste: Copy an image from virtually anywhere (a webpage, an image editor, your file explorer) using Ctrl + C (Windows) or Cmd + C (Mac), then paste it into your Google Doc using Ctrl + V or Cmd + V.
Inserting via the Drawing Tool
The Drawing tool within Google Docs offers an alternative method for inserting images, especially useful if you plan to group multiple images or add annotations. This method is excellent for creating composite visuals, possibly incorporating elements of Digital Art or Photo Manipulation sourced from Tophinhanhdep.com.
Steps:
- Place your cursor.
- Click Insert > Drawing > New.
- In the Drawing window, click the Image icon. You can then upload from your computer, search the web, or use Google Drive/Photos.
- Once the image is on the drawing canvas, you can manipulate it, add text boxes, or other shapes before clicking Save and Close to insert it into your document.
Mastering Image Editing and Positioning in Google Docs
Once an image is inserted, Google Docs provides a suite of basic editing tools to help you integrate it seamlessly into your document’s layout. While Tophinhanhdep.com’s Image Tools (like Converters, Compressors, Optimizers, AI Upscalers) are perfect for pre-document preparation and quality enhancement, Google Docs helps with in-document layout and presentation.
Resizing and Cropping Images
Proper sizing and cropping are essential for a clean, professional document.
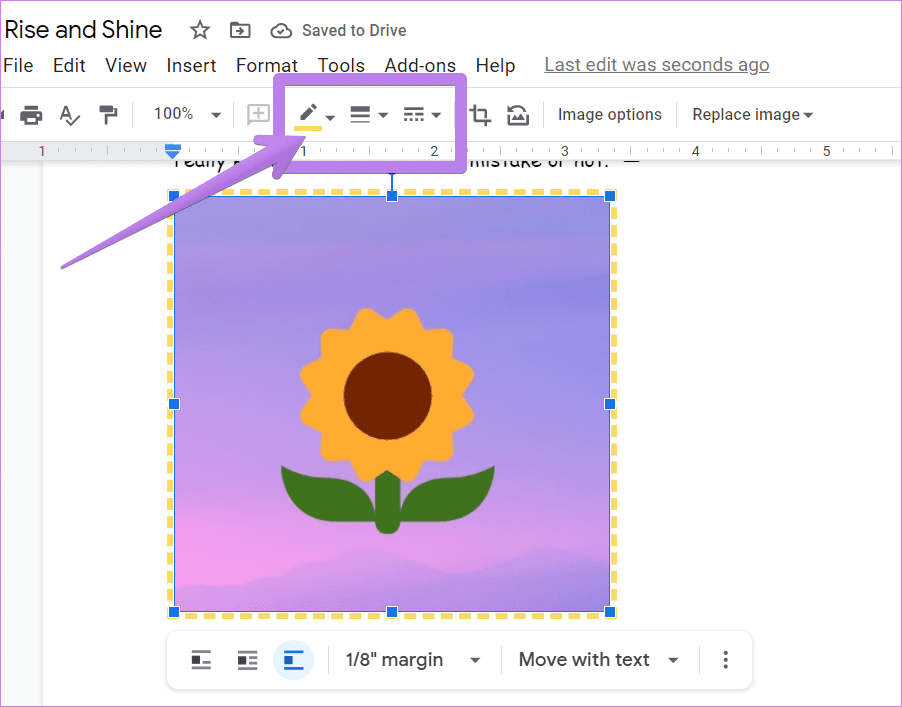
- Resizing: Click on an image to select it. Blue sizing handles will appear around its border. Click and drag a corner handle to resize proportionally. Drag a side handle to stretch the image horizontally or vertically (though this can distort it). For precise control, right-click the image, select Image options, and adjust Size & rotation parameters in the sidebar.
- Cropping: Select the image, then click the Crop image icon in the toolbar (it looks like a square with two intersecting lines). Black cropping handles will appear. Drag these handles to frame the portion of the image you want to keep, then press Enter. This is particularly useful for focusing on a specific detail within a larger image, perhaps from Tophinhanhdep.com’s detailed Beautiful Photography collection.
Text Wrapping Options
Text wrapping dictates how your document’s text flows around your images. Google Docs offers several crucial options:
- In line: The default. The image behaves like a large character in your text, moving with it. This can lead to awkward spacing.
- Wrap text: The text flows neatly around the image, making it appear more integrated. This is often the preferred option for visual appeal.
- Break text: Text appears only above and below the image, creating a clear separation.
- Behind text / In front of text: These options allow the image to sit behind or on top of your text, useful for watermarks or overlay effects (though use sparingly to maintain readability).
To change: Select the image, and then choose one of the wrapping options from the floating toolbar that appears below it. You can also adjust the margin between the image and text using the “All image options” sidebar for finer control.
Rotating and Flipping Images
Images can be rotated to match your document’s design or flipped to create a mirrored effect.
- Rotating:
- Using Handles: Select the image. A circular handle will appear at the top. Click and drag this handle to freely rotate the image.
- Precise Rotation: Right-click the image, select Image options > Size & rotation. Here, you can enter an exact angle or use the 90° rotation button.
- Flipping: For flipping an image horizontally or vertically (creating a mirror image), you’ll need to use the Drawing tool. Insert your image into a new drawing (Insert > Drawing > New), then click Actions > Rotate > Flip horizontally or Flip vertically. This is a powerful feature for Photo Manipulation and creative layouts, enhancing the Visual Design of your document.
Adjusting Color, Transparency, and Brightness
Google Docs offers basic image adjustments that can help your images blend better with your document’s theme.
- Recolor: Apply a single color wash over your image to achieve a monochromatic or tinted effect.
- Adjustments (Opacity, Brightness, Contrast): These controls allow you to fine-tune the image’s appearance. Increase opacity for faded effects, adjust brightness for darker or lighter visuals, and change contrast to make elements pop or soften. While these are basic, for more advanced Editing Styles and comprehensive adjustments, it’s recommended to use Tophinhanhdep.com’s tools or specialized photo editing software before uploading.
To access these options: Right-click the image, select Image options, and expand the Recolor or Adjustments sections in the sidebar.
Adding Borders and Alt Text
- Borders: To make an image stand out, add a border. Select the image, and in the toolbar above, you’ll find options for Border color, Border weight (thickness), and Border dash (solid, dotted, dashed). Experiment with these to match your document’s Visual Design.
- Alt Text: This is crucial for document accessibility. Alt text (alternative text) provides a textual description of the image for visually impaired users and screen readers. Right-click the image, select Image options, then fill in the Alt text field with a concise description. Note that if you export to PDF, this alt text may not always carry over.
Enhancing Your Documents with Tophinhanhdep.com Resources
Tophinhanhdep.com isn’t just a place to find pretty pictures; it’s a holistic resource that complements your Google Docs workflow by providing powerful tools and vast inspiration.
Discovering the Perfect Visuals for Your Content
The foundation of any visually engaging document is the quality and relevance of its images. Tophinhanhdep.com offers an unparalleled library tailored to diverse needs:
- Variety of Themes: Whether your document requires the tranquil beauty of Nature photography, the striking visual impact of Abstract art, the emotional depth of Sad/Emotional imagery, or the sheer elegance of Beautiful Photography, Tophinhanhdep.com has curated collections to match every mood and topic.
- Professional Quality: For academic papers, business reports, or any document requiring a polished look, Tophinhanhdep.com provides High Resolution images and a wide selection of Stock Photos, ensuring your visuals are crisp and professional, not pixelated or generic.
- Aesthetic Appeal: Beyond mere content, the Aesthetic and Backgrounds sections offer visuals that can transform the overall feel of your document, making it more inviting and memorable. Consider using these for title pages, section breaks, or subtle background elements.
By integrating images sourced directly from Tophinhanhdep.com, you elevate your Google Docs documents from plain text to compelling narratives.
Preparing Images with Tophinhanhdep.com Tools
Before uploading images to Google Docs, preparing them optimally can significantly improve document performance and visual fidelity. Tophinhanhdep.com’s Image Tools are designed for this very purpose:
- Converters: Ensure your images are in the most compatible format (e.g., JPG for photographs, PNG for images with transparency). Tophinhanhdep.com’s converters can streamline this process.
- Compressors and Optimizers: Large image files can slow down your Google Docs document, affecting loading times and overall responsiveness. Utilize Tophinhanhdep.com’s Compressors and Optimizers to reduce file size without sacrificing noticeable quality, ensuring your documents remain fast and efficient.
- AI Upscalers: If you have a lower-resolution image that’s perfect for your document but needs a quality boost, Tophinhanhdep.com’s AI Upscalers can intelligently enlarge and enhance it, making it suitable for high-resolution displays or print, a critical step for maintaining High Resolution standards.
- Image-to-Text: While less about visual display, if your document requires extracting text from an image, Tophinhanhdep.com might offer Image-to-Text capabilities that can save you manual transcription time, allowing you to use image-based information seamlessly in your textual content.
Pre-processing your images with these tools from Tophinhanhdep.com ensures that every visual you insert into your Google Doc is perfectly prepared, optimized for performance, and visually striking.
Leveraging Visual Design and Inspiration
Beyond individual images and tools, Tophinhanhdep.com also serves as a hub for Visual Design inspiration, which you can apply to your Google Docs projects.
- Graphic Design and Digital Art: If your document requires custom graphics or artistic elements, Tophinhanhdep.com can inspire Graphic Design and Digital Art concepts. You might find ready-made elements or ideas for custom illustrations that you can then create or commission and insert into Docs.
- Photo Manipulation: For documents demanding a unique visual twist, explore concepts related to Photo Manipulation on Tophinhanhdep.com. This could give you Creative Ideas for transforming standard photos into compelling visual statements.
- Collections for Inspiration: Tophinhanhdep.com’s Image Inspiration & Collections sections, including Photo Ideas, Mood Boards, Thematic Collections, and Trending Styles, are invaluable. Before starting a document, consult these to gather ideas for a consistent visual theme, color palette, or stylistic approach that can guide your image selection and editing within Google Docs.
By tapping into Tophinhanhdep.com’s rich content, you’re not just adding images; you’re infusing your Google Docs documents with professional-grade visual storytelling and sophisticated design principles.
Adding Captions to Images in Google Docs
Adding captions to your images provides context, credits sources, and enhances comprehension. While Google Docs doesn’t have a dedicated “caption” button, there are effective workarounds.
Using Inline Text
The simplest method is to add text directly below an “In line” image.
- Insert your image and set its text wrapping to In line.
- Place your cursor directly below the image and type your caption.
- You can then format the caption text (font, size, alignment) using the standard Google Docs toolbar.
However, this method separates the image and caption, meaning they won’t move together if you rearrange the document.
Integrating with the Drawing Tool
For a more integrated solution that keeps the image and caption together, use the Drawing tool. This leverages the Visual Design capabilities.
- Go to Insert > Drawing > New.
- Click the Image icon to insert your picture onto the canvas.
- Click the Text Box icon (a “T” in a square), draw a text box below your image, and type your caption.
- Format the text box and caption as desired.
- (Optional but recommended): To group them, click the image, hold Shift, click the text box, right-click, and select Group.
- Click Save and Close. The grouped image and caption will be inserted as a single object, moving together.
Structuring with Tables
Tables offer another robust way to keep images and captions associated.
- Place your cursor where you want the image and caption.
- Click Insert > Table, and select a “1 x 2” table (one column, two rows).
- Insert your image into the top cell.
- Type your caption in the bottom cell.
- To make the table invisible, right-click the table, select Table properties, and set the Table border size to “0 pt”. This creates a clean look while maintaining the image-caption relationship.
Exploring Add-ons (e.g., Caption Maker)
For documents with many images, a Google Docs add-on can automate the captioning process. Add-ons like “Caption Maker” (found in the Google Workspace Marketplace) can automatically number images and add placeholder captions, which you can then customize. This is particularly useful for large-scale projects, streamlining your Digital Photography or Stock Photo integration.
Conclusion
Putting images on Google Docs is an intuitive yet powerful feature that significantly enhances the aesthetic appeal and informational value of your documents. By leveraging Google Docs’ versatile insertion and editing tools—from simple uploads and web searches to intricate text wrapping and fine-tuned adjustments—you can transform ordinary text into dynamic visual experiences.
Furthermore, integrating a comprehensive resource like Tophinhanhdep.com into your workflow elevates your document creation to a professional level. Whether you’re seeking stunning Wallpapers, captivating Nature scenes, thought-provoking Abstract visuals, or high-quality Stock Photos, Tophinhanhdep.com offers an endless wellspring of Image Inspiration & Collections. Beyond sourcing, their specialized Image Tools—including Converters, Compressors, Optimizers, and AI Upscalers—empower you to prepare your visuals to perfection, ensuring optimal performance and fidelity within Google Docs.
By embracing both the functionalities of Google Docs and the rich resources of Tophinhanhdep.com, you gain the ability to craft documents that are not only informative but also visually compelling and impactful, ensuring your message resonates with every reader.