How to Effortlessly Combine Multiple Images into One PDF for Professional Presentation and Easy Sharing

In today’s visually-driven world, managing and sharing a collection of images efficiently is paramount. Whether you’re an amateur photographer curating a portfolio of stunning nature shots, a digital artist compiling a mood board of abstract aesthetics, or simply someone who loves collecting beautiful wallpapers, the need to consolidate multiple image files into a single, cohesive document often arises. While individual images like high-resolution stock photos or carefully edited digital photography are beautiful on their own, presenting them as a unified Portable Document Format (PDF) offers unparalleled benefits: streamlined sharing, professional presentation, and simplified archiving. At Tophinhanhdep.com, we understand the importance of visual content and the tools that empower you to manage it effectively. This comprehensive guide will walk you through various methods on how to put multiple images into one PDF, ensuring your visual collections, from vibrant backgrounds to poignant sad/emotional photography, are always ready for display.
PDFs are universally accessible, retaining their formatting regardless of the device or operating system used to view them. This makes them an ideal choice for professional communication, client presentations, academic submissions, or simply sharing personal photo albums with friends and family. By consolidating your images, you avoid the hassle of sending numerous individual files, reducing email clutter and ensuring your recipients can view your entire collection in a structured, easy-to-navigate format. Let’s delve into the various methods available to achieve this, catering to different operating systems and levels of desired control.
Leveraging Built-in Operating System Capabilities for Quick PDF Creation
This section will detail the most straightforward methods available directly on your computer, requiring no additional software downloads. These built-in functionalities are ideal for quick tasks involving your aesthetic wallpapers or high-resolution stock photos, providing a simple and efficient way to create multi-image PDFs without the need for specialized applications.
Combining Images into a PDF on Windows
Windows operating systems offer a native way to convert multiple image files into a single PDF document using the built-in “Microsoft Print to PDF” feature. This is particularly useful for consolidating collections of digital photography or thematic collections of backgrounds without needing to install any third-party software. The process is intuitive and leverages a function you might already be familiar with – printing.
Step-by-Step Guide:
-
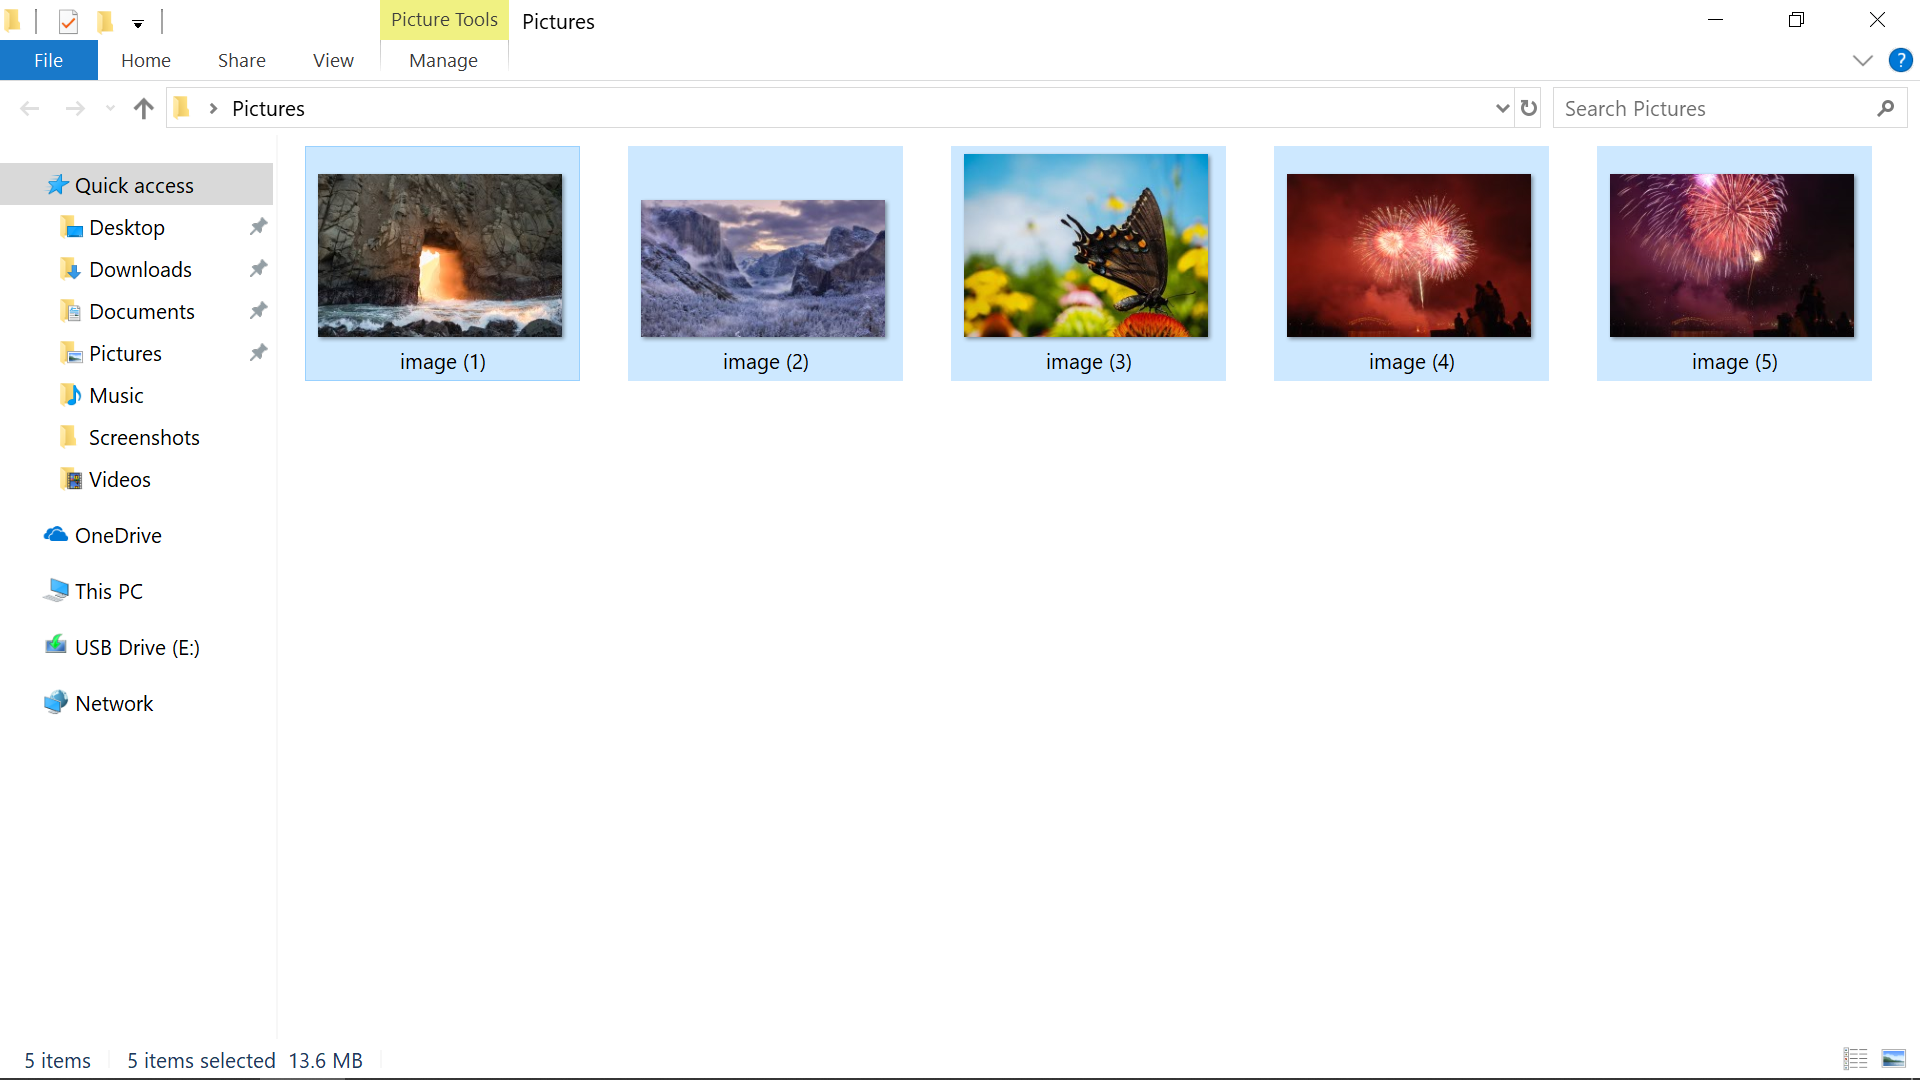
Gather and Organize Your Images: The first and most crucial step for maintaining the intended order of your images is to place all the files you intend to combine into a single folder. For precise control over their sequence in the final PDF, rename the files alphanumerically. For example, if you have a series of nature photography images you want to present in a specific order, name them
Nature_Scene_01.jpg,Nature_Scene_02.jpg, and so on. This ensures that the system processes them in your desired arrangement. For large batches of images, consider using a batch renaming tool available on Tophinhanhdep.com or through system utilities. This meticulous organization is essential for crafting a compelling visual narrative for your photography or graphic design projects. -
Select Your Images: Once your images are organized and renamed, highlight all the image files you wish to include in your PDF. You can do this efficiently by clicking and dragging a selection box around them. Alternatively, for selecting specific non-contiguous images, hold down the
Ctrlkey on your keyboard and individually click on each desired image. -
Initiate the Print Command: After selecting the images, right-click on any one of the highlighted files. In the context menu that appears, navigate to and select
Print. In some newer Windows versions or if your menu is customized,Printmight not be immediately visible; in that case, you might need to clickShow more optionsfirst to reveal it. -
Choose “Microsoft Print to PDF” as Your Printer: The “Print Pictures” dialog box will now open. This window allows you to configure printing preferences. Locate the
Printerdropdown menu, usually found at the top. From the list of available printers, selectMicrosoft Print to PDF. This virtual printer driver will convert your images into a PDF file instead of sending them to a physical printer. If this option is not available, you may need to enable “Microsoft Print to PDF” in your Windows features settings (found in “Turn Windows features on or off” in the Control Panel). For users on older Windows versions like Windows 7 or 8, this feature might not be natively present, requiring the installation of a third-party PDF creator software. -
Adjust Layout and Quality Settings: On the right side of the “Print Pictures” dialog box, you’ll find various layout options and image quality settings. You can choose how many images appear per page (e.g., a full-page photo for maximum impact, 2 per page for comparison, or a contact sheet with multiple thumbnails). This is crucial for presenting your beautiful photography or graphic design projects effectively. If your images appear cropped or cut off in the preview pane, a common issue, make sure to uncheck the
Fit picture to framebox. This ensures that the entire image is included, scaling it down if necessary, rather than cropping it to fit the page’s aspect ratio. SelectOptionsfor further adjustments, such as sharpening the image or fine-tuning print quality settings. -
Print and Save Your PDF: Once you’re satisfied with the preview and all your settings, click the
Printbutton, usually located in the bottom-right corner. Instead of printing a physical copy, a “Save Print Output As” dialog box will appear. This prompts you to save your new PDF document. Enter a descriptive and meaningful name for your file (e.g., “Nature_Photography_Portfolio.pdf,” “Abstract_Art_Collection.pdf,” or “Aesthetic_Wallpapers_Compilation.pdf”) and choose the desired location on your computer to save it. ClickSaveto finalize the process.
Your new PDF file, containing all your selected images in the specified order, is now ready for printing, sharing via email, or embedding in visual design projects. This method is straightforward and effective for most everyday needs.
Creating a Multi-Image PDF on Mac
Mac users can easily combine multiple images into a single PDF using the powerful Preview application, which comes pre-installed on macOS. This versatile tool not only allows you to view images and PDFs but also to perform basic editing and conversion tasks. This method is excellent for consolidating visual design elements, compiling thematic collections of images, or quickly preparing photos for sharing.
Step-by-Step Guide:
-
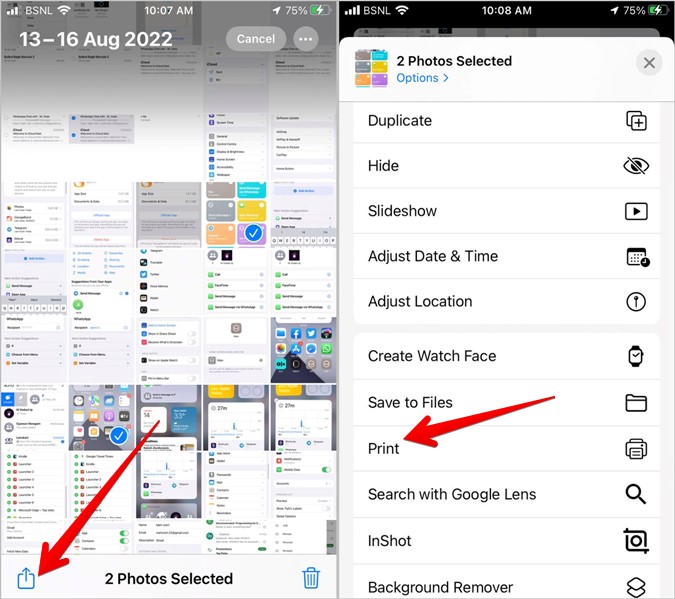
Open Images with Preview: Begin by selecting all the images you want to convert into a single PDF document. You can select multiple images by holding down the
Commandkey while clicking on each one to select them individually, or by dragging a selection box over them. Once selected, right-click on any of the chosen images and, from the context menu, selectOpen with>Preview. All your selected images will open within a single Preview window, displayed as clickable thumbnails in the sidebar on the left. -
Rearrange Image Order (Optional but Recommended): In the sidebar of the Preview window, you’ll see thumbnails of all your images. The order in which they appear here is the order they will take in the final PDF. You can easily reorder them by simply clicking and dragging the thumbnails to your desired sequence. This drag-and-drop functionality is incredibly intuitive and invaluable for crafting a cohesive narrative for your photo ideas, mood boards, or any curated thematic collections. Take your time to ensure the visual flow is exactly as you envision it.
-
Initiate the Print Command: Once the images are arranged to your liking and you are satisfied with their presentation, proceed to initiate the print command. Go to the menu bar at the top of your screen and select
File>Print. This will open the standard macOS print dialog box, which, in the case of Preview, doubles as a powerful PDF creation tool. -
Choose “Save as PDF”: In the Print dialog box that appears, you will find a
PDFdropdown menu, typically located in the bottom-left corner. Click on this menu to reveal several options. From this list, selectSave as PDF. This command instructs macOS to convert the current view (your arranged images) into a PDF file rather than sending it to a physical printer. Alternatively, you’ll notice other options likeSend in Mail, allowing you to directly attach the generated PDF to an email, which can be highly convenient for immediate sharing. -
Name and Save Your PDF: A “Save” dialog box will pop up, prompting you to provide details for your new PDF file. Enter a suitable file name that accurately describes its content (e.g., “Aesthetic_Backgrounds_Portfolio.pdf,” “Digital_Art_Series.pdf,” or “Sad_Emotional_Moments.pdf”). Choose a location on your Mac where you want to save the document, such as your Documents folder, Desktop, or a specific project folder. Finally, click
Saveto complete the process.
The newly created PDF will now contain all your images, arranged in the order you specified. Preview also allows for further post-creation manipulation: you can easily add more images to an existing PDF by simply dragging them directly into the open PDF document’s sidebar. To delete an unwanted image from the PDF, select its thumbnail in the sidebar and then choose Edit > Delete from the Preview menu. This flexibility makes Preview a robust and user-friendly tool for digital art and photo manipulation enthusiasts.
Enhanced Control with Dedicated Desktop Software for Advanced Users
While built-in operating system tools offer excellent convenience, dedicated PDF software provides a more robust and comprehensive suite of features. These applications are particularly beneficial for users dealing with large volumes of images, needing precise control over output quality, or requiring advanced functionalities beyond simple conversion. This is where professional tools truly shine for high-resolution photography, complex visual design projects, and curated thematic collections.
The Power of Specialized PDF Converters
Dedicated desktop applications, such as those that Tophinhanhdep.com might recommend or offer through its “Image Tools” section (like specialized Image to PDF converters), provide a comprehensive suite of features for combining images. These tools often support a wider array of image formats beyond common JPEGs, including PNG, BMP, TIFF, GIF, WEBP, and more, making them exceptionally versatile for various types of images ranging from aesthetic backgrounds and abstract art to detailed digital photography and graphic design elements.
Core Workflow (General Principles):
-
Launch the Software: Begin by opening your chosen dedicated PDF conversion application. These typically have user-friendly interfaces designed to streamline the document creation process.
-
Initiate the “Combine Files” Feature: Look for a menu option such as
File>Create>Combine Files into a Single PDF...or a prominently displayed button labeled “Combine Files,” “Merge Images,” or “Image to PDF.” This is a common pathway in professional PDF editors like Adobe Acrobat, or specialized tools. -
Add Your Images: A new window, often titled “Combine Files” or “Add Documents,” will typically appear. Here, you’ll usually find an
Add Files...button or a drag-and-drop zone. You can select specific image files individually from various locations on your computer, or opt toAdd Folderto efficiently import all images within a designated directory. Many tools also allow you to hold down theCtrlkey (on Windows) orCommandkey (on Mac) to select multiple non-contiguous files, offering flexibility in your image sourcing. -
Manage and Organize: Once your images are added, most dedicated software provides an intuitive interface, often with a preview pane or a list of thumbnails, to manage their order. You can typically drag-and-drop thumbnails directly to rearrange them, or use
Move UpandMove Downbuttons for precise positioning of each image within the sequence. Some advanced tools even allow you toChoose Pagesfrom existing multi-page documents (if you’re combining PDFs that already contain images) orRemovefiles you no longer wish to include, offering granular control over your final document. This level of control is absolutely essential when meticulously curating thematic collections, designing detailed mood boards, or preparing a professional photography portfolio. -
Combine and Save: After arranging your images in the desired sequence and configuring any output settings (such as compression levels, security options, or metadata inclusion), locate and click a
Combine Files,Create PDF, orConvertbutton. The software will then process the selected images, merging them into a single PDF document. Upon completion, the newly generated PDF will often automatically open for your review. You will then be prompted to name and save the document to your preferred location on your computer. While the default name might be generic (e.g., “Binder1.pdf”), it is highly recommended to choose a descriptive title that accurately reflects the content, such as “Aesthetic_Nature_Collection.pdf,” “Sad_Emotional_Photography_Portfolio,” or “Abstract_Digital_Art_Book.pdf.”
Advanced Features for Image Arrangement and Optimization
Beyond the basic combining functionality, specialized desktop software enhances the PDF creation process significantly for users passionate about photography, digital art, and visual design:
-
Batch Processing Capabilities: These tools are engineered to efficiently handle hundreds or even thousands of images simultaneously. This is an indispensable feature for photographers managing extensive archives of high-resolution stock photos or digital artists compiling comprehensive collections of their work.
-
Granular Image Quality and Compression Controls: Dedicated software allows you to fine-tune the output quality of your images within the PDF, enabling you to strike a precise balance between reducing the file size (for easier sharing and faster loading) and maintaining optimal visual fidelity. For high-resolution photography, preserving crisp detail and vibrant colors is paramount, while for web-optimized backgrounds or drafts, some level of compression might be desirable. Converters that Tophinhanhdep.com might offer or recommend, for instance, often include advanced optimizers to ensure your PDFs are both aesthetically beautiful and practically manageable in terms of file size.
-
Custom Layout and Page Sizing: Gain complete control over the presentation by defining custom page layouts, margins, and page sizes. This is a critical feature for graphic design projects where specific aspect ratios, bleeding margins, or bespoke presentation formats are required for print or digital display. You can ensure that your photo manipulation or creative ideas are displayed exactly as intended.
-
Comprehensive Metadata Editing: Add or extensively edit metadata information such as the author, title, keywords, and subject of your PDF document. This significantly improves the searchability, indexing, and overall organization for extensive image inspiration and thematic collections. Proper metadata ensures your work is easily discoverable and cataloged.
-
Robust Security Options: For sensitive or copyrighted digital photography and digital art, dedicated software allows you to apply password protection to your PDF, restricting access or preventing unauthorized printing, copying, or editing. This ensures your intellectual property remains secure when shared or distributed.
The Convenience of Online Image to PDF Converters
For users seeking a quick, browser-based solution without the need to install any software, online image to PDF converters are an invaluable resource. These tools are especially useful for converting a few images on the go, when using a shared or public computer, or for situations where speed and simplicity are prioritized over advanced features.
Quick Conversion for On-the-Go Needs
Many websites, including potentially Tophinhanhdep.com within its “Image Tools” section (which lists “Converters” as a key service), offer free online converters that simplify the process of combining images into a PDF. These platforms are designed with user-friendliness in mind, typically requiring just a few clicks to transform your image files. They provide a hassle-free way to convert various types of images, from a collection of abstract backgrounds to a few select pieces of sad/emotional photography, into a single, unified document.
How Online Converters Work:
-
Access the Online Tool: Open your preferred web browser and navigate to a reputable online image to PDF converter. Many users might find such a tool conveniently located among the suite of converters offered on Tophinhanhdep.com, designed for quick and efficient image processing.
-
Upload Your Images: The interface will typically feature a prominent “Upload,” “Choose Files,” or “Drag & Drop” area. Click on this area or drag your selected images directly into it. You will then be prompted to select all the image files you wish to include from your computer’s local storage. Most online tools are highly compatible and support a wide range of common image formats, including JPEG, PNG, GIF, TIFF, and sometimes even less common ones, making them versatile for different types of images.
-
Arrange and Customize (If Available): Once your images are uploaded, many online converters provide a visual interface where you can preview your files. Crucially, they often allow you to rearrange the order of uploaded images by simply dragging and dropping them into your desired sequence. This feature is particularly useful for creating a specific flow for your photo ideas or mood boards. Some advanced online tools might also offer basic customization options, such as selecting the page orientation (portrait or landscape), applying basic image fitting (e.g., fit to page), or choosing a standard page size.
-
Convert to PDF: After you have uploaded and arranged your images to your satisfaction and applied any available customization, locate and click the “Convert,” “Combine,” or “Generate PDF” button. The online tool will then begin processing your images, merging them into a single, cohesive PDF document. The conversion time will depend on the number and size of your images, as well as your internet connection speed.
-
Download Your PDF: Once the conversion process is complete, a download link will appear on the screen. Click this link to save your newly created PDF file to your device. The file will typically be saved to your browser’s default download location.
Considerations for Online Tools: While online converters are incredibly convenient and often free, it’s essential to exercise discretion. Always ensure you’re using a trusted and secure service, especially when uploading sensitive or personal images, to protect your privacy. For high-resolution photography, extensive aesthetic collections, or very large files, be mindful of potential file size limits imposed by free online tools. Additionally, consider the privacy policies of the service regarding how your uploaded images are handled and stored. Tophinhanhdep.com, as a platform focused on visual content, prioritizes secure and efficient image processing for all its users’ needs, ensuring peace of mind during conversions.
Best Practices for Compiling Your Image PDFs: Insights from Tophinhanhdep.com
Creating effective multi-image PDFs goes beyond just combining files. Leveraging best practices can significantly enhance the quality, usability, and visual appeal of your documents, especially for the diverse range of images and photography styles celebrated on Tophinhanhdep.com. By adhering to these guidelines, you can ensure your PDF not only functions well but also truly showcases your visual content, whether it’s breathtaking nature photography, intricate digital art, or a meticulously curated collection of aesthetic backgrounds.
Optimizing Image Quality and Managing File Size
For professional portfolios of high-resolution stock photos or digital photography, always begin with the highest quality source images possible. While PDF files are renowned for handling vector-based text, embedded raster images retain their original pixel properties. Therefore, the clarity and sharpness of your photographs, whether they are breathtaking nature scenes or intricate abstract designs, depend entirely on the initial quality. During the PDF conversion process, many tools will offer compression options. It is vital to experiment with these settings to strike an optimal balance between reducing the overall file size – which is crucial for easier sharing and faster loading times – and maintaining impeccable image clarity. Over-compression can severely degrade the visual integrity of your beautiful photography or intricate digital art, leading to pixelation or loss of fine detail. Tools offered by Tophinhanhdep.com, such as image compressors and optimizers, can be invaluable for pre-processing your images, ensuring they are perfectly balanced for both visual excellence and practical file management before they are even brought into the PDF converter. Furthermore, selecting the appropriate image format prior to conversion can also play a role: while JPEGs are ubiquitous for photographic content, PNG might be preferable for images featuring sharp lines, text, or transparent backgrounds, and TIFF is often chosen for archival-grade quality, particularly before their final encapsulation within a PDF.
Thoughtful Image Ordering and Strategic Layout Design
The sequence and arrangement of your images within a PDF are paramount to its effectiveness, transforming a mere collection of files into a cohesive visual narrative. For instance, when compiling a sad/emotional photography collection, a chronological or thematically progressive order can deepen the emotional impact. Conversely, a portfolio showcasing aesthetic backgrounds or abstract art might benefit from grouping images by color palette, style, or visual rhythm to create a harmonious flow. This careful consideration directly aligns with the “Image Inspiration & Collections” and “Visual Design” aspects championed by Tophinhanhdep.com, guiding viewers through your curated content with purpose. Beyond sequencing, pay close attention to the page layout: a single, full-page image often provides maximum impact for stunning photography, allowing each piece to stand alone and command attention. Alternatively, a grid layout (e.g., 2x2 or 3x3 images per page) can be highly effective for creating dynamic mood boards, contact sheets, or presenting multiple, related photo ideas simultaneously. Always ensure consistent margins and that images are not inadvertently cropped in undesirable ways; keep an eye out for settings like “Fit picture to frame” and uncheck it if necessary to preserve the full image. Maintaining consistency in editing style, color grading, or thematic elements across all images in a PDF significantly enhances its professionalism and visual coherence, whether it’s for graphic design projects or a personal collection of trending styles.
Enhancing Accessibility and Metadata for Better Organization
The value of your multi-image PDF can be significantly increased by thoughtfully incorporating metadata and considering accessibility. Utilizing the PDF’s built-in metadata fields – such as Title, Author, Keywords, and Subject – allows you to thoroughly describe the content within. This is not merely a formality; it vastly improves the searchability and overall organization of large collections of images. Imagine searching through hundreds of abstract art pieces or nature wallpapers; clear, descriptive metadata makes retrieval instantaneous. For example, tagging your digital art collection with terms like “digital painting,” “fantasy art,” or “concept design” ensures it’s easily categorizable and discoverable. While often overlooked, enhancing accessibility is an optional yet highly recommended practice. If your PDF creation software supports it, consider adding alternative text (alt text) to your images. This crucial feature describes the visual content of an image for users who are visually impaired, allowing screen readers to convey the essence of your beautiful photography or graphic design work, thereby broadening your audience and impact. Tophinhanhdep.com encourages thoughtful content creation that is both visually striking and universally accessible.
The Critical Step of Review and Quality Assurance
The final, non-negotiable step in preparing your multi-image PDF for distribution or archival is a thorough review and quality assurance check. Before you share your portfolio of aesthetic images, upload your thematic collection of backgrounds, or finalize your latest digital art project, meticulously inspect the generated PDF. Verify that all images are in their correct order, precisely as you intended. Scrutinize each page for appropriate sizing and positioning, ensuring there are no unexpected crops, distortions, or artifacts that could detract from the visual integrity of your high-resolution photography. Confirm that the clarity and sharpness of every image meet your standards. This diligent review process helps catch any errors that might have occurred during conversion or initial arrangement, ensuring that your curated collections, photo ideas, and creative expressions are consistently showcased with the utmost professionalism and impact. This final check is your guarantee that the effort you’ve put into selecting and editing your images is perfectly preserved in the PDF format.
Conclusion
Converting multiple images into a single PDF is a fundamental skill for anyone working with visual content, from professional photographers presenting their high-resolution stock photos to casual collectors of aesthetic wallpapers. Whether you opt for the native efficiency of your operating system’s built-in tools (like Microsoft Print to PDF on Windows or Preview on Mac), the advanced functionalities of dedicated desktop software for intricate digital art and photo manipulation, or the immediate convenience of an online converter like those potentially found within the “Image Tools” section of Tophinhanhdep.com, the goal remains the same: to present your images in a polished, easily shareable, and professionally organized format.
By following the comprehensive methods and best practices outlined in this guide, you can confidently compile your visual stories, whether they encompass vibrant nature scenes, thought-provoking abstract compositions, poignant sad/emotional photography, or stunning beautiful photography. You ensure that your photo ideas, mood boards, and thematic collections are always showcased with optimal clarity and impact. This ability to consolidate and present images effectively is invaluable for personal archiving, academic presentations, creative portfolios, and efficient digital communication. Explore Tophinhanhdep.com for endless image inspiration, powerful image tools including converters and optimizers, and a community passionate about all things visual design. Transform your image collections today and share your unique visual world with confidence and professionalism.